Manage Wallet passes
Este contenido aún no está disponible en su idioma.
After you generate a pass, you manage it from the All passes list: edit it, get its install link or QR code, and remove it when it’s no longer needed. Pass holders appear in User Explorer, so you can check who added the pass. To send a pass to users, see Share Wallet passes.
View and manage existing passes
Anchor link toApple Wallet
Anchor link to- In the Control Panel, go to Campaigns → Wallet Passes.
- Open the All passes tab and select Apple Wallet.
- To find a pass, search by User ID or serial number, or filter the list by campaign.
For every pass of the application, the table shows:
- The pass name and style
- The User ID it is associated with
- Whether it comes from a campaign
- The date and time it was last updated
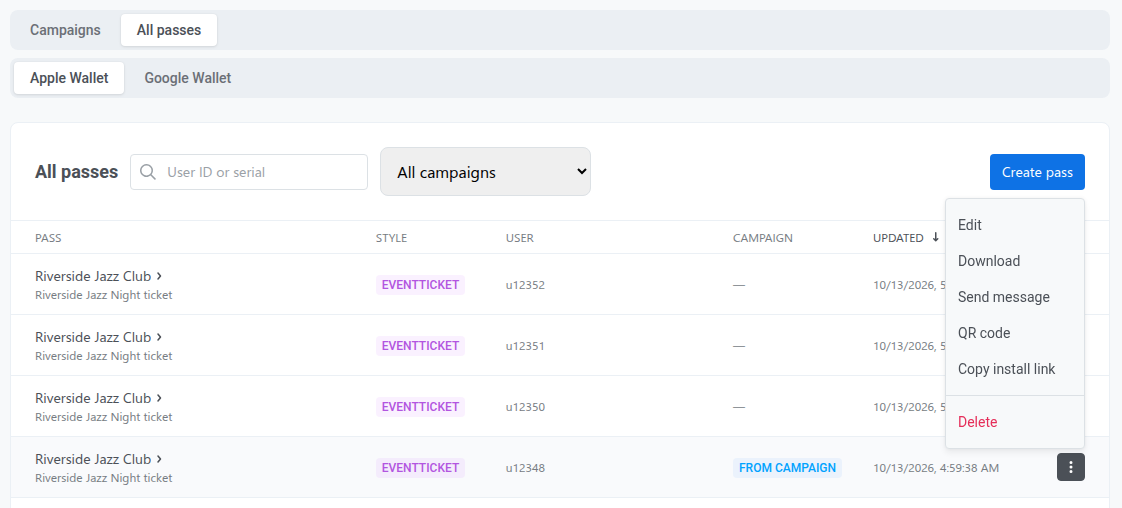
On the passes list, open the actions menu (⋮) to:
-
Edit: update the pass name and description, field values and labels, change messages, colors, barcode message, expiration and status, locations, and beacons. Pass style and images stay locked after creation. When you click Save changes, every device that added the pass receives the update, and users don’t need to add the pass again. To alert holders about a change, see Apple Wallet change message.
-
Download: download the signed
.pkpassfile. -
Send message: open the one-time push composer to message the pass holder by User ID. This option needs permission to send messages in the application and is unavailable when the pass has no User ID. See Message Wallet pass holders for all the ways to reach them.
-
QR code: show an install QR code users can scan to add the pass to Wallet and register their device for updates. In this window, you can also use Copy install link below the QR.
-
Copy install link: copy the install URL to share the pass in your messaging channels. Learn more.
-
Delete: remove the pass. Copies already installed on devices stop receiving updates and become invalid on their next refresh.
Google Wallet
Anchor link to- In the Control Panel, go to Campaigns → Wallet Passes.
- Open the All passes tab and select Google Wallet.
For every pass of the application, the table shows:
- The pass name and style
- The User ID it is linked to
- The pass state
- When it was last updated
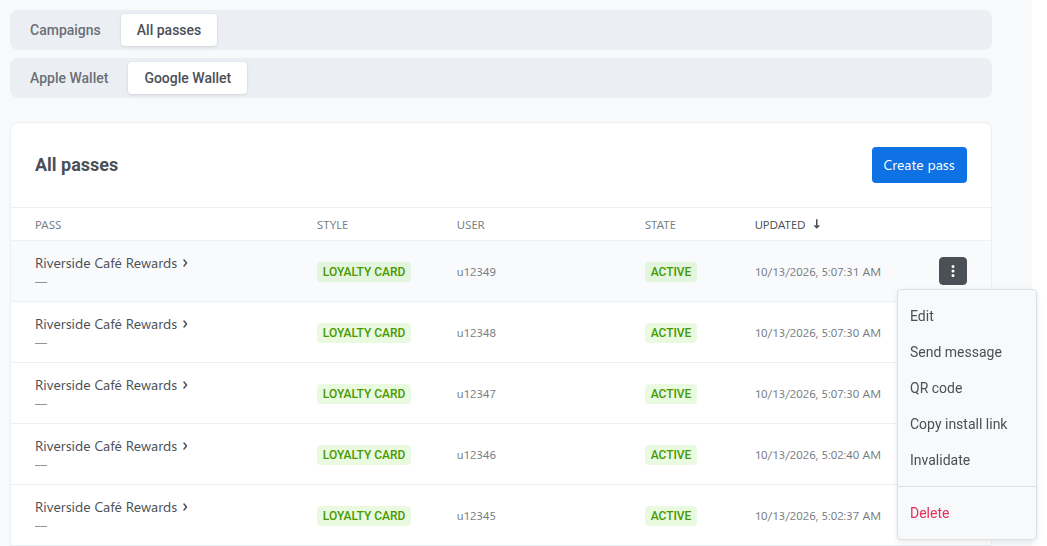
On the passes list, open the actions menu (⋮) to:
-
Edit: change field values and labels, colors, the logo and hero image, barcode, links, the app link, locations, and expiration. The pass type stays locked after creation. Who can save the pass shows on the edit page, but a changed value is rejected when you save. When you save, every device that saved the pass receives the update.
- Notify about changed fields: on the edit page of loyalty, event ticket, and flight passes, this checkbox is selected by default. When it’s selected, Google sends holders an Android notification. Google writes the text from the changed fields. For notification limits, see Google Wallet notification.
-
Send message: open the one-time push composer to message the pass holder by User ID. Like on Apple Wallet, it needs permission to send messages and a User ID on the pass. See Message Wallet pass holders for all the ways to reach them.
-
QR code: show a QR code that encodes the pass save link. Users scan it to save the pass to Google Wallet and register their device for updates.
-
Copy install link: copy the pass save link to share in your messaging channels. Learn more.
-
Invalidate: set an active pass to inactive right away, with no confirmation. The pass moves to the user’s Expired passes section in Google Wallet. The record stays in Pushwoosh.
-
Activate: set an inactive pass back to active. This option appears in the actions menu only when the pass is inactive. The pass is restored in Google Wallet.
-
Delete: invalidate the pass in Google and remove its record in Pushwoosh. Google does not allow force-removing a pass already saved on a device. It becomes invalid and moves to Expired passes.
Alert holders about a pass update
Anchor link toEditing a pass and saving pushes the new version to every device that added it, without a separate message. The way you alert holders about the change differs by platform.
Apple Wallet change message
Anchor link toSet Change message (update notification) on any field you want holders alerted about. iOS shows it as a lock-screen message. Fields without a change message update silently.
- In Campaigns → Wallet Passes, open All passes → Apple Wallet, find the pass and click Edit in the actions menu.
- Change the fields you need, and add a change message to any field you want holders to be alerted about.
- Click Save changes.
Google Wallet notification
Anchor link toFor loyalty, event ticket, and flight passes, enable Notify about changed fields to have Google send an Android notification alongside the sync. Other pass types sync silently.
- In Campaigns → Wallet Passes, open All passes → Google Wallet, find the pass and click Edit in the actions menu.
- Change the fields you need.
- Make sure the Notify about changed fields checkbox is selected.
- Click Save changes.
Google’s notifications have these limits:
- Google generates the notification text. You can’t customize it like an Apple Wallet change message.
- For event and flight passes, the notification only fires if fewer than 3 hours remain until the start time.
- Google allows at most 3 notifications per pass per 24 hours. If the limit is reached, the pass updates silently.
Manage passes via API
Anchor link toEverything the pass builder does is also available programmatically: create, update, list, and delete passes. The Apple Wallet API also downloads the .pkpass file. The Google Wallet API also returns a save link and sets the pass state.
To update one pass and notify its holders, call Update a pass (Apple Wallet, Google Wallet). It updates the pass and notifies devices. On Google Wallet, set notifyMessage to send a custom notification alongside the update. Without it, the pass syncs silently, unless notifyOnUpdate is set, in which case Google sends its own notification about the changed fields for loyalty, event ticket, and flight passes.
View pass holders in User Explorer
Anchor link toWhen a user adds your pass, Pushwoosh lists it on the Devices and platforms tab in User Explorer.
- Go to Audience → User Explorer and open the user profile.
- Open the Devices and platforms tab.
- Select Apple Wallet or Google Wallet in the sidebar.
On the platform profile, you can review:
- Subscription status: for example, Subscribed
- Platform identifier: the pass identifier shown under the platform name
- Metadata: First subscription, Timezone, and other fields when available
- Tags: platform tags, including any you set when issuing the pass