Crear una Cloud Page
Utilice esta guía para crear y publicar una Cloud Page.
Antes de empezar
Anchor link to- Cloud Pages está disponible bajo petición. Contacte con el Soporte de Pushwoosh para habilitarlo en su proyecto.
- Decida a dónde redirigir a los usuarios después de la acción principal en la página, por ejemplo, a una página de agradecimiento, una página de resultados o cualquier otra URL.
Crear una página
Anchor link to- Vaya a Contenido → Cloud Pages.
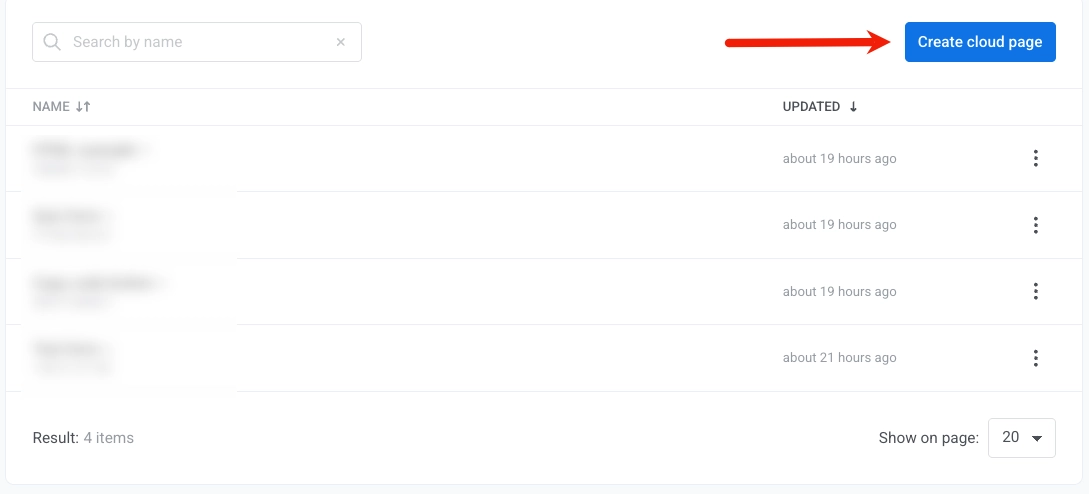
- Haga clic en Crear cloud page.
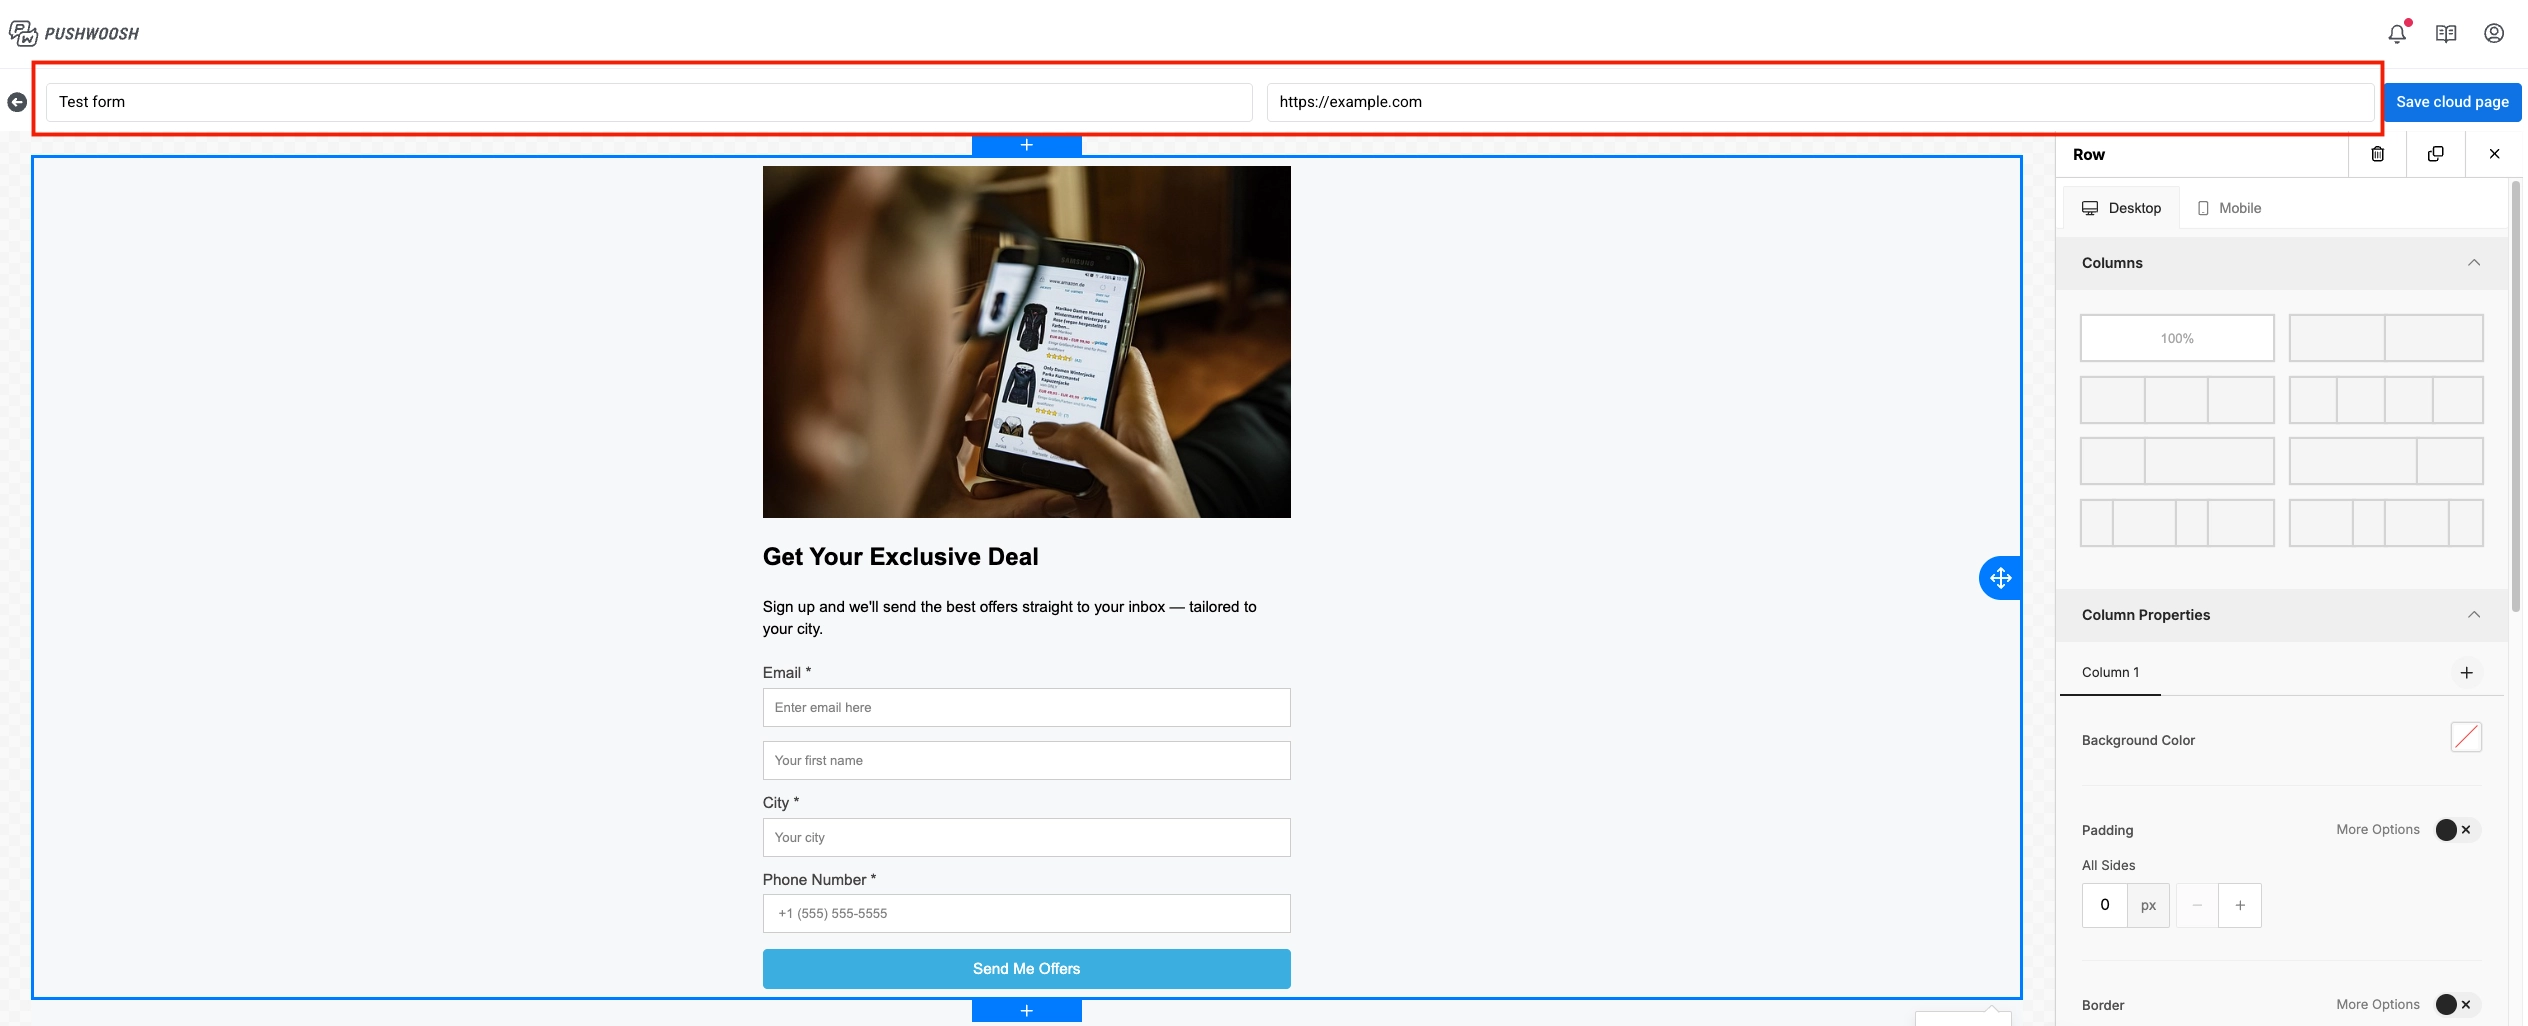
- Introduzca el nombre de la página.
- Añada la URL en Redirigir a (después de enviar el formulario). Este campo es obligatorio. Utilícelo para definir a dónde van los usuarios después de completar una acción en la página, por ejemplo, a una página de agradecimiento u otra página de campaña.
- En En usuario existente, elija qué sucede cuando un contacto existente envía el formulario de nuevo:
- Actualizar usuario existente (predeterminado): actualiza los campos del perfil del contacto con los valores enviados.
- Omitir usuario existente: registra el dispositivo desde el que el usuario envía, pero no actualiza los tags existentes en el perfil del contacto.
- Error para usuario existente: para registros únicos como ofertas exclusivas o seminarios web. Si el contacto ya existe, el envío se rechaza, el perfil no se actualiza y el usuario es redirigido de nuevo al formulario y ve un mensaje de error.

Construir el contenido de la página
Anchor link toEl flujo de trabajo de arrastrar y soltar es similar al del Editor de correo electrónico de arrastrar y soltar.
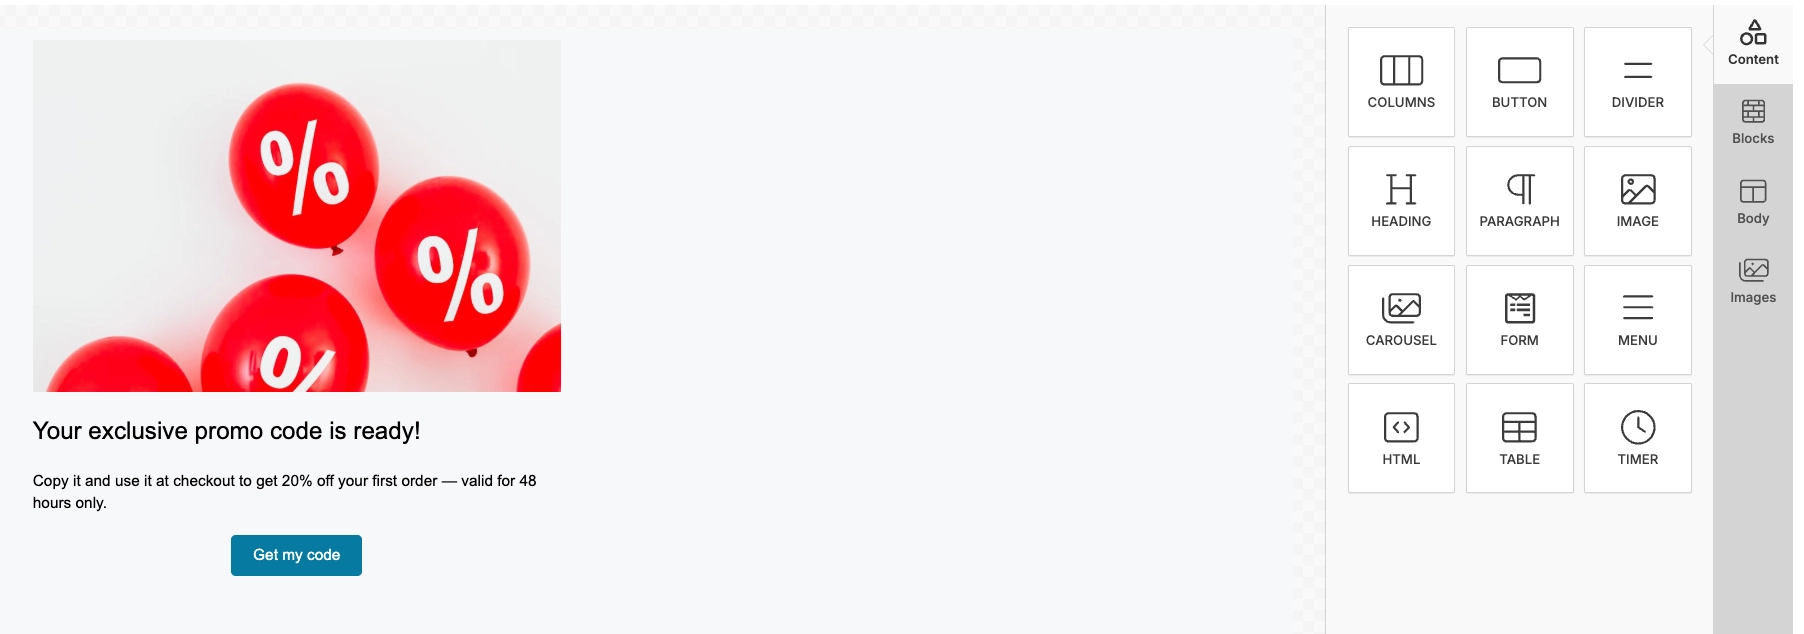
- Abra el panel de Contenido en el editor.
- Arrastre un bloque al lienzo.
- Edite el contenido del bloque.
- Repita para cada bloque requerido.
- Haga clic en Guardar cloud page.
Añadir imágenes
Anchor link toPara añadir una imagen, arrastre un bloque de Imagen al lienzo. Suba un archivo, elija una foto de stock (Más imágenes → Fotos de stock), o pegue una URL de imagen de su Almacén de medios.
Crear un formulario de captación de leads o de envío
Anchor link toAñada un formulario para recopilar datos de contacto y otros valores que necesite para la segmentación.
- Añada un bloque de Formulario.
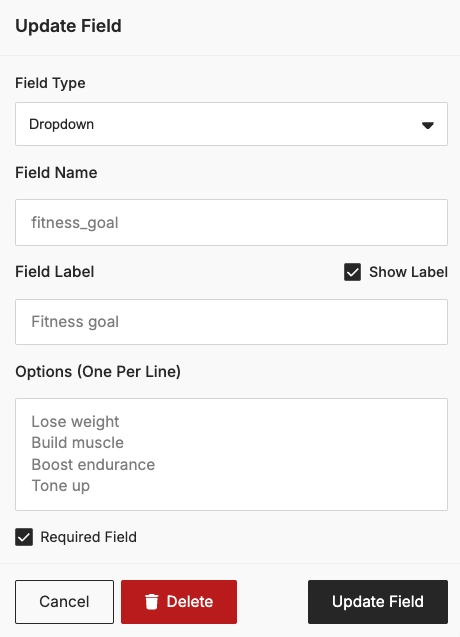
- Añada los campos que necesite. Para cada campo, establezca el tipo de campo y el nombre del campo, luego habilite Campo requerido para los valores que los usuarios deben proporcionar antes de enviar.
- Configure el botón de Enviar.
- Una vez que todo esté listo, haga clic en Guardar cloud page.

Qué sucede después del envío del formulario
Anchor link toPerfil de contacto y dispositivos
Anchor link toCuando un usuario envía el formulario, Pushwoosh crea o actualiza un perfil de contacto en User Explorer.
Por ejemplo, si el formulario incluye un campo de correo electrónico y un campo de teléfono, Pushwoosh registra un dispositivo de Email y un dispositivo de SMS. Ambos dispositivos están vinculados bajo un mismo User ID.

Tags
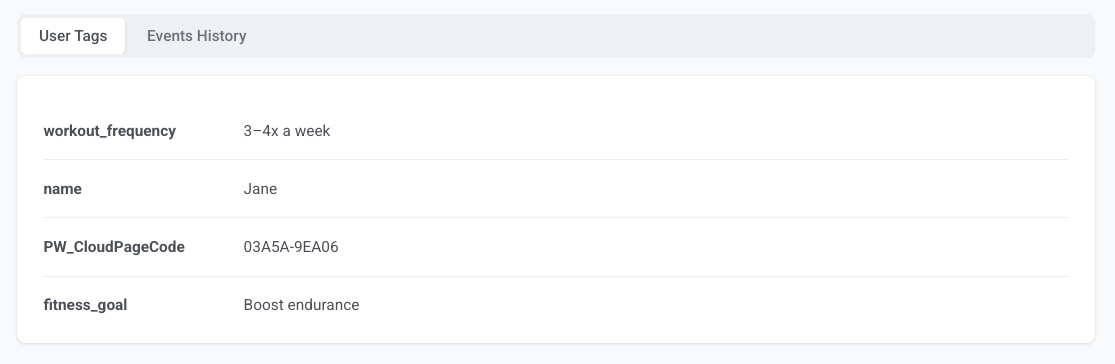
Anchor link toTodos los demás campos se guardan como tags personalizados por nombre de campo. Por ejemplo, si su formulario tiene los campos fitness_goal y workout_frequency, el perfil del contacto mostrará tags como fitness_goal = Aumentar resistencia y workout_frequency = 3–4x por semana.
El código de la página se guarda en el tag PW_CloudPageCode.
Evento
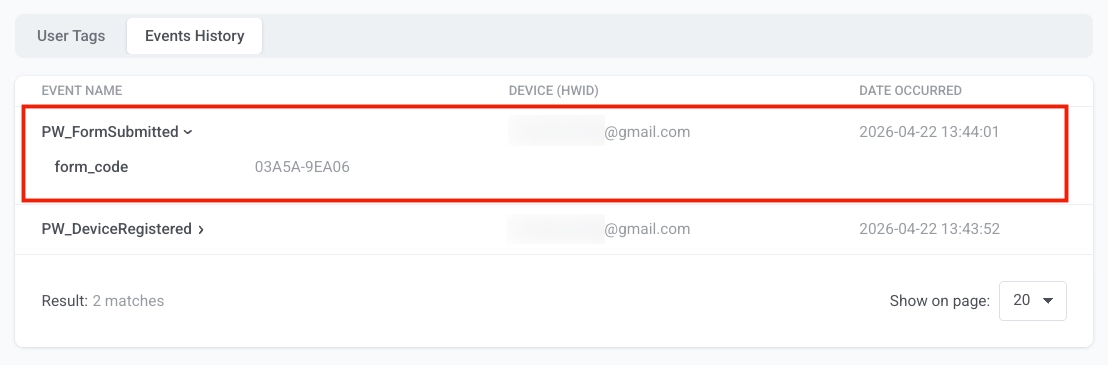
Anchor link toPushwoosh dispara PW_FormSubmitted en cada envío de formulario. Puede verlo en la pestaña Historial de eventos en el perfil del contacto en User Explorer. El evento incluye un atributo form_code que identifica de qué Cloud Page provino el envío, y una marca de tiempo de cuándo ocurrió.
Úselo como un disparador en Customer Journey para iniciar secuencias de bienvenida, flujos de seguimiento y otras automatizaciones. Por ejemplo, puede construir un journey que envíe un correo electrónico de bienvenida inmediatamente después de que un usuario envíe un formulario de cuestionario de fitness, y luego haga un seguimiento con un plan de entrenamiento personalizado 24 horas después.
Probar la página
Anchor link toDespués de guardar la página, se vuelve accesible públicamente a través de su URL. El formato predeterminado es https://cloud-pages.svc-nue.pushwoosh.com/cloud-pages/v1/page/<page-code>.
- En la lista de páginas, abra el menú de acciones de la página y haga clic en Vista previa.
- Verifique que el contenido de la página se carga correctamente y se muestra como se esperaba.
- Si su página incluye un formulario, rellénelo con datos de prueba y haga clic en el botón de enviar.
- Confirme que la redirección abre la página esperada.
- Abra User Explorer y confirme que se muestran los datos de usuario y los tags enviados.
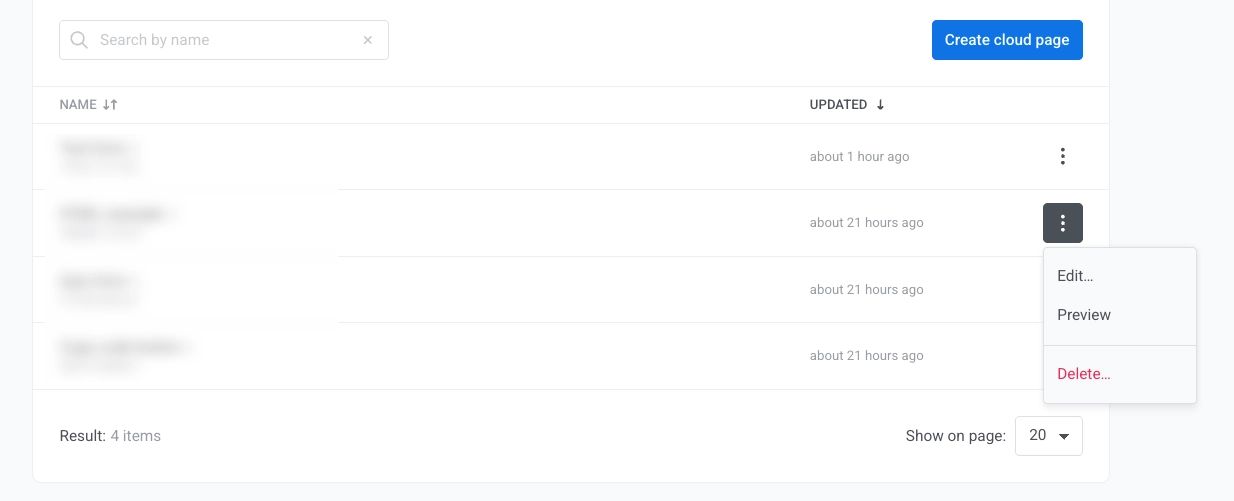
Editar o eliminar una página
Anchor link toTodas las Cloud Pages se listan en Contenido → Cloud Pages, donde puede gestionarlas y editarlas.
- Vaya a Contenido → Cloud Pages.
- Abra el menú de acciones de la página.
- Haga clic en Editar o Eliminar la página.