Integración con WooCommerce
El plugin Pushwoosh for WooCommerce conecta su tienda de WordPress con Pushwoosh. Los clientes se convierten en contactos de email y SMS, los pedidos y los carritos abandonados se convierten en eventos desde los que puede iniciar Customer Journeys, y su tienda obtiene web push con una campana de suscripción.
Resumen de la integración
Anchor link toWooCommerce es un plugin de comercio electrónico de código abierto para WordPress. El plugin Pushwoosh for WooCommerce envía los datos de su tienda a Pushwoosh directamente a través de la API de Pushwoosh. El plugin envía los datos en segundo plano, por lo que no ralentiza el proceso de pago.
Tipo de integración
Anchor link toDestino: Esta integración envía datos de su tienda WooCommerce a Pushwoosh.
Requisitos previos
Anchor link to- WordPress 6.4 o posterior, WooCommerce 8.2 o posterior y PHP 8.1 o posterior
- Acceso de administrador a su sitio de WordPress
- Una cuenta de Pushwoosh con una aplicación para su tienda
- Una dirección de sitio HTTPS, si desea usar web push. Los navegadores solo registran web push en sitios HTTPS.
El plugin funciona con High-Performance Order Storage (HPOS) y con las páginas de Carrito y Finalizar compra tanto clásicas como basadas en bloques.
Qué sincroniza el plugin
Anchor link toLa tabla muestra en qué se convierte cada entidad de WooCommerce en Pushwoosh:
| WooCommerce | Pushwoosh |
|---|---|
| Cliente o comprador invitado | Usuario con un contacto de email, más un contacto de SMS si el número de teléfono es un número móvil válido |
| Nombre del cliente, consentimiento y campos mapeados | Etiquetas |
| Pedido creado, actualizado o cancelado | Eventos PW_OrderCreated, PW_OrderUpdated, PW_OrderCanceled |
| Carrito abandonado | Eventos PW_AbandonedCart y PW_AbandonedCartUpdate con un enlace que restaura el carrito |
| Visitante de la tienda que permite las notificaciones | Suscriptor de web push vinculado al email del cliente |
El User ID en Pushwoosh es la dirección de email del cliente en minúsculas: el email de la cuenta para los clientes registrados y el email de facturación para los invitados. Los contactos, los eventos y los suscriptores de web push de un mismo cliente terminan en el mismo usuario.
Casos de uso
Anchor link to- Enviar un email o un push cuando un comprador deja artículos en el carrito, con un botón que restaura ese carrito.
- Agradecer a los compradores después de un pedido, hacer un seguimiento cuando se envía un pedido o recuperar clientes después de una cancelación.
- Segmentar a los clientes por ciudad, país o cualquier campo de cliente que mapee a una etiqueta.
- Enviar promociones por web push a los visitantes de la tienda que se suscribieron mediante la campana.
Prepare su aplicación de Pushwoosh
Anchor link toRealice estos pasos antes de activar el plugin. Si el plugin envía un evento que aún no existe, Pushwoosh lo crea automáticamente y deduce los tipos de los atributos a partir de los primeros valores que recibe. Un tipo deducido puede ser incorrecto (por ejemplo, un precio guardado como entero), y los datos enviados antes de que corrija el tipo se pierden.
Cree los tokens de API
Anchor link toEl plugin utiliza dos tokens de API de dispositivo. Cree ambos en Settings → API Access y deles acceso a su aplicación:
- Cree un token de API de dispositivo para el servidor. El plugin lo utiliza para registrar contactos y enviar eventos. Nunca sale de su servidor.
- Cree un segundo token de API de dispositivo para la tienda. El plugin lo inserta en cada página de la tienda para iniciar web push, por lo que es público. Un token independiente le permite reemplazarlo sin tocar el token del servidor.
Un token de API del servidor es opcional. Con él, la configuración del plugin muestra la lista de etiquetas de su aplicación, lo que ayuda al mapear campos de cliente a etiquetas.
Cree los eventos
Anchor link toCree cinco eventos personalizados en Audience → Events → Create Event → Custom Event: PW_OrderCreated, PW_OrderUpdated, PW_OrderCanceled, PW_AbandonedCart y PW_AbandonedCartUpdate. Aprenda a crear eventos personalizados.
Asigne a cada evento los atributos que recibe, con estos tipos:
| Atributo | Tipo | Eventos |
|---|---|---|
orderId | string | Todos |
source | integer | Todos |
orderNumber, status, wcStatus | string | Eventos de pedido |
email, customerId, shippingMethod, currency | string | Todos |
orderUrl | string | Eventos de carrito |
totalPrice, shippingAmount, discountAmount | decimal (price) | Todos |
taxAmount | decimal (price) | Eventos de pedido |
createdDate | date | Todos |
updatedDate | date | Eventos de pedido |
abandonedDate | date | Eventos de carrito |
items | list | Todos |
historical | boolean | Eventos de pedido |
Si orderId ya está configurado como integer en sus eventos de pedido, cámbielo a string. Con integer, Pushwoosh no cuenta los artículos del pedido como ventas para las recomendaciones de los más vendidos en el bloque Productos del email.
Cree las etiquetas
Anchor link toCree estas etiquetas en la página Tags:
| Etiqueta | Tipo |
|---|---|
firstName | string |
lastName | string |
acceptsMarketing | integer |
Cree también una etiqueta para cada campo de cliente que planee mapear, como se describe en Mapear campos de cliente a etiquetas. El mapeo predeterminado utiliza las etiquetas City y Country.
Configure web push
Anchor link toPara usar web push, configure la plataforma Web para su aplicación. Consulte Configuración de web push.
Instale el plugin
Anchor link to- En el panel de administración de WordPress, vaya a Plugins → Add New Plugin.
- Busque Pushwoosh for WooCommerce.
- Haga clic en Install Now.
- Haga clic en Activate. WooCommerce ya debe estar activo.
También puede descargar el zip del plugin desde wordpress.org y subirlo en Plugins → Add New Plugin → Upload Plugin.
Conecte el plugin a Pushwoosh
Anchor link toVaya a WooCommerce → Settings → Pushwoosh y complete la sección Connection:
- Deje API URL como
https://api.pushwoosh.com, a menos que el soporte de Pushwoosh le haya proporcionado una dirección diferente. - En Application code, introduzca su código de aplicación.
- En Device API token, pegue el token del servidor que creó.
- En Web SDK token, pegue el token de la tienda.
- Opcionalmente, en Server API token (optional), pegue un token de API del servidor.
- Haga clic en Save changes.
- Haga clic en Check connection.
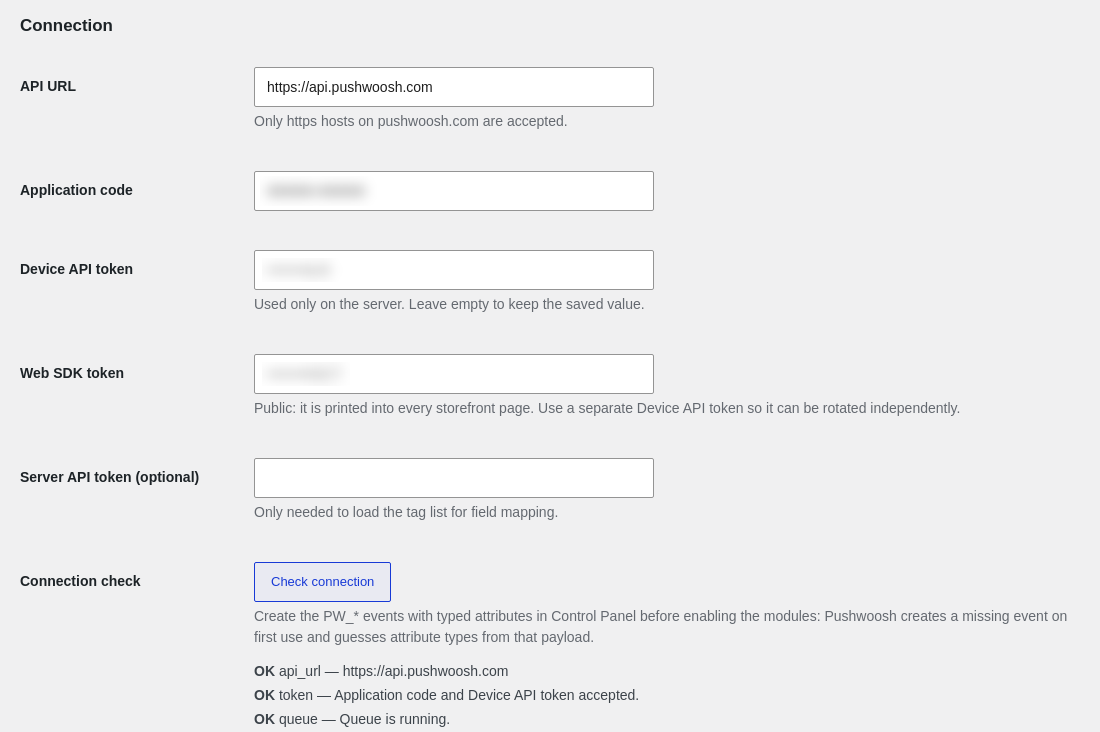
Check connection verifica:
- La URL de la API
- El código de la aplicación y el token
- La cola de envío
- El service worker de web push, si web push está activado
No envía eventos de prueba, porque un evento de prueba crearía los eventos con atributos vacíos. Si la comprobación indica que no se pudo verificar el token, su aplicación acepta cualquier token de API de dispositivo. Pida al soporte de Pushwoosh que active la verificación de token de API de dispositivo para la aplicación.
Los tokens guardados se muestran enmascarados. Para conservar un token guardado, deje su campo vacío al guardar la configuración.
Active los módulos
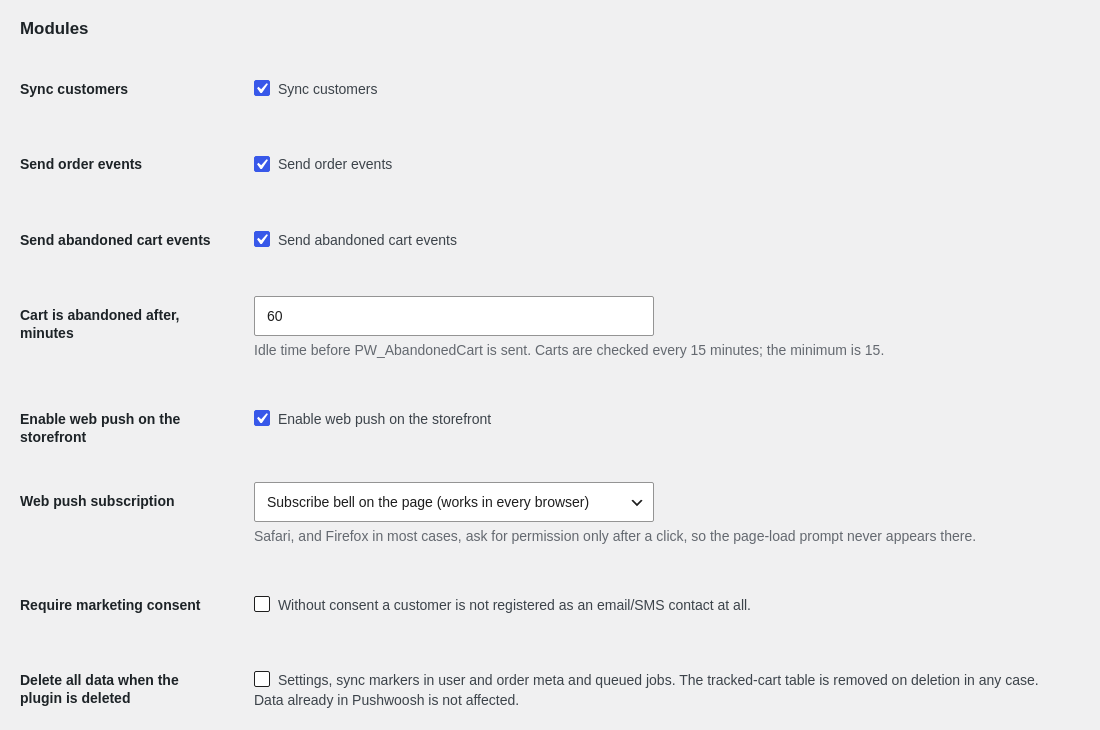
Anchor link toEn la sección Modules, active los datos que desea enviar y, a continuación, haga clic en Save changes:
- Sync customers: registra a los clientes como contactos en Pushwoosh cuando se registran y cada vez que se guarda su perfil.
- Send order events: envía eventos de pedido. Solo los pedidos creados después de activar esta opción reciben
PW_OrderCreated. Para enviar pedidos anteriores, consulte Importar clientes y pedidos existentes. - Send abandoned cart events: envía eventos de carrito. Establezca en Cart is abandoned after, minutes cuánto tiempo debe permanecer un carrito sin cambios antes de que se envíe
PW_AbandonedCart. El valor predeterminado es 60 y el mínimo es 15. - Enable web push on the storefront: carga web push en cada página de la tienda. Consulte Configurar web push.
- Require marketing consent: no envía nada de los clientes que no aceptaron recibir marketing. Consulte Recopilar el consentimiento de marketing.
- Delete all data when the plugin is deleted: al eliminar el plugin, también elimina su configuración, sus datos en los registros de usuarios y pedidos, y los trabajos en cola. La tabla de carritos rastreados se elimina tanto si esta opción está activada como si no. Los datos que ya están en Pushwoosh se conservan.
Mapear campos de cliente a etiquetas
Anchor link toEn la sección Customer tags, utilice Field → tag mapping para enviar más datos de clientes como etiquetas. Escriba un par source = Tag por línea:
billing_city = Citybilling_country = Countryshipping_postcode = Postcodemeta:loyalty_level = Loyalty level- Source es un campo de cliente, como
billing_cityoshipping_postcode, ometa:seguido de una clave meta de usuario o de pedido. - Tag es el nombre de una etiqueta que ya existe en su aplicación de Pushwoosh.
firstName, lastName y acceptsMarketing se envían siempre, por lo que no necesita mapearlos. Con un token de API del servidor guardado, la sección muestra las etiquetas que existen en su aplicación y las líneas de mapeo que se ignoraron.
Recopilar el consentimiento de marketing
Anchor link toEl plugin añade la casilla I agree to receive news and offers by email and SMS al formulario de registro y a los procesos de pago clásico y basado en bloques. La respuesta se almacena en el cliente y en el pedido, y se envía como la etiqueta acceptsMarketing (1 o 0). Un cliente que ya aceptó no vuelve a ver la casilla, y una casilla sin marcar en un pedido posterior no retira una aceptación anterior.
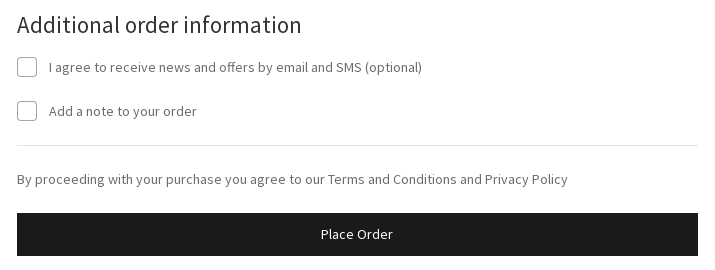
Qué cambia Require marketing consent:
- Desactivada (predeterminado): todos los clientes se registran como contactos, y
acceptsMarketingle indica quién aceptó. Úsela para filtrar su audiencia en segmentos. - Activada: los clientes sin consentimiento no obtienen contacto de email ni de SMS, sus pedidos no envían eventos y sus carritos no envían eventos de carrito.
Al activar la opción, los contactos existentes no se eliminan de inmediato. Un cliente registrado que se sincronizó antes sin consentimiento se elimina de Pushwoosh la próxima vez que se guarde su perfil o cuando vuelva a ejecutar la importación de clientes. Los contactos de invitados no se eliminan.
El proceso de pago basado en bloques muestra la casilla en WooCommerce 8.9 y posteriores. En versiones anteriores con Require marketing consent activada, los carritos de ese proceso de pago no envían eventos.
Eventos y etiquetas que envía el plugin
Anchor link toEsta sección enumera todos los eventos y etiquetas que envía el plugin, para que pueda crear segmentos y journeys a partir de ellos.
Contactos y etiquetas
Anchor link toEl plugin registra a cada cliente como contacto de email y, cuando el teléfono de facturación es un número móvil válido, como contacto de SMS. El idioma del contacto es el idioma de la tienda que el cliente utilizó al registrarse o al finalizar la compra. Cada contacto recibe estas etiquetas:
| Etiqueta | Valor |
|---|---|
firstName | Nombre de facturación, o el nombre de la cuenta si el de facturación está vacío |
lastName | Apellido de facturación, o el apellido de la cuenta si el de facturación está vacío |
acceptsMarketing | 1 si el cliente aceptó recibir marketing; en caso contrario, 0 |
| Etiquetas mapeadas | Valores de los campos de su mapeo de campos |
El plugin sincroniza los clientes en estos momentos:
- Clientes registrados: cuando se registran y cada vez que se guarda su perfil.
- Compradores invitados: a partir de su pedido, con Sync customers activado.
- Invitados que abandonan un carrito: justo antes del evento de carrito, para que el evento tenga un usuario al que asignarse.
- Clientes que cambian el email de su cuenta: el plugin elimina el usuario anterior en Pushwoosh y registra el nuevo.
Pushwoosh rechaza algunos contactos y el plugin no los reintenta: emails con dominios no válidos o desechables y números de teléfono que no son móviles. Se registran en el log como se describe en Comprobar que la integración funciona.
Eventos de pedido
Anchor link toEl plugin envía un evento cada vez que un pedido cambia de estado:
| Evento | Cuándo se envía |
|---|---|
PW_OrderCreated | La primera vez que se sincroniza un pedido creado después de activar Send order events, en el estado que tenga en ese momento |
PW_OrderUpdated | Cada cambio de estado posterior, excepto la cancelación. También es el primer evento de un pedido creado antes de activar Send order events. |
PW_OrderCanceled | El pedido pasa a Cancelled |
Los pedidos en borrador y los fallidos no envían eventos.
Pushwoosh también cuenta los artículos de PW_OrderCreated y PW_OrderUpdated como ventas para las recomendaciones de los más vendidos en el bloque Productos del email.
El atributo status utiliza los mismos valores que la integración con Magento, por lo que los journeys creados para Magento funcionan sin cambios. El estado original de WooCommerce está en wcStatus:
| Estado de WooCommerce | status |
|---|---|
| Pending payment, On hold | pending |
| Processing | processing |
| Completed | complete |
| Refunded | closed |
| Cancelled | canceled |
| Estado personalizado | El slug del estado tal cual |
Cada evento de pedido incluye estos atributos:
| Atributo | Valor |
|---|---|
orderId | ID del pedido |
orderNumber | Número de pedido que se muestra al cliente |
source | Siempre 1 |
email | Email de facturación |
customerId | El User ID: el email de la cuenta o, para los invitados, el email de facturación |
items | Productos pedidos, consulte más abajo |
createdDate, updatedDate | Fecha en que se creó el pedido y en que cambió por última vez, en la zona horaria de la tienda |
shippingMethod | Nombre del primer método de envío |
totalPrice | Total del pedido |
shippingAmount, taxAmount, discountAmount | Totales de envío, impuestos y descuentos |
currency | Código de la moneda del pedido |
status, wcStatus | Estado del pedido, consulte la tabla anterior |
historical | true para pedidos anteriores enviados por la importación; en caso contrario, false |
Cada entrada de items tiene productId, sku, name, description (descripción corta), price (precio unitario sin impuestos), quantity, imageUrl, productUrl y category (nombres de categorías separados por comas).
Ejemplo de atributos de PW_OrderCreated:
{ "orderId": "1042", "orderNumber": "1042", "source": 1, "email": "jane@example.com", "customerId": "jane@example.com", "items": [ { "productId": "17", "sku": "TSHIRT-M", "name": "T-shirt", "description": "Cotton T-shirt", "price": 20.0, "quantity": 2, "imageUrl": "https://shop.example.com/wp-content/uploads/tshirt.jpg", "productUrl": "https://shop.example.com/product/t-shirt/", "category": "Clothing, T-shirts" } ], "createdDate": "2026-09-30T12:00:00+02:00", "updatedDate": "2026-09-30T12:00:00+02:00", "shippingMethod": "Flat rate", "totalPrice": 47.6, "shippingAmount": 5.0, "taxAmount": 7.6, "discountAmount": 5.0, "currency": "EUR", "status": "pending", "wcStatus": "on-hold", "historical": false}Eventos de carrito abandonado
Anchor link toUn carrito se considera abandonado cuando tiene un email, permanece sin cambios más tiempo que Cart is abandoned after, minutes y no se realiza ningún pedido a partir de él:
| Evento | Cuándo se envía |
|---|---|
PW_AbandonedCart | La primera vez que se abandona un carrito |
PW_AbandonedCartUpdate | El mismo carrito cambió después de PW_AbandonedCart y se abandona de nuevo |
El plugin comprueba los carritos cada 15 minutos, por lo que el evento suele llegar en los 15 minutos posteriores al umbral.
Si el comprador realiza un pedido antes de eso, desde la misma sesión o con el mismo email de facturación, el carrito se cierra y no se envía ningún evento. Si el comprador vuelve a llenar un carrito cerrado, empieza de nuevo con PW_AbandonedCart.
El plugin necesita el email del comprador para enviar un evento de carrito:
- Comprador con sesión iniciada: el email de la cuenta.
- Invitado: el email escrito en el campo de email de facturación al finalizar la compra, aunque el pedido nunca se realice.
Los atributos de los eventos de carrito son orderId (ID del carrito), source, email, customerId, items, createdDate, abandonedDate (cuándo cambió el carrito por última vez), shippingMethod, totalPrice, shippingAmount, discountAmount, currency y orderUrl. En los eventos de carrito, los precios de los artículos incluyen impuestos.
Enlace de recuperación del carrito
Anchor link toorderUrl es un enlace que restaura el carrito del comprador. Úselo como enlace del botón en su recordatorio:
- Al abrir el enlace, los artículos guardados se colocan en el carrito y el comprador va al proceso de pago. Funciona en cualquier navegador, incluso en uno en el que el comprador nunca visitó su tienda.
- El enlace no inicia sesión de nadie.
- El enlace es válido durante 14 días. Después de que se realice un pedido desde el carrito, o después de que se elimine el carrito, el enlace abre en su lugar la página de carrito habitual del visitante.
Los enlaces de recuperación dejan de funcionar cuando elimina el plugin, aunque lo vuelva a instalar, porque la clave que los firma se elimina junto con el plugin.
Crear un journey de carrito abandonado
Anchor link toEste ejemplo envía un email con los artículos del carrito y un botón que restaura el carrito. Necesita que Send abandoned cart events y Send order events estén activados, para que el journey sepa cuándo compró el comprador.
Cree el email
Anchor link toCree un email en el editor de contenido de email y, a continuación, muestre los artículos del carrito de una de estas dos formas:
- Bloque Productos: muestra el carrito tal como Pushwoosh lo almacena en el momento del envío. Si el comprador cambió el carrito después de
PW_AbandonedCart, el email muestra los artículos más recientes. - Liquid: muestra los artículos del evento
PW_AbandonedCartque inició el journey, con cualquier diseño que usted mismo escriba.
Mostrar los artículos con el bloque Productos
Anchor link toEl origen Cart necesita Content Templates en su plan y un token de acceso a la API en Settings → API Access. Sin un token, el email no se puede guardar.
Mostrar los artículos con Liquid
Anchor link toAñada el contenido del carrito al cuerpo del email con Liquid. Los marcadores de posición toman sus valores del evento PW_AbandonedCart que inicia el journey:
<p>Your cart total is {{ totalPrice }} {{ currency }}.</p><table> {% for item in items %} <tr> <td><img src="{{ item.imageUrl }}" width="64" alt=""></td> <td><a href="{{ item.productUrl }}">{{ item.name }}</a></td> <td>× {{ item.quantity }}</td> <td>{{ item.price }} {{ currency }}</td> </tr> {% endfor %}</table>Añadir el botón de recuperación
Anchor link toEl bloque Productos no añade un enlace que restaure el carrito, así que añada este botón con cualquiera de las dos formas de mostrar los artículos:
- Añada un botón al email.
- Establezca el enlace del botón en
{{ orderUrl }}. - Guarde el email.
Cree el journey
Anchor link to- Añada una Entrada basada en disparador con el evento
PW_AbandonedCart. - Añada un paso de Esperar por disparador.
- Establezca su período de espera, por ejemplo, en 1 hora.
- En Wait for Trigger, nombre la rama Order placed.
- Añada el evento
PW_OrderCreateda la rama Order placed. - Termine la rama Order placed con un elemento de Salida o dejándola sin conexión de salida. El comprador ya compró.
- Dirija la rama Not triggered a un paso de Email.
- En el paso Email, seleccione el email que creó.
- En el paso Email, active Overwrite Liquid placeholders y seleccione el evento
PW_AbandonedCart. - Termine la rama después del paso Email con un elemento Exit o dejándola sin conexión de salida.
- Inicie el journey.
El plugin ya espera el tiempo de Cart is abandoned after, minutes antes de enviar PW_AbandonedCart. El período de espera de Wait for Trigger se suma a ese tiempo, así que manténgalo corto.
Establezca el período de espera en el propio Wait for Trigger, sin un paso de Time Delay independiente antes de él.
Wait for Trigger solo detecta los PW_OrderCreated enviados después de que el comprador llegue a él. Un comprador que realiza un pedido durante un Time Delay sigue recibiendo el recordatorio, y un bloque Productos en él no muestra artículos, porque el pedido borra la etiqueta PW_AbandonedCartID con la que el bloque lee el carrito.
Para enviar el recordatorio al comprador mediante un push, utilice un paso de Push y active Personalize message with event attributes para insertar orderUrl o totalPrice. Consulte Contenido dinámico y plantillas Liquid en journeys.
Configurar web push
Anchor link toCon web push activado, cada página de la tienda carga el Web SDK de Pushwoosh y los visitantes pueden suscribirse a las notificaciones de su tienda.
Elija cómo se pide a los visitantes que se suscriban:
- Subscribe bell on the page (works in every browser): muestra una campana en una esquina de la página. El navegador solicita el permiso después de que el visitante haga clic en ella. Es la opción predeterminada.
- Ask on page load (Chrome and Edge only): el navegador solicita el permiso en cuanto se abre la página. Safari y, en la mayoría de los casos, Firefox solo muestran una solicitud de permiso después de un clic, por lo que a los visitantes de esos navegadores no se les pregunta en absoluto.
Para activar web push:
- Asegúrese de que la plataforma Web esté configurada en su aplicación, como se describe en Configure web push.
- En WooCommerce → Settings → Pushwoosh, complete Web SDK token.
- Active Enable web push on the storefront.
- En Web push subscription, elija cómo se pide a los visitantes que se suscriban.
- Haga clic en Save changes.
- Haga clic en Check connection para asegurarse de que el service worker se carga.
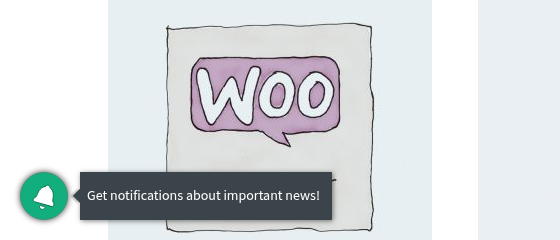
Puede cambiar el texto de la campana, el Subscription prompt, el título y la imagen predeterminados de las notificaciones y la configuración de Safari en la configuración de web push de su aplicación. Esa configuración prevalece sobre los valores predeterminados del plugin.
Cómo se vinculan los suscriptores a los clientes
Anchor link toAl principio, un nuevo suscriptor es anónimo. El plugin vincula al suscriptor con el usuario del cliente en Pushwoosh:
- Después de que un cliente inicie sesión.
- En la página de confirmación del pedido, para todos los compradores, incluidos los invitados.
Cuando un cliente cierra sesión o retira su consentimiento, se elimina el vínculo creado al iniciar sesión. Con Require marketing consent activada, un suscriptor solo se vincula cuando el cliente o el pedido tiene consentimiento.
Service worker
Anchor link toEl plugin sirve el service worker de web push desde /pushwoosh-sw/ en su sitio y lo excluye del almacenamiento en caché de páginas de WP Rocket, LiteSpeed Cache y W3 Total Cache. Si Check connection informa de un estado incorrecto para el service worker, pida a su desarrollador que compruebe que el servidor no bloquea ni almacena en caché esa URL.
El service worker abarca todo el sitio, por lo que reemplaza a cualquier otro service worker registrado en la raíz del sitio, como uno de un plugin PWA o de otro proveedor de push. Su desarrollador puede añadir los scripts de ese otro service worker con el filtro pushwoosh_wc_service_worker_imports.
Importar clientes y pedidos existentes
Anchor link toEnvíe los clientes y pedidos que existían antes de instalar el plugin desde la sección Historical sync de WooCommerce → Settings → Pushwoosh:
- Sync existing customers: registra a todos los clientes con el rol Customer y, a continuación, a los compradores invitados de pedidos anteriores.
- Send past orders: envía un evento
PW_OrderCreatedconhistoricalestablecido entruepor cada pedido anterior que nunca lo tuvo. Los pedidos cancelados se omiten.
La sección muestra el progreso de cada ejecución. Ambas ejecuciones solo ponen las llamadas en cola, y Action Scheduler las envía en segundo plano.
En una tienda grande, pida a su desarrollador que ejecute la importación con WP-CLI. Añada --since=YYYY-MM-DD para importar solo los registros a partir de esa fecha:
wp pushwoosh sync customers --since=2025-01-01wp pushwoosh sync orders --historical --since=2026-01-01Exportar y borrar datos personales
Anchor link toEl plugin funciona con las herramientas de datos personales de WordPress en Tools → Export Personal Data y Tools → Erase Personal Data:
- Export incluye los datos que el plugin guarda sobre el cliente: el email sincronizado, la respuesta de consentimiento, el idioma y los carritos rastreados del cliente.
- Erase elimina esos datos y los carritos rastreados del cliente, cancela las llamadas pendientes a Pushwoosh para ese email y elimina el usuario y sus contactos en Pushwoosh. El cliente no vuelve a sincronizarse a menos que marque la casilla de consentimiento en una compra posterior.
El borrado no elimina los pedidos. Un pedido que WooCommerce conserva sigue enviando eventos de pedido con su email de facturación cuando cambia de estado. La anonimización de los pedidos se configura en los ajustes de privacidad propios de WooCommerce.
Añada los datos que envía a Pushwoosh a la política de privacidad de su tienda.
Comprobar que la integración funciona
Anchor link to- Realice un pedido de prueba con un email que pueda encontrar y marque la casilla de consentimiento.
- Abra el Explorador de usuarios y busque ese email.
- Compruebe que el usuario tiene un contacto de email con las etiquetas
firstName,lastNameyacceptsMarketing. - Compruebe que los eventos del usuario incluyen
PW_OrderCreated.
Si los datos no llegan, abra WooCommerce → Status → Logs y seleccione el origen pushwoosh. El log muestra cada llamada fallida con el motivo. Los tokens nunca se registran y los emails se enmascaran.
Cómo gestiona el plugin los errores:
- Errores de red y errores temporales del servidor: la llamada se reintenta después de 1, 5, 15, 60 y 240 minutos, y luego se registra como error.
- Datos rechazados, como un contacto con un dominio de email desechable: se registran como error y no se reintentan.
- Token rechazado: el envío se pausa y el panel de administración de WordPress muestra un aviso con un botón Resume sending. Las llamadas en cola se conservan. Corrija el token en la configuración y, a continuación, haga clic en Resume sending.