Loop
Use Loop para repetir los mismos pasos para un usuario varias veces sin duplicarlos en el lienzo. Es adecuado para recordatorios, seguimientos y comprobaciones que deben ejecutarse una y otra vez, hasta un límite que usted establezca. Después de la última repetición, el usuario continúa con la siguiente parte del journey.
Casos de uso
Anchor link to- Recordatorios de pago: envíe un recordatorio y espere el pago. Los usuarios que pagan continúan y ya no reciben más recordatorios. Los usuarios que no pagan reciben otro recordatorio después de una pausa, hasta el límite que usted establezca.
- Recuperar usuarios inactivos: envíe un número limitado de incentivos con un retraso entre ellos. Después del último, mueva a los usuarios a una oferta diferente o deje de enviarles mensajes.
- Seguir comprobando un evento: espere el mismo evento una y otra vez sin duplicar el paso de espera en el lienzo.
Requisitos previos
Anchor link toLoop está desactivado de forma predeterminada. Para usarlo, pida al Soporte de Pushwoosh que lo habilite para su cuenta.
Agregar y configurar Loop
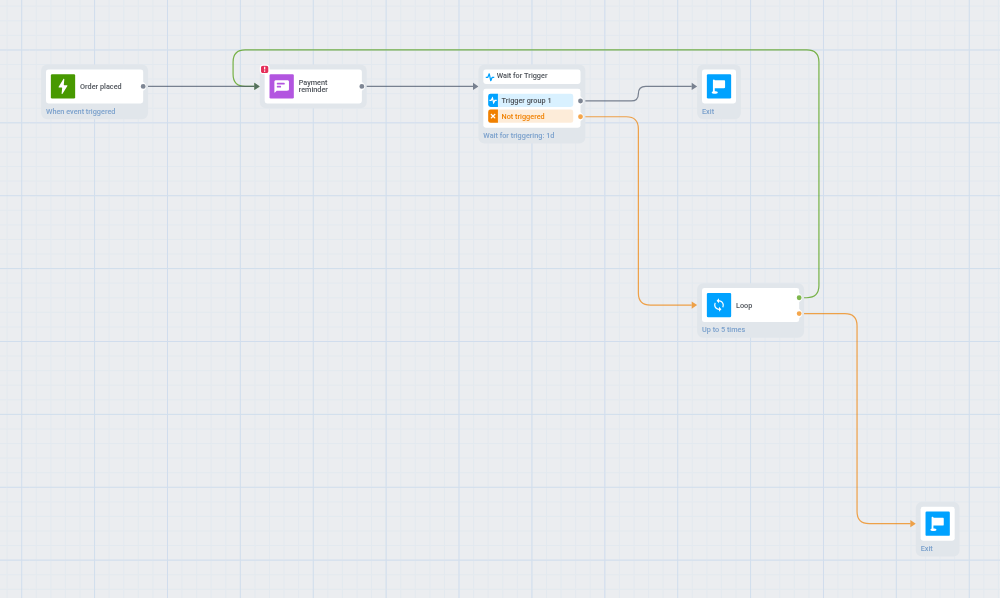
Anchor link toPrimero construya los pasos que desea repetir, luego coloque el Loop justo después de ellos. El Loop tiene dos salidas:
- Repeat: una conexión de vuelta al primer paso repetido. Los usuarios vuelven allí y pasan por los pasos de nuevo.
- Exit: una conexión hacia adelante a lo que viene después del bucle. Los usuarios llegan allí después de su última repetición.
-
Agregue el elemento Loop justo después de los pasos que desea repetir, y haga doble clic en él.
-
En Maximum repeats, defina cuántas veces puede un usuario pasar por los pasos repetidos, de 1 a 100. El valor predeterminado es 10. Un número fuera de ese rango se ajusta al límite más cercano en cuanto guarda.
-
En Not more often than every, s, defina la pausa mínima entre dos repeticiones para un usuario, en segundos:
- 0: úselo cuando los pasos repetidos ya esperen por sí solos, con un paso Wait for Trigger, un paso Time delay, u otro Loop que tenga su propia pausa.
- 60 o más: úselo cuando nada en los pasos repetidos espere. El Loop retiene a cada usuario hasta que ha pasado ese tiempo desde su última repetición. Si escribe un valor de 1 a 59, cambia a 60 de inmediato.
Si deja
0pero ninguno de los pasos repetidos espera, el journey no se guardará y mostraráThe loop body has no waiting element, set a minimum interval. Sin ninguna pausa, el bucle se repetiría tan rápido como el sistema pueda procesarlo. Establezca 60 o más, o agregue un paso Wait for Trigger o Time delay a los pasos repetidos.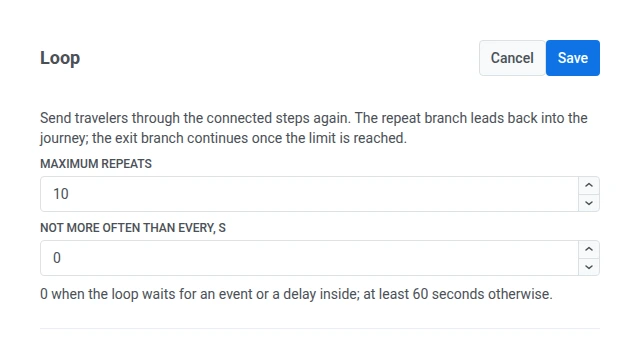
-
Arrastre una conexión desde la salida Repeat de vuelta al primer paso que desea repetir. En el ejemplo anterior, ese es el recordatorio Push.
Si Repeat no está conectado, el journey no se guardará y mostrará
Connect the repeat output of the Loop. Si conduce al propio Loop, veráThe repeat output of the Loop cannot lead to the Loop itself. -
Arrastre una conexión desde la salida Exit al paso que debe venir después del bucle, por ejemplo un mensaje final o una oferta diferente. Los usuarios llegan allí una vez que han pasado por el bucle Maximum repeats veces.
-
Haga clic en Save.
Solo Repeat puede apuntar de vuelta a un paso anterior. Si conecta cualquier otra salida a un paso anterior en el journey, el journey no se guardará.
Qué sucede en cada repetición
Anchor link toCada paso en la parte repetida se ejecuta de nuevo cada vez. Tenga en cuenta estas reglas al construirla.
Los cambios de Tag se acumulan
Anchor link toUn paso Update user profile dentro del bucle se ejecuta en cada repetición. Lo que eso significa depende de la acción:
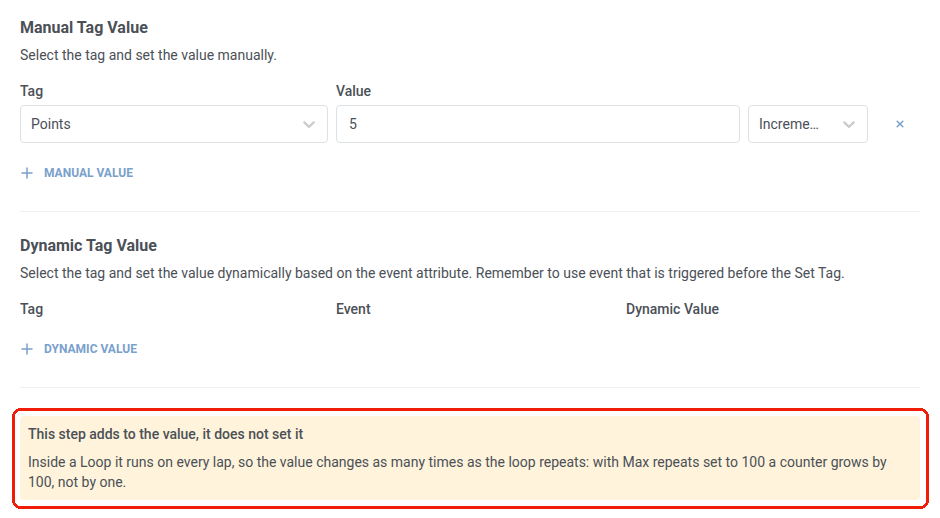
- Aumentar, disminuir, agregar un elemento a la lista, eliminar un elemento de la lista: el cambio se acumula. Por ejemplo, con Maximum repeats establecido en 100, un Tag que aumenta en 1 crece en 100, no en 1.
- Reemplazar el valor: seguro de repetir, porque no se acumula.
Cuando el paso tiene un cambio que se acumula, muestra una advertencia explicando que el cambio se acumula en cada repetición.
Las esperas se reinician en cada repetición
Anchor link toUn paso Wait for Trigger o Time delay cuenta su tiempo desde la repetición actual, no desde cuando el usuario entró al bucle. Una espera de 24 horas significa 24 horas en cada repetición, por lo que un usuario que pasa por el bucle 3 veces puede pasar hasta 72 horas en él.
Los usuarios permanecen en la misma rama de prueba
Anchor link toUn A/B/n Split envía a cada usuario a la misma rama cada vez que la alcanza: en cada repetición, y cuando vuelve a entrar al journey más tarde. Un Holdout Split funciona de la misma manera. Esto mantiene precisos los resultados de la prueba, porque ningún usuario puede pasar a otra rama y ser contado dos veces.
Wait for Trigger usa el evento más reciente
Anchor link toUn paso Wait for Trigger en el bucle conserva solo el evento de la repetición actual. Cada evento nuevo reemplaza al de la repetición anterior. Los pasos posteriores que usan datos del evento siempre obtienen el evento más reciente, incluyendo marcadores de posición de mensajes, un Time delay dinámico, un valor de Tag dinámico y un Condition split.
Los objetivos cuentan una vez, los mensajes cuentan cada vez
Anchor link toUn Objetivo de Conversión alcanzado dentro del bucle cuenta una vez para el journey, no una vez por repetición.
Los mensajes funcionan de manera diferente. Cada repetición de un paso de canal es un envío separado y cuenta hacia el límite de límite de frecuencia del usuario. Un paso Push que se repite 10 veces puede usar hasta 10 envíos de ese límite, no uno.
Bucles anidados
Anchor link toPuede colocar un Loop dentro de la parte repetida de otro. Cada Loop cuenta sus propias repeticiones. El Loop interno comienza a contar desde cero cada vez que los usuarios lo abandonan, por lo que ejecuta todas sus repeticiones de nuevo en cada repetición del Loop externo.
Por ejemplo, si el Maximum repeats del Loop externo es 3 y el del Loop interno es 2, los pasos del Loop interno pueden ejecutarse hasta 2 × 3 = 6 veces. El límite combinado de 1000 repeticiones sigue aplicándose.
Límite de seguridad en todos los bucles
Anchor link toUn usuario puede pasar por un máximo de 1000 repeticiones en total en todos los Loop de un journey, incluso si el propio Maximum repeats de cada Loop permite más.
- Un usuario que alcanza 1000 sale a través del Exit del último Loop, incluso si el límite propio de ese Loop aún no se ha alcanzado.
- El límite protege contra bucles dentro de bucles que se multiplican en muchas más repeticiones de las que esperaría, por ejemplo dos bucles de 100 repeticiones colocados uno dentro del otro.