Mixpanel: establecer perfil
Utilice Mixpanel: establecer perfil para actualizar el perfil de Mixpanel del viajero desde un paso del journey, a través de la API Engage, autenticándose con un token de proyecto. No se necesita una conexión o cuenta de servicio por separado.
Usos típicos:
- Sincronizar etiquetas en segmentos de Mixpanel: envíe un plan, correo electrónico u otra etiqueta al perfil de Mixpanel para que las cohortes de Mixpanel coincidan con las audiencias de Pushwoosh.
- Mantener los perfiles actualizados sin un trabajo de sincronización por separado: actualice el perfil en el paso exacto del journey donde cambió la etiqueta.
- Emparejar con el evento de seguimiento: utilice el mismo Distinct ID que el punto Mixpanel: track event emparejado para que los eventos y las actualizaciones de perfil lleguen a la misma persona en Mixpanel.
Configurar el punto
Anchor link to- Arrastre Mixpanel: set profile desde la sección Integraciones al lienzo.
- Haga doble clic en el punto e ingrese un Nombre del Paso.
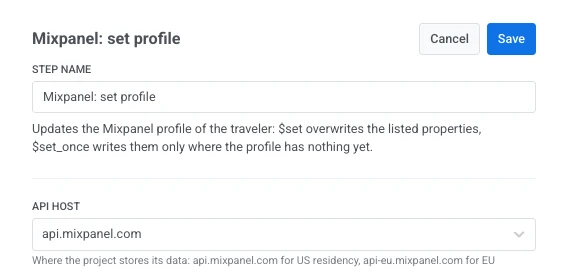
- En Host de la API, elija la región en la que el proyecto de Mixpanel almacena sus datos:
api.mixpanel.compara un proyecto de EE. UU.,api-eu.mixpanel.compara uno de la UE.
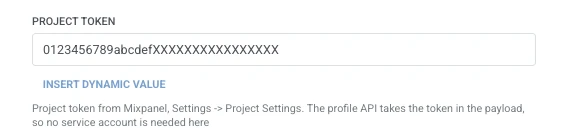
- En Token del proyecto, ingrese el token del proyecto de Mixpanel: Configuración > Configuración del proyecto. La API de perfil toma el token en el cuerpo de la solicitud, por lo que, a diferencia de Mixpanel: track event, no se requiere una cuenta de servicio aquí.
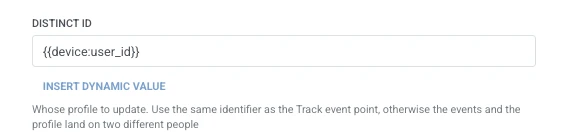
- En Distinct ID, ingrese de quién es el perfil que se va a actualizar. Utilice el mismo identificador que el punto Mixpanel: track event emparejado, ya que ambos usan por defecto
{{device:user_id}}. Una discrepancia envía eventos y actualizaciones de perfil a dos personas diferentes en Mixpanel.
- En Modo de actualización, elija $set para sobrescribir las propiedades listadas cada vez, o $set_once para escribirlas solo cuando el perfil no tenga ya un valor.

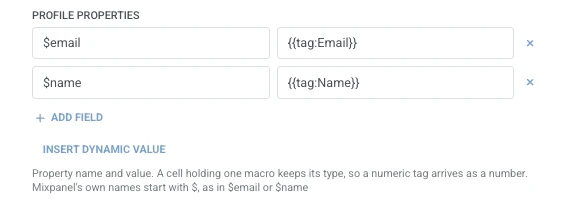
- En Propiedades del perfil, agregue una fila por cada propiedad a establecer en el perfil de Mixpanel. Ingrese el nombre de la propiedad y el valor. Los nombres no deben estar vacíos y deben ser únicos. Utilice los nombres reservados de Mixpanel cuando corresponda, por ejemplo
$emailo$name. Un valor que es una única macro de viajero mantiene su propio tipo ({{tag:Age}}llega como un número). Cualquier otro texto se envía como una cadena. Las macros utilizan la misma sintaxis que el cuerpo de un Webhook. O haga clic en Insertar Valor Dinámico para elegir un atributo que un paso anterior en este journey haya producido, por ejemplo, una respuesta de LLM o un valor de Webhook mapeado.
- Haga clic en Guardar.
Respuesta
Anchor link toEl viajero continúa hacia el paso que conecte a continuación en el lienzo.
Atributos después de que se ejecute el paso
Anchor link toEste punto no mapea ningún dato de respuesta de vuelta al journey.
Fallos y respuestas inesperadas
Anchor link toUna solicitud fallida elimina al viajero del journey. Consulte Errores y solicitudes fallidas.
Escenario de ejemplo: Mantener un perfil de Mixpanel sincronizado con una actualización de un journey
Anchor link toUn equipo quiere que el nivel del plan de un viajero se actualice en su perfil de Mixpanel tan pronto como cambie en Pushwoosh.
- Agregue Mixpanel: set profile justo después del paso donde cambia el nivel del plan. Establezca el Distinct ID en
{{device:user_id}}(coincidiendo con el punto Mixpanel: track event emparejado) y el Modo de actualización en $set. En Propiedades del perfil, establezca$emailen{{tag:Email}}. - Haga clic en Guardar.
Una vez que esto se ejecute, el perfil de Mixpanel reflejará el cambio de plan sin un trabajo de sincronización por separado.