Envoyer des messages Facebook Messenger via Customer Journey
Envoyez des messages Facebook Messenger via Customer Journey de Pushwoosh, déclenchés automatiquement lorsqu’un utilisateur interagit avec votre Page Facebook connectée.
Prérequis
Anchor link toConnectez votre Page Facebook dans la configuration de la plateforme Facebook Messenger avant de créer un parcours. Sinon, l’envoi de messages Facebook Messenger ne sera pas disponible. L’envoi en direct nécessite également l’approbation de la Meta App Review pour les autorisations Messenger de votre application Meta.
Créer un parcours Facebook Messenger
Anchor link to-
Allez dans Campaigns → Customer Journey Builder, puis cliquez sur Build a journey from scratch.
-
Ajoutez une Entrée basée sur un déclencheur. Choisissez :
PW_FBMessengerReceivedsi le parcours doit commencer lorsque l’utilisateur envoie un message, ouPW_FBMessengerStarteds’il doit commencer lorsqu’ils appuient sur un élément de menu, une réponse rapide, ou ouvrent un lien de parrainage (cela peut se produire plus d’une fois par utilisateur).
-
Ajoutez un élément Facebook Messenger et connectez-le au déclencheur d’entrée.

-
Cliquez sur l’élément Facebook Messenger pour ouvrir son panneau de configuration.
-
Saisissez votre Texte de message.
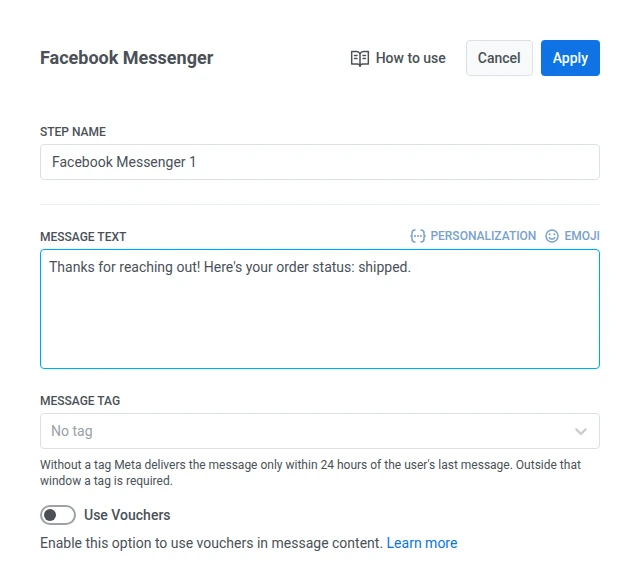
-
Définissez une Balise de message si vous devez envoyer en dehors de la fenêtre de 24 heures. Laissez Balise de message sur Aucune balise lorsque vous envoyez à l’intérieur de cette fenêtre.
En dehors de cette fenêtre, Meta exige une balise correspondant à l’un de ses cas d’utilisation approuvés :
- CONFIRMED_EVENT_UPDATE : un rappel ou une mise à jour concernant un événement auquel le destinataire est prévu d’assister.
- POST_PURCHASE_UPDATE : une mise à jour liée à un achat que le destinataire a déjà effectué.
- ACCOUNT_UPDATE : une mise à jour non récurrente concernant une modification du compte du destinataire.
- HUMAN_AGENT : un message d’un agent humain répondant au destinataire.
Choisissez une balise qui correspond à la raison réelle du message. En savoir plus sur les balises de message
-
(Facultatif) Pour joindre un code de bon d’achat, incluez
{{voucher}}dans le texte de votre message, puis :- Activez l’option Utiliser les Vouchers.
- Dans Pool de Vouchers, sélectionnez le pool contenant vos codes. Ajoutez le pool à l’avance. En savoir plus sur les vouchers
- (Facultatif) Dans Attribuer une balise, appliquez une balise aux utilisateurs qui reçoivent un voucher.
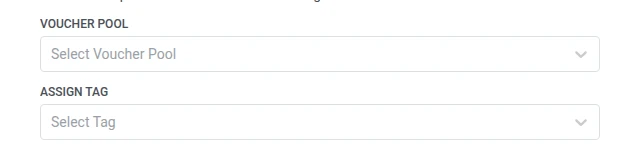
-
Cliquez sur Appliquer pour enregistrer les paramètres de l’élément.
-
(Facultatif) Terminez le parcours avec un élément de Sortie. Une étape sans étape suivante termine également ce chemin.
-
Lorsque vous êtes prêt, cliquez sur Lancer le parcours pour l’activer.
Limitations
Anchor link to- Texte brut uniquement, sans modèles, boutons ou pièces jointes multimédias.
- En dehors de la fenêtre de 24 heures ouverte par un message entrant, vous avez besoin d’une balise de message, sinon Meta rejettera l’envoi.
- Vous ne pouvez pas confirmer qu’un message Messenger spécifique dans le parcours a été lu.
- Le canal ne livre les messages qu’une fois que Meta a approuvé les autorisations Messenger de votre application Meta pour la Page connectée.