Demandes de données
Utilisez les Demandes de données pour effacer de manière permanente les données personnelles de Pushwoosh pour les personnes que vous identifiez par ID utilisateur, HWID ou E-mail, et pour consulter les effacements passés sur ce compte.
Pour l’ouvrir, cliquez sur Mon compte dans la barre supérieure ou la barre latérale, puis sélectionnez Demandes de données.
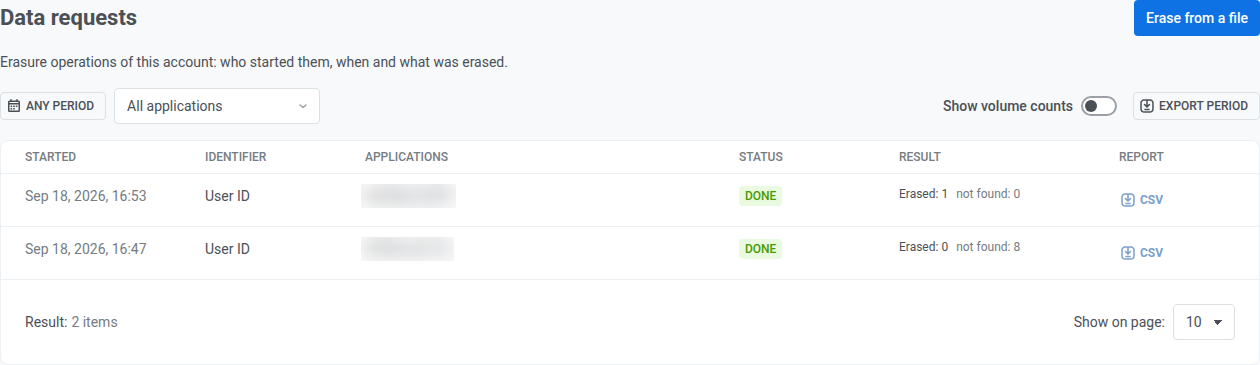
Tout membre de l’équipe peut ouvrir la page, mais l’exécution de l’option Effacer à partir d’un fichier nécessite des droits de modification sur l’application sélectionnée.
Pour effacer un seul abonné au lieu d’un fichier, utilisez Effacer les données personnelles sur sa fiche dans User Explorer. Ces effacements apparaissent dans ce même tableau.
Pushwoosh conserve ce journal, y compris le rapport par identifiant, pendant 3 ans.
Effacer à partir d’un fichier
Anchor link toCliquez sur Effacer à partir d’un fichier pour effacer en masse les données personnelles à l’aide d’une liste d’identifiants.
La liste des sujets est un fichier CSV avec un identifiant par ligne, jusqu’à 5 Mo et 10 000 identifiants. Sélectionnez jusqu’à 50 applications, et gardez le produit identifiants × applications à 50 000 ou moins, car c’est le nombre de lignes que le rapport peut contenir. La première ligne peut nommer la colonne.
-
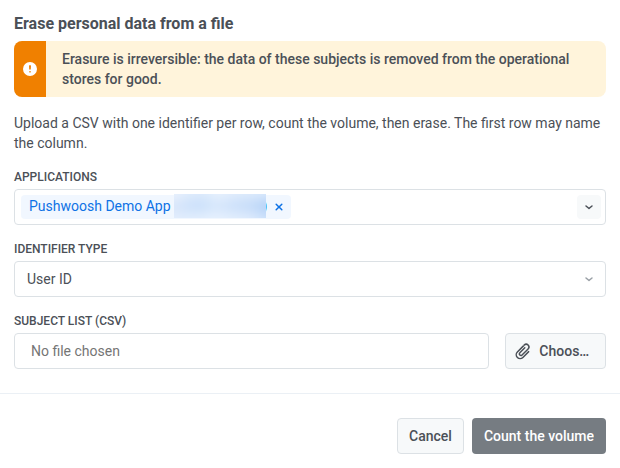
Dans Applications, sélectionnez les applications dans lesquelles rechercher les identifiants.
-
Dans Type d’identifiant, choisissez ID utilisateur, HWID ou E-mail, en fonction de ce que contient la colonne du CSV.
-
Sous Liste des sujets (CSV), cliquez sur Choisir un fichier.
-
Sélectionnez le fichier CSV à téléverser.
-
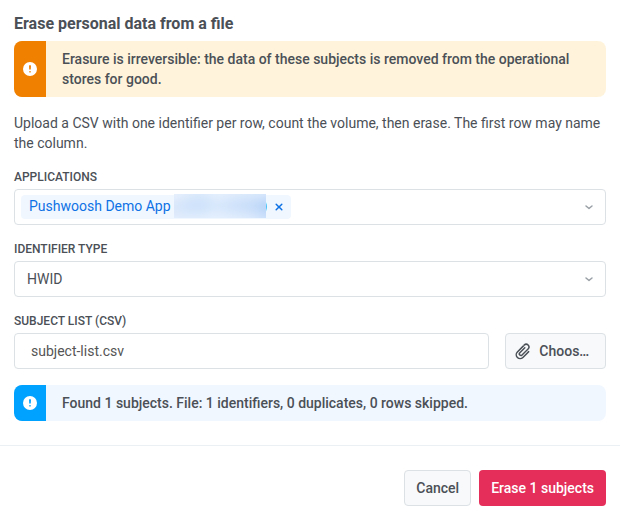
Cliquez sur Compter le volume pour voir combien d’enregistrements correspondent, ainsi que le nombre de doublons et de lignes ignorées du fichier, avant de ne rien effacer. Vous pouvez vous arrêter après cette étape sans effacer. Pour voir ces exécutions de comptage uniquement dans le tableau plus tard, activez Afficher les comptages de volume.
-
Cliquez sur Effacer N sujets une fois que le comptage semble correct, où N est le nombre d’enregistrements correspondants. Cette étape ne peut pas être annulée.
Un compte peut lancer jusqu’à 20 exécutions d’effacement de données sur une période glissante de 24 heures, y compris les vérifications de volume. Au-delà, Effacer à partir d’un fichier et Effacer les données personnelles refusent d’en démarrer une autre tant qu’un délai suffisant sur ces 24 heures ne s’est pas écoulé.
Consulter les effacements passés
Anchor link toLe tableau liste les opérations d’effacement sur ce compte. Chaque ligne correspond à une exécution.
- Débuté par : vérifiez qui a lancé l’exécution. La colonne affiche l’adresse de l’utilisateur du Panneau de contrôle, ou jeton d’API si l’exécution a été lancée via l’API. Un tiret indique les anciennes exécutions, antérieures à cet enregistrement.
- Statut : par exemple Terminé.
- Résultat : combien d’identifiants ont été Effacés et combien n’ont pas été trouvés.
- Rapport : cliquez sur CSV pour télécharger le résultat par identifiant pour cette opération.
Afficher les comptages de volume
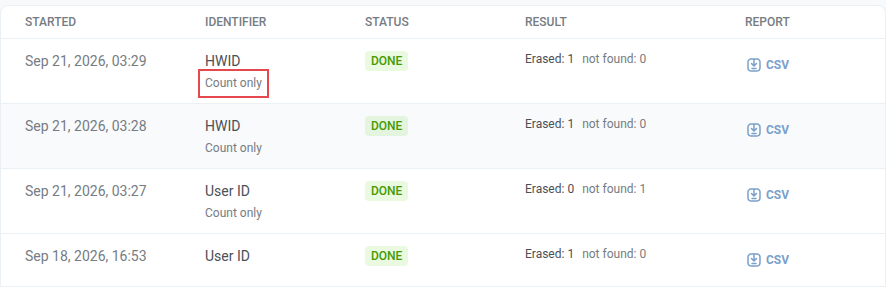
Anchor link toPour voir les exécutions où vous avez seulement cliqué sur Compter le volume sans effacer personne, activez Afficher les comptages de volume. Par défaut, le tableau les masque et n’affiche que les effacements terminés.
Ces exécutions affichent Comptage uniquement dans la colonne Identifiant, sous le type d’identifiant (HWID, ID utilisateur ou E-mail).
Pour affiner ou exporter la liste :
- Dans TOUTE PÉRIODE, choisissez la période.
- Choisissez une application dans Toutes les applications, ou laissez Toutes les applications sélectionné.
- Dans N’importe quel initiateur, choisissez un membre de l’équipe dans la liste ou saisissez n’importe quelle adresse. Cela permet aussi de trouver quelqu’un qui ne fait plus partie du compte, car ses effacements passés restent dans le journal sous son adresse.
- Cliquez sur Exporter la période pour télécharger un CSV des opérations affichées pour la période sélectionnée.