إعداد Shopify
نظرة عامة على التكامل
Anchor link toيتكامل Pushwoosh بسلاسة مع Shopify، وهي منصة تجارة إلكترونية رائدة تمكّن الشركات من إنشاء وإدارة وتوسيع المتاجر عبر الإنترنت. يرشدك هذا الدليل خلال تثبيت وتهيئة تطبيق Pushwoosh في متجر Shopify الخاص بك، وإعداد تعريف المستخدمين، واستخدام الإشعارات وأدوات الأتمتة للتفاعل مع العملاء عبر قنوات مثل push والبريد الإلكتروني والرسائل النصية القصيرة وWhatsApp.
نوع التكامل
Anchor link to- الوجهة: يرسل Shopify بيانات العملاء إلى Pushwoosh، حيث تُستخدم للاستهداف والمراسلة.
المتطلبات الأساسية
Anchor link to- حساب Pushwoosh
- الوصول إلى لوحة إدارة Shopify الخاصة بك
- رمز API للجهاز وApplication Code الخاصين بـ Pushwoosh
- متجر Shopify تتوفر فيه بيانات العملاء والطلبات
- الموافقة على نطاق الوصول
read_ordersلأحداث الطلبات/سلة التسوق، بالإضافة إلىwrite_pixelsوread_customer_eventsلتتبع خطوات الدفع
الكيانات المتزامنة
Anchor link to- العملاء: تُستخدم لتعيين وتحديد User ID الخاصة بـ Pushwoosh عبر حقول Shopify الوصفية
- شرائح العملاء: تُستخدم للاستهداف والمراسلة على أساس المجموعات
- الأحداث والمُشغّلات (مثل الطلبات المقدمة، العلامات المطبّقة): تُستخدم في Shopify Flow لأتمتة المراسلة عبر القنوات
- واجهة المتجر: تُستخدم لالتقاط الاشتراكات في web push عبر السكريبتات المضمّنة
- موجز المنتجات: يتصل موجز واجهة متجرك (
products.json) تلقائيًا بـ كتالوج المنتجات الخاص بـ Pushwoosh عند توصيل التطبيق، وينقطع تلقائيًا إذا قمت بإلغاء تثبيته. - الطلبات وسلات التسوق: أحداث من الخادم إلى الخادم من webhooks الخاصة بـ Shopify:
orders/paidوcheckouts/createوcheckouts/update. راجع أحداث وحملات Shopify. - سلوك التصفح في واجهة المتجر: مشاهدات المنتجات وإجراءات الإضافة إلى السلة، يتم جمعها بواسطة نفس تضمين القالب المستخدم للاشتراكات في web push.
- خطوات الدفع: معلومات الاتصال المُدخلة ومعلومات الدفع المُرسلة، يتم جمعها عبر Shopify Web Pixel.
المسرد (ربط أسماء الكيانات إذا كانت مختلفة)
Anchor link to| Shopify | Pushwoosh |
|---|---|
| Customer | User ID |
webhook الخاص بـ orders/paid | حدث PW_OrderCreated — مشترك مع تكاملات التجارة الإلكترونية الأخرى (مثل Magento) |
webhook الخاص بـ checkouts/create | حدث PW_AbandonedCart — نفس الحدث المشترك، ويُستخدم أيضًا بواسطة مصدر Cart في وحدة Products |
webhook الخاص بـ checkouts/update | حدث PW_AbandonedCartUpdate — يُطلق بينما يستمر المتسوق في تعديل نفس عملية الدفع، مستبدلًا سلة التسوق المخزنة من PW_AbandonedCart |
| مشاهدة صفحة المنتج | حدث PW_ProductViewed |
| الإضافة إلى السلة (بدون إعادة تحميل الصفحة) | حدث PW_AddToCart |
Web Pixel الخاص بـ checkout_contact_info_submitted | حدث PW_CheckoutContactInfo |
Web Pixel الخاص بـ payment_info_submitted | حدث PW_PaymentInfoSubmitted |
كيف يعمل التكامل
Anchor link toيعمل Pushwoosh كوجهة مراسلة لـ Shopify. بمجرد التكامل، يرسل Shopify بيانات العملاء والسلوك إلى Pushwoosh، حيث تُشغّل الإشعارات في الوقت الفعلي، وتقسيم العملاء، والمراسلة الشخصية عبر القنوات المختلفة.
المكونات الأساسية للتكامل
Anchor link to-
تحديد هوية العملاء عبر الحقول الوصفية يُخصَّص لكل عميل في Shopify User ID فريد، يُخزَّن في حقل وصفي (
custom.pushwoosh_userid). يتيح هذا المعرّف لـ Pushwoosh التعرف على المستخدمين ومراسلتهم باستمرار عبر المنصات. -
الأتمتة القائمة على الأحداث عبر Shopify Flow يوفر Pushwoosh إجراءات Flow تتيح لك أتمتة المراسلة (push، البريد الإلكتروني، الرسائل النصية القصيرة، WhatsApp) بناءً على أحداث Shopify، مثل:
- تقديم طلب جديد
- تطبيق علامة على عميل
- التخلي عن سلة التسوق
-
الاستهداف القائم على الشرائح يمكن استخدام شرائح العملاء من Shopify لإرسال إشعارات خاصة بمجموعة معينة عبر القنوات المختلفة، مثل العروض الترويجية للمشترين لأول مرة أو حملات إعادة التفعيل للمستخدمين غير النشطين.
-
المراسلة اليدوية في الوقت الفعلي من عرض العميل أو الشريحة في Shopify، يمكنك تشغيل الإشعارات يدويًا باستخدام إضافات Pushwoosh:
- Notification by Customer: للمتابعات الشخصية أو الاختبار
- Notification by Segment: للرسائل القائمة على الحملات
إشعارات web push عبر تضمين واجهة المتجر
Anchor link toمن خلال تفعيل تضمين Pushwoosh في قالب Shopify الخاص بك، يمكنك دعوة زوار الموقع للاشتراك في إشعارات push الخاصة بالمتصفح — دون الحاجة إلى تطبيق جوال.
نظرة عامة على تدفق البيانات
Anchor link toبيانات عملاء وأحداث Shopify ↓واجهة برمجة تطبيقات Pushwoosh (عبر التطبيق) ↓User ID → التقسيم إلى شرائح → إشعارات مُشغَّلة أو يدويةيمكّنك هذا التكامل من إرسال رسائل مناسبة التوقيت وذات صلة تحسّن الاحتفاظ بالمستخدمين، وتزيد التحويلات، وتُحسّن تجربة العميل — سواء تلقائيًا أو عند الطلب.
الجزء 1. التثبيت
Anchor link toسجّل الدخول إلى Shopify
Anchor link to- انتقل إلى Shopify Admin
- اختر متجرك من لوحة التحكم
ثبّت تطبيق Pushwoosh
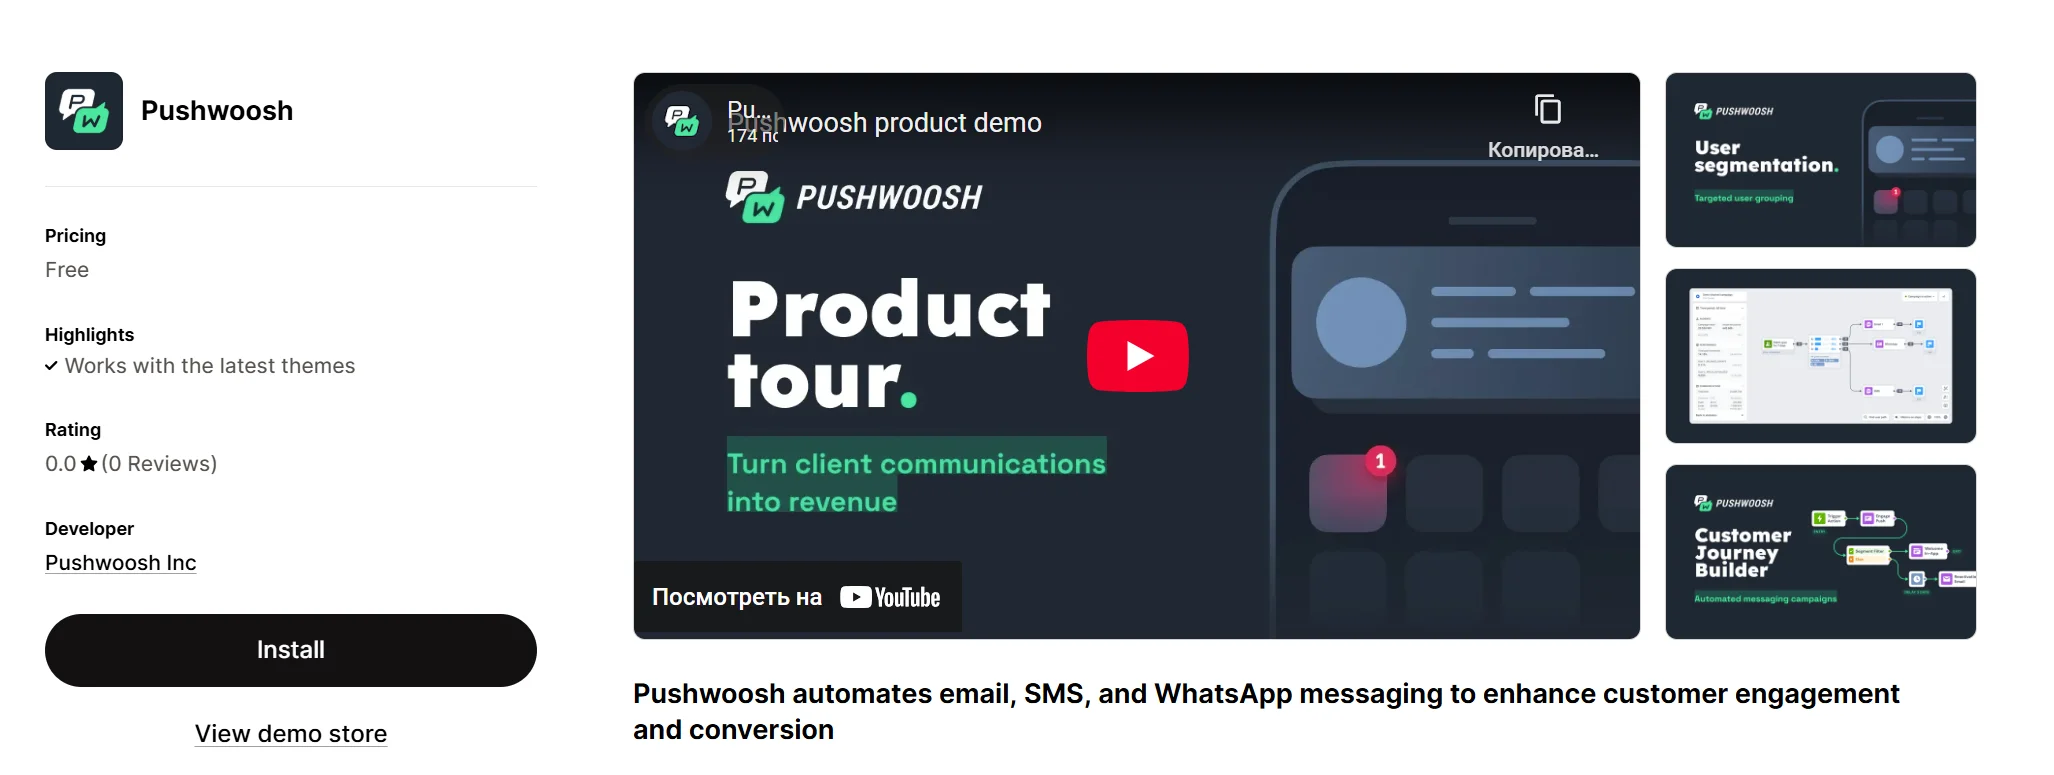
Anchor link to- قم بزيارة صفحة Pushwoosh في متجر تطبيقات Shopify
- انقر على Install
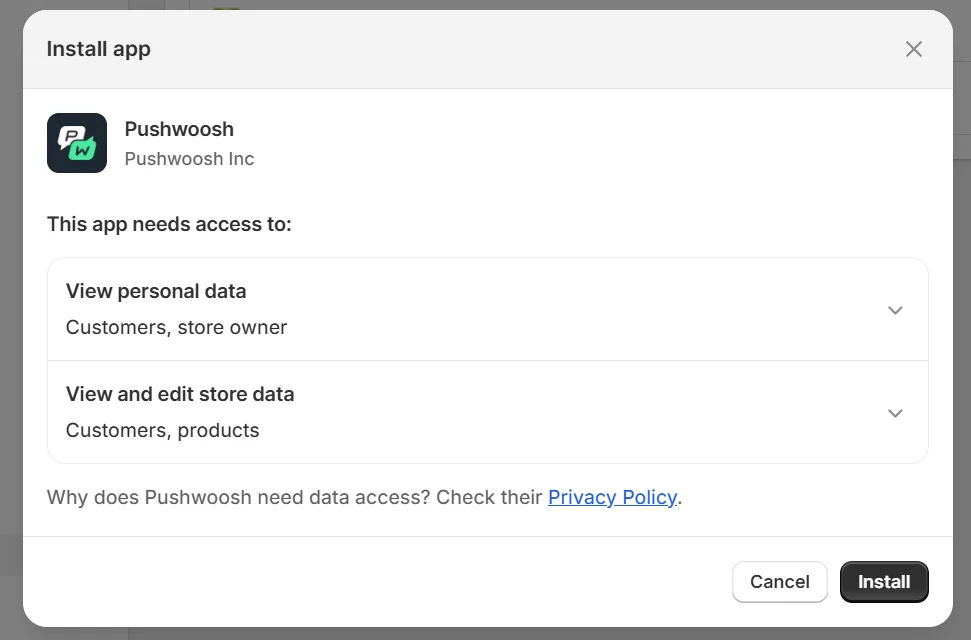
- أكّد التثبيت في مربع حوار Shopify
اربط تطبيق Pushwoosh الخاص بك
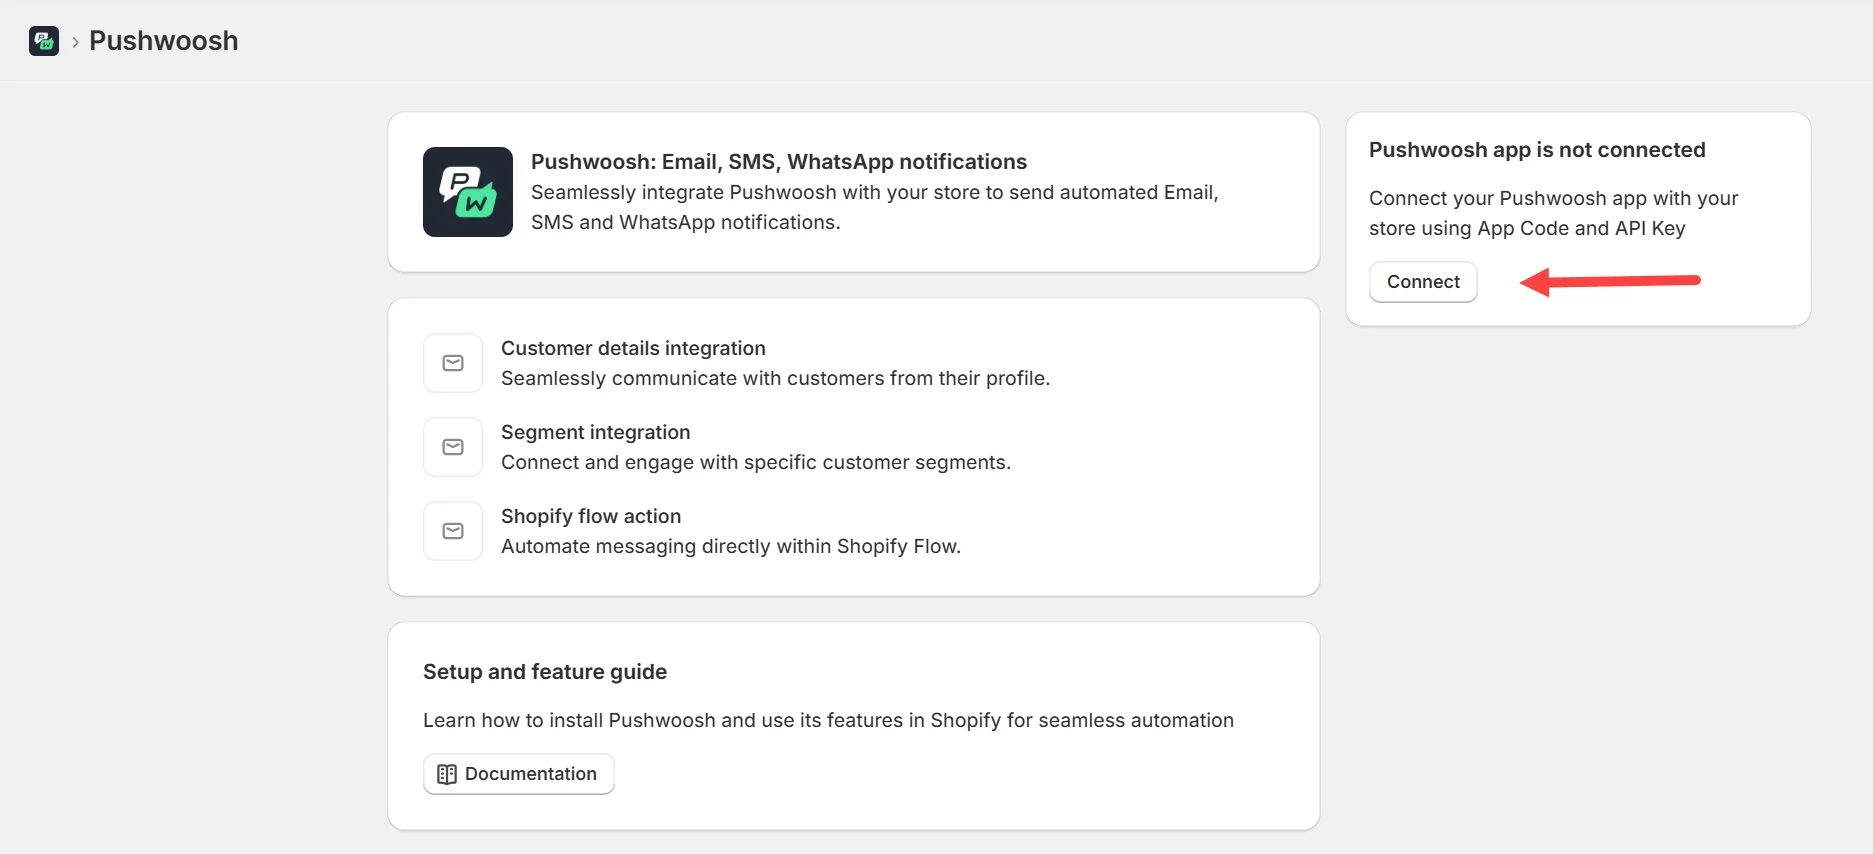
Anchor link toبعد التثبيت، ستتم إعادة توجيهك إلى تطبيق Pushwoosh داخل Shopify.
- انقر على Connect.
- أدخل Application Code وAPI Key، اللذين يمكنك العثور عليهما في Pushwoosh Control Panel → Settings → API Access. الـ API Key هنا هو رمز API للجهاز الخاص بك.
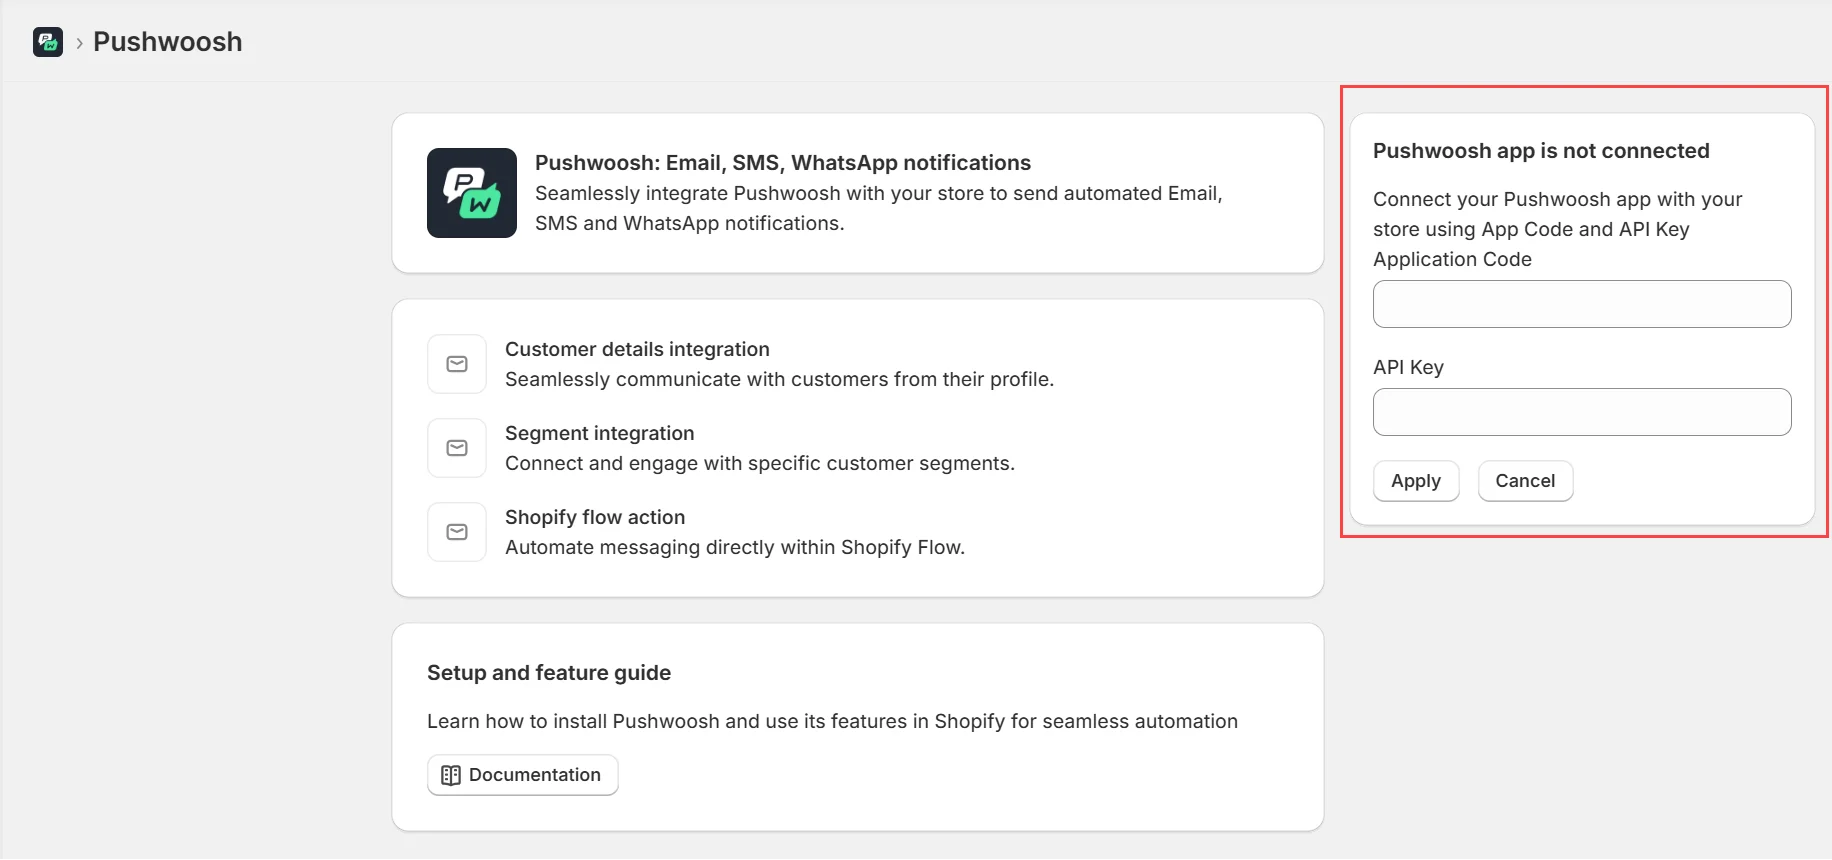
عند الاتصال، ستظهر رسالة نجاح: «Pushwoosh app connected.»
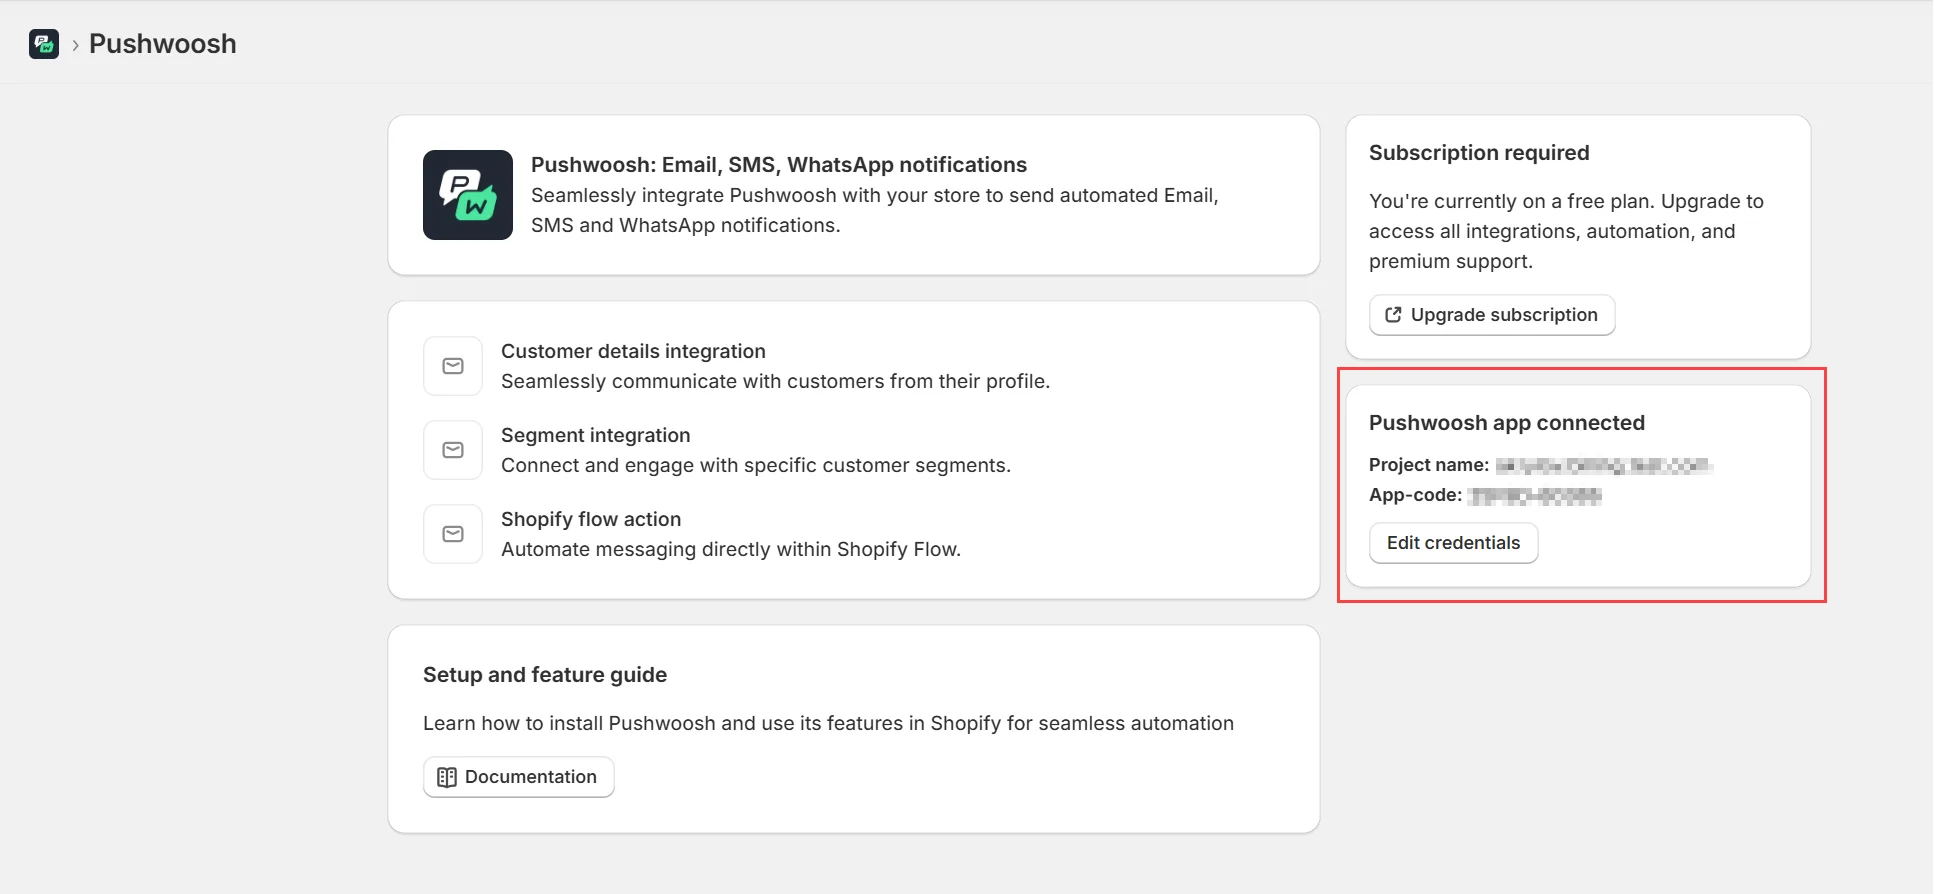
عندما يطلب Shopify أذونات (الطلبات، pixels، أحداث العملاء)، وافق عليها. هذه النطاقات مطلوبة لتتبع أحداث وحملات Shopify. إذا قمت بتوصيل التطبيق سابقًا، راجع متصل بالفعل؟ سيُطلب منك الموافقة على الوصول مرة أخرى.
اشترك في خطة
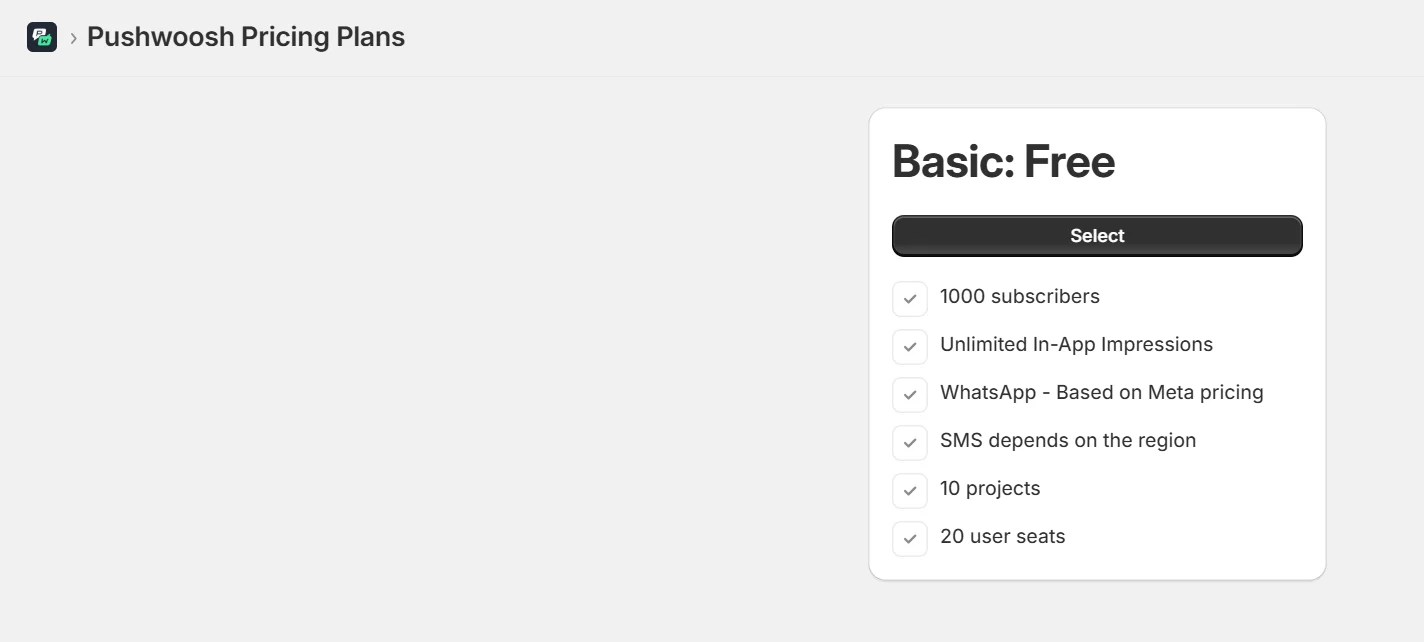
Anchor link to- انقر على Upgrade Subscription
- سيتم عرض خطة واحدة قائمة على الاستخدام.
- أكّد الفوترة.
الجزء 2. الإعداد: User ID الخاص بالعميل عبر الحقول الوصفية
Anchor link toلتسليم الإشعارات إلى المستخدمين المحددين عبر قنوات مختلفة (push، البريد الإلكتروني، الرسائل النصية القصيرة، WhatsApp)، يستخدم Pushwoosh User ID فريدًا لكل عميل. يخزّن Shopify هذه القيمة داخل الحقول الوصفية للعميل الخاصة بـ Shopify.
- انتقل إلى Settings → Metafields and metaobjects → Customers
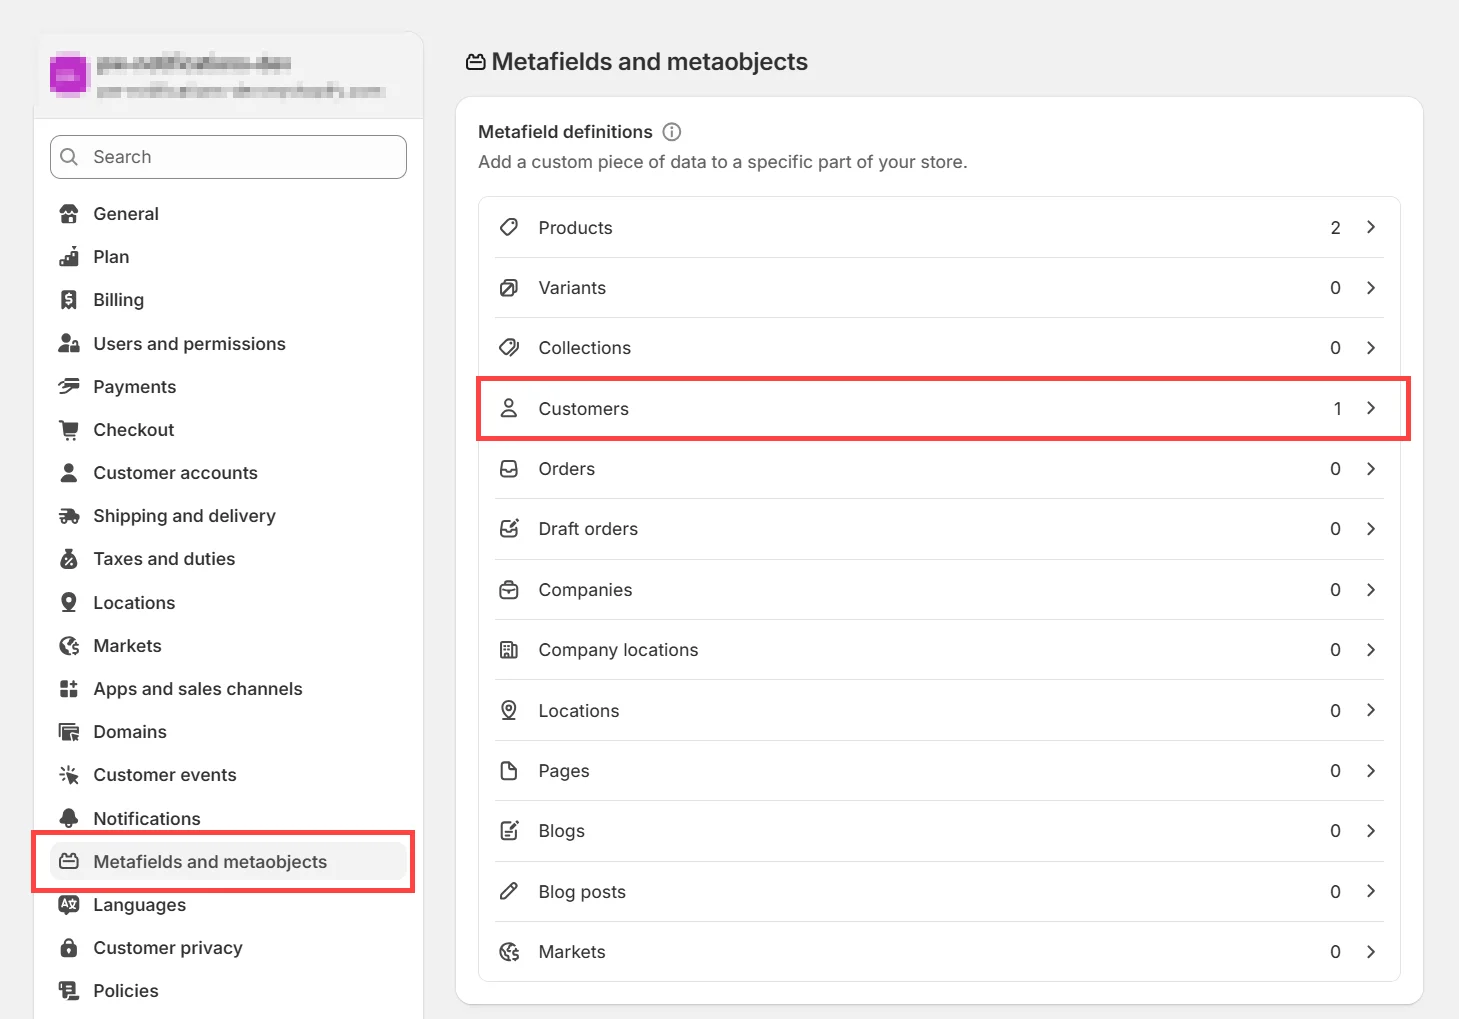
- انقر على Add definition واستخدم هذه القيم:
| الحقل | القيمة |
|---|---|
| Namespace and key | custom.pushwoosh_userid |
| Namespace | custom |
| Type | Single line text |
| Validation | None |
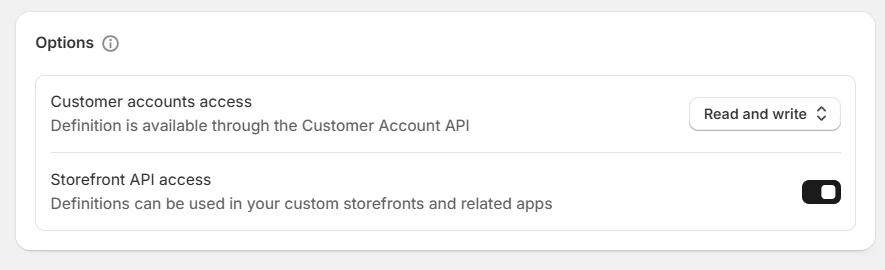
| Customer Account Access | Read and Write |
| Storefront API Access | Enabled |
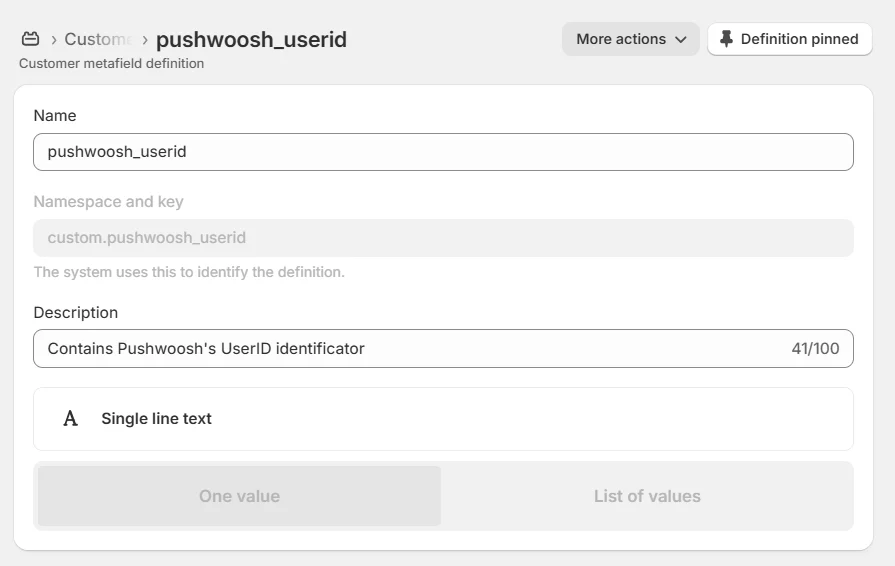
اضبط Customer accounts access وStorefront API access كما في الجدول أعلاه.
الجزء 3. استخدام إضافات Pushwoosh
Anchor link toيتضمن Pushwoosh إضافات Shopify لاستهداف الشرائح، والأتمتة (Flow)، والإشعارات الخاصة بعميل معين.
الإضافة 1. Send notification by customer
Anchor link toحالة الاستخدام
Anchor link toإرسال رسائل شخصية أو إشعارات اختبار يدويًا إلى مستخدم معين.
الخطوات
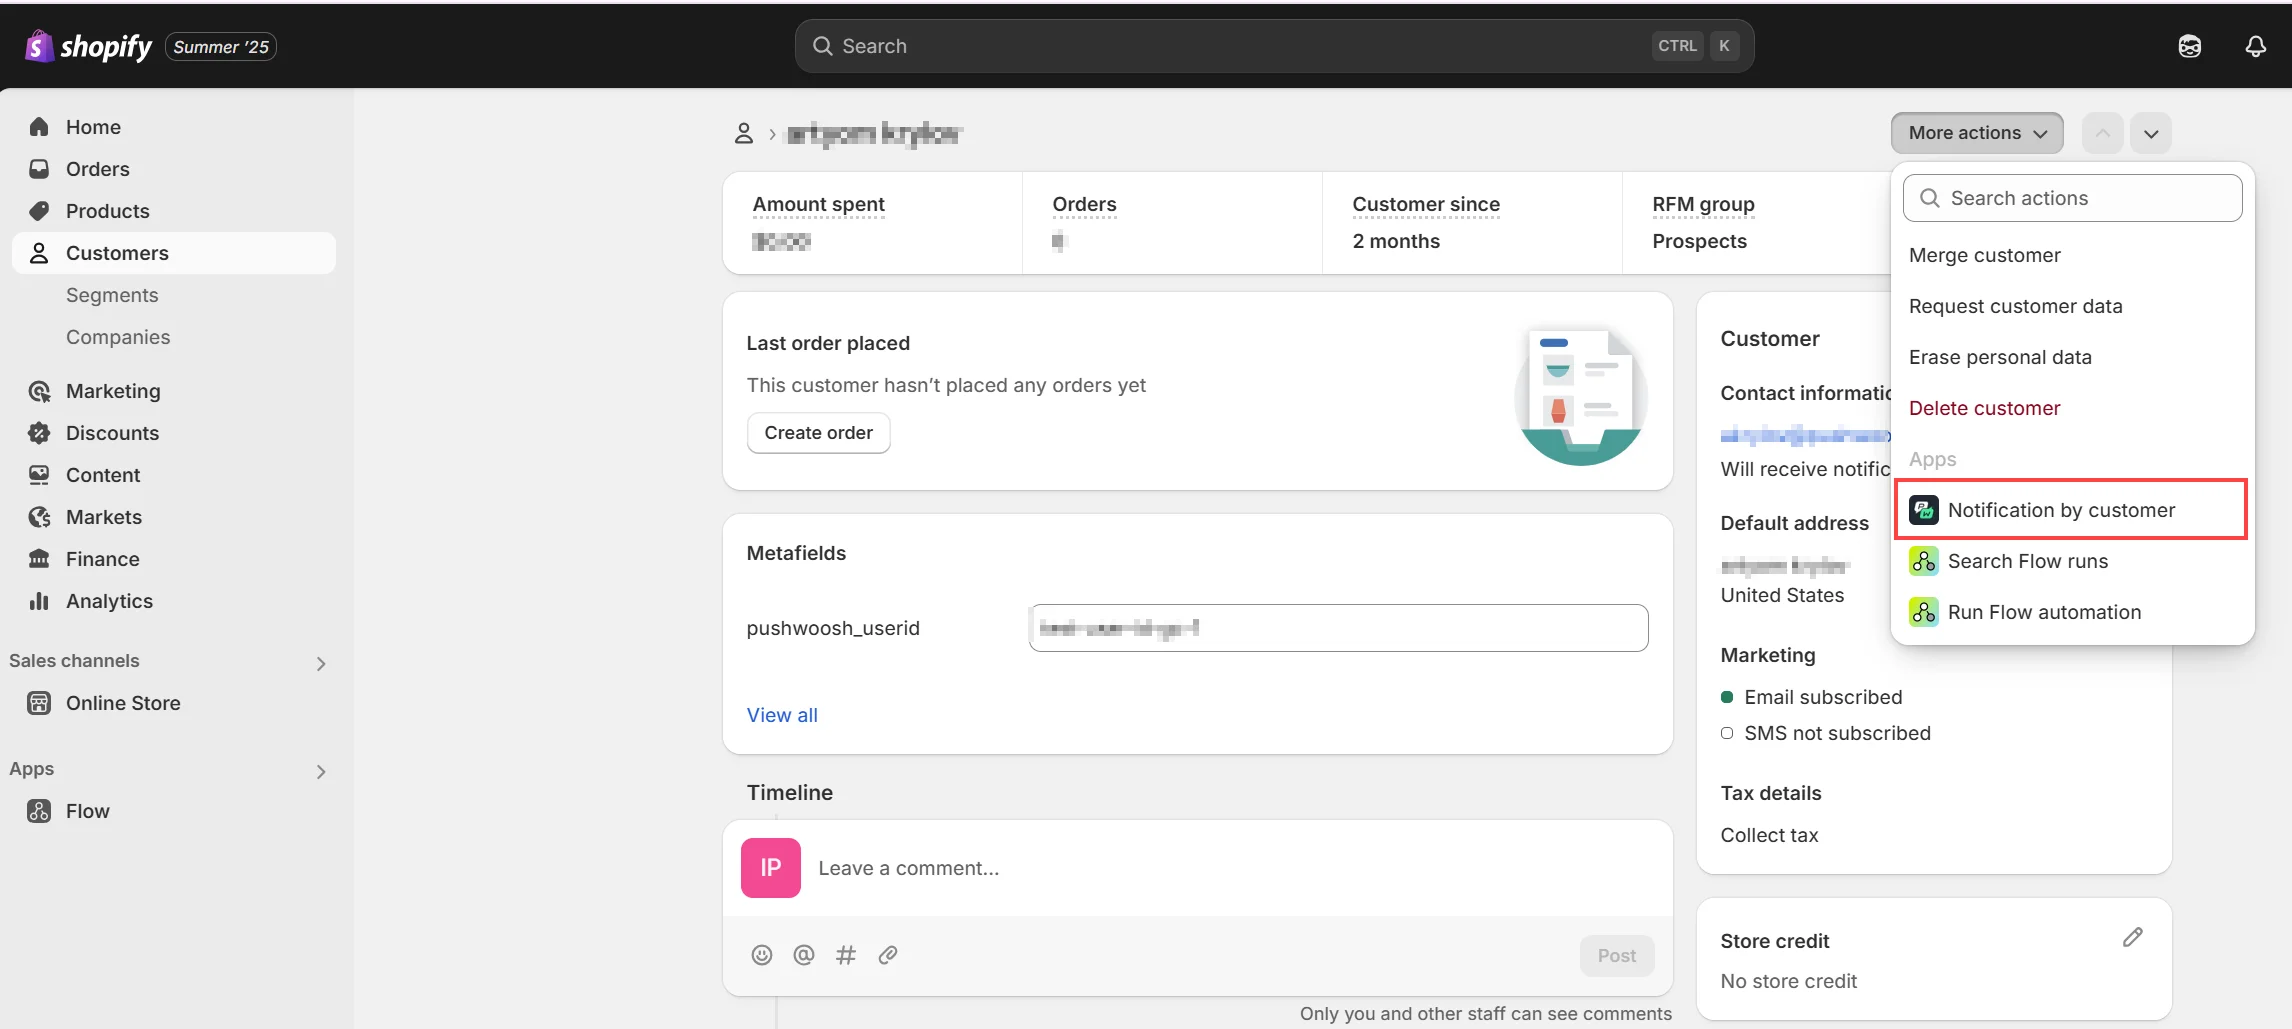
Anchor link to- افتح Customers → اختر عميلًا
- انقر على More actions → Notification by customer
- اختر منصة المراسلة (مثل Email) وإعداد محتوى مسبق.
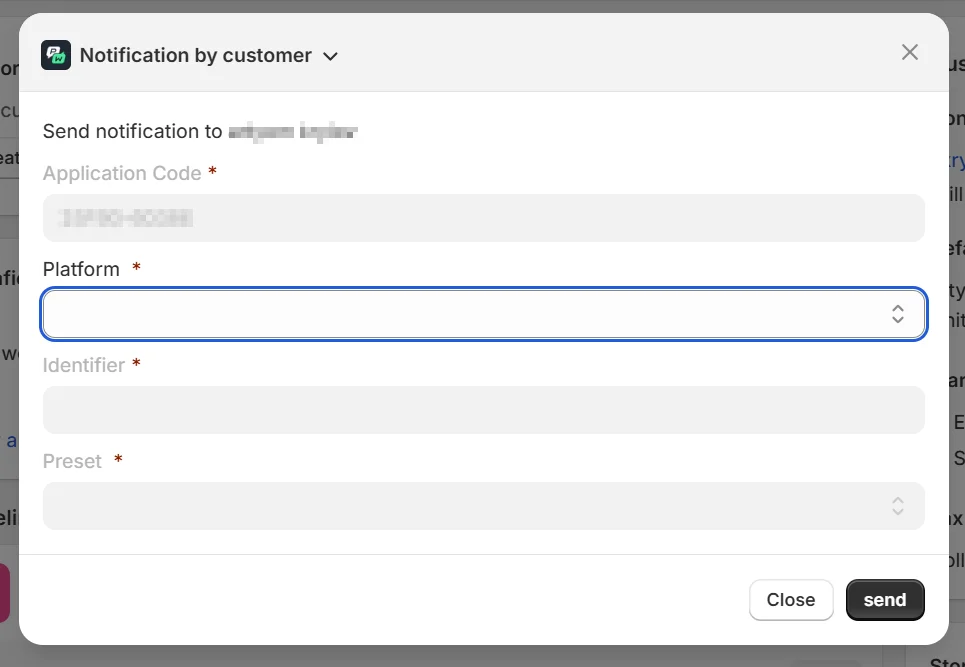
- انقر على Send
الإضافة 2. Notification by segment
Anchor link toحالة الاستخدام
Anchor link toاستهداف مجموعات من العملاء — سلات التسوق المتروكة، المشترون لأول مرة، كبار المنفقين.
الخطوات
Anchor link to-
انتقل إلى Customers → Segments
-
اختر شريحة → انقر على Use Segment
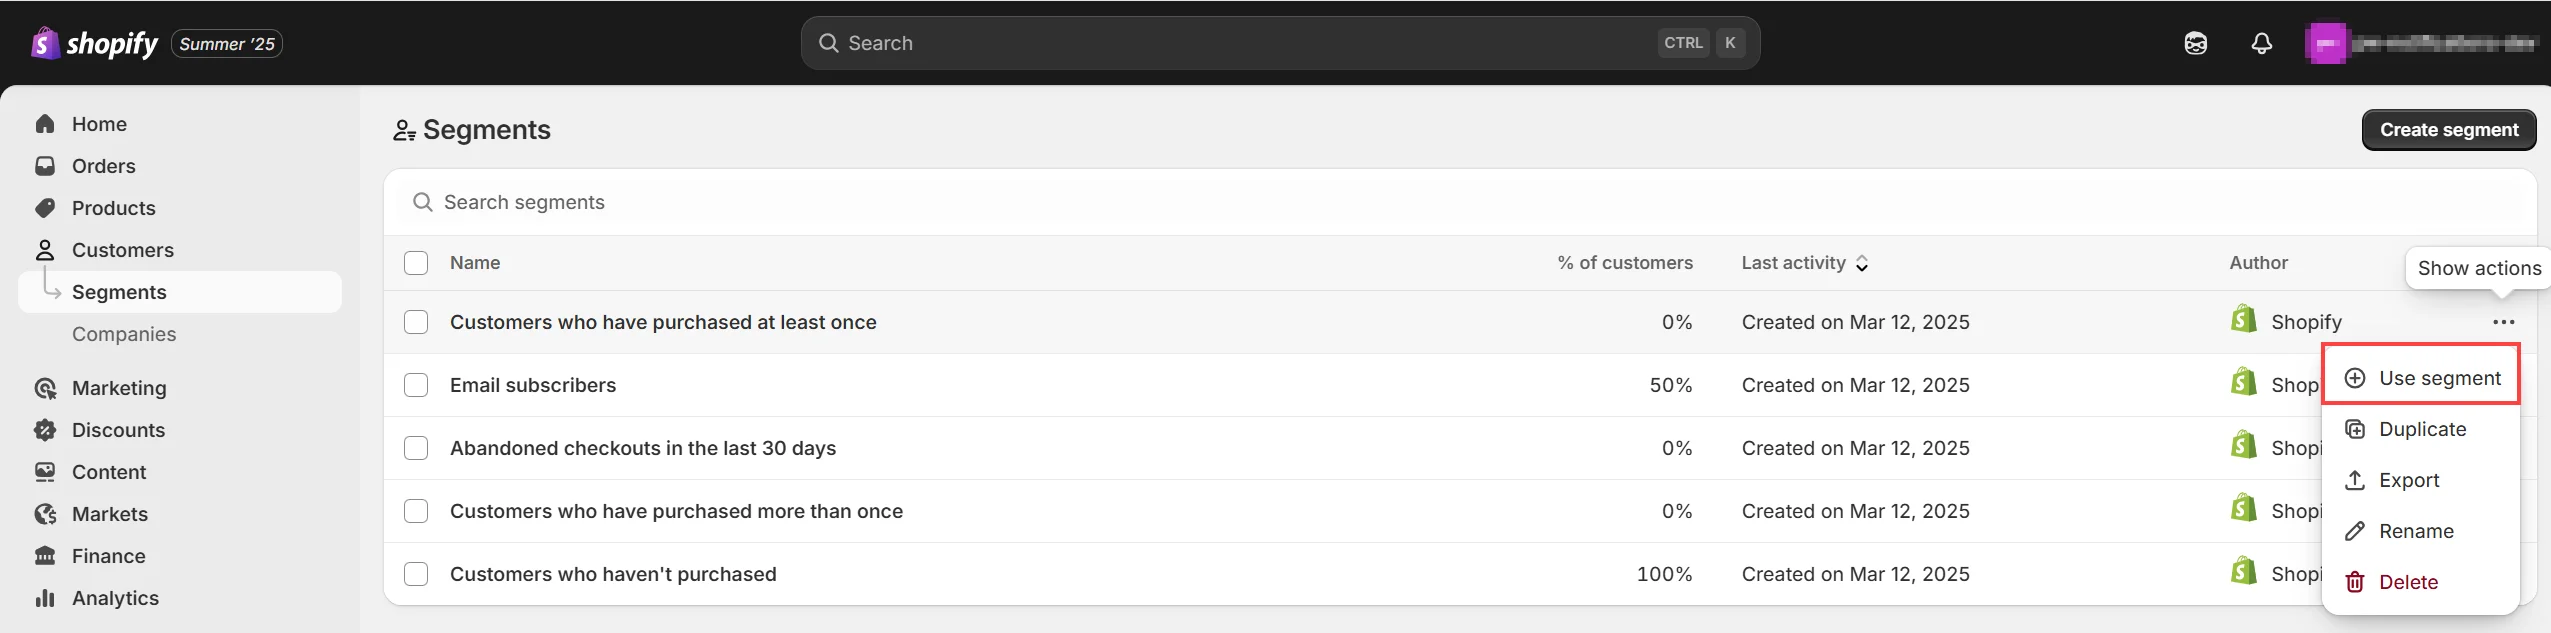
- اختر Notification by Segment
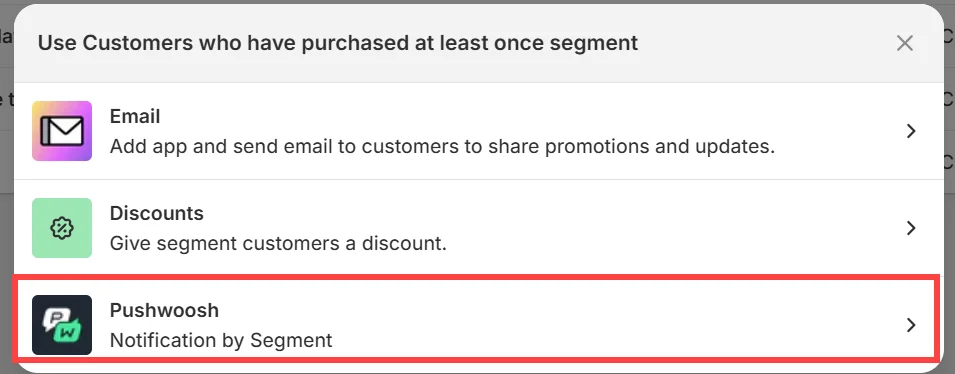
- اختر قناة الاتصال المطلوبة وإعداد الرسالة المسبق. انقر على Send.
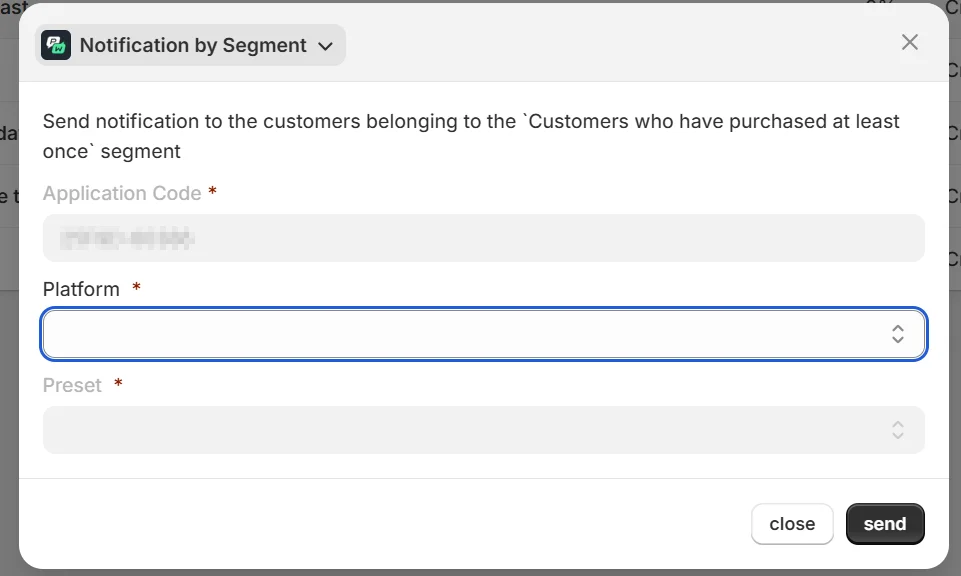
الإضافة 3. Pushwoosh في Shopify Flow
Anchor link toحالة الاستخدام
Anchor link toأتمتة المراسلة في رحلات العملاء باستخدام مُشغّلات مثل الطلبات أو العلامات أو السلوك.
الخطوات
Anchor link to- أنشئ Flow جديدًا في Shopify Flow
- أضف إجراءً ← اختر Pushwoosh send notification
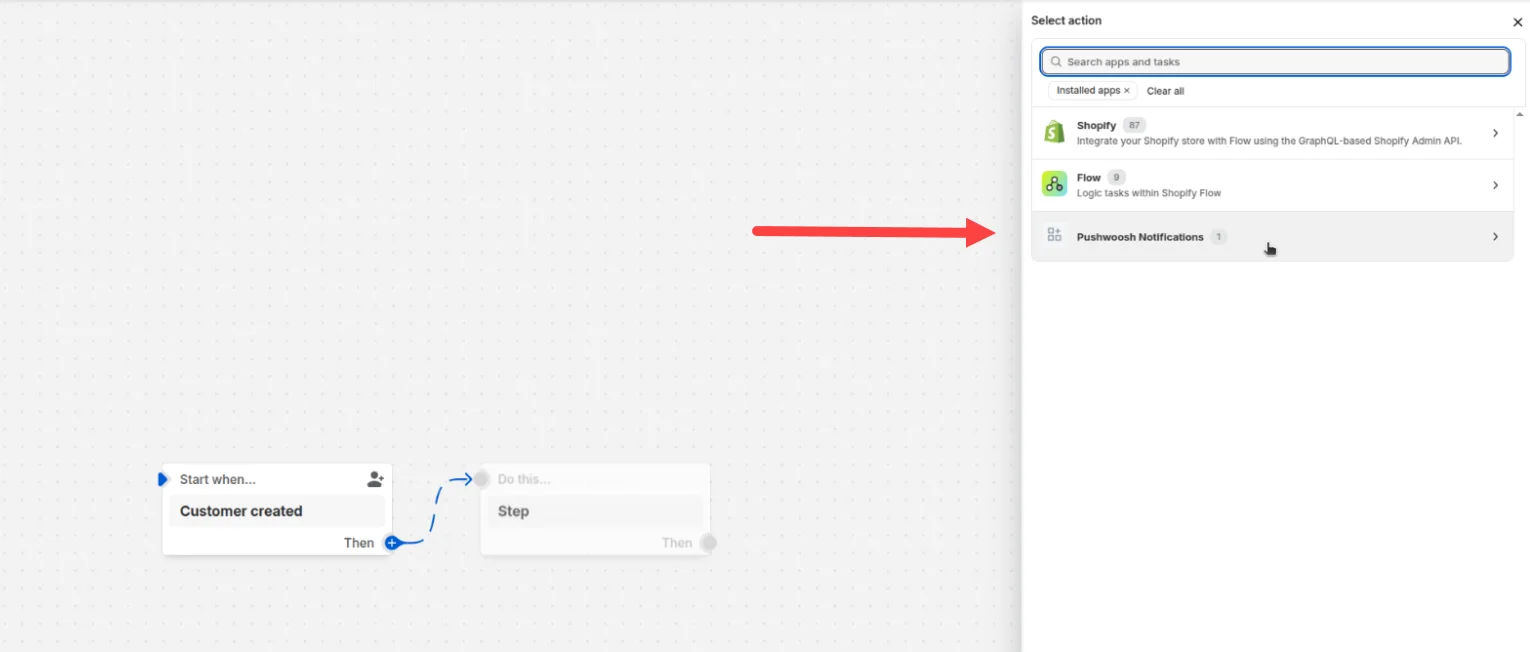
- قم بتهيئة الرسالة والحقول الديناميكية
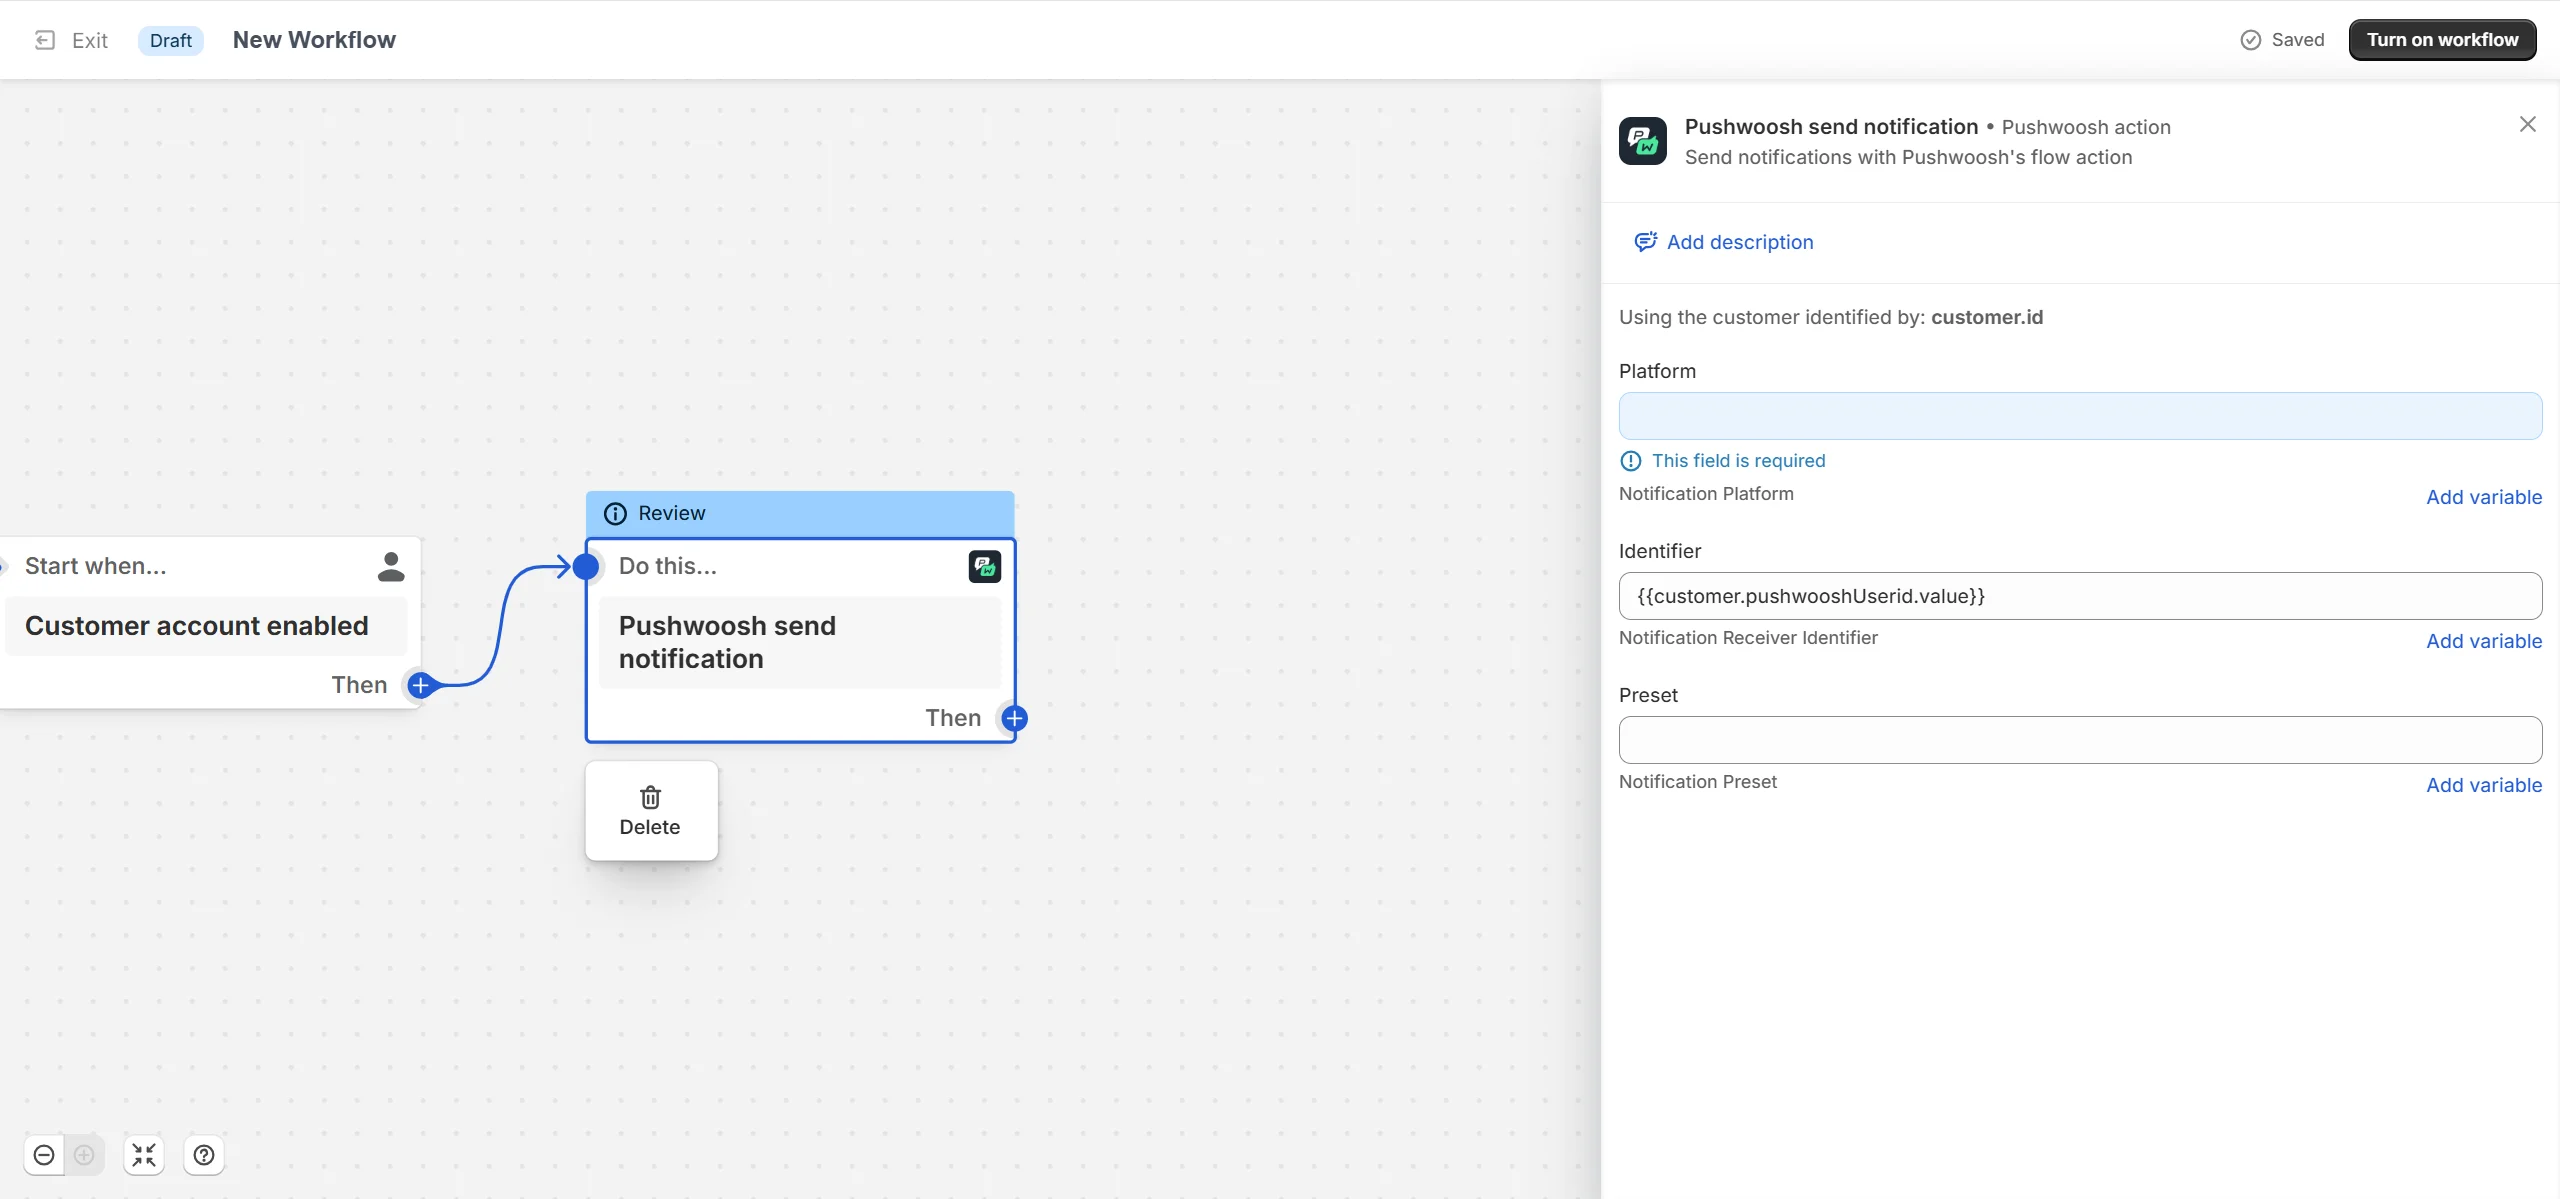
على سبيل المثال:
-
إرسال رسالة بعد تقديم الطلب
-
تذكير المستخدم عند التخلي عن سلة التسوق
-
إرسال push لإعادة التفعيل بعد 30 يومًا من عدم النشاط
الجزء 4. فعّل web push (وأحداث تصفح واجهة المتجر)
Anchor link toاختياري لـ web push وحده. مطلوب إذا كنت بحاجة إلى أحداث مشاهدة المنتج والإضافة إلى السلة في أحداث وحملات Shopify.
فعّل تضمين القالب لـ web push الخاص بالمتصفح على واجهة متجرك:
- انتقل إلى Online Store → Themes → Customize
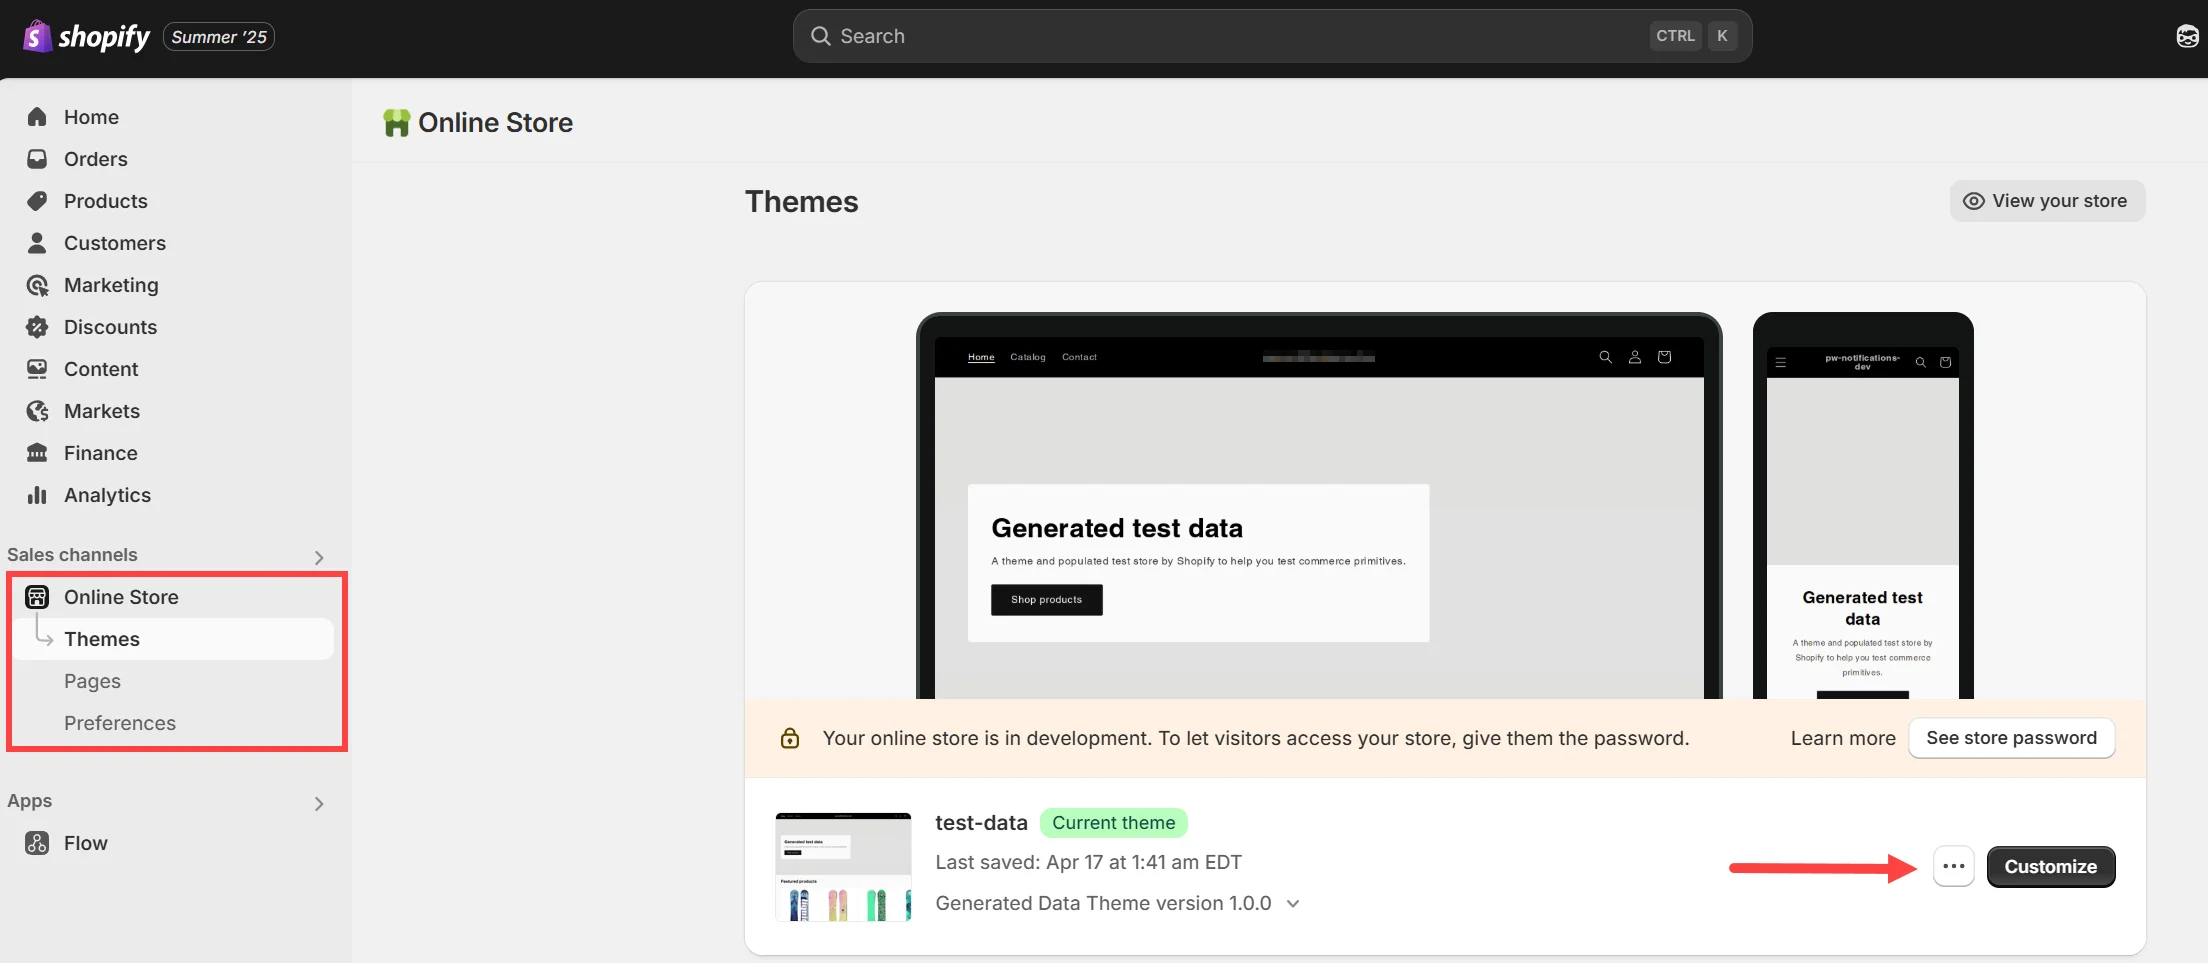
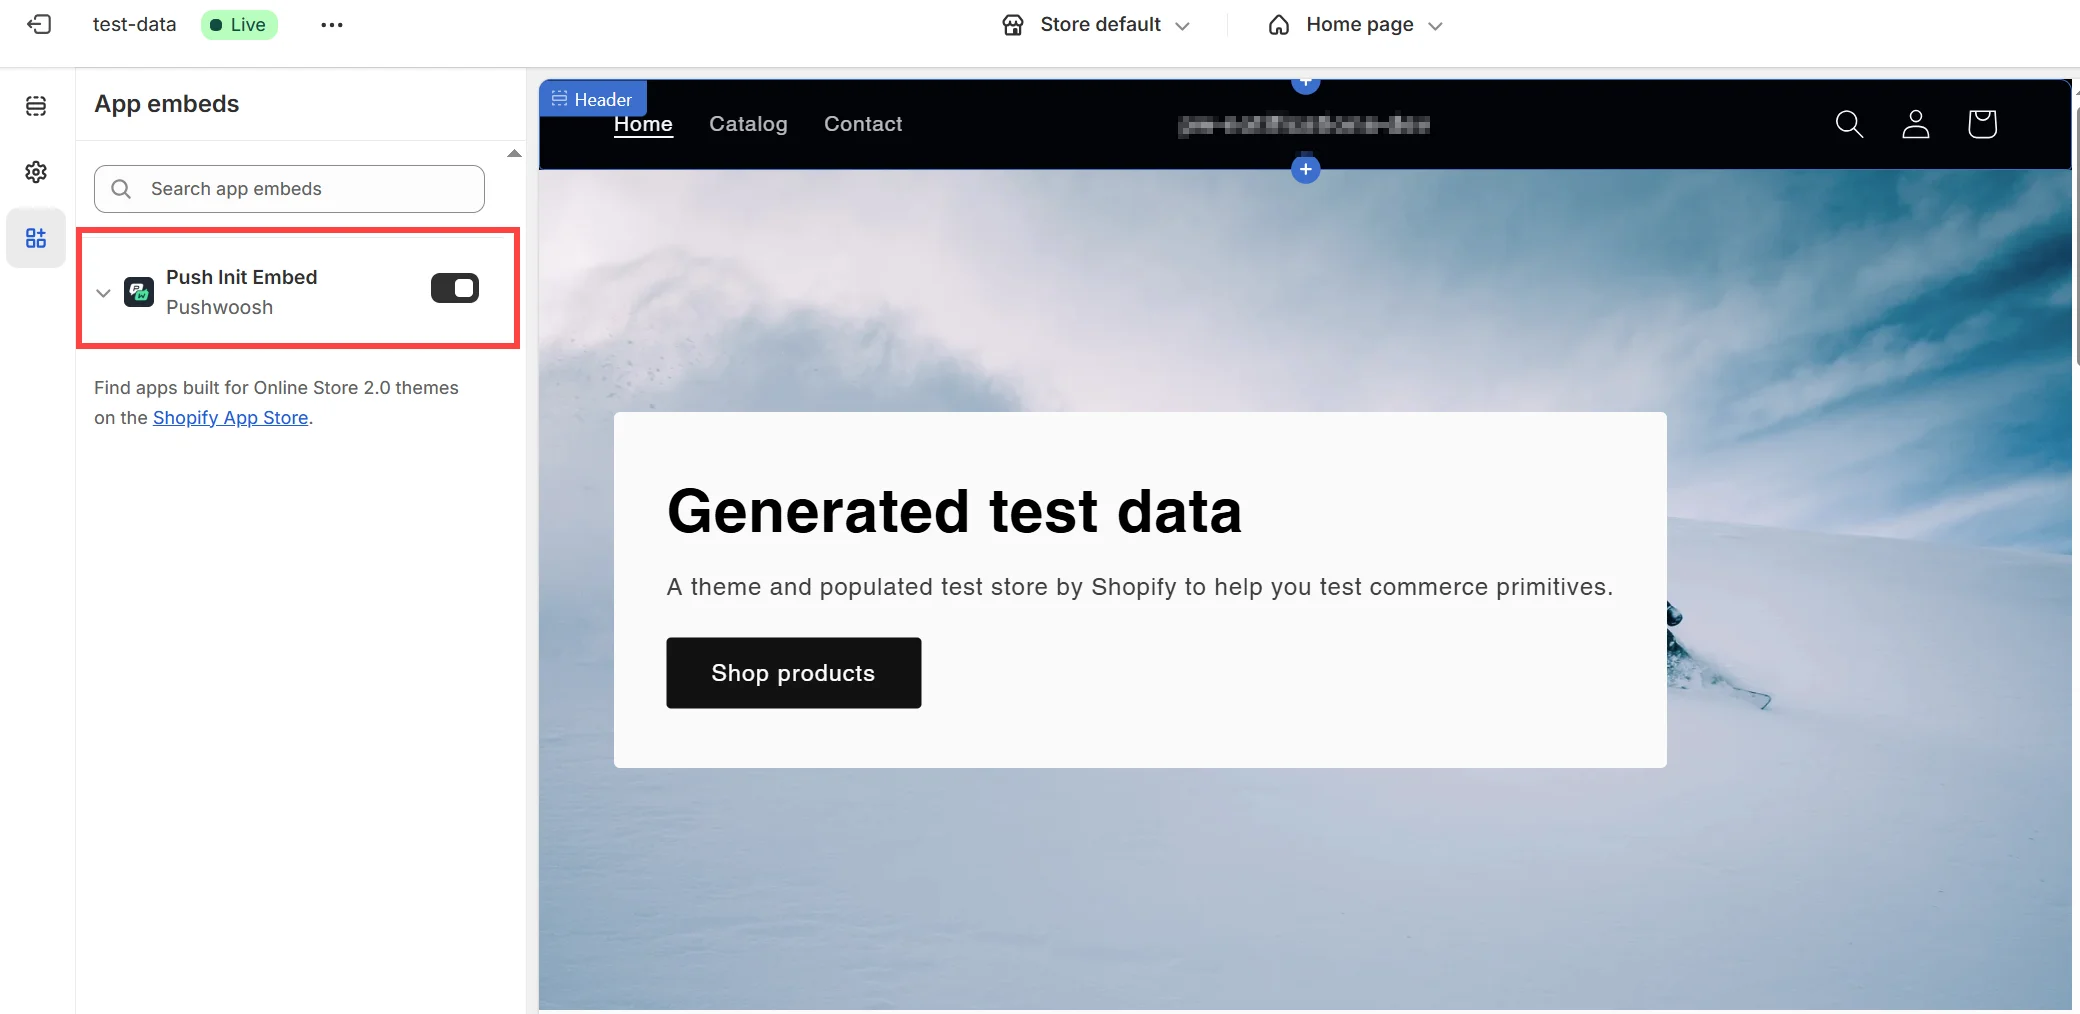
- افتح App Embeds من القائمة اليسرى
- فعّل Push Init Embed
الامتثال للبيانات
Anchor link toيتطلب Shopify من كل تطبيق عام الاستجابة لـ webhooks الإلزامية الخاصة بـ GDPR/CCPA. يتعامل Pushwoosh معها على النحو التالي:
customers/redact: عندما يطلب متسوق من المتجر محو بياناته، يمحو Pushwoosh سجلات Pushwoosh المطابقة باستخدام أي معرّفات يرسلها Shopify — البريد الإلكتروني، الهاتف، ومعرّف عميل Shopify.customers/data_request: عندما يطلب متسوق نسخة من بياناته، ينشر Pushwoosh إشعارًا في القناة الداخلية للدعم، ويتعامل شخص مع الطلب يدويًا. يتطلب Shopify من التطبيقات الاستجابة لهذه الطلبات في غضون 30 يومًا.shop/redact: يرسل Shopify هذا بعد 48 ساعة من قيام متجر بإلغاء تثبيت التطبيق، طالبًا محو بيانات المتجر. يعيد Pushwoosh تشغيل عملية الحذف نفسها التي يُشغّلها إلغاء التثبيت نفسه، مما يُنظّف أي جلسة متبقية ويمحو سجل تكامل المتجر (بما في ذلك مفتاح API الخاص بالجهاز، ورمز التطبيق، ومعرّفات الفوترة). يوجد هذا كشبكة أمان للحالة التي لم يُنظّف فيها إلغاء التثبيت كل شيء بالكامل في المرة الأولى.
ملخص حالات الاستخدام
Anchor link toبعد الإعداد، الطرق الشائعة لإرسال الرسائل من Shopify:
| السيناريو | الأداة المستخدمة |
|---|---|
| متابعة شخصية | Notification by Customer |
| ترويج قائم على الشريحة | Notification by Segment |
| رسالة ترحيب بعد التسجيل | Flow + تتبع الحقل الوصفي |
| تذكير بالتخلي عن سلة التسوق | Shopify Flow + إجراء Pushwoosh |
| الاشتراك في push | تضمين القالب + مفتاح Push Init |
للاطلاع على الرحلات والشرائح المتعلقة بأحداث الطلبات وسلات التسوق والدفع وواجهة المتجر، راجع أحداث وحملات Shopify.