วิธีส่งอีเมลพร้อมสินค้าจากแคตตาล็อกของคุณ
ใช้คู่มือนี้เพื่อส่งแคมเปญอีเมลที่โปรโมตสินค้าจาก Product Catalog ของ Pushwoosh ตัวอย่างเช่น อีเมล “สินค้ามาใหม่ประจำสัปดาห์” สำหรับหมวดหมู่อิเล็กทรอนิกส์ ส่งเวอร์ชันครั้งเดียวพร้อมสินค้าที่เลือกด้วยตนเองไม่กี่รายการ หรือเวอร์ชันที่เกิดซ้ำซึ่ง Customer Journey จะส่งทุกวันจันทร์พร้อมกับสินค้าอิเล็กทรอนิกส์ใหม่ล่าสุดในแคตตาล็อกในสัปดาห์นั้น
ก่อนที่คุณจะเริ่ม
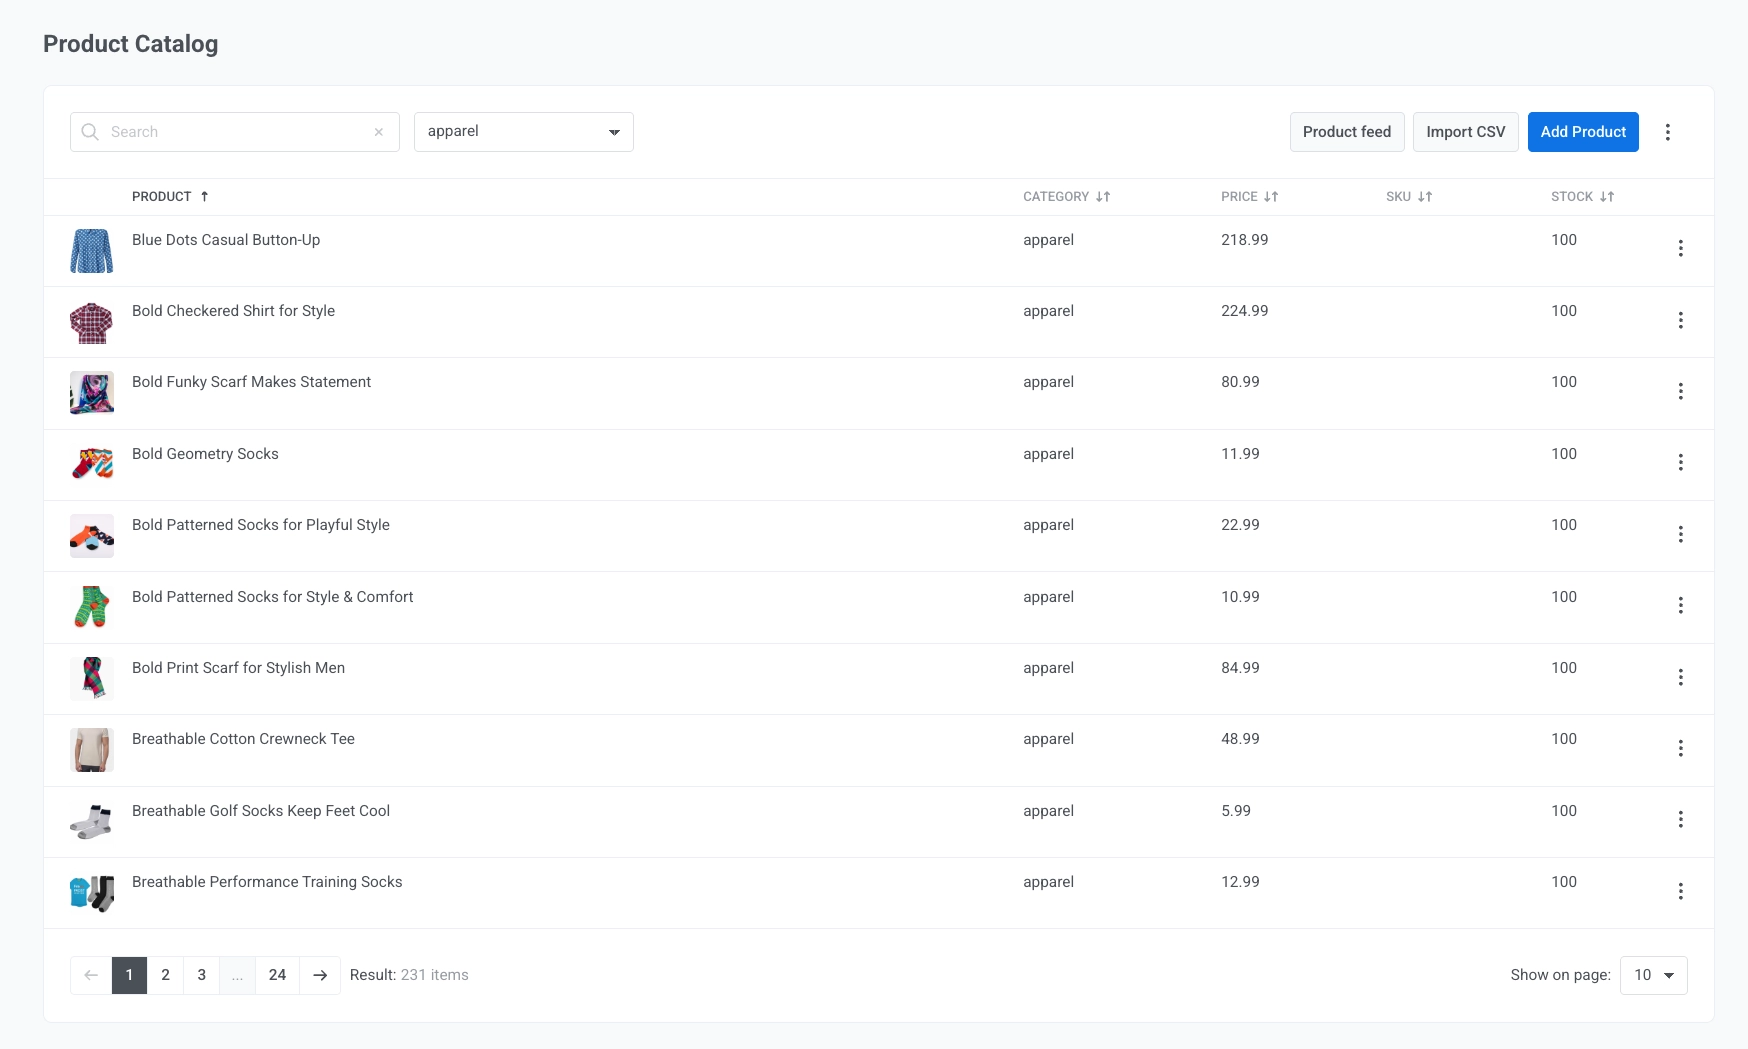
Anchor link toตรวจสอบให้แน่ใจว่าแคตตาล็อกในบัญชีของคุณมีสินค้าอยู่ ไปที่ เนื้อหา → แคตตาล็อกสินค้า (Content → Product Catalog) และเชื่อมต่อฟีด, นำเข้า CSV, หรือเพิ่มสินค้าด้วยตนเอง เรียนรู้วิธีการเติมสินค้าในแคตตาล็อกของคุณ
สร้างอีเมล
Anchor link to-
ไปที่ เนื้อหา → เนื้อหาอีเมล (Content → Email Content) และสร้างอีเมลใน Drag & drop editor ตั้งชื่ออีเมลเช่น “Weekly New Arrivals Electronics”
-
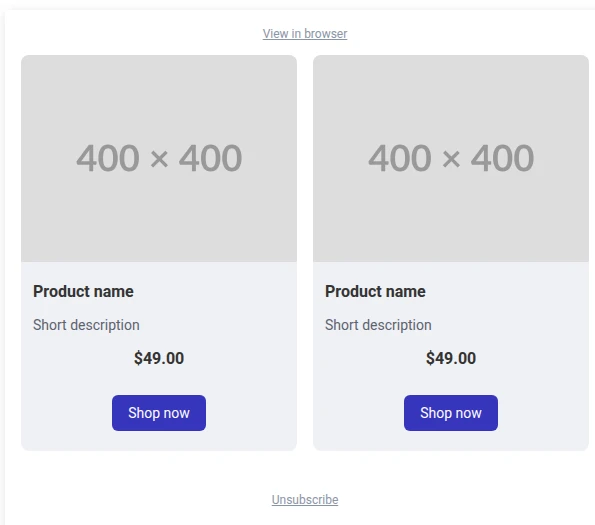
ลากบล็อก Products ไปยังพื้นที่ทำงาน
-
ในแผงการตั้งค่าของบล็อก ใต้ แหล่งที่มา (Source) ให้เลือก Manual เพื่อเลือกชุดสินค้าที่คงที่ด้วยตนเอง หรือ Catalog rule เพื่อให้ Pushwoosh เลือกสินค้าจากแคตตาล็อก ณ เวลาที่ส่ง
เลือกสินค้าที่เฉพาะเจาะจง
Anchor link toใช้ Manual เมื่อคุณต้องการควบคุมสินค้าที่จะปรากฏอย่างเต็มที่ ตัวอย่างเช่น อีเมลแบบครั้งเดียวที่เน้นสินค้าอิเล็กทรอนิกส์ใหม่สี่รายการ
-
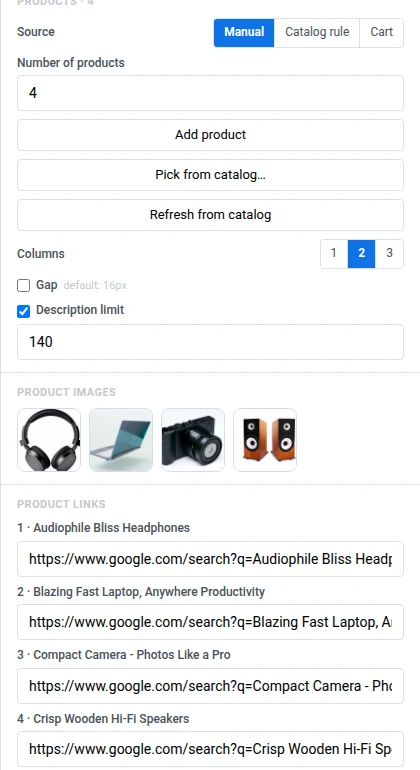
เลือก Manual ใต้ แหล่งที่มา (Source)
-
ตั้งค่า จำนวนสินค้า (Number of products) เป็นจำนวนการ์ดที่ต้องการแสดง (1-24) สำหรับตัวอย่างนี้ ให้ใช้ 4
-
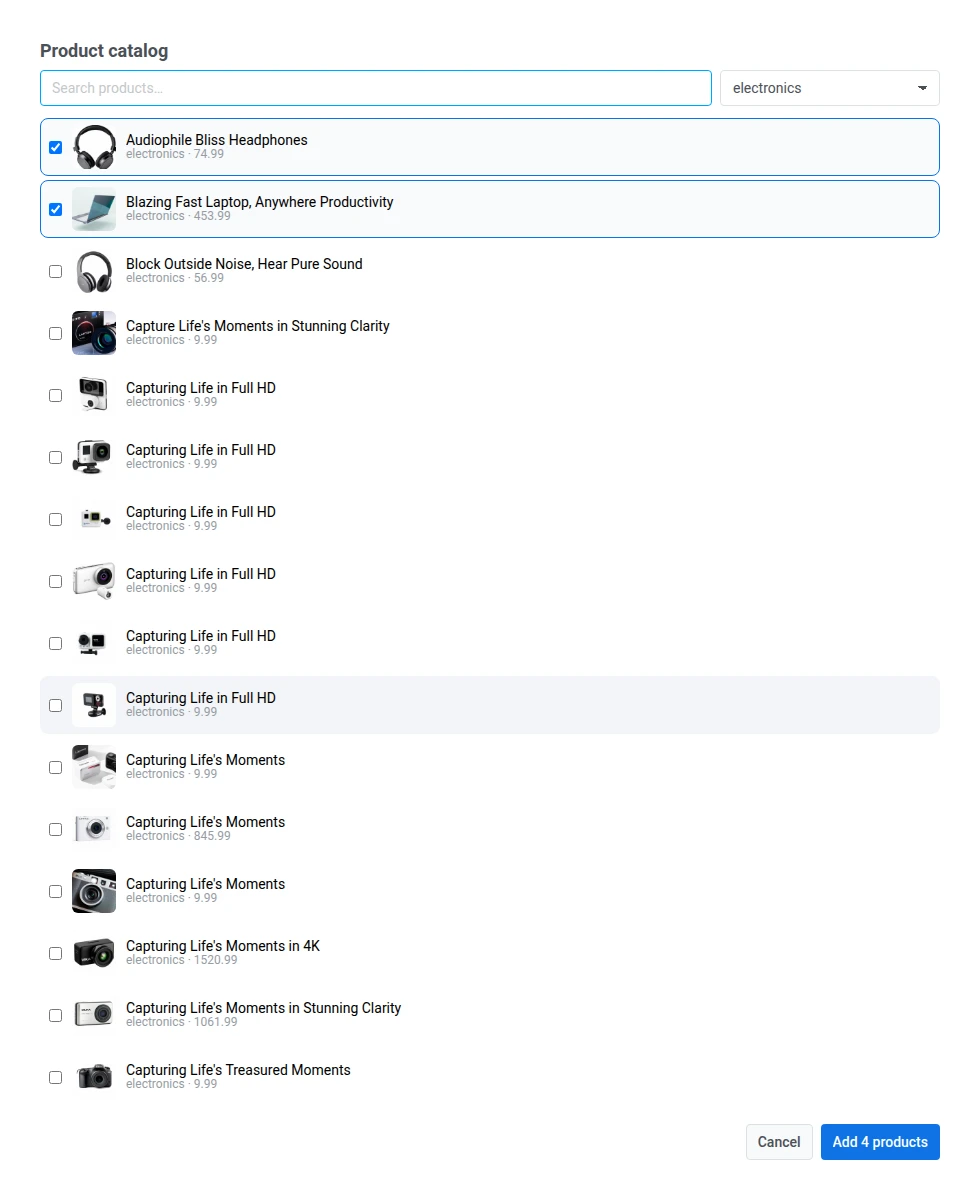
คลิก เลือกจากแคตตาล็อก… (Pick from catalog…), กรองไปยังหมวดหมู่ electronics และเลือกสินค้าที่ต้องการนำเสนอ
-
หากต้องการเปลี่ยนรูปภาพของสินค้า ให้คลิกที่ภาพขนาดย่อใต้ รูปภาพสินค้า (Product images)
-
สินค้าที่เลือกจากแคตตาล็อกจะนำ URL หน้าสินค้าจริงมาโดยอัตโนมัติใต้ ลิงก์สินค้า (Product links) หากคุณเพิ่มสินค้าด้วยตนเองแทนการเลือกจากแคตตาล็อก ลิงก์จะว่างเปล่า ให้คุณกรอกเอง
-
จัดรูปแบบตารางและเทมเพลตการ์ดตามต้องการ ดูที่ จัดรูปแบบตาราง
ดึงสินค้าด้วย Catalog rule
Anchor link toใช้ Catalog rule เมื่อต้องการให้การเลือกสินค้าเป็นปัจจุบันโดยอัตโนมัติ ตัวอย่างเช่น การส่ง “สินค้ามาใหม่ประจำสัปดาห์” ที่เกิดซ้ำซึ่งควรแสดงสินค้าใหม่ล่าสุดในหมวดหมู่อิเล็กทรอนิกส์เสมอ โดยที่คุณไม่ต้องแก้ไขอีเมลทุกสัปดาห์
-
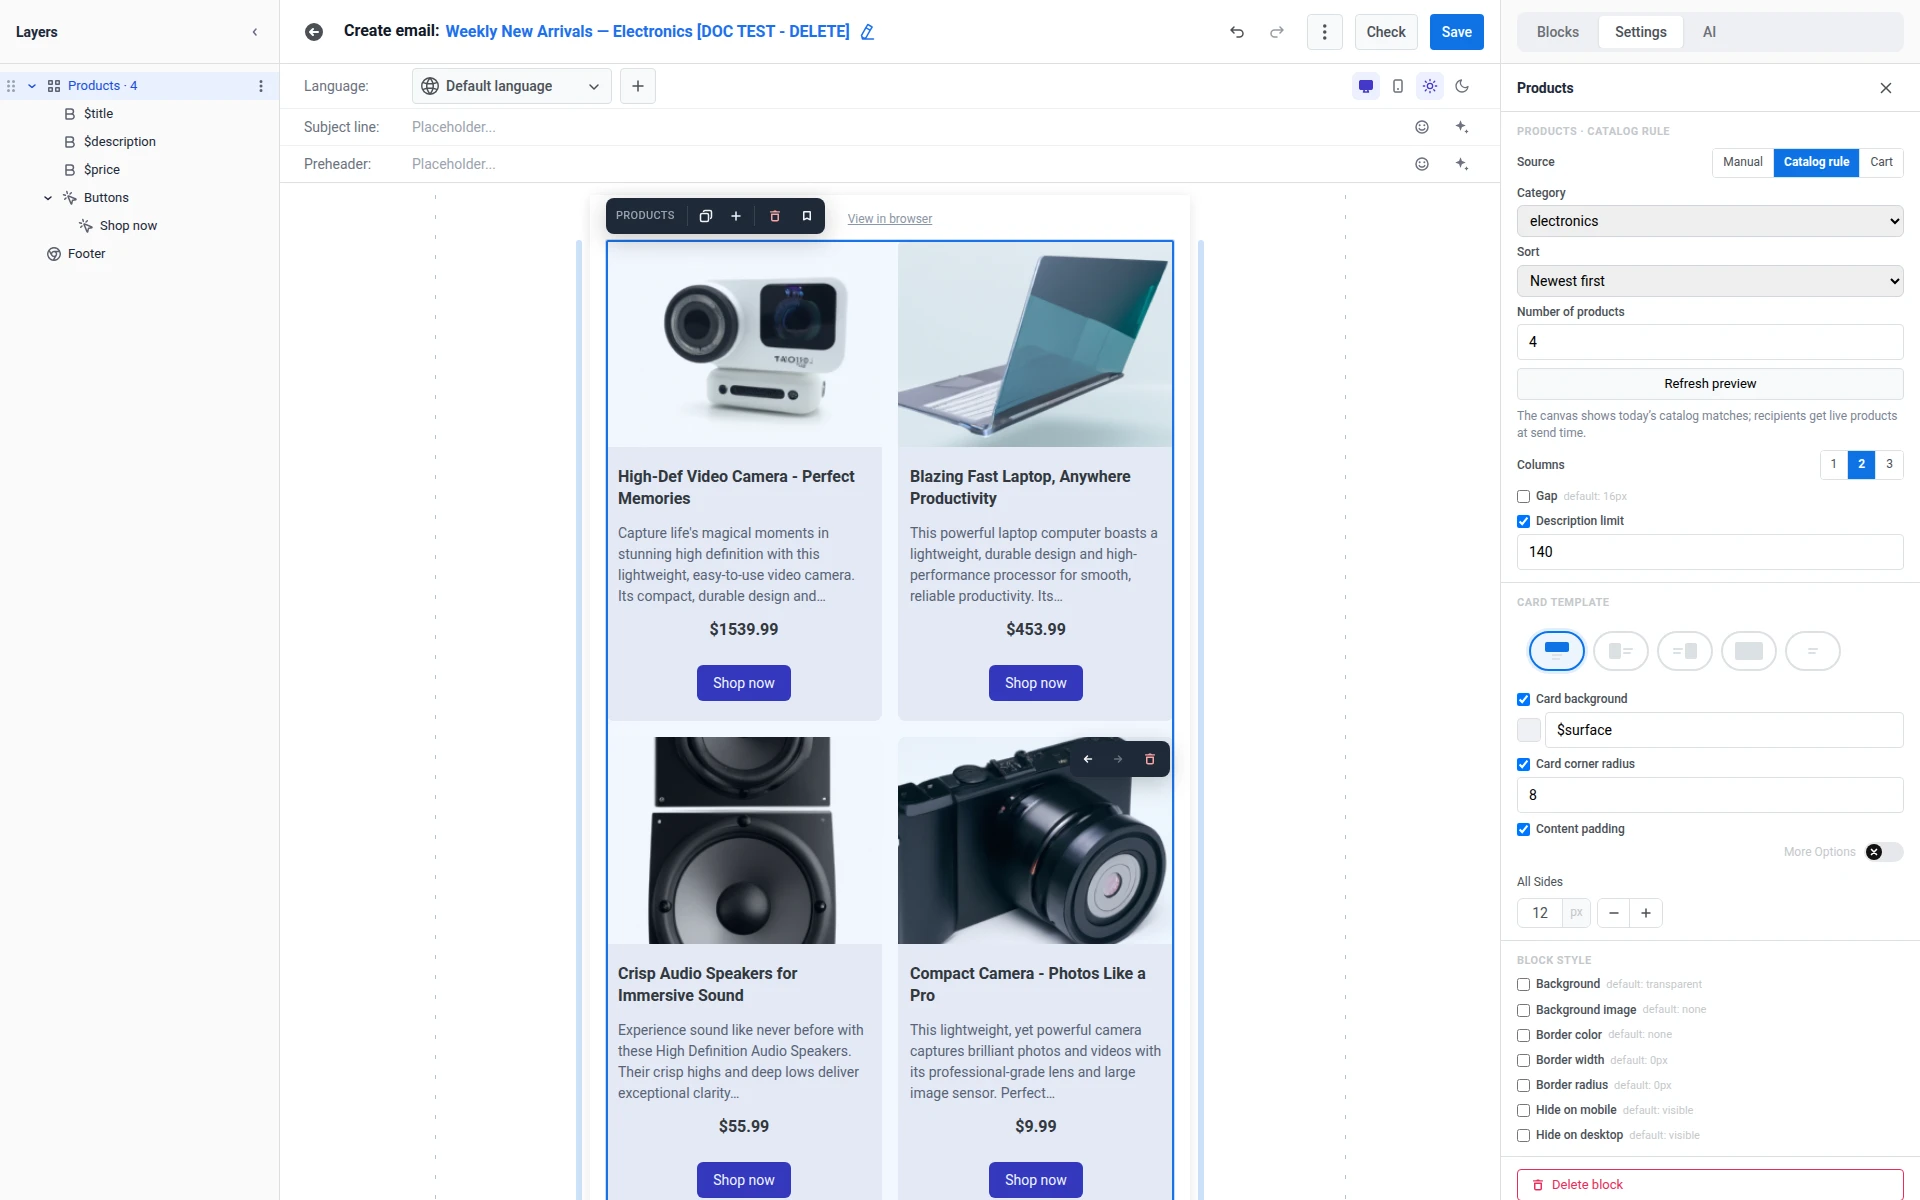
เลือก Catalog rule ใต้ แหล่งที่มา (Source)
-
ตั้งค่า หมวดหมู่ (Category) เป็น electronics (หรือ ทุกหมวดหมู่ (All categories))
-
เลือกลำดับ การจัดเรียง (Sort): ใหม่ล่าสุดก่อน (Newest first) สำหรับอีเมลสินค้ามาใหม่, หรือ ราคา: น้อยไปมาก (Price: low to high), ราคา: มากไปน้อย (Price: high to low), ชื่อ A-Z (Title A-Z)
-
ตั้งค่า จำนวนสินค้า (Number of products) (1-12) สำหรับตัวอย่างนี้ ให้ใช้ 4
-
คลิก รีเฟรชตัวอย่าง (Refresh preview) เพื่อคำนวณตัวอย่างบนพื้นที่ทำงานใหม่ตามแคตตาล็อก
-
จัดรูปแบบตารางและเทมเพลตการ์ดตามต้องการ ดูที่ จัดรูปแบบตาราง
พื้นที่ทำงานจะแสดงสินค้าที่ตรงกันในแคตตาล็อกของวันนี้ ผู้รับจะได้รับสินค้าที่เป็นปัจจุบัน ณ เวลาที่ส่ง
ดูที่ การอ้างอิงบล็อก Products สำหรับรายละเอียดเกี่ยวกับการจัดเรียง, รูปภาพสินค้า, ลิงก์, และราคาส่วนลด
สร้างอีเมลให้เสร็จสิ้น
Anchor link toสร้างส่วนที่เหลือของอีเมลให้เสร็จสิ้น รวมถึงหัวเรื่อง, บล็อกเนื้อหาอื่นๆ, และส่วนท้าย เรียนรู้เพิ่มเติม
ส่งอีเมล
Anchor link toหลังจากที่คุณบันทึกเนื้อหาอีเมลแล้ว ให้เลือกวิธีส่ง อีเมลแบบ Manual เหมาะสำหรับการส่งครั้งเดียว อีเมลแบบ Catalog rule เหมาะสำหรับ Journey ที่เกิดซ้ำซึ่งจะส่งอีเมล “สินค้ามาใหม่ประจำสัปดาห์” ที่อัปเดตอยู่เสมอตามกำหนดเวลา คู่มือนี้จะสร้างทั้งสองเวอร์ชันด้านล่าง หากคุณต้องการเพียงวิธีเดียว ให้สร้างเฉพาะเวอร์ชันนั้นแทนที่จะสร้างทั้งสอง
อีเมลแบบครั้งเดียว
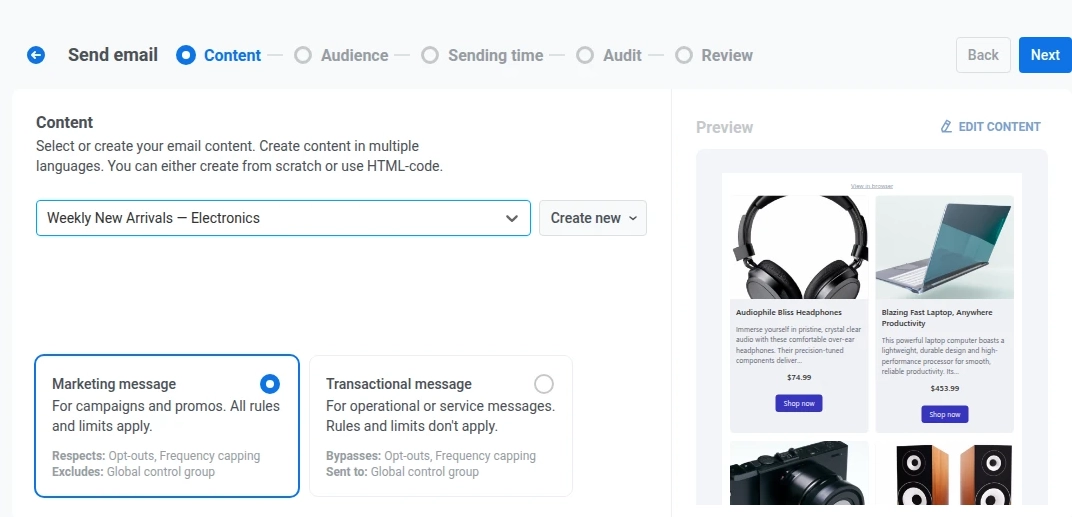
Anchor link toใช้อีเมลแบบครั้งเดียวสำหรับโปรโมชันเดียว เช่น การเน้นสินค้าอิเล็กทรอนิกส์ที่เลือกด้วยตนเองที่สร้างขึ้นข้างต้น เลือกเนื้อหาอีเมลที่คุณสร้าง, เลือกเซกเมนต์หรือผู้รับทั้งหมดของคุณ, จากนั้นส่งทันทีหรือกำหนดเวลาไว้สำหรับภายหลัง ดูที่ ส่งอีเมลแบบครั้งเดียว
Customer Journey
Anchor link toสำหรับการส่งที่เกิดซ้ำหรือตามทริกเกอร์ ให้เพิ่มอีเมลแบบ Catalog rule ไปยัง Customer Journey ซึ่งจะทำให้การเลือกสินค้าเป็นปัจจุบัน ณ เวลาที่ส่งโดยไม่ต้องแก้ไขเนื้อหาอีเมลอีก
-
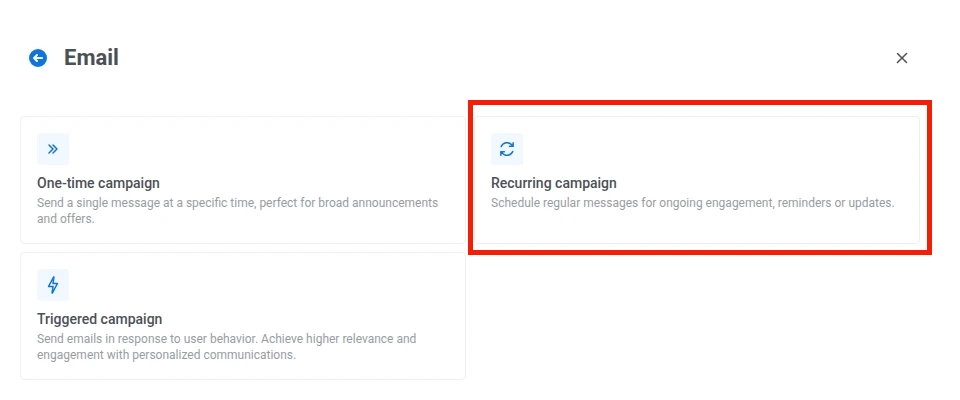
ไปที่ แคมเปญ → ตัวสร้าง Customer Journey → สร้างแคมเปญ → อีเมล (Campaigns → Customer Journey Builder → Create campaign → Email)
-
เลือก แคมเปญที่เกิดซ้ำ (Recurring campaign) สำหรับกำหนดเวลา เช่น การส่งรายสัปดาห์ หรือ แคมเปญตามทริกเกอร์ (Triggered campaign) สำหรับเหตุการณ์จากแบ็กเอนด์ของคุณ เช่น เหตุการณ์สินค้ากลับมาในสต็อก
-
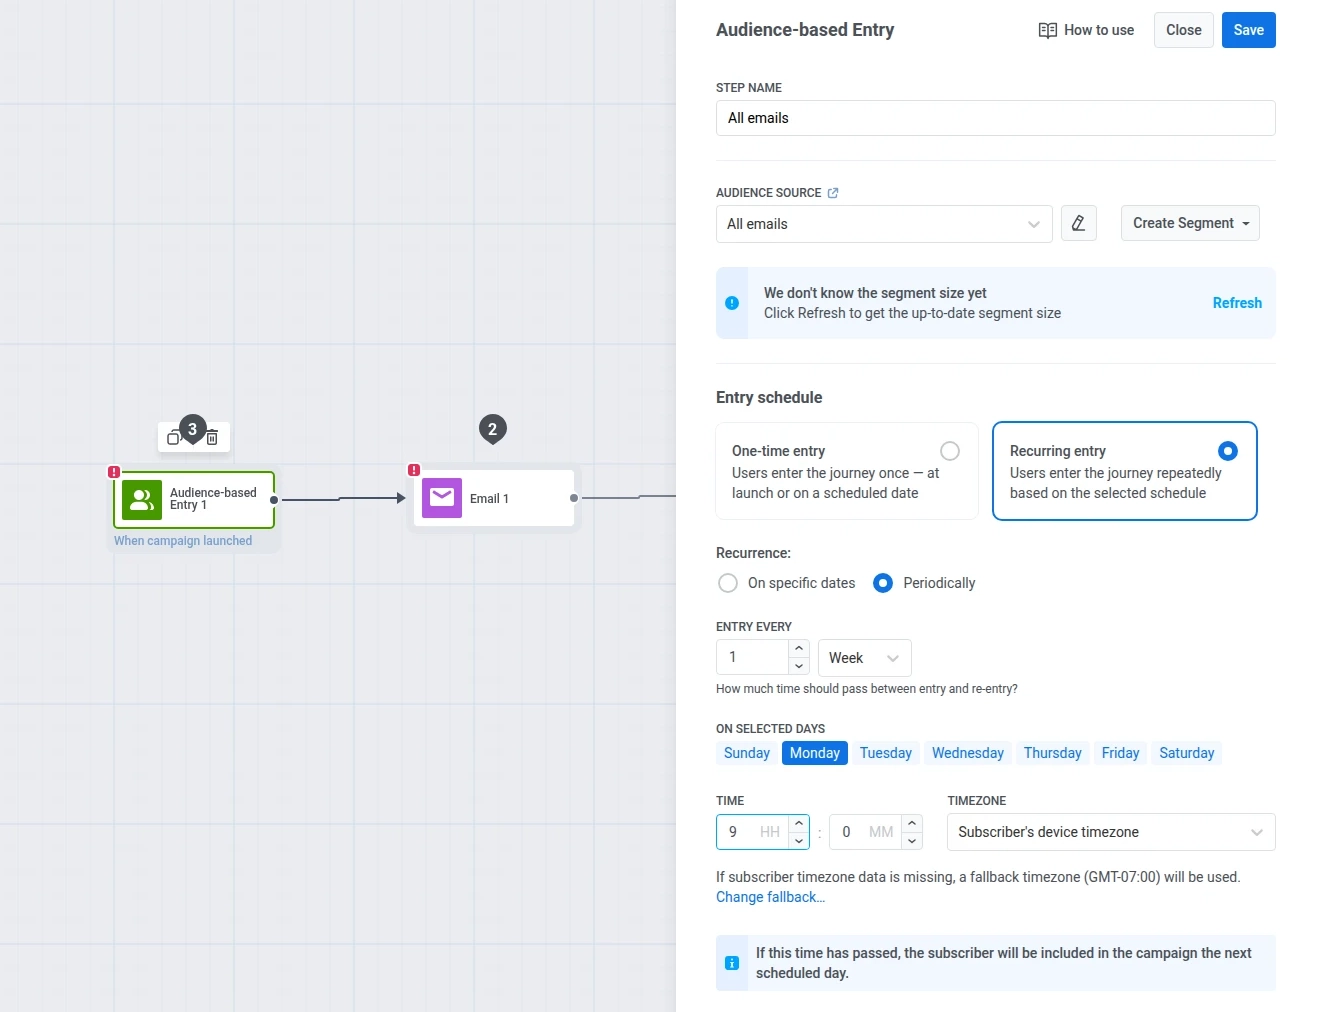
กำหนดค่าองค์ประกอบ Audience-based Entry:
- แหล่งที่มาของผู้ชม: (Audience Source) เลือกเซกเมนต์ เช่น อีเมลทั้งหมด (All emails)
- กำหนดการเข้า: (Entry schedule) เลือก การเข้าที่เกิดซ้ำ → เป็นระยะ (Recurring entry → Periodically)
- เข้าทุกๆ: (ENTRY EVERY) ตั้งค่าเป็น 1 สัปดาห์ (1 Week)
- ในวันที่เลือก: (ON SELECTED DAYS) เลือก วันจันทร์ (Monday)
- เวลา: (Time) ตั้งค่าเป็น 09:00
- เขตเวลา: (Timezone) ปล่อยไว้เป็น เขตเวลาของอุปกรณ์ผู้สมัครรับข้อมูล (Subscriber’s device timezone) สำหรับผู้สมัครรับข้อมูลที่ไม่มีข้อมูลเขตเวลาของอุปกรณ์ Pushwoosh จะใช้ เขตเวลาสำรอง (Fallback timezone) ที่ตั้งค่าไว้ถัดไป โดยค่าเริ่มต้นคือเขตเวลาที่เบราว์เซอร์ของคุณอยู่เมื่อคุณกำหนดค่าการเข้า ตรวจสอบให้แน่ใจว่าตรงกับที่คุณต้องการ
-
เปิดขั้นตอน อีเมล (Email) และเลือกอีเมล Weekly New Arrivals Electronics ที่คุณสร้างขึ้นข้างต้นเป็นเนื้อหา
-
กำหนดค่าการตั้งค่าและองค์ประกอบ Journey ที่เหลือตามต้องการ ดูที่ ภาพรวม Customer Journey
-
คลิก เปิดตัวแคมเปญ (Launch campaign) เพื่อเปิดใช้งาน Journey
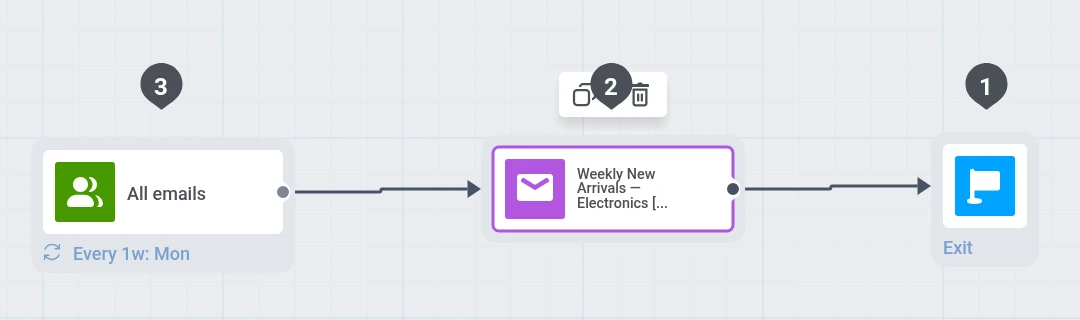
ทุกวันจันทร์ องค์ประกอบการเข้าจะลงทะเบียนผู้ชมอีกครั้งและบล็อก Catalog rule จะดึงสินค้าอิเล็กทรอนิกส์ที่ตรงกันในปัจจุบัน คุณไม่จำเป็นต้องเปิดเนื้อหาใหม่ทุกสัปดาห์ สำหรับ Manual ให้รีเฟรชบล็อกเมื่อแคตตาล็อกมีการเปลี่ยนแปลง
ติดตามการเปิด, การคลิก, และคอนเวอร์ชันในหน้า สถิติ Journey หรือใน สถิติอีเมล สำหรับการส่งครั้งเดียว