Issue Wallet Pass
เนื้อหานี้ยังไม่มีในภาษาของคุณ
The Issue Wallet Pass element creates an Apple Wallet or Google Wallet pass for a traveler from a Wallet Pass Campaign. After it runs, you can insert the install or save link into a later message in the same journey.
Example use cases
Anchor link toBoarding pass after check-in
Anchor link toIssue an Apple or Google Wallet boarding pass once a traveler checks in. Personalize seat and gate from the check-in event, then send the install link by push before departure.
- Trigger:
CheckInCompleted - Personal fields: map Seat and Gate to the matching event attributes
- Deliver: Send Push with
apple_install_linkorgoogle_save_link
Loyalty card on signup
Anchor link toIssue a loyalty card the first time a traveler joins a rewards program. Personalize it with their starting points balance.
- Trigger:
LoyaltySignup - Personal fields: map Points to the event’s
pointsattribute - Deliver: Send Email right after, with the save link in the welcome message
Event ticket after purchase
Anchor link toIssue a ticket once a traveler completes a ticket purchase. Personalize seat or row from the order.
- Trigger:
TicketPurchased - Personal fields: map Seat and Row to the order attributes
- Deliver: confirmation email with
apple_install_linkso the traveler can add the ticket in one tap
Prerequisites
Anchor link toBefore you add this element:
- Wallet Pass Campaign: create at least one Wallet Pass Campaign for the application. Issue Wallet Pass can only issue passes from an existing campaign. It can’t design one.
- Apple Wallet: connect the iOS platform and complete Apple Wallet pass setup for the application. See also Getting started with Apple Wallet passes.
- Google Wallet: configure Google Wallet for Android for the application. See also Getting started with Google Wallet passes.
Full campaign prerequisites for both platforms: Wallet Pass Campaigns prerequisites.
Add the element
Anchor link to- Drag the Issue Wallet Pass element onto the canvas after the step that should trigger issuance.
- Double-click the element to open its settings.
- Enter a recognizable name in Step Name, for example
Loyalty card. You’ll use this name later when you insert the pass link into a Send Push or Send Email element. - In Apple Wallet campaign and Google Wallet campaign, select a campaign for either platform, or both. Each dropdown accepts one campaign. Leave a dropdown empty to skip that platform.
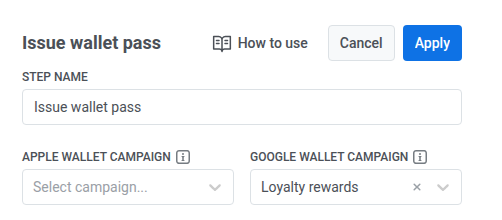
Both dropdowns only list this application’s campaigns for the matching platform, already excluding archived ones.
Fill in personal fields
Anchor link toUnder Personal fields on the pass, set a value for each field that appears.
The list stays empty until you select a campaign above. Then it shows that campaign’s Personal fields, the same ones you fill in the campaign’s Issue pass dialog. If you switch the campaign, the list updates to match.
For each field, open the value dropdown and choose one of the following:
- Static value: type one value for every traveler who reaches this element. For example, type
SUMMER2026into an OFFER field so every pass this element issues carries the same promo code.
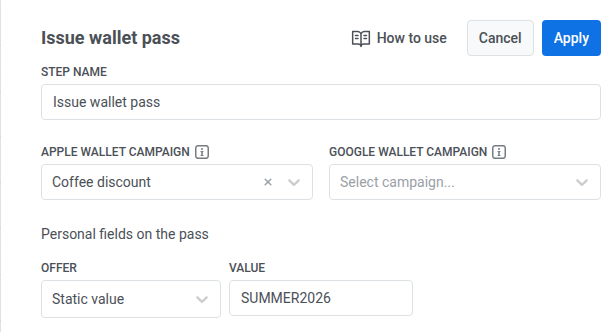
- An event from earlier in the traveler’s path through the journey. Then choose an Attribute to pull the field’s value from. For example, choose the entry event and its
offer_codeattribute to fill the OFFER field with each traveler’s own value instead of one value for everybody. Pushwoosh reads that attribute from the traveler’s own event data when this element runs, so each traveler’s pass gets their own value.
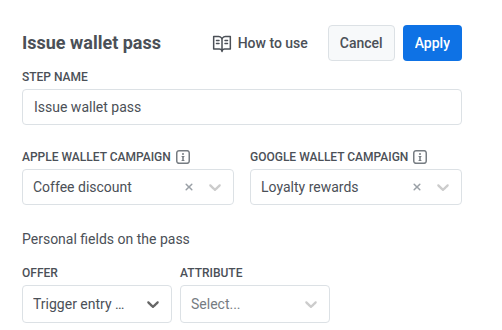
With campaigns selected for both platforms, the list shows fields from both. A field that only one campaign has is filled just for that platform’s pass.
When you’re done, click Apply to save the element settings.
Repeat entries and drop conditions
Anchor link toIf the same traveler reaches this element again, for example after looping back in the journey, Pushwoosh returns the pass already issued to them instead of creating a new one. Each traveler holds at most one pass per campaign.
Issue Wallet Pass drops the traveler, with no automatic retry, in two cases:
- The traveler has no User ID at all, not even the default device HWID a normal SDK session sets automatically. This happens when a traveler enters the journey without one, for example through API-based entry or an event payload that has no User ID field.
- Issuing the pass failed for a configured campaign, for example because it was deleted or archived after you added the element. When both platforms are configured, Apple is attempted first. If it fails, the traveler drops before Google is attempted at all, so a partial result never happens.
See No User ID and Pass issuance failed for what to check.
Deliver the pass to the traveler
Anchor link toWhen you personalize a later push or email, you can pull values from this Issue Wallet Pass step by the Step Name you gave it. These are the attributes you can insert:
| Attribute | Platform | Contains |
|---|---|---|
apple_install_link | Apple Wallet | URL to install the pass |
google_save_link | Google Wallet | URL to save the pass |
Only the attribute for the platform(s) you configured on the element is available.
- Add a Send Push or Send Email element after Issue Wallet Pass.
- In the message body, type the install link placeholder with vertical bars, for example
{apple_install_link|regular|}. Do not use a plain{apple_install_link}. See Dynamic Content or Liquid Templates for the full syntax. - Turn on Personalise message with event attributes.
- In the table, check the Overwrite placeholder box next to your placeholder. Its Source event and Dynamic attribute dropdowns stay disabled until you do.
- In Source event, choose your Issue Wallet Pass step by the Step Name you gave it, for example
Loyalty card. - In Dynamic attribute, choose
apple_install_linkorgoogle_save_linkto match the placeholder you used.
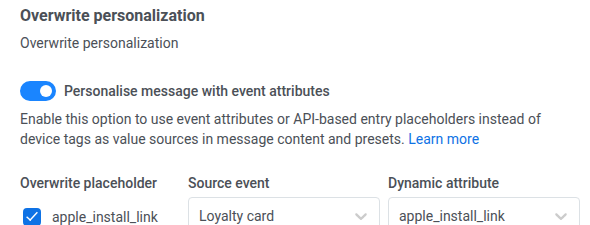
Each issued pass also has a serial number (apple_serial_number or google_serial_number in the point’s context). Pass it to your own systems with a Data to app or Webhook element, for example to log it in a CRM or support tool. To find the matching pass in Pushwoosh by its serial number, use the Wallet Pass Campaign’s Passes tab or the AttachPasses API, when you need to attach a standalone pass to a campaign.
Example scenario: coffee shop loyalty offer
Anchor link toA coffee shop wants to welcome every new loyalty member with a discount pass they can add to their phone’s wallet.
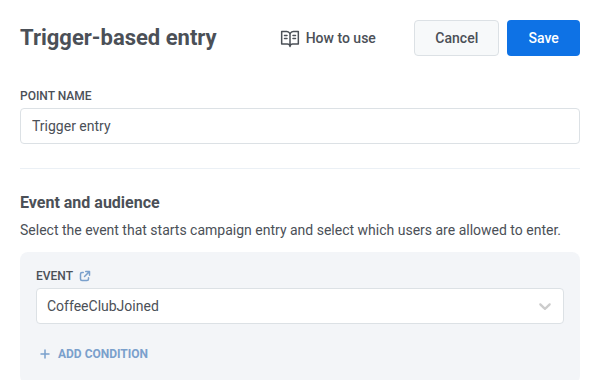
- Create the event
CoffeeClubJoinedand make sure it includes an attribute for the welcome offer, for exampleoffer_code. Learn more about creating events - Set this event as the trigger for the journey, so every new member enters as soon as they join.
- Add Issue Wallet Pass after the trigger.
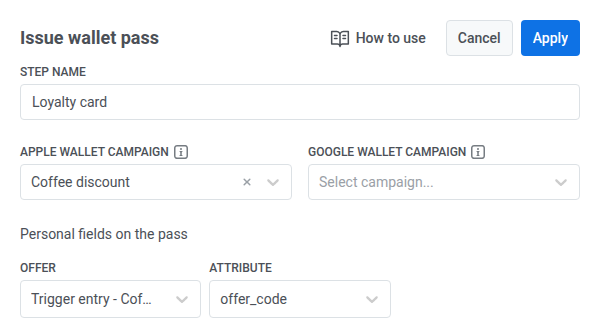
- Name it
Loyalty card. - Select the loyalty campaign, for example
Coffee discount, for Apple Wallet campaign (and Google Wallet campaign too, if you support Android). - Under Personal fields on the pass, set OFFER to the trigger entry event.
- Choose
offer_codeas the Attribute.
- Add a Send Email element right after Issue Wallet Pass.
- Personalize it with
apple_install_link(orgoogle_save_link) so the welcome email includes a one-tap link to add the pass.
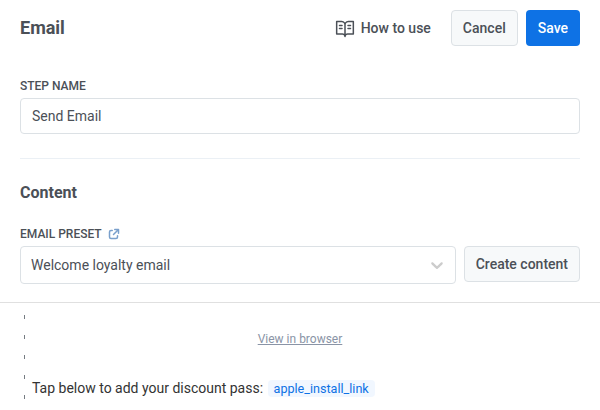
When CoffeeClubJoined fires, the traveler enters the journey, Issue Wallet Pass issues their pass with that event’s offer_code, and Send Email sends the welcome message with the link to add it.
