向 Wallet 通行证持有者发送消息
一旦用户添加了您的通行证,Pushwoosh 会将其注册为一个平台订阅(Apple Wallet 或 Google Wallet),并与该 User ID 绑定。
您可以通过多种方式触达持有者:发送通行证更新、发送一次性推送、通过 Customer Journey 自动化消息,或通过 API 通知特定通行证的持有者。
发送通行证更新
Anchor link to编辑并保存通行证会将新版本推送到添加了它的每台设备上,而无需发送单独的消息。提醒持有者有关更改的方式因平台而异。
Apple Wallet
Anchor link to在您希望提醒持有者的任何字段上设置更改消息;iOS 会将其显示为锁屏消息。没有更改消息的字段会静默更新。
- 在 Campaigns → Wallet Passes → Apple Wallet 中,找到通行证并在操作菜单中点击 Edit。
- 更改您需要的字段,并在任何您希望提醒持有者的字段上添加更改消息。
- 点击 Save。
Google Wallet
Anchor link to对于会员卡、活动门票和登机牌,启用通知已更改的字段,让 Google 在同步时发送 Android 通知。其他类型的通行证会静默同步。
- 在 Campaigns → Wallet Passes → Google Wallet 中,找到通行证并在操作菜单中点击 Edit。
- 更改您需要的字段。
- 确保 通知已更改的字段 已启用。
- 点击 Save changes。
向通行证持有者发送一次性推送
Anchor link to向单个通行证持有者或更广泛的受众发送独立的推送。它在 Apple Wallet 通行证上显示为锁屏消息,或在 Google Wallet 通行证上显示为通知。
-
打开一次性推送编辑器。您可以在 Campaigns → Wallet Passes → Apple Wallet 或 Google Wallet 中点击 Send message,或者转到 Campaigns → One-Time Messages 并点击 Send message → One-time push。
-
在 Content 步骤中,编写消息或选择一个预设。
-
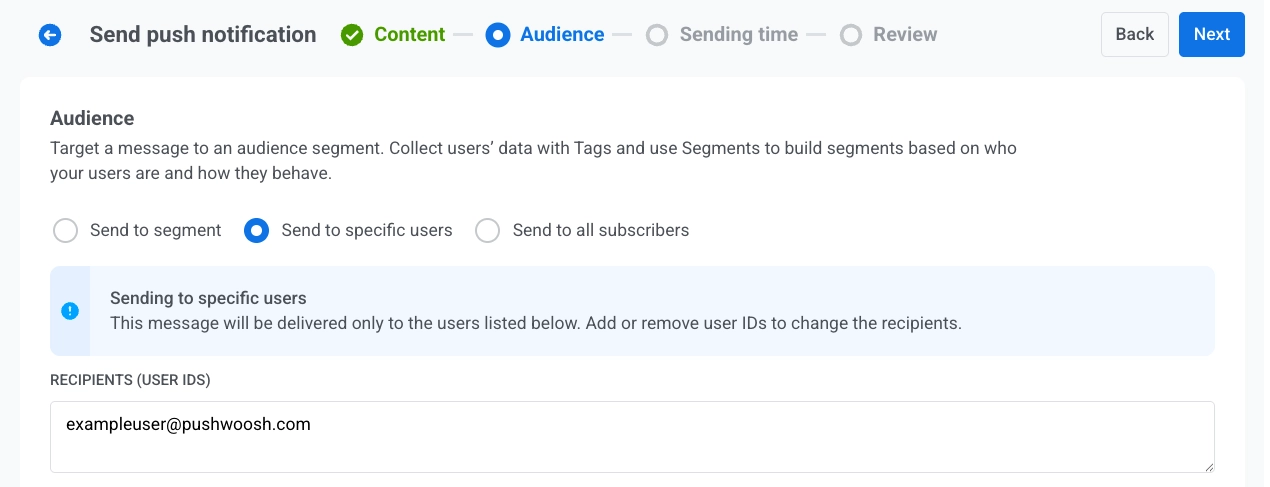
在 Audience 步骤中,设置接收消息的对象。默认设置取决于您从哪里打开编辑器:
- 从通行证上的 Send message 进入: 此时会选中 Send to specific users,并且 Recipients (User IDs) 中已列出该通行证持有者的 User ID。直接发送即可触达该持有者,或者您可以更改受众:
- 在 Recipients (User IDs) 中添加更多 User ID
- 切换到 Send to segment
- 选择 Send to all subscribers
- 从 One-Time Messages 进入: 像常规的一次性推送一样设置受众:Send to specific users、Send to segment 或 Send to all subscribers。
- 从通行证上的 Send message 进入: 此时会选中 Send to specific users,并且 Recipients (User IDs) 中已列出该通行证持有者的 User ID。直接发送即可触达该持有者,或者您可以更改受众:
- 在 Target platforms 下,选择 Apple Wallet、Google Wallet 或两者都选。
- 发送或安排消息。
通过 Customer Journey 自动化消息
Anchor link to根据事件或细分群体自动发送消息。
基于触发器的进入 Journey
Anchor link to- 创建一个 Customer Journey 并添加一个 Trigger-based entry。
- 选择应启动 Journey 的事件。如果您尚未创建自定义事件,请先在 Control Panel 中创建一个,例如
RewardAvailable。 - 添加并配置一个推送元素。启用 Send by User ID,以便推送能够触达与用户绑定的每台设备,包括已保存的通行证。
- 完成配置并激活 Journey。
当进入事件触发时,Pushwoosh 会将推送发送到与用户绑定的每台设备。通行证持有者会在 Apple Wallet 上收到锁屏消息,或在 Google Wallet 上收到通知。没有钱包通行证的用户将在他们的其他设备上收到推送。
示例:通知用户奖励可用
POST https://api.pushwoosh.com/json/1.3/postEvent
{ "request": { "application": "XXXXX-XXXXX", "userId": "u12345", "event": "RewardAvailable", "attributes": { "reward": "Free coffee", "expires": "2026-07-01" } }}event 名称必须与您在 Control Panel 中创建的事件匹配。
构建 Journey 的其他方式
Anchor link to上述基于触发器的流程是一种选择。根据应启动 Journey 的条件,选择不同的进入元素:
- Audience-based entry: 为整个细分群体而不是单个事件启动 Journey。可以运行一次、按计划运行或定期运行(例如,每周向所有持有有效通行证的人运行),新用户在加入细分群体时进入 Journey。
- API-based entry: 从应用外部发生的业务事件(例如航班延误或登机口变更)启动 Journey。您的外部系统调用进入元素的请求模板,并传递一个过滤器来定位正确的用户,例如,所有在通行证签发时设置了标签
flightNumber = SU1234的用户。这非常适合登机牌和活动门票。
通过 API 通知特定通行证的持有者
Anchor link to要向所有保存了某个特定通行证的用户发送消息,请调用更新通行证。它会更新通行证并通知设备。在 Google Wallet 上,设置 notifyMessage 以在更新的同时发送自定义通知;如果不设置,通行证将静默同步。
- Apple Wallet:
- Google Wallet: