设置 Shopify
集成概述
Anchor link toPushwoosh 与 Shopify(一个领先的电子商务平台,帮助企业创建、管理和扩展在线店铺)无缝集成。本指南将引导您在 Shopify 店铺中安装和配置 Pushwoosh 应用,设置用户识别,并使用通知和自动化工具通过 push、email、SMS 和 WhatsApp 等渠道与客户互动。
集成类型
Anchor link to- 目标:Shopify 将客户数据发送到 Pushwoosh,用于定位和消息发送。
前提条件
Anchor link to- 一个 Pushwoosh 账户
- 您的 Shopify 后台管理权限
- Pushwoosh 设备 API 令牌 和 Application Code
- 一个拥有客户和订单数据的 Shopify 店铺
- 批准
read_orders访问范围以获取订单/购物车事件,以及write_pixels和read_customer_events以跟踪结账步骤
同步的实体
Anchor link to- 客户:用于通过 Shopify 元字段分配和识别 Pushwoosh User ID
- 客户细分:用于基于群组的定位和消息发送
- 事件与触发器(例如,下单、应用标签):用于 Shopify Flow 中,自动化跨渠道的消息发送
- Storefront:用于通过嵌入脚本捕获 web push 订阅
- 产品 Feed:您店铺的店面 feed(
products.json)会在您连接应用时自动连接到 Pushwoosh 产品目录,并在您卸载应用时自动断开连接。 - 订单和购物车:来自 Shopify
orders/paid、checkouts/create和checkouts/updatewebhook 的服务器到服务器事件。请参阅Shopify 事件与营销活动。 - 店面浏览行为:产品浏览和加入购物车操作,由用于 web push 订阅的同一主题嵌入代码收集。
- 结账步骤:输入的联系信息和提交的支付信息,通过 Shopify Web Pixel 收集。
术语对照(如果名称不同,则进行实体名称映射)
Anchor link to| Shopify | Pushwoosh |
|---|---|
| Customer | User ID |
orders/paid webhook | 事件 PW_OrderCreated —— 与其他电子商务集成共享(例如 Magento) |
checkouts/create webhook | 事件 PW_AbandonedCart —— 同一个共享事件,也被 Products 模块的 Cart 来源 使用 |
checkouts/update webhook | 事件 PW_AbandonedCartUpdate —— 当购物者继续编辑同一结账时触发,覆盖从 PW_AbandonedCart 存储的购物车 |
| 产品页面浏览 | 事件 PW_ProductViewed |
| 加入购物车(无需重新加载页面) | 事件 PW_AddToCart |
Web Pixel checkout_contact_info_submitted | 事件 PW_CheckoutContactInfo |
Web Pixel payment_info_submitted | 事件 PW_PaymentInfoSubmitted |
集成的工作原理
Anchor link toPushwoosh 充当 Shopify 的消息发送目的地。集成后,Shopify 将客户数据和行为数据发送到 Pushwoosh,用于驱动实时通知、客户细分以及跨渠道的个性化消息发送。
集成的关键组件
Anchor link to-
通过元字段进行客户识别 每个 Shopify 客户都会被分配一个唯一的 User ID,存储在元字段(
custom.pushwoosh_userid)中。此 ID 使 Pushwoosh 能够在各平台上一致地识别用户并向其发送消息。 -
通过 Shopify Flow 实现事件驱动的自动化 Pushwoosh 提供 Flow 操作,让您可以根据 Shopify 事件自动化消息发送(push、email、SMS、WhatsApp),例如:
- 新订单已下单
- 客户被应用了标签
- 购物车被放弃
-
基于细分的定位 来自 Shopify 的客户细分可用于跨渠道发送特定群组的通知,例如针对首次购买者的促销活动,或针对不活跃用户的重新激活营销活动。
-
手动实时消息发送 从 Shopify 的客户或细分视图中,您可以使用 Pushwoosh 扩展手动触发通知:
- Notification by Customer:用于个人跟进或测试
- Notification by Segment:用于基于营销活动的消息
通过店面嵌入代码发送 Web push 通知
Anchor link to通过在 Shopify 主题中启用 Pushwoosh 嵌入代码,您可以提示网站访客订阅基于浏览器的 push 通知——无需移动应用。
数据流概览
Anchor link toShopify 客户和事件数据 ↓Pushwoosh API(通过应用) ↓User ID → 细分 → 触发式或手动通知此集成使您能够发送及时、相关的消息,从而提高用户留存率、提升转化率并改善客户体验——无论是自动发送还是按需发送。
第一部分。安装
Anchor link to登录 Shopify
Anchor link to- 前往 Shopify Admin
- 在仪表板中选择您的店铺
安装 Pushwoosh 应用
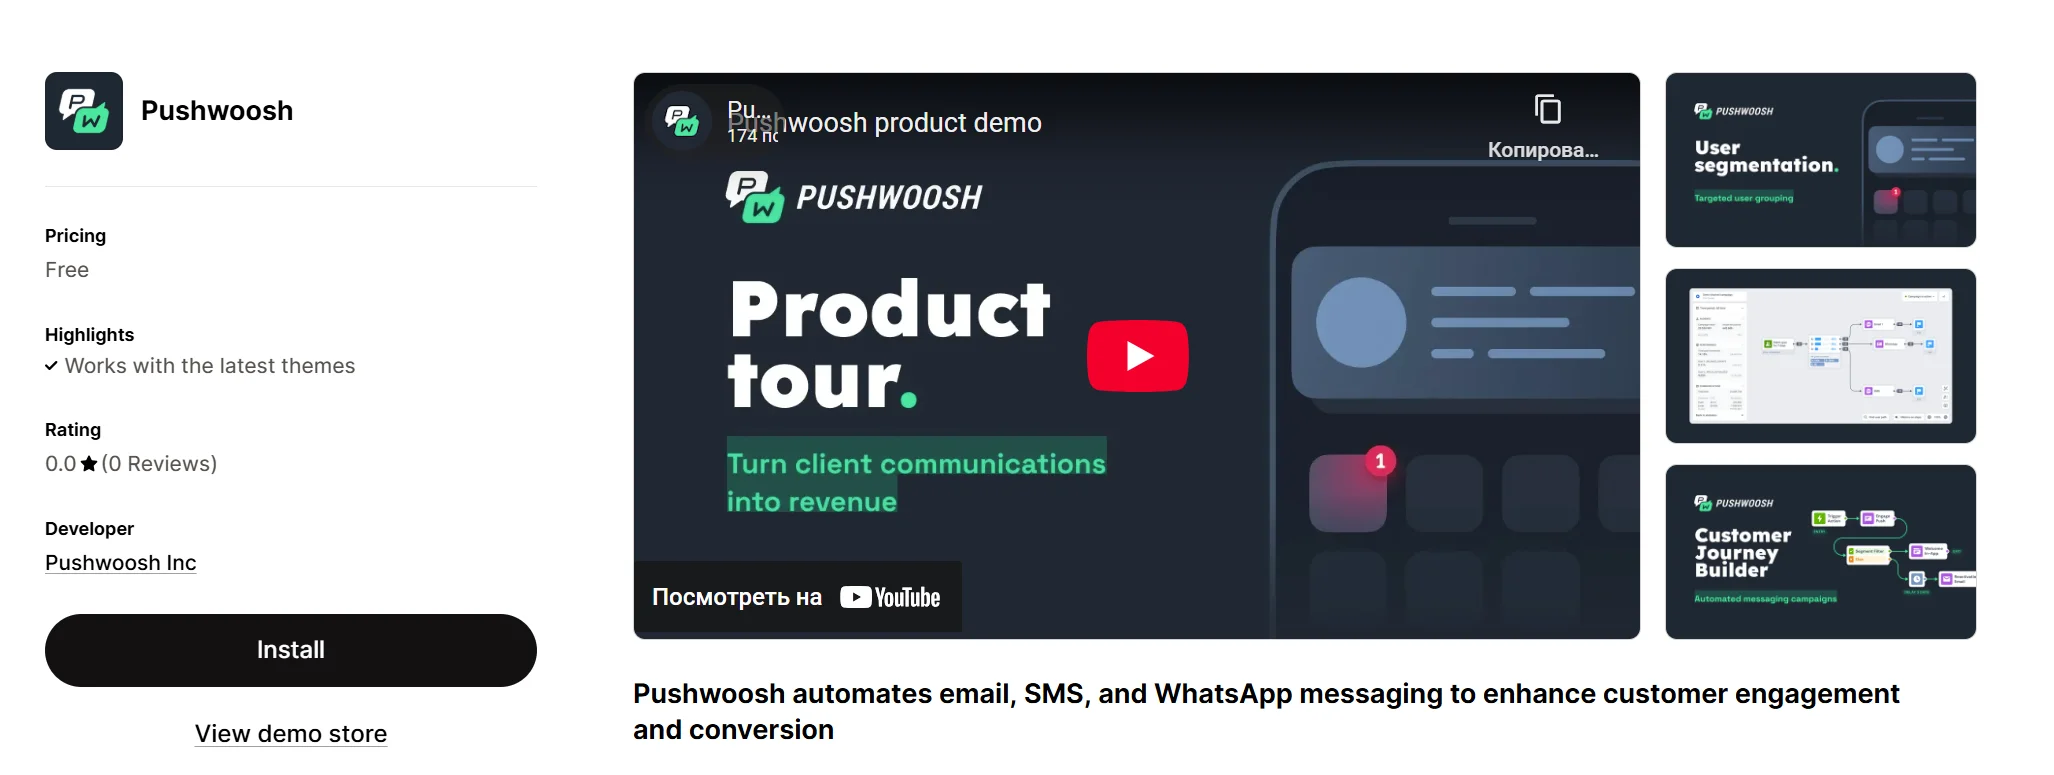
Anchor link to- 访问 Pushwoosh 应用商店页面
- 点击 Install
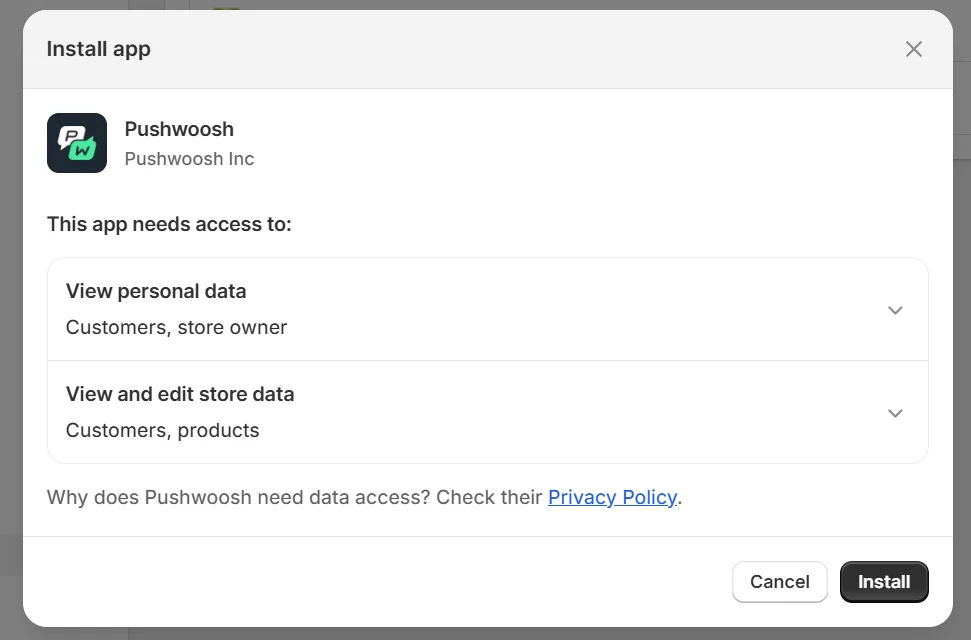
- 在 Shopify 对话框中确认安装
连接您的 Pushwoosh 应用
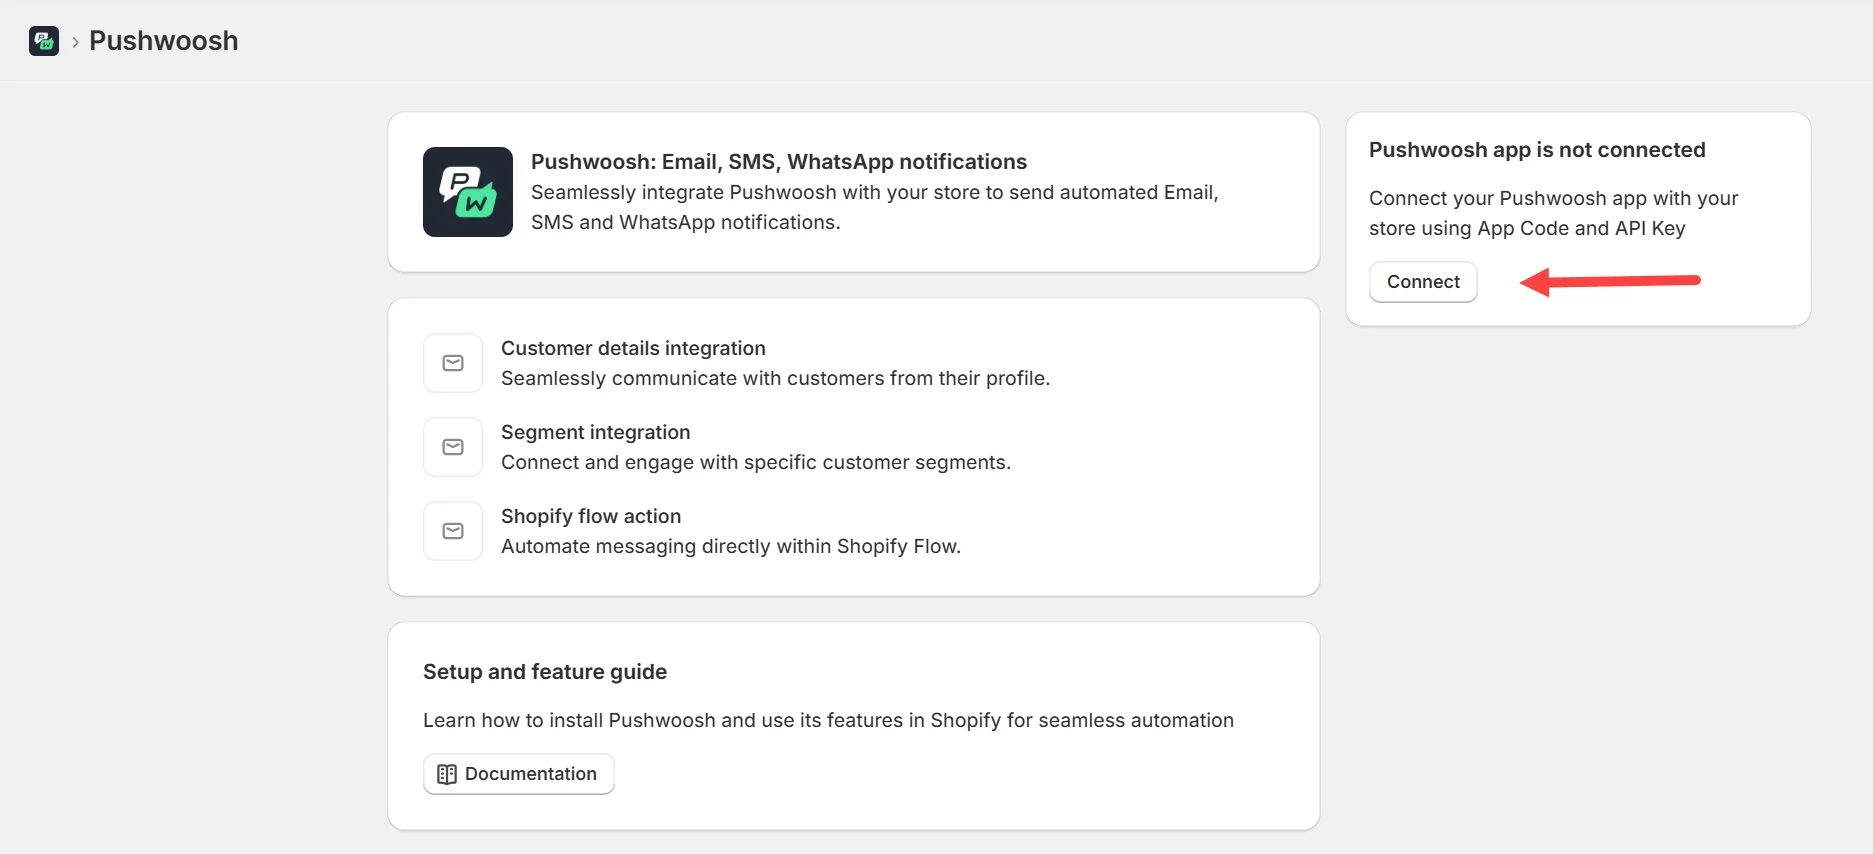
Anchor link to安装后,您将被重定向到 Shopify 内的 Pushwoosh 应用。
- 点击 Connect。
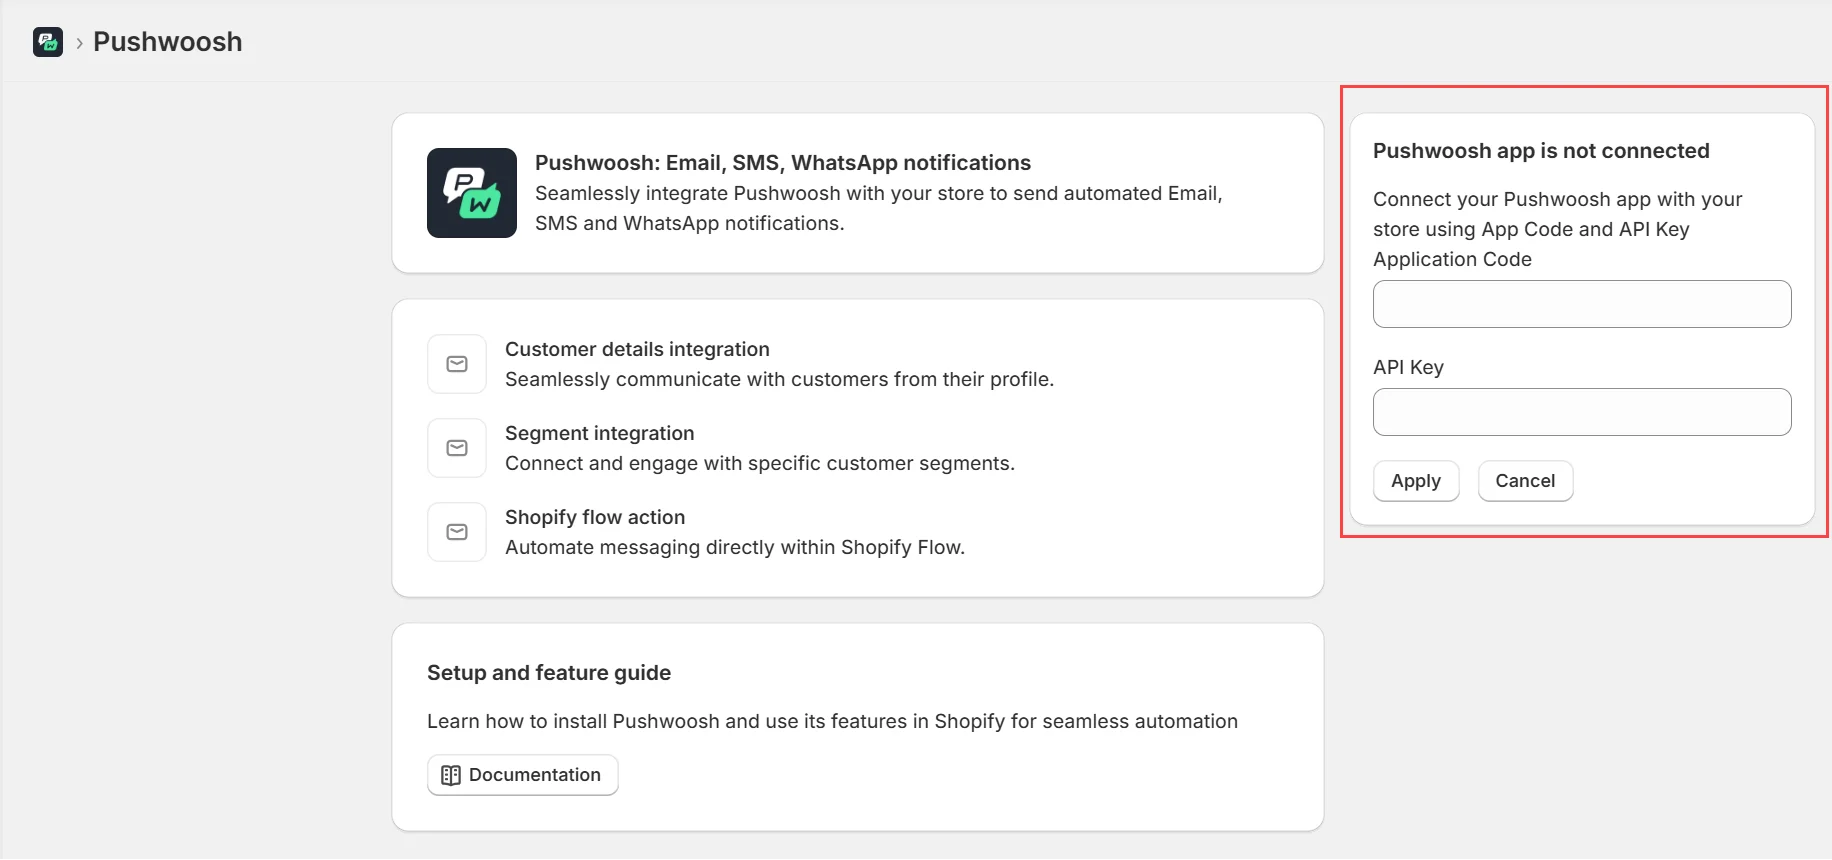
- 输入 Application Code 和 API Key,您可以在 Pushwoosh Control Panel → Settings → API Access 中找到它们。这里的 API Key 就是您的设备 API 令牌。
连接后,将显示成功消息:「Pushwoosh app connected.」
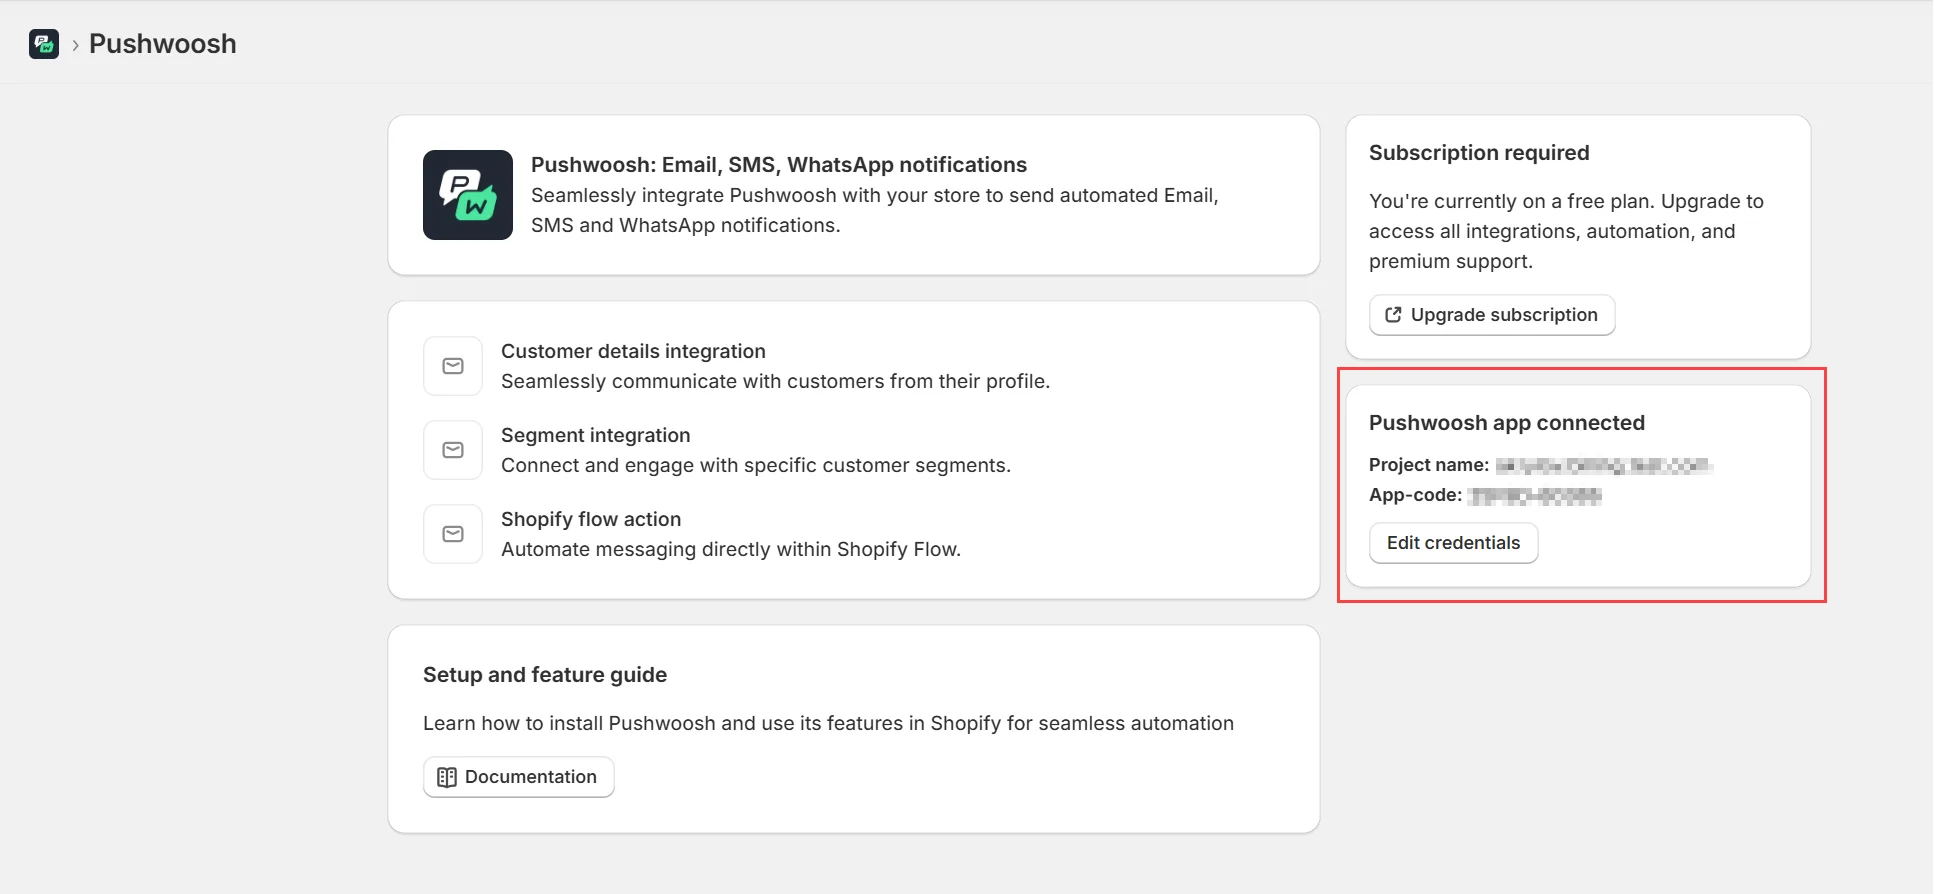
当 Shopify 请求权限(订单、pixel、客户事件)时,请批准它们。这些访问范围是跟踪 Shopify 事件与营销活动 所必需的。如果您之前已连接过该应用,请参阅已经连接?系统会要求您重新批准访问权限。
订阅套餐
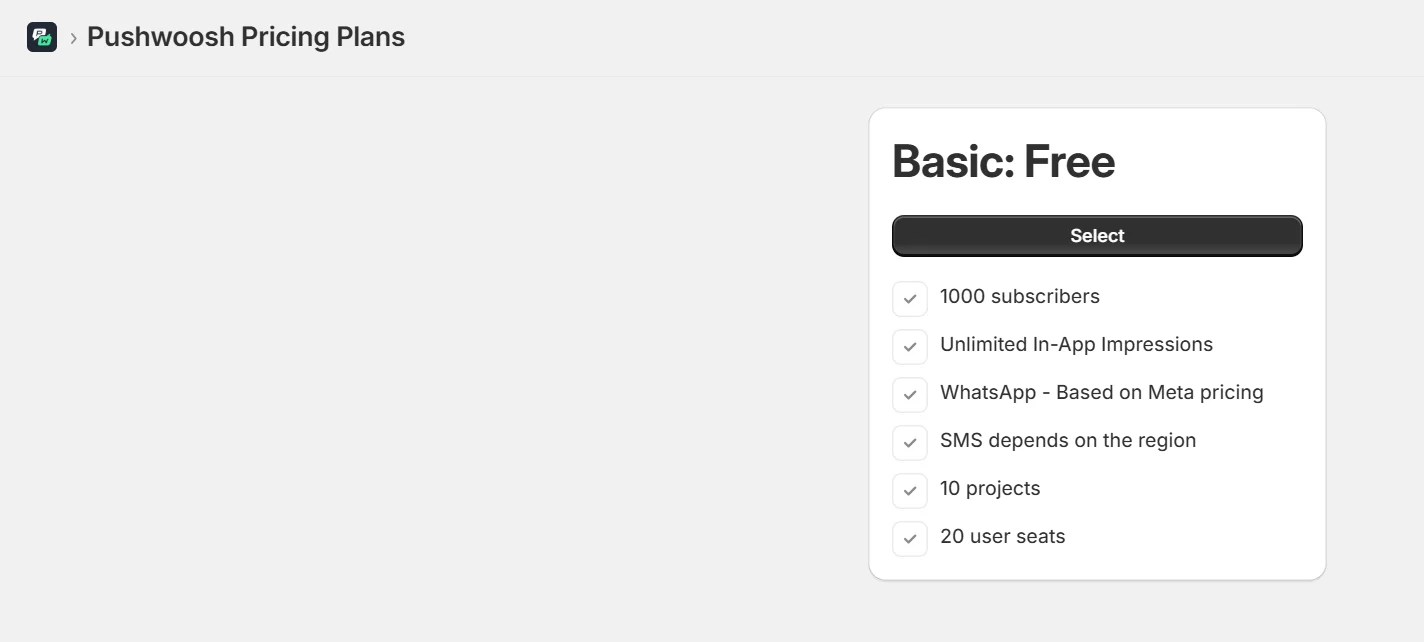
Anchor link to- 点击 Upgrade Subscription
- 将显示一个基于用量的单一套餐。
- 确认账单。
第二部分。设置:通过元字段设置客户 User ID
Anchor link to为了通过不同渠道(push、email、SMS、WhatsApp)向已识别的用户投递通知,Pushwoosh 会为每个客户使用唯一的 User ID。Shopify 将此值存储在 Shopify 的客户元字段中。
- 前往 Settings → Metafields and metaobjects → Customers
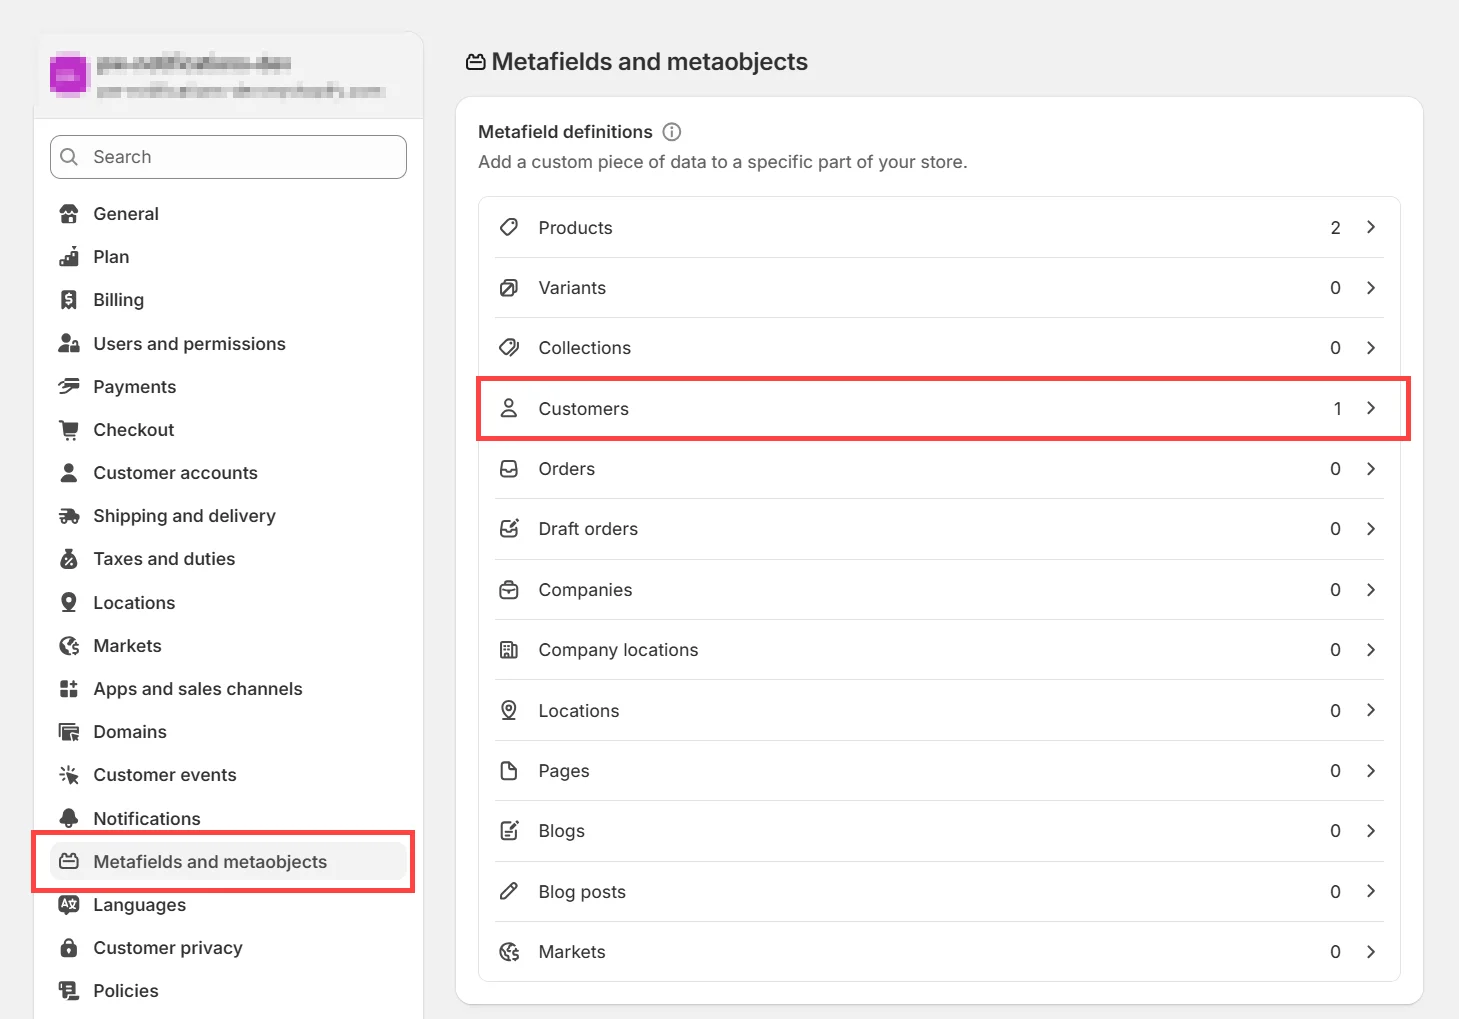
- 点击 Add definition 并使用以下值:
| 字段 | 值 |
|---|---|
| Namespace and key | custom.pushwoosh_userid |
| Namespace | custom |
| Type | Single line text |
| Validation | None |
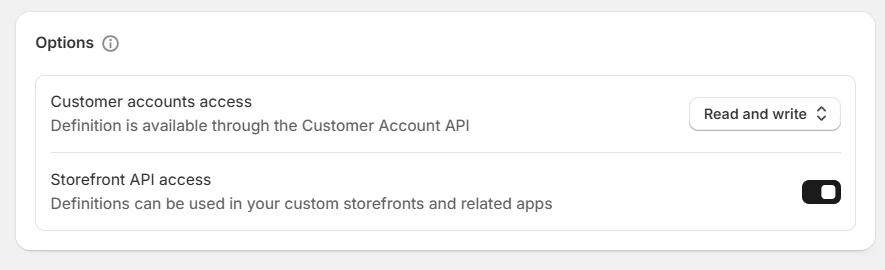
| Customer Account Access | Read and Write |
| Storefront API Access | Enabled |
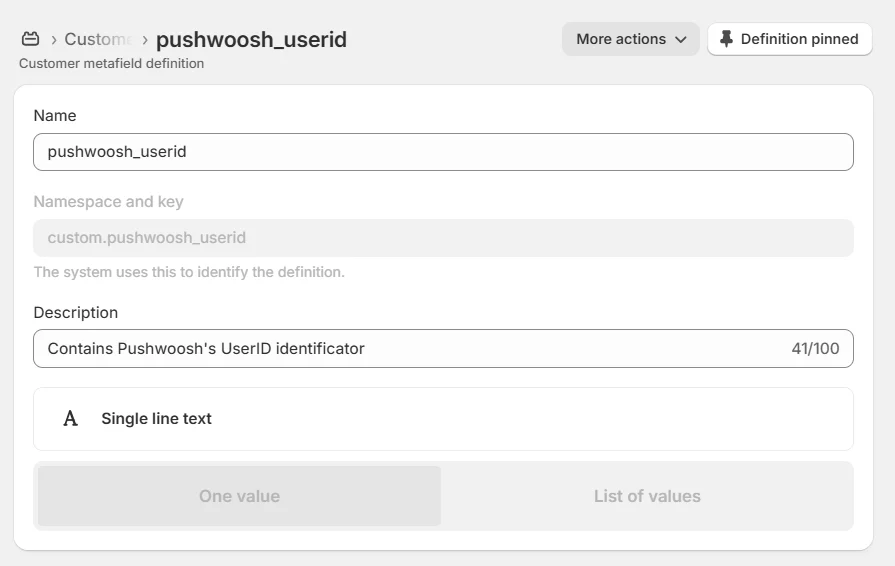
按照上表设置 Customer accounts access 和 Storefront API access。
第三部分。使用 Pushwoosh 扩展
Anchor link toPushwoosh 包含用于细分定位、自动化(Flow)和特定客户通知的 Shopify 扩展。
扩展 1. Send notification by customer
Anchor link to使用场景
Anchor link to手动向特定用户发送个性化消息或测试通知。
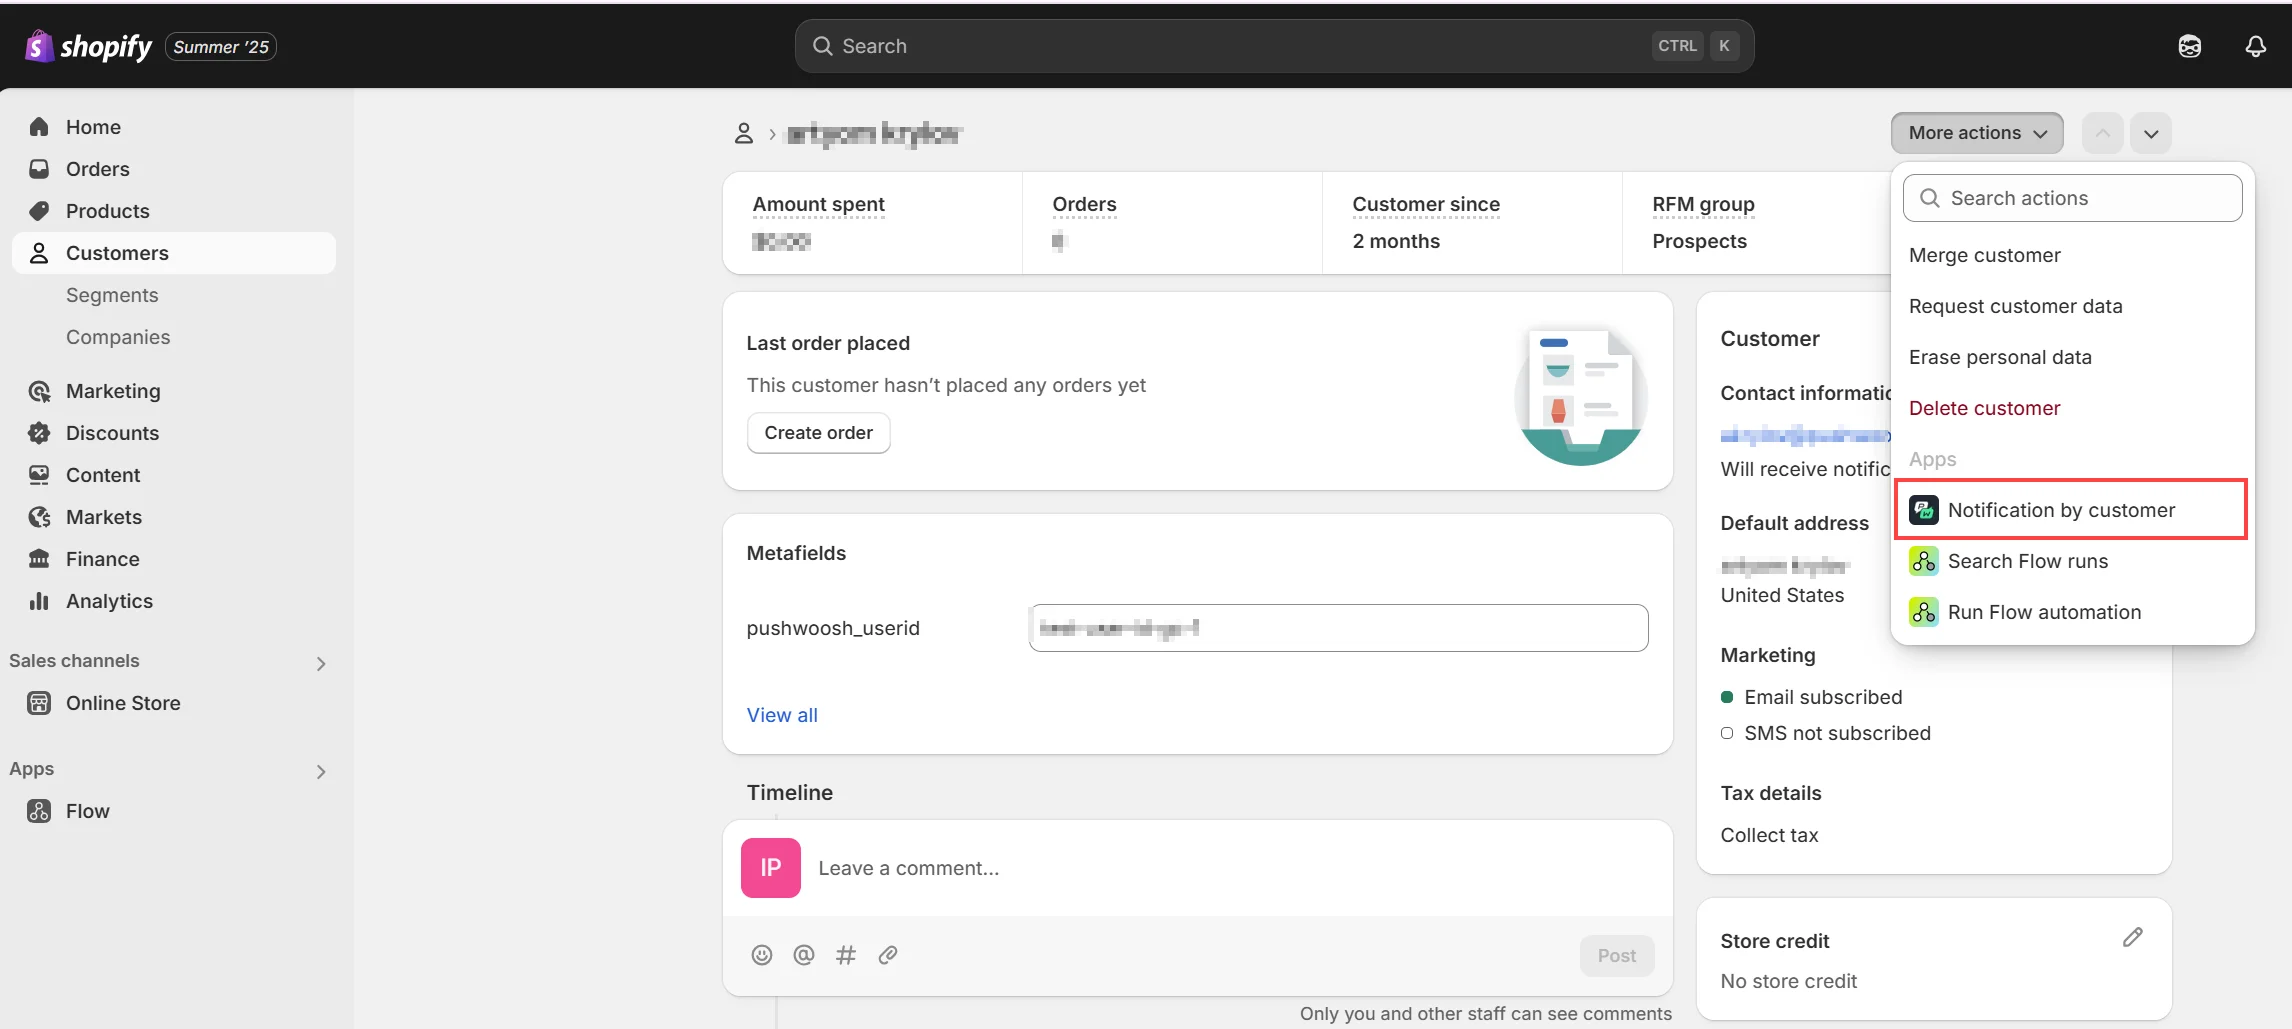
- 打开 Customers → 选择一位客户
- 点击 More actions → Notification by customer
- 选择消息传递平台(例如 Email)和一个内容预设。
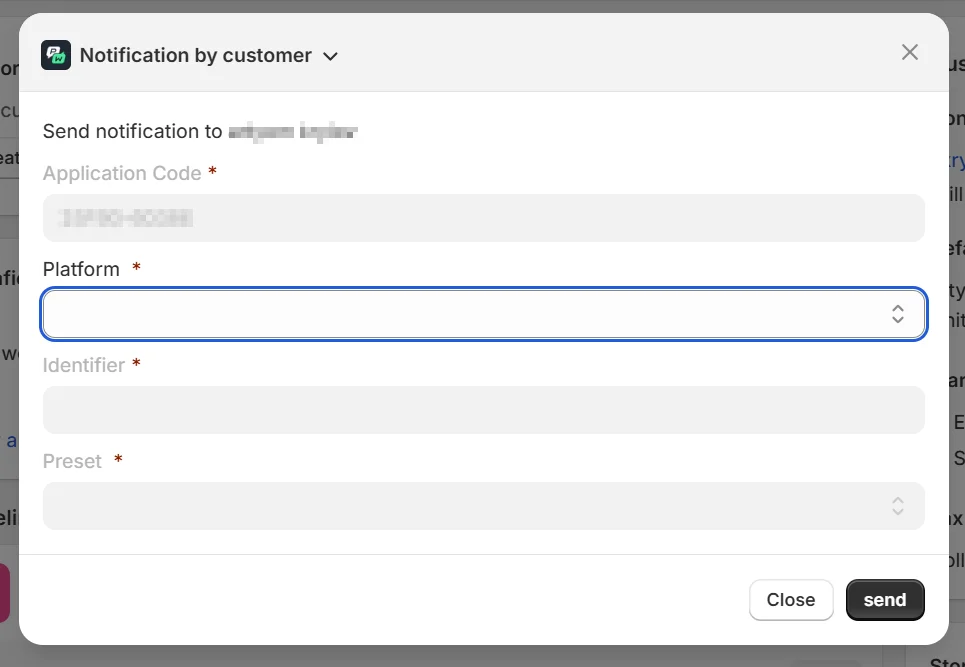
- 点击 Send
扩展 2. Notification by segment
Anchor link to使用场景
Anchor link to定位客户群组——放弃购物车的客户、首次购买者、高消费客户。
-
前往 Customers → Segments
-
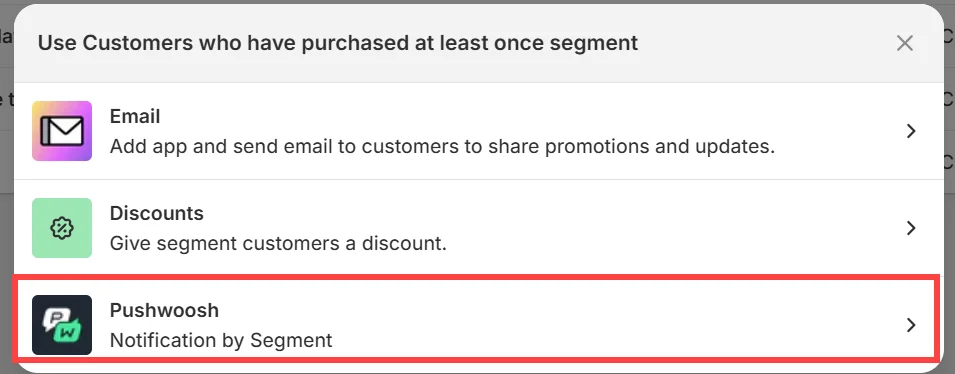
选择一个细分 → 点击 Use Segment
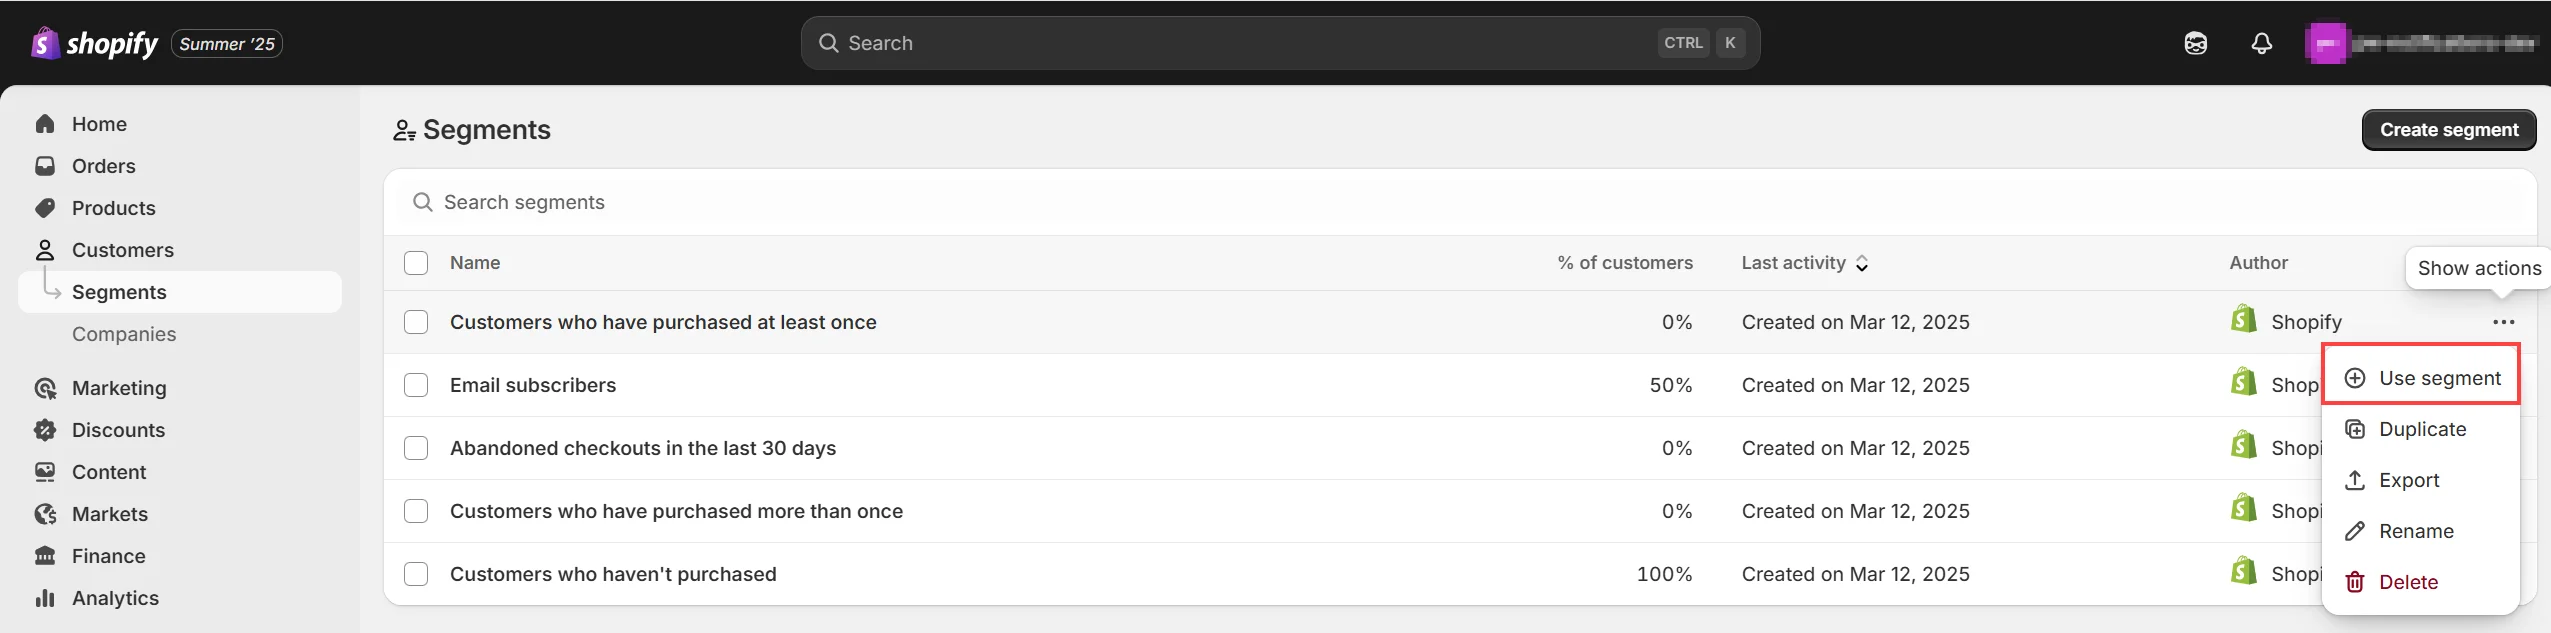
- 选择 Notification by Segment
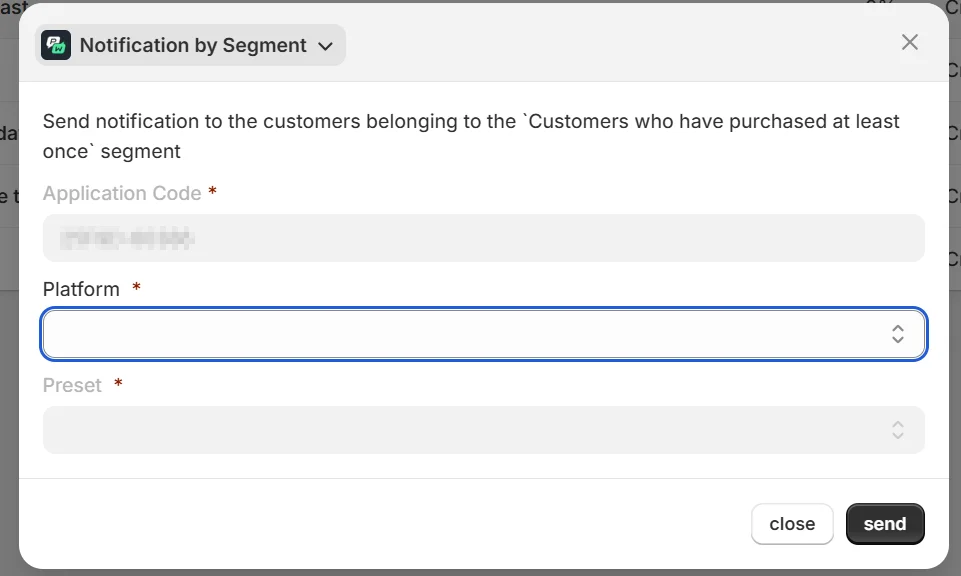
- 选择所需的通信渠道和消息预设。点击 Send。
扩展 3. Shopify Flow 中的 Pushwoosh
Anchor link to使用场景
Anchor link to使用订单、标签或行为等触发器,在客户旅程中自动化消息发送。
- 在 Shopify Flow 中创建一个新的 Flow
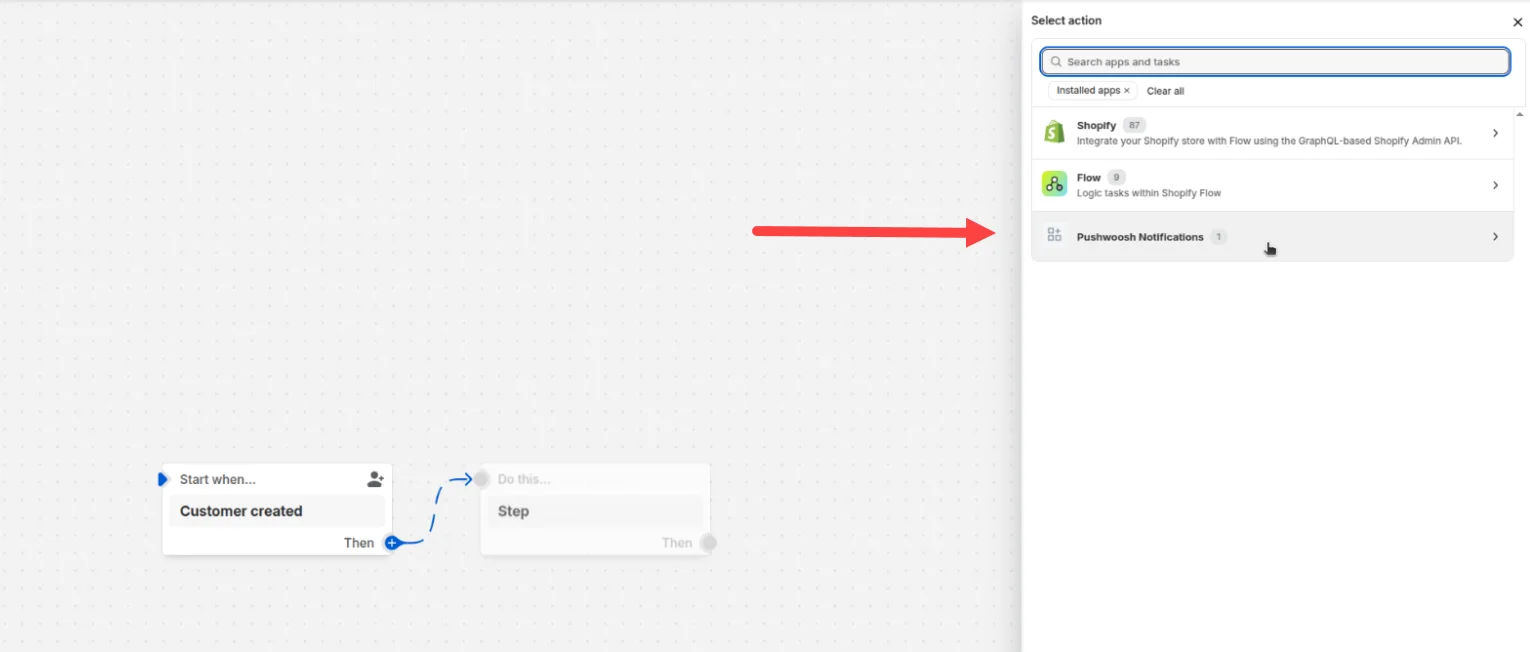
- 添加操作 → 选择 Pushwoosh send notification
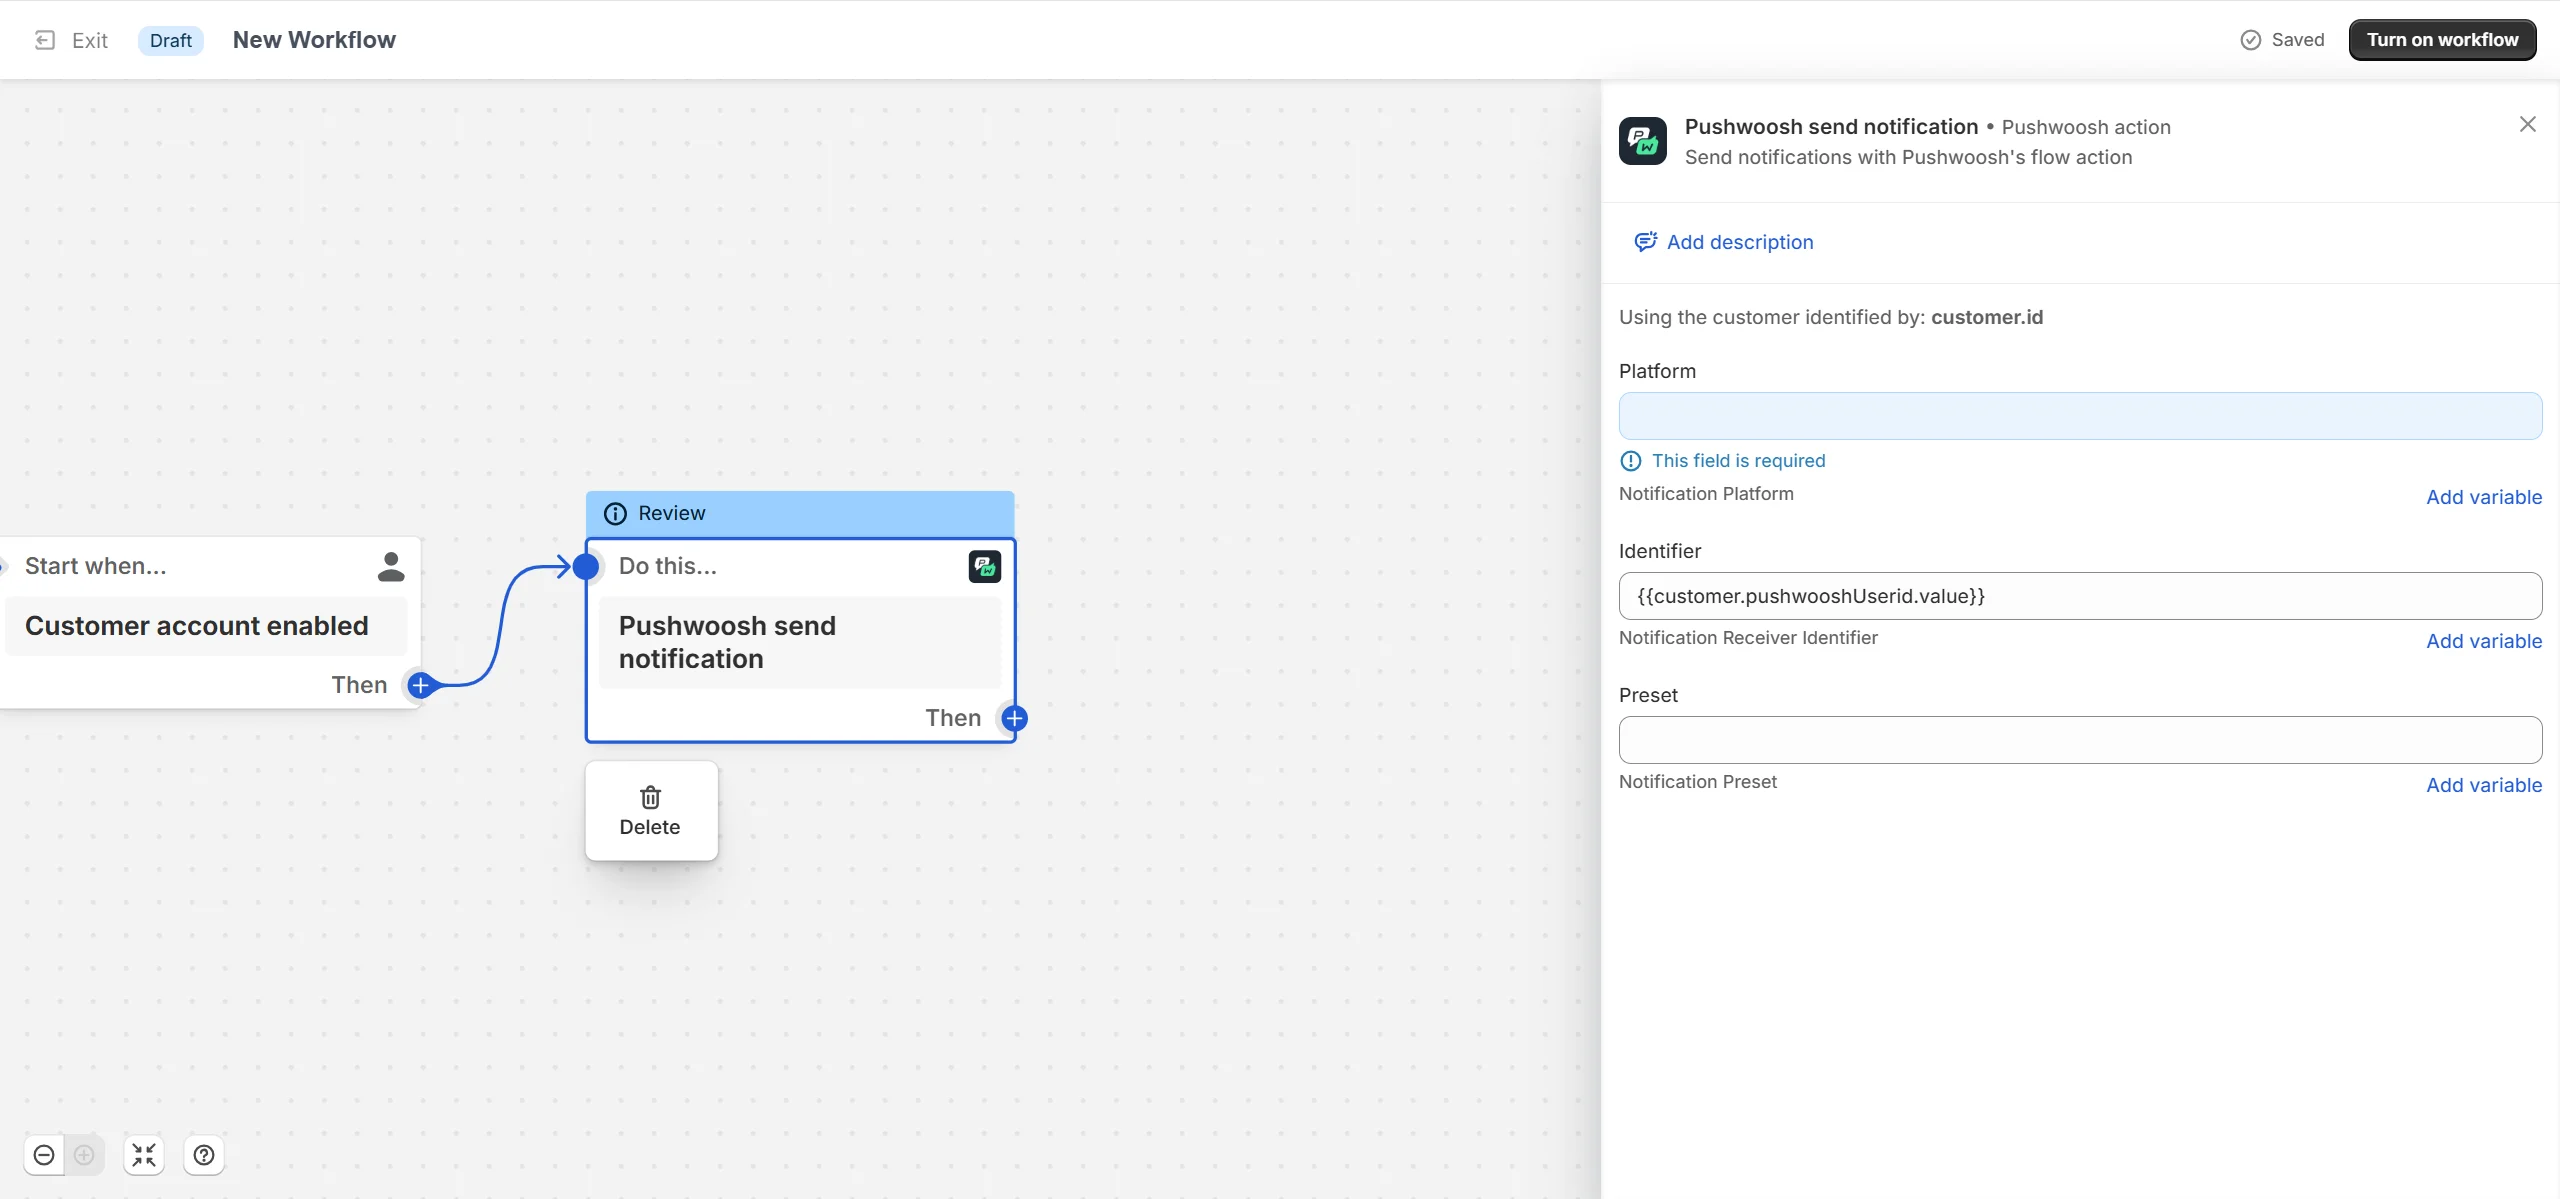
- 配置消息和动态字段
例如:
-
下单后发送消息
-
在购物车被放弃时提醒用户
-
在 30 天不活跃后发送重新激活 push
第四部分。启用 Web push(以及店面浏览事件)
Anchor link to仅使用 web push 时为可选项。如果您需要在Shopify 事件与营销活动中获取产品浏览和加入购物车事件,则为必需项。
在您的店面上为浏览器 web push 启用主题嵌入代码:
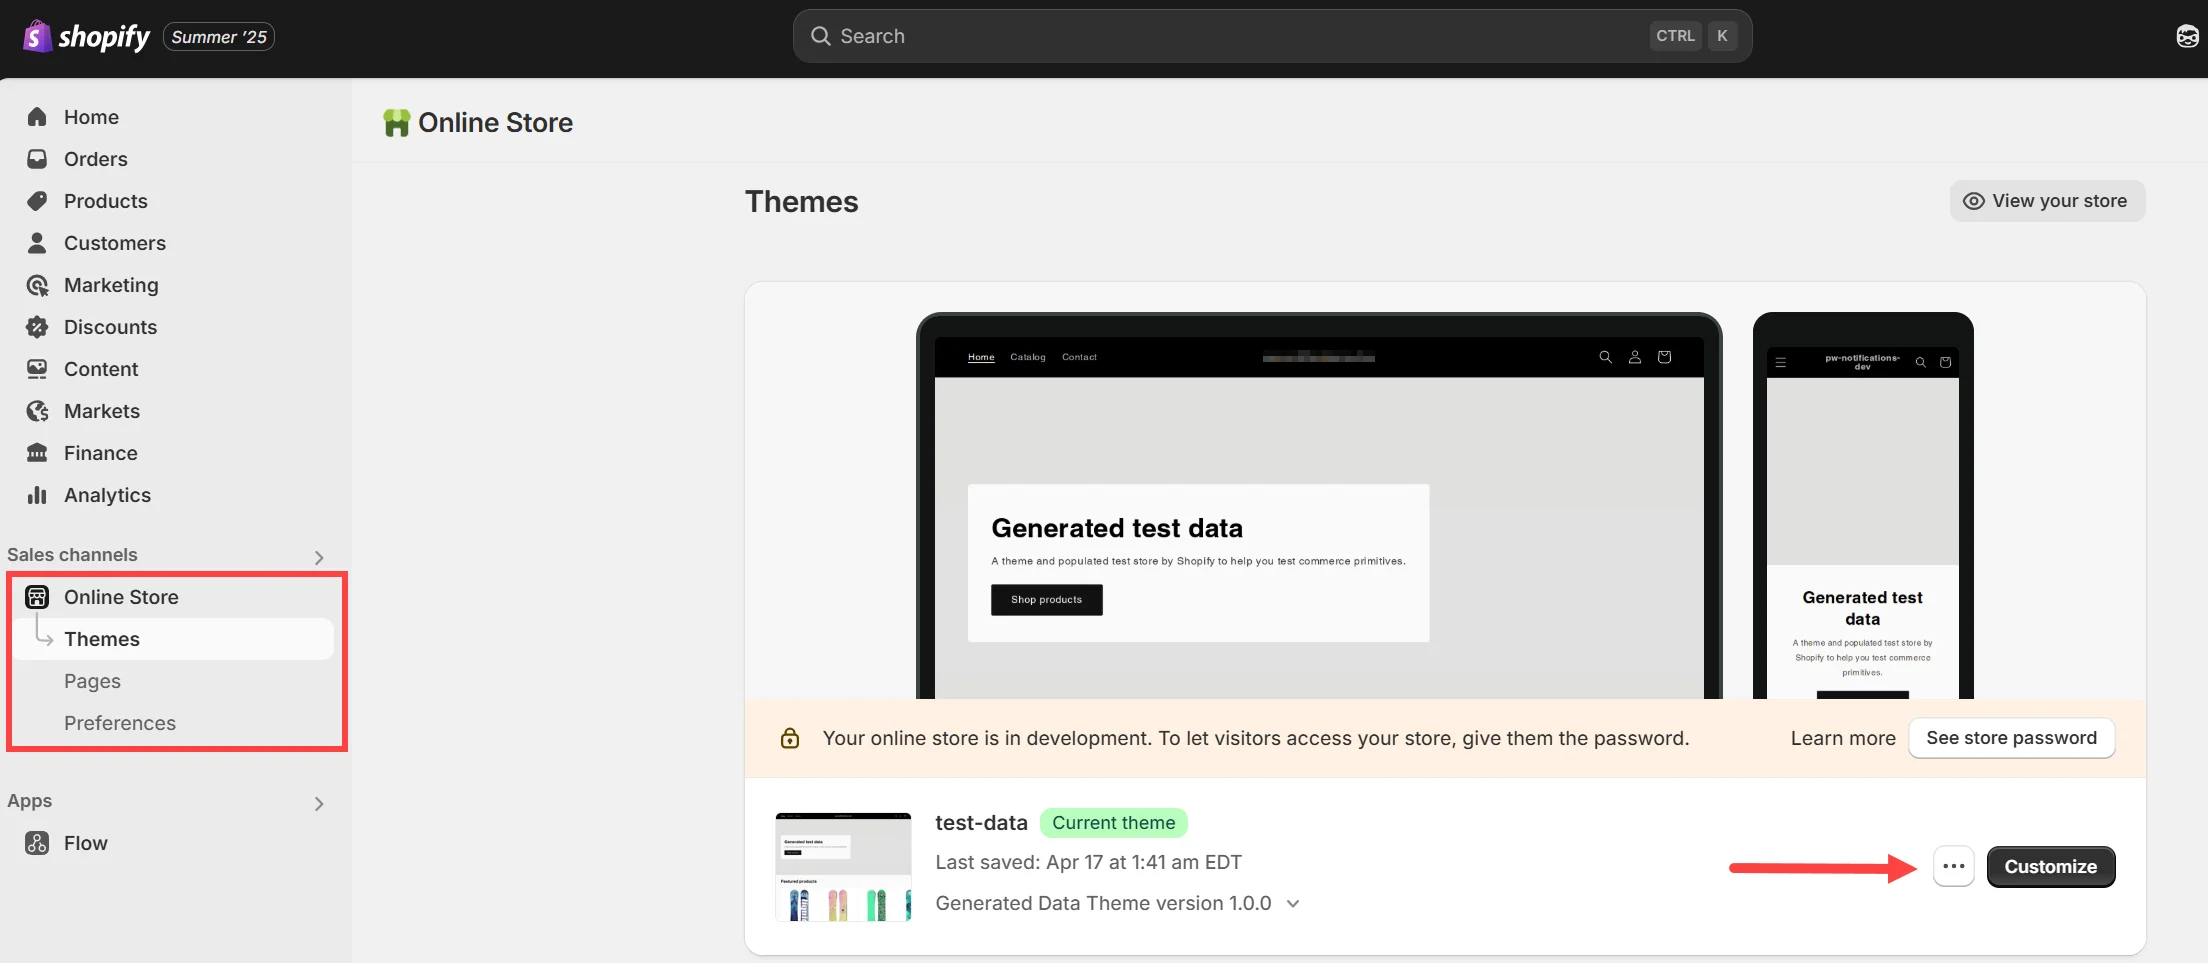
- 前往 Online Store → Themes → Customize
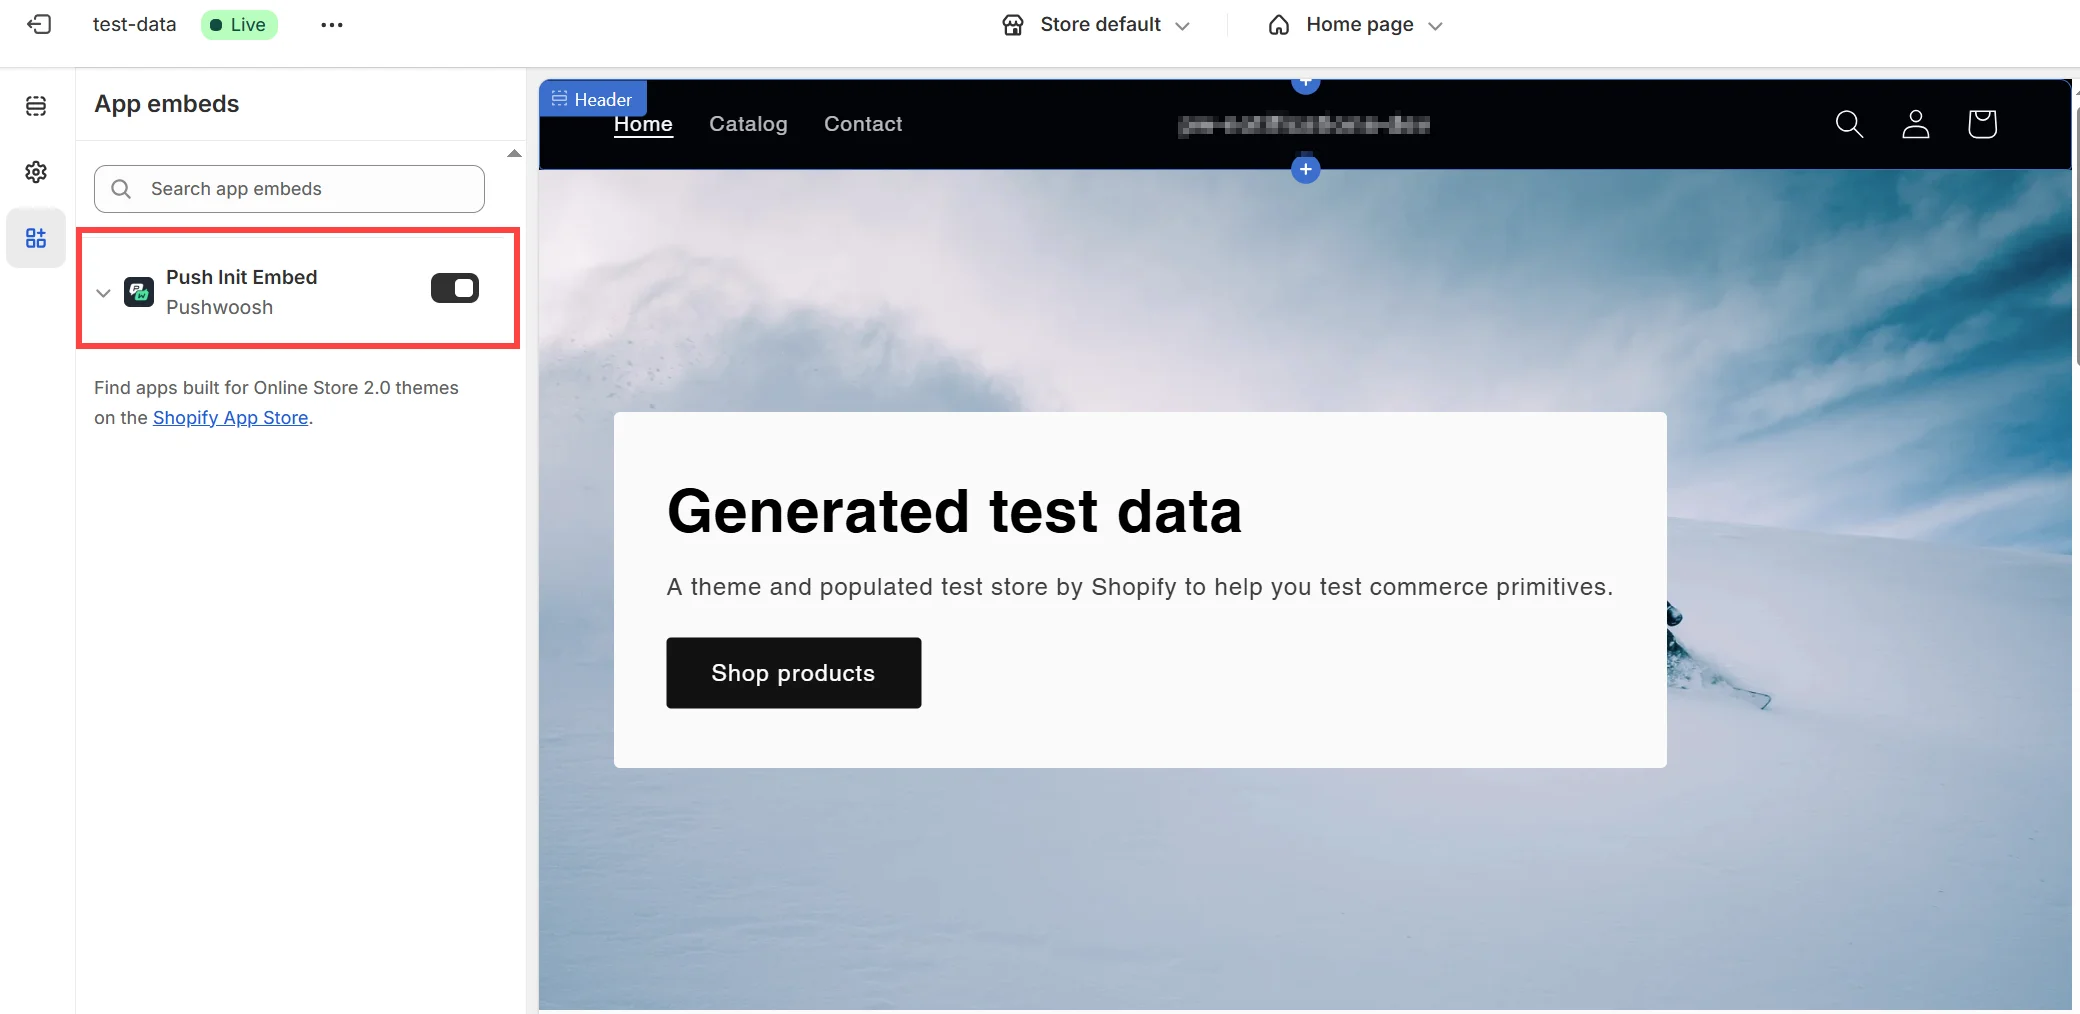
- 从左侧菜单打开 App Embeds
- 将 Push Init Embed 切换为开启
数据合规
Anchor link toShopify 要求每个公开应用都响应其强制性的 GDPR/CCPA webhook。Pushwoosh 的处理方式如下:
customers/redact:当购物者要求店铺删除其数据时,Pushwoosh 会根据 Shopify 发送的任何标识符(email、电话和 Shopify 客户 ID)删除相应的 Pushwoosh 记录。customers/data_request:当购物者请求获取其数据的副本时,Pushwoosh 会向支持团队的内部渠道发布通知,由专人手动处理该请求。Shopify 要求应用在 30 天内响应此类请求。shop/redact:Shopify 会在店铺卸载应用 48 小时后发送此请求,要求删除店铺数据。Pushwoosh 会重新执行卸载本身触发的相同删除操作,清除任何遗留会话,并删除店铺的集成记录(包括设备 API 密钥、应用代码和账单 ID)。这是为了在首次卸载未能完全清理的情况下提供一个安全保障。
使用场景摘要
Anchor link to设置完成后,从 Shopify 发送消息的常见方式:
| 场景 | 使用的工具 |
|---|---|
| 个性化跟进 | Notification by Customer |
| 基于细分的促销 | Notification by Segment |
| 注册后的欢迎消息 | Flow + 元字段跟踪 |
| 购物车放弃提醒 | Shopify Flow + Pushwoosh 操作 |
| Push 订阅 | 主题嵌入代码 + Push Init 开关 |
有关基于订单、购物车、结账和店面事件的 journey 和细分,请参阅Shopify 事件与营销活动。