ওয়েব পপআপ ক্যাম্পেইন তৈরি করুন
ওয়েব পপআপ ক্যাম্পেইন আপনাকে আপনার তৈরি করা ওয়েব পপআপ কন্টেন্ট আপনার ওয়েবসাইটে স্থাপন করতে দেয় এবং এটি কখন প্রদর্শিত হবে এবং কারা এটি দেখবে তা সঠিকভাবে নিয়ন্ত্রণ করতে দেয়।
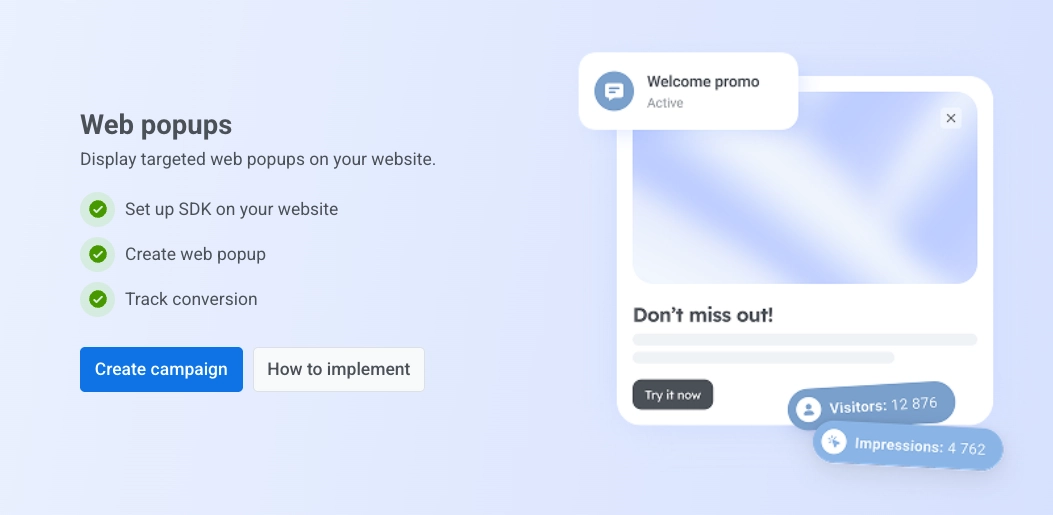
একটি নতুন ক্যাম্পেইন শুরু করুন
Anchor link to১. Campaigns → Web popups-এ যান। ২. Create campaign-এ ক্লিক করুন।
ওয়েব পপআপ কন্টেন্ট নির্বাচন করুন
Anchor link toএই ক্যাম্পেইনটি দর্শকদের যে ওয়েব পপআপ কন্টেন্ট দেখাবে তা বেছে নিন। তালিকার একটি বিদ্যমান আইটেম নির্বাচন করুন, অথবা এডিটর খুলতে Create new-এ ক্লিক করুন (ওয়েব পপআপ কন্টেন্ট দেখুন)। আপনার কন্টেন্ট প্রস্তুত হলে এই ট্যাবে ফিরে আসুন এবং তালিকা থেকে এটি নির্বাচন করুন।
তালিকায় কন্টেন্টের ক্রম পরিবর্তন করতে, ড্রপডাউনের উপরের সর্ট বোতামে ক্লিক করুন এবং সম্প্রতি আপডেট করা, নাম A→Z বা নাম Z→A বেছে নিন। আপনি কোনো ক্রম বেছে না নেওয়া পর্যন্ত তালিকাটি নাম A→Z অনুসারে সাজানো থাকে। Pushwoosh আপনার পছন্দ মনে রাখে এবং আপনি যে প্রতিটি ওয়েব পপআপ কন্টেন্ট পিকার খোলেন তাতে এটি প্রয়োগ করে, ওয়ান-টাইম মেসেজ এবং জার্নি উভয় ক্ষেত্রেই। স্ক্রোল করার সাথে সাথে আরও আইটেম লোড হয়।
সঠিক কন্টেন্ট নির্বাচন করা হলে Next-এ ক্লিক করুন।
অডিয়েন্স নির্ধারণ করুন
Anchor link toকারা পপআপটি দেখবে তা নির্বাচন করুন।
- সমস্ত ব্যবহারকারী: ফিল্টার ছাড়াই সবাইকে পপআপ দেখান।
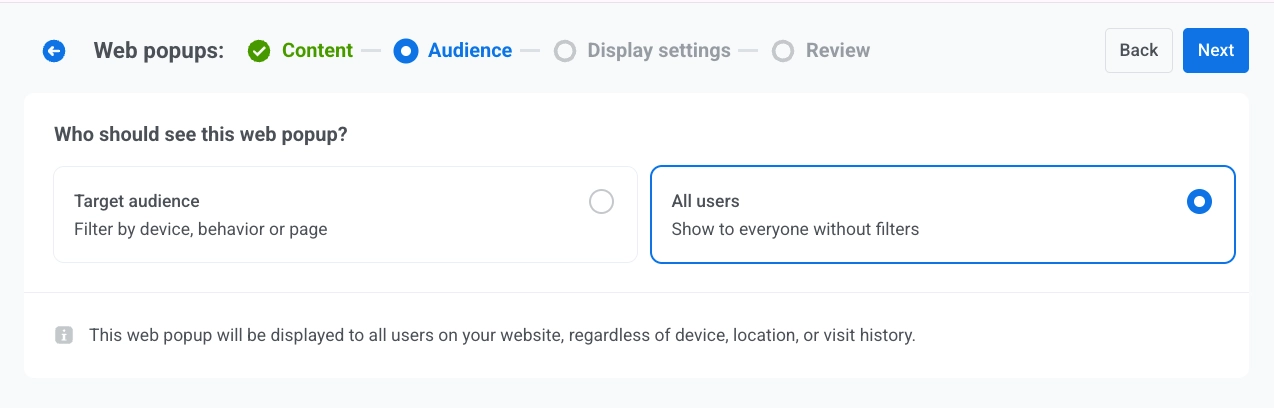
- টার্গেট অডিয়েন্স: শুধুমাত্র সেই ব্যবহারকারীদের পপআপ দেখান যারা একটি সেগমেন্ট বা কাস্টম শর্তাবলীর সাথে মেলে। দুটি উপ-বিকল্প দেখা যাবে:
- Use existing segment: তালিকা থেকে একটি সেভ করা সেগমেন্ট বাছুন। উইজার্ড না ছেড়েই একটি তৈরি করতে, Create segment-এ ক্লিক করুন।
- Use custom conditions: ট্যাগ, ইভেন্ট, সেগমেন্ট, বা ইউজার আইডি দ্বারা ফিল্টার যোগ করে ইনলাইন অডিয়েন্স তৈরি করুন।

আপনার কাজ শেষ হলে, Next-এ ক্লিক করুন।
প্রদর্শন সেটিংস কনফিগার করুন
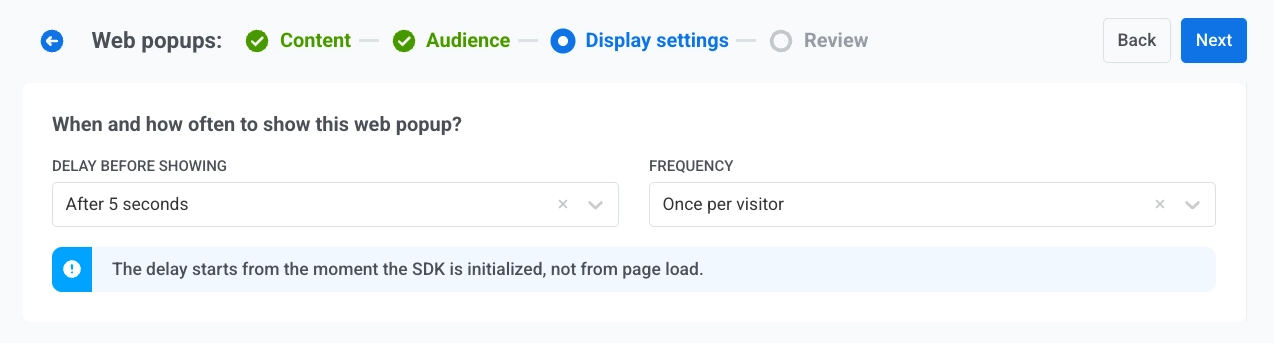
Anchor link toএই ওয়েব পপআপটি কখন, কত ঘন ঘন এবং কোথায় দেখানো হবে তা সেট আপ করুন।
প্রদর্শনের বিলম্ব
Anchor link toপেজ লোড হওয়ার পরে ওয়েব পপআপটি প্রথম কখন প্রদর্শিত হতে পারে তা বেছে নিন।
- অবিলম্বে
- ৩ সেকেন্ড পরে
- ৫ সেকেন্ড পরে
- ১০ সেকেন্ড পরে
ফ্রিকোয়েন্সি
Anchor link toFREQUENCY-এর অধীনে, একজন দর্শক এই ওয়েব পপআপটি কত ঘন ঘন দেখতে পাবে তা বেছে নিন:
- প্রতি দর্শকের জন্য একবার: দর্শক সেই ব্রাউজারে পপআপটি সর্বাধিক একবার দেখতে পাবে, এমনকি একটি নতুন ট্যাবেও।
- প্রতি সেশনে একবার: দর্শক প্রতি ব্রাউজিং সেশনে একবার পপআপটি দেখতে পাবে। যদি তারা একটি ট্যাব বন্ধ করে এবং সেশন শেষ হওয়ার আগে ফিরে আসে, পপআপটি আর প্রদর্শিত হবে না।
- প্রতিবার পরিদর্শনে: দর্শক যখনই একটি ম্যাচিং পেজ লোড করবে তখনই পপআপটি প্রদর্শিত হবে।
ডিভাইস
Anchor link toওয়েব পপআপটি কোন পরিবেশে প্রদর্শিত হবে তা নিয়ন্ত্রণ করে।
নির্বাচন করুন:
- সমস্ত ডিভাইস
- ডেস্কটপ
- মোবাইল।

পেজগুলিতে দেখান
Anchor link toকোন URL গুলি ওয়েব পপআপটি ট্রিগার করবে তা নিয়ন্ত্রণ করে।
সমস্ত পেজ
Anchor link toসাইটের প্রতিটি পেজে পপআপটি দেখান।
ঐচ্ছিকভাবে নির্দিষ্ট পেজ বাদ দিন: + Add exclusion-এ ক্লিক করুন এবং একটি পাথ লিখুন। আপনি ১০টি পর্যন্ত এক্সক্লুশন যোগ করতে পারেন।
প্রতিটি বাদ দেওয়া পেজের জন্য, আপনার ডোমেনের পরে যেমন পাথটি দেখা যায় তেমন লিখুন, উদাহরণস্বরূপ /pricing বা /blog/intro, এবং এটি কীভাবে ম্যাচ করবে তা বেছে নিন:
- Exact match: পরিদর্শন করা পাথটি আপনার প্রবেশ করানো পাথের সাথে হুবহু এক হতে হবে।
- Starts with: পপআপটি প্রবেশ করানো পাথ এবং তার অধীনে থাকা প্রতিটি পাথে প্রযোজ্য হবে।
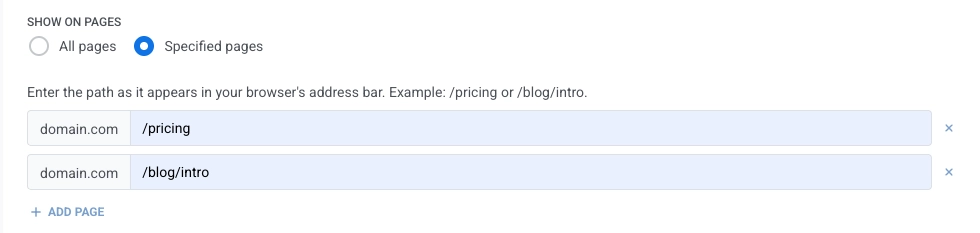
নির্দিষ্ট পেজ
Anchor link toশুধুমাত্র আপনার তালিকাভুক্ত পেজগুলিতে পপআপটি দেখান। আরও সারি যোগ করতে + Add page-এ ক্লিক করুন, অথবা একটি সরাতে ×-এ ক্লিক করুন। আপনি ১০টি পর্যন্ত পেজ যোগ করতে পারেন। সমস্ত পেজে এক্সক্লুশন-এর মতো একইভাবে প্রতিটি পাথ লিখুন এবং ম্যাচ করুন।
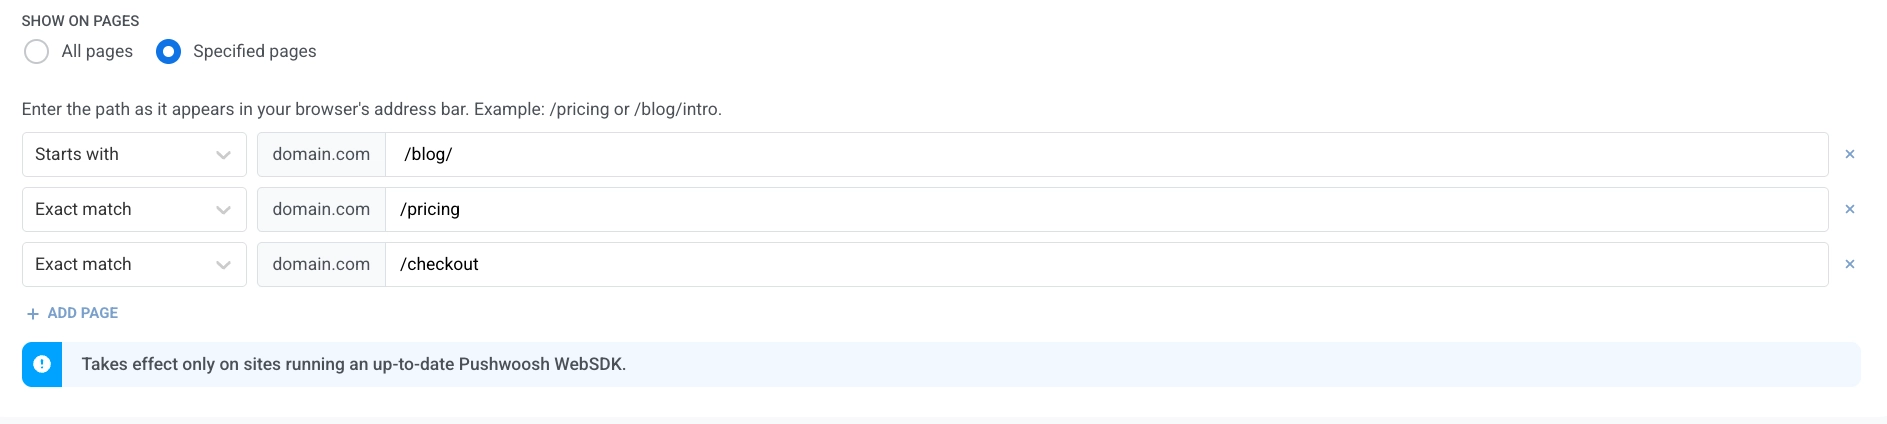
চালিয়ে যেতে Next-এ ক্লিক করুন।
ক্যাম্পেইন পর্যালোচনা করুন
Anchor link toReview স্ক্রিনটি সংক্ষেপে দেখায়:
- কন্টেন্ট: সংযুক্ত ওয়েব পপআপ কন্টেন্ট। ওয়েব পপআপ কন্টেন্ট নির্বাচন করুন দেখুন। একটি ক্যাম্পেইন যা এখনও ওয়েব পপআপ কন্টেন্টের পরিবর্তে একটি লিগ্যাসি সাবস্ক্রিপশন ফর্মের সাথে লিঙ্ক করা আছে, সেটি এখানে সেই ফর্মের নাম দেখাবে।
- অডিয়েন্স: সমস্ত ব্যবহারকারী, অথবা নির্বাচিত সেগমেন্টের নাম বা কাস্টম শর্তাবলী সহ টার্গেট অডিয়েন্স।
- প্রদর্শন সেটিংস: ডিভাইস, যে পেজগুলিতে ওয়েব পপআপটি দেখায় (ম্যাচ টাইপ এবং যেকোনো এক্সক্লুশন সহ), বিলম্ব এবং ফ্রিকোয়েন্সি।
যেকোনো ব্লকে CHANGE OPTIONS ব্যবহার করে পিছনে গিয়ে সেই অংশটি সম্পাদনা করুন।
Preview এলাকাটি দেখায় যে ওয়েব পপআপটি একটি নমুনা ভিউপোর্টে কেমন দেখায়। যদি আপনার মূল কন্টেন্ট অ্যাসেটটি সামঞ্জস্য করার প্রয়োজন হয় তবে EDIT CONTENT ব্যবহার করুন।
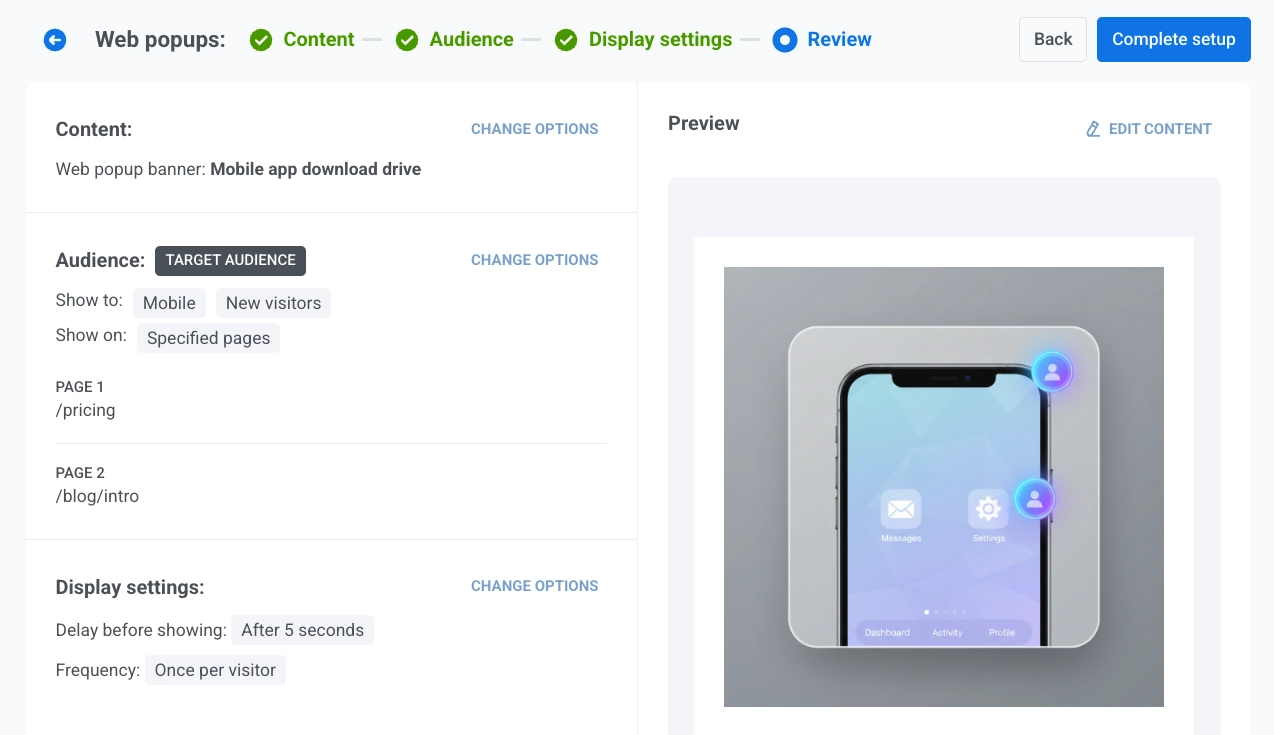
যখন সবকিছু ঠিকঠাক দেখায়, তখন Complete setup-এ ক্লিক করুন।
তারপর মেনু থেকে একটি বিকল্প বেছে নিন:
- Launch campaign ওয়েব পপআপটি সক্রিয় করে।
- Save as draft ক্যাম্পেইনটি সক্রিয় না করেই সেভ করে। আপনি যখন লাইভ যেতে প্রস্তুত, তখন Campaigns → Web popups-এ যান, টেবিল থেকে ড্রাফটটি খুঁজুন এবং তার সারিতে Activate-এ ক্লিক করুন। যদি আপনার এখনও সেটিংস পরিবর্তন করার প্রয়োজন হয় তবে প্রথমে সারি অ্যাকশন মেনুতে Edit campaign ব্যবহার করুন।
তালিকা থেকে ক্যাম্পেইন অনুসন্ধান, ফিল্টার এবং পরিচালনা করতে, ক্যাম্পেইন দেখুন এবং পরিচালনা করুন দেখুন।