CSV ফাইল থেকে জিওজোন ইম্পোর্ট করুন
যখন আপনার শত শত অবস্থান থাকে, যেমন একটি চেইনের প্রতিটি স্টোর বা প্রতিটি পিকআপ পয়েন্ট, তখন সেগুলিকে এক এক করে ম্যাপে স্থাপন করা বাস্তবসম্মত নয়। এর পরিবর্তে একটি স্প্রেডশীট থেকে সেগুলি ইম্পোর্ট করুন।
ফাইলটি প্রস্তুত করুন
Anchor link toফাইলটিতে একটি হেডার সারি এবং প্রতিটি অবস্থানের জন্য একটি সারি প্রয়োজন, এবং এটি 5 MB এর বেশি হওয়া উচিত নয়। এতে হাজার হাজার অবস্থানের জন্য জায়গা রয়েছে, যা একটি একক জিওজোন ক্যাম্পেইনের জন্য যা কভার করার কথা তার চেয়ে অনেক বেশি। তিনটি কলাম আবশ্যক।
ফাইলটিতে আপনি range বা cooldown এর মতো ছোট হেডার ব্যবহার করতে পারেন। Import geozones স্ক্রিনে ম্যাপিং ড্রপডাউন নীচের লেবেলগুলি ব্যবহার করে (উদাহরণস্বরূপ range → Range, m)।
| ফাইলের কলাম | ম্যাপ করা হবে | আবশ্যক | নোট |
|---|---|---|---|
| Name | Name | হ্যাঁ | 64 অক্ষর পর্যন্ত। |
| Latitude | Latitude | হ্যাঁ | -90 এবং 90 এর মধ্যে। |
| Longitude | Longitude | হ্যাঁ | -180 এবং 180 এর মধ্যে। |
| Range | Range, m | না | মিটার, 50 এবং 100,000 এর মধ্যে। Default range, m-এ ফলব্যাক করে। |
| Cooldown | Cooldown, s | না | সেকেন্ড, 60 এবং 3,596,400 (41 দিন) এর মধ্যে। Default cooldown, s-এ ফলব্যাক করে। |
| Message | Message | না | পুশ টেক্সট, 1024 অক্ষর পর্যন্ত। |
| Cluster code | Cluster code | না | একটি বিদ্যমান ক্লাস্টার কোড। |
| Preset code | Preset code | না | একটি বিদ্যমান প্রিসেট কোড। |
প্রতিটি জিওজোনের কিছু পাঠানোর জন্য প্রয়োজন, তাই প্রতিটি সারিতে একটি মেসেজ বা একটি প্রিসেট থাকতে হবে। এটি সারির নিজস্ব কলাম থেকে বা ইম্পোর্ট স্ক্রিনের Message for every zone / Preset for every zone থেকে আসতে পারে। যখন একটি সারিতে উভয়ই থাকে, তখন একটি প্রিসেট প্রাধান্য পায়।
উদাহরণ CSV
Anchor link toএখানে দুটি অবস্থান সহ একটি geozones.csv রয়েছে। দ্বিতীয় সারিতে range খালি রাখা হয়েছে তাই Default range, m প্রযোজ্য হবে:
| name | latitude | longitude | range | message |
|---|---|---|---|---|
| স্টোর ডাউনটাউন | 40.7128 | -74.0060 | 200 | আমাদের স্টোরে স্বাগতম! |
| পিকআপ পয়েন্ট | 51.5074 | -0.1278 | আপনার অর্ডার প্রস্তুত |
geozones.csv-এর প্লেইন টেক্সট ফরম্যাটে উপস্থাপনা:
name,latitude,longitude,range,messageStore Downtown,40.7128,-74.0060,200,Welcome to our store!Pickup Point,51.5074,-0.1278,,Your order is readyকিভাবে ইম্পোর্ট করবেন
Anchor link toফাইলটি আপলোড করতে এবং জিওজোন তৈরি করতে এই পদক্ষেপগুলি অনুসরণ করুন।
- Geo campaigns পেজে, Import CSV-তে ক্লিক করুন। Import geozones স্ক্রিনটি খুলবে।

-
আপনার CSV ফাইলটি নির্বাচন করুন।
-
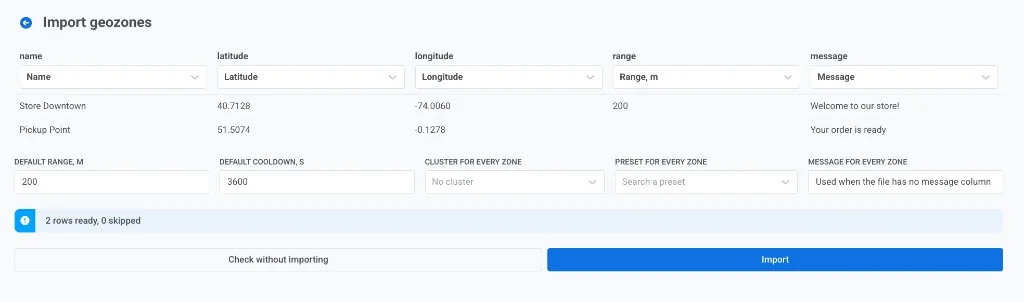
Import geozones স্ক্রিনে কলাম ম্যাপ করুন এবং ডিফল্ট সেট করুন।
প্রতিটি CSV কলামকে একটি জিওজোন ফিল্ডে ম্যাপ করুন। প্রতিটি কলাম হেডারের নীচে, ড্রপডাউনটি খুলুন এবং সেই ফিল্ডটি বেছে নিন যা কলামটি পূরণ করবে:
- যদি Pushwoosh হেডারটি ভুলভাবে ম্যাচ করে, তাহলে ড্রপডাউন থেকে সঠিক ফিল্ডটি বেছে নিন।
- এটিকে উপেক্ষা করতে একটি কলামকে Do not import-এ সেট করুন।
- ন্যূনতম Name, Latitude, এবং Longitude ম্যাপ করুন।
- যখন ফাইলটিতে Range, m, Cooldown, s, Message, Cluster code, বা Preset code কলামগুলি থাকে, তখন সেগুলি ম্যাপ করুন।
ফাইল যে মানগুলি সরবরাহ করে না তার জন্য ডিফল্ট সেট করুন:
- Default range, m এবং Default cooldown, s. ব্যবহৃত হয় যখন ফাইলটিতে কোনো রেঞ্জ বা কুলডাউন কলাম না থাকে, বা সেলটি খালি থাকে (যেমন উদাহরণের “Pickup Point”-এর ক্ষেত্রে)।
- Cluster for every zone. একটি ক্লাস্টার বেছে নিন, অথবা No cluster ছেড়ে দিন।
- Preset for every zone. প্রতিটি সারির জন্য ঐচ্ছিক পুশ প্রিসেট যার একটি প্রয়োজন। অ্যাপের সমস্ত প্রিসেটে পৌঁছাতে তালিকাটি স্ক্রল করুন, এবং এগুলির ক্রম পরিবর্তন করতে ফিল্ডের পাশের সর্ট বোতামটি ব্যবহার করুন।
- Message for every zone. ব্যবহৃত হয় যখন ফাইলটিতে কোনো মেসেজ কলাম না থাকে। যে সারিগুলিতে ইতিমধ্যে একটি মেসেজ আছে সেগুলি তাদের নিজস্ব টেক্সট রাখে।
-
প্রস্তুত এবং স্কিপ করা সংখ্যাগুলি পরীক্ষা করুন (উদাহরণস্বরূপ 2 rows ready, 0 skipped)। প্রয়োজন হলে ম্যাপিং বা স্প্রেডশীট ঠিক করুন, তারপর Check without importing-এ ক্লিক করুন। Pushwoosh জিওজোন তৈরি না করেই পুরো ফাইলটি যাচাই করে। প্রত্যাখ্যাত সারিগুলি লাইন নম্বর এবং কারণ সহ ফিরে আসে, যাতে আপনি স্প্রেডশীটটি ঠিক করতে পারেন এবং কিছু অর্ধেক লেখা না রেখে আবার চেষ্টা করতে পারেন।
-
যখন চেকটি ঠিক মনে হয়, তখন Import-এ ক্লিক করুন। জিওজোনগুলি ব্যাচে তৈরি হয়। ফলাফল স্ক্রিন রিপোর্ট করে যে কতগুলি তৈরি হয়েছে এবং কোন সারিগুলি ব্যর্থ হয়েছে।

একই ফাইল দুবার ইম্পোর্ট করলে প্রতিটি জিওজোনের একটি দ্বিতীয় কপি তৈরি হয়: নামগুলি ইউনিক নয়। একটি ভুল সংশোধন করতে, আপনি যে জিওজোনগুলি ইম্পোর্ট করেছেন সেগুলি ডিলিট করুন এবং সংশোধিত ফাইলটি ইম্পোর্ট করুন।
কেন একটি সারি স্কিপ করা হয়
Anchor link toচেক বা ইম্পোর্টের সময়, যে সারিগুলি পড়া যায় না সেগুলি তাদের লাইন নম্বর সহ তালিকাভুক্ত করা হয় এবং স্কিপ করা হয়। বাকিগুলি এখনও ইম্পোর্ট করা হয়। একটি সারি স্কিপ করা হয় যখন:
- নামটি খালি থাকে
- অক্ষাংশ বা দ্রাঘিমাংশ একটি সংখ্যা নয়, বা উপরের টেবিলে দেওয়া পরিসরের বাইরে পড়ে
- রেঞ্জ একটি সংখ্যা নয়, বা 50 থেকে 100,000 মিটারের বাইরে পড়ে
- কুলডাউন একটি সংখ্যা নয়, বা 60 থেকে 3,596,400 সেকেন্ডের বাইরে পড়ে
- সারিটিতে একটি মেসেজ বা একটি প্রিসেট কোনোটিই থাকে না
একটি ফাইলের পরিবর্তে আপনার নিজের সিস্টেম থেকে জিওজোন তৈরি করতে, addGeoZone API মেথড ব্যবহার করুন।