Supabase: 행 삽입
Supabase: 행 삽입을 사용하여 프로젝트의 REST API를 통해 서비스 역할 키를 사용하여 Journey 단계에서 Supabase 테이블에 행을 작성합니다. 이 지점은 자체 서비스 역할 키로 인증합니다. 설정의 다른 곳에 구성된 계정 수준 통합은 사용하지 않습니다.
일반적인 사용 사례:
- 앱의 자체 데이터베이스에 쓰기: 앱이 해당 Supabase 테이블에서 이미 읽는 행을 삽입합니다.
- 이벤트 발생 시 기록: 배치 파이프라인을 기다리지 않고 원시 Journey 데이터를 테이블에 직접 씁니다.
- 기존 데이터와 동기화: Supabase 테이블이 자체 데이터와 조인할 수 있는 디바이스 또는 태그 값을 삽입합니다.
지점 구성
Anchor link to- 왼쪽 패널의 Integrations 섹션에서 Supabase: 행 삽입을 캔버스로 드래그합니다.
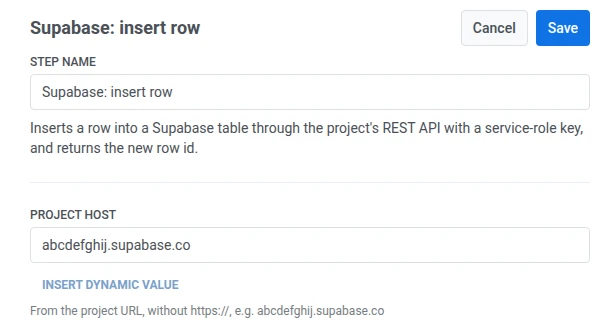
- 지점을 더블 클릭하고 단계 이름을 입력합니다.
- 프로젝트 호스트에 URL에서 프로젝트의 호스트(예:
abcdefghij.supabase.co)를 입력합니다.https://또는 후행 슬래시를 포함하지 마십시오. Pushwoosh가https://와 API 경로를 직접 추가합니다.
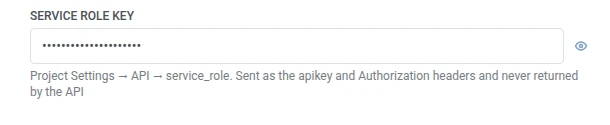
- 서비스 역할 키에 Project Settings > API > service_role의 키를 입력합니다. 이 키는 웹훅 비밀 헤더처럼 마스킹되어 저장되며, Supabase는 이를 Pushwoosh로 다시 반환하지 않습니다.
- 테이블에 대상 테이블의 이름을 입력합니다.

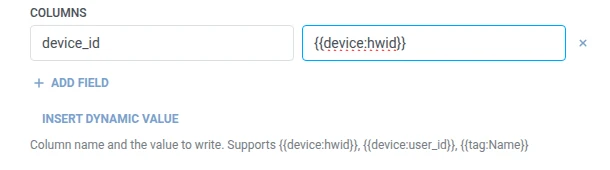
- 열에 쓸 테이블 열당 하나의 행을 추가합니다. 열 이름과 값을 입력합니다. 이름은 비어 있지 않고 고유해야 합니다. 값은 고정된 텍스트이거나 웹훅 본문에서와 같은
{{tag:Name}}과 같은 트래블러 매크로일 수 있습니다. 또는 동적 값 삽입을 클릭하여 이 Journey의 이전 단계에서 생성된 속성(예: LLM 응답 또는 매핑된 웹훅 값)을 선택합니다.
- 저장을 클릭합니다.
트래블러는 캔버스에서 다음에 연결하는 단계로 계속 진행합니다.
단계 실행 후 속성
Anchor link to| 속성 | 내용 |
|---|---|
supabase_row_id | 새 행의 ID |
이후 단계에서 사용하는 방법
Anchor link to트래블러는 이 속성과 관계없이 이미 다음 단계로 계속 진행했습니다. 나중에 이 특정 행을 참조하거나 업데이트해야 하는 경우(예: Supabase 자체 API를 통해) 사용자 프로필 업데이트를 사용하여 태그에 저장하십시오.
실패 및 예기치 않은 응답
Anchor link to요청이 실패하면 트래블러는 Journey에서 제외됩니다. 오류 및 실패한 요청을 참조하십시오.
예시 시나리오: Supabase에서 새 평가판 기록
Anchor link to앱은 별도의 내보내기 작업 없이 모든 평가판 시작을 자체 Supabase 데이터베이스에 기록하려고 합니다.
- 트리거 기반 진입 요소를 추가하고
TrialStarted이벤트에서 실행되도록 설정합니다. - 바로 뒤에 Supabase: 행 삽입을 추가합니다. 테이블을
travelers로 설정합니다. 열에서device_id를{{device:hwid}}로 설정합니다. - 저장을 클릭합니다.
이것이 실행되면 모든 평가판 시작이 travelers 테이블에 행으로 기록되어 앱 자체 쿼리에 사용할 수 있게 됩니다.