Issue passes from a campaign
이 콘텐츠는 아직 귀하의 언어로 제공되지 않습니다.
Issue a pass from a campaign to give a user their own copy of the campaign’s design, or attach passes you created earlier so they follow the campaign too. You can’t issue or attach passes while the campaign is Archived.
Issue a pass from the campaign
Anchor link to-
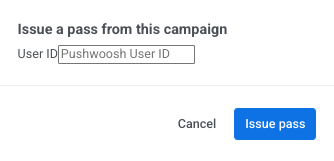
On the Passes tab, click Issue pass.
-
Enter the recipient’s Pushwoosh User ID.
-
Click Issue pass to confirm.
Depending on how you configured Personal fields, the dialog handles them as follows:
- Editable fields: appear under their field key, with default values that you can change for this user.
- Tag placeholders (like
{Seat}): do not appear in the dialog. Pushwoosh automatically populates them from the user’s tags.
You can also edit any personal field on an individual pass at any time after issuance.
Pushwoosh generates the pass from the campaign’s current design and lists it on the Passes tab and in the application’s All passes table.
Deliver the pass to the recipient
Anchor link toIssuing a pass creates the pass record in Pushwoosh. To deliver it to the user’s device, share the install link:
- Open the pass’s actions menu on the Passes tab or in All passes.
- Select Copy install link or QR code. Apple Wallet passes also offer Download for the signed
.pkpassfile. - Send the link or file to the recipient.
Other ways to deliver passes:
- Share in your channels: send the link by email, push, or SMS. See Share Wallet passes.
- Issue and deliver automatically: use the Issue wallet pass element in a Customer Journey. It issues a pass as users move through the journey, and a later Push or Email element sends them the link, so you don’t issue passes here.
Attach an existing pass to a campaign
Anchor link toYou can attach standalone passes (created outside any campaign) to a campaign so they start receiving shared updates.
-
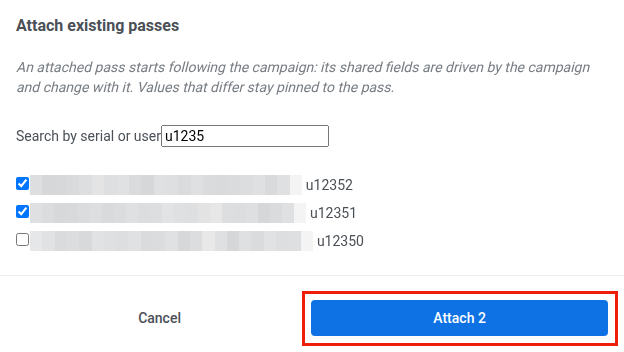
On the Passes tab, click Attach passes. The list shows only passes that don’t belong to any campaign.
-
Search for passes by User ID, serial number, or barcode.
-
Select the passes and click Attach N, where N is the number of selected passes.
A pass that can’t be attached stays in the list with the reason next to it:
- The pass already belongs to another campaign.
- The pass style differs from the campaign’s.
- The pass has no field for one of the campaign’s fields.
Once attached:
- Shared fields with the same value as the campaign start following it and update whenever you change the pass template.
- Shared fields with a different value keep it and become overrides on that pass.
- Personal values already on the pass (such as user details or unique balances) are preserved.