SMS 및 메신저 통계
Pushwoosh는 푸시 및 이메일을 추적하는 것과 동일한 방식으로 SMS, WhatsApp, Viber, Telegram 전송을 추적합니다. 즉, 전송된 하나의 메시지에 대해 열 수 있는 메시지 통계 페이지로 추적합니다.
캠페인 → 일회성 메시지 또는 Journey의 메시지 요소에 있는 상세 통계에서 열 수 있습니다. 메시지 이름을 클릭하여 통계를 엽니다.
상세 SMS 및 메신저 통계
Anchor link to메시지 통계를 사용하여 특정 SMS 또는 메신저 전송의 성과를 확인하세요.
이 페이지에는 개요, 타임라인, 오류의 세 가지 탭이 있습니다.
동일한 전송이 다른 채널로도 전송된 경우, 개요 / 타임라인 / 오류 위에 채널별로 레이블이 지정된 채널 탭(예: SMS 또는 WhatsApp)이 나타납니다. 단일 채널 메시지에는 채널 탭이 표시되지 않습니다.
개요 탭
Anchor link to개요 탭을 사용하여 이 전송의 도달률, 전송률, 열람률(플랫폼에서 보고하는 경우)을 확인하세요.
메시지가 FAIL 상태이면 개요 탭에 숫자 대신 대시와 전송되지 않은 이유가 담긴 알림이 표시됩니다. 메시지가 실패한 이유를 참조하세요.
캠페인 성과
Anchor link to표시되는 카드는 채널에 따라 다릅니다:
- 항상: Audience 및 Sent
- Opened: 플랫폼에서 열람을 보고하는 경우에만 표시됩니다. 현재는 WhatsApp이 해당됩니다. Viber와 Telegram은 표시하지 않습니다. SMS는 열람을 추적할 이벤트가 없으므로 절대 표시되지 않습니다.
정확한 계산식을 보려면 카드에 있는 ⓘ 위로 마우스를 가져가세요.
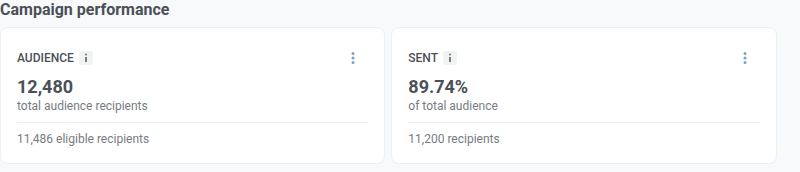
| 카드 | 내용 |
|---|---|
| Audience | 이 전송의 대상이 된 사람 수와 제외 후에도 자격이 유지된 사람 수입니다. |
| Sent | 타겟팅한 모든 사람 중 메시징 제공업체가 전송을 수락한 비율입니다. 수락됨은 메시지가 이미 도착했다는 의미가 아니라 제공업체가 전송 작업을 시작했다는 의미입니다. |
| Opened | 전송된 수신자 중 메시지를 열람한 비율입니다. 플랫폼에서 열람을 보고하는 경우에만 표시됩니다. |
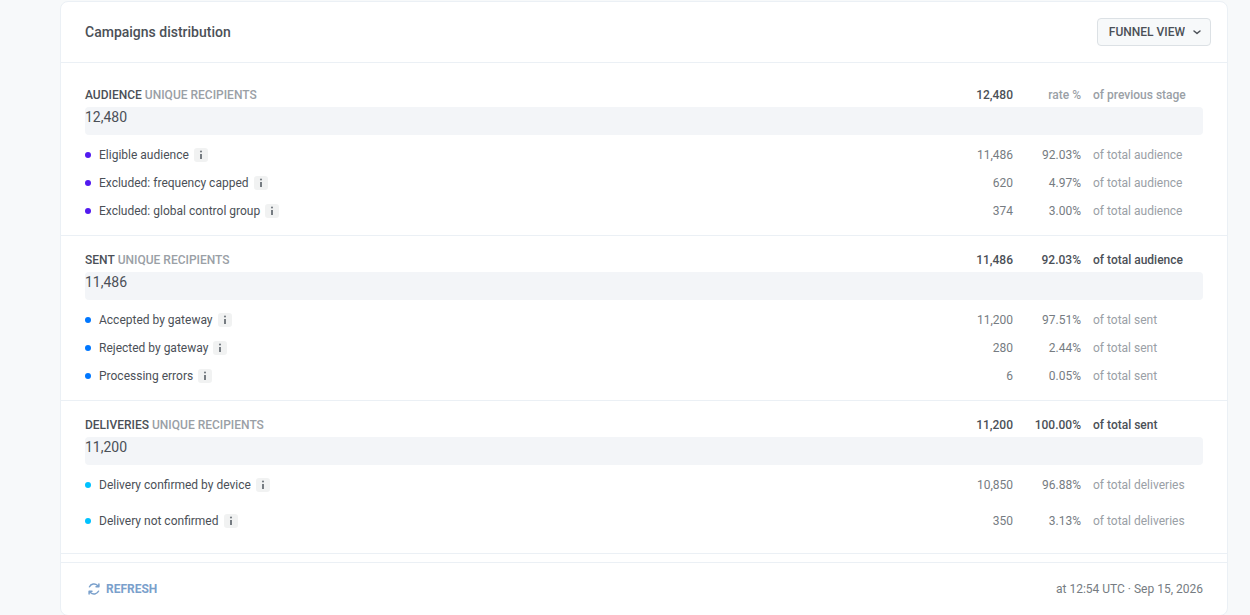
캠페인 분포
Anchor link to캠페인 분포는 이 전송을 단계별로 나눕니다:
- Audience: 타겟팅한 대상
- Sent: 전송이 수락된 대상
- Deliveries: 전송 확인을 받은 대상
- Opened: 열람한 대상 (플랫폼에서 열람을 보고하는 경우, 현재 WhatsApp)
그렇지 않은 경우, SMS를 포함하여 퍼널은 Audience → Sent → Deliveries에서 멈춥니다.
동일한 분석 내용을 퍼널(기본값) 또는 테이블의 두 가지 방식으로 볼 수 있습니다. 테이블 보기를 클릭하여 테이블을 열고, 퍼널 보기를 클릭하여 다시 전환합니다.
새로고침을 클릭하여 숫자를 다시 로드합니다. 그 옆의 “업데이트 시간…” 줄은 통계가 마지막으로 로드된 시간(항상 UTC)을 보여줍니다.
퍼널 읽는 방법
Anchor link to- 이 채널에 나타나는 단계를 따라 경로를 아래로 따라갑니다.
- 단계에 표시된 큰 백분율은 위 단계에서 해당 단계에 도달한 비율입니다.
- 단계 아래의 목록은 해당 사람들이 어떻게 나뉘었는지(예: 수락됨 vs 거부됨) 보여줍니다.
- 행이 누락된 경우, 이 전송에서 해당 그룹에 속한 사람이 아무도 없다는 의미입니다.
- Sent 카드와 Sent 퍼널 단계는 다를 수 있습니다. 카드는 타겟팅한 모든 사람을 계산하고, 퍼널 단계는 자격이 있는 사람만 계산합니다.
각 단계에 포함되는 내용
Anchor link to자격이 유지된 사람과 제외된 사람(예: 빈도 제한 또는 전역 제어 그룹).
자격이 있는 사람들은 다음과 같이 나뉩니다:
- 게이트웨이에서 수락됨: 제공업체가 전송 처리를 시작했으며, 도착했다는 의미는 아닙니다.
- 게이트웨이에서 거부됨: 제공업체 측 문제입니다. 자세한 내용은 오류 탭에 있습니다.
- 처리 오류: Pushwoosh 측 실패입니다. 자세히 알아보기
전송 확인을 받은 사람(열람 아님).
- 일반적으로: 확인됨, 확인되지 않음.
- SMS와 WhatsApp은 일반적으로 전송 세부 정보를 보여줍니다.
- Viber와 Telegram은 종종 전송 확인을 보내지 않으므로, 해당 채널의 빈 전송 행은 일반적으로 전송 실패가 아니라 “확인 데이터 없음”을 의미합니다.
이 단계가 표시될 때 열람한 사람(현재 WhatsApp).
타임라인 탭
Anchor link to타임라인 탭을 사용하여 이 전송이 개요의 총계뿐만 아니라 시간별(또는 일별)로 어떻게 수행되었는지 확인하세요. 예를 들어, 전송 후 전송 확인이 언제 들어왔는지 또는 거부가 언제 쌓였는지 확인할 수 있습니다. 차트에는 네 개의 선이 있습니다:
- 게이트웨이에서 수락됨: 제공업체가 전송 작업을 시작했습니다.
- 게이트웨이에서 거부됨: 제공업체가 전송을 거부했습니다.
- 전송 확인: 제공업체 또는 기기가 전송을 보고했습니다. 이것은 열람이 아닙니다.
- 열람: 누군가 메시지를 열었습니다(플랫폼에서 열람을 보고하는 경우).
차트 아래의 요약 테이블은 선택한 기간 동안 각 지표의 총계를 보여줍니다.
차트를 구성하려면:
- 시간 범위를 설정합니다. 시간은 UTC 기준입니다. 짧은 범위의 경우 차트는 시간별로 포인트를 표시합니다. 긴 범위의 경우 일별(또는 더 큰 단계)로 포인트를 그룹화합니다.
- 네 개의 선을 함께 그리려면 지표 비교를 선택하고, 하나의 지표에 대해 플랫폼을 비교하려면 플랫폼 비교를 선택합니다.
이 컨트롤은 차트, 요약 테이블, 그리고 아래의 이벤트 테이블에 적용됩니다. 개요 카드나 퍼널은 변경하지 않습니다.
WhatsApp 메시지를 읽은 후의 사용자 지정 이벤트
Anchor link toWhatsApp 의 경우, 차트 아래의 이벤트 테이블은 수신자가 이 메시지를 읽은 후 앱이나 웹사이트가 보낸 사용자 지정 이벤트를 보여줍니다. 앱이나 웹사이트가 Pushwoosh 로 이벤트를 보내는 경우에만 채워집니다.
각 이벤트는 이벤트 발생 전 72시간 이내에 사용자가 마지막으로 클릭한 메시지에 귀속됩니다:
- 클릭으로 집계되는 동작: 메시지를 읽는 것입니다.
- 다른 메시지에 대한 클릭: 같은 앱의 모든 메시지에 대한 클릭이 집계되므로, 이후의 메시지를 클릭한 뒤 발생한 이벤트는 이 메시지가 아니라 그 이후의 메시지에 귀속됩니다.
- 제한: 하나의 이벤트는 하나의 메시지에만 귀속됩니다.
| 열 | 내용 |
|---|---|
| 이벤트 | 이벤트 이름. |
| 조회수 | 이 메시지에 귀속된 이벤트 수. 메시지를 읽은 이후 사용자가 보내는 모든 이벤트가 사용자가 다른 메시지를 클릭하거나 72시간이 지날 때까지 집계됩니다. |
| 고유 | 한 번 이상 이벤트를 보낸 고유 사용자 수. |
이벤트는 기기가 아니라 User ID 로 메시지와 매칭됩니다. 전화번호가 앱이나 웹사이트에서 같은 사람에게 사용하는 것과 다른 User ID 로 등록되어 있으면, 그 사람의 이벤트는 여기에서 0으로 표시됩니다.
시간 범위는 읽음이 아니라 이벤트를 필터링합니다. 범위 시작 전의 읽음도 범위 내 이벤트에 대해서는 집계됩니다. 각 행에는 해당 행에 해당하는 기기 목록을 CSV로 다운로드하는 내보내기 아이콘이 있으며, 같은 규칙으로 집계됩니다.
SMS 에는 클릭이나 열람이 없으므로, SMS 전송에는 테이블 대신 SMS에서는 이벤트를 사용할 수 없습니다가 표시됩니다. Viber 및 Telegram 전송에는 이벤트 테이블이 없습니다.
오류 탭
Anchor link to오류 탭을 사용하여 전송이 거부된 이유를 확인하세요. 탭에 표시되는 내용과 표시되지 않는 내용은 오류 탭 읽는 방법을, 각 오류 코드의 의미는 전송 오류를 참조하세요.
콘텐츠 패널
Anchor link to오른쪽 콘텐츠 패널은 수신자가 본 메시지를 보여줍니다. WhatsApp은 채팅 버블을 사용합니다. SMS와 Viber는 현재 간단한 카드 미리보기를 사용합니다.
미리보기 아래의 전송 및 설정은 이 전송이 어떻게 구성되었는지 보여줍니다. SMS의 경우, 이 값들은 일회성 SMS를 생성할 때 설정한 값입니다:
- 상태: 이 전송이 완료되었는지(완료) 또는 아직 처리 중인지 여부
- 전송 날짜: 이 메시지가 실제로 발송된 시간
- 예약: 즉시 또는 선택한 시간
- 타겟 세그먼트: 설정한 대상
- 타겟 플랫폼: 이 채널에 대해 선택한 플랫폼
WhatsApp 설정에 대해서는 일회성 WhatsApp 메시지 보내기를 참조하세요. Viber에 대해서는 Viber 메시지 보내기를 참조하세요.
기술적인 세부 정보가 필요한 경우에만 모든 속성 표시를 클릭하세요. Request ID는 이 특정 전송을 추적할 때 지원팀이나 개발자를 위한 것입니다. Journey 및 일부 자동화된 전송에는 종종 Request ID가 없습니다. 성능만 확인할 때는 건너뛰세요.
메시지 코드 복사
Anchor link to이 전송을 추적할 때 지원팀이나 개발자를 위한 ID를 얻으려면:
- 페이지 상단에서 메시지 코드를 클릭합니다.
- ID가 클립보드에 복사됩니다.
통계를 읽는 데는 보통 필요하지 않습니다.
수신자 내보내기 및 세그먼트 생성
Anchor link to수신자 내보내기
Anchor link to수신자를 내보내려면 역할에 Personal data 권한이 필요합니다.
페이지 상단에서 수신자를 CSV로 다운로드하려면:
- 통계 내보내기를 클릭합니다.
- 다운로드를 확인합니다.
다음 위치에서도 목록 내보내기를 클릭할 수 있습니다:
- 개요에 있는 카드의 세 점 메뉴(⋮)
- 오류 탭의 오류 행
통계 내보내기와 목록 내보내기는 모두 동일한 수신자별 로그에서 데이터를 가져오며, 이 로그는 최근 30일만 포함합니다. 오래된 수신자는 파일에 포함되지 않습니다. 확인 대화 상자는 다운로드가 시작되기 전에 이 제한을 명시합니다.
Sent에서 세그먼트 생성
Anchor link to예를 들어, 제공업체가 전송을 수락한 모든 사람에게 다시 메시지를 보내고 싶을 때 사용합니다.
- 개요에서 Sent 카드를 찾습니다.
- 해당 카드의 세 점 메뉴(⋮)를 클릭합니다.
- 세그먼트 생성을 클릭합니다.
- 세그먼트 생성 대화 상자에서 세그먼트 이름에 이름을 입력합니다.
- 생성을 클릭합니다.
새로운 세그먼트에는 해당 카드에 있는 사람들이 포함됩니다.