تصميم البطاقات في منشئ البطاقات
منشئ بطاقات Apple Wallet هو مصمم مرئي في لوحة التحكم. يمكنك اختيار نمط بطاقة، وملء العلامة التجارية، والحقول، والباركود، ومشاهدة معاينة مباشرة، وإنشاء ملف .pkpass موقع—دون الحاجة إلى كتابة pass.json يدويًا.
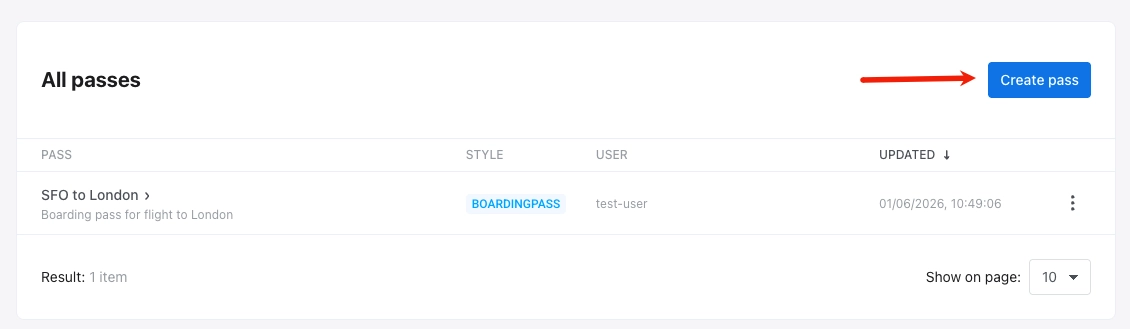
إنشاء بطاقة
Anchor link toفي لوحة التحكم، انتقل إلى الحملات → Apple Wallet وانقر على إنشاء بطاقة.
تكوين البطاقة
Anchor link to-
من البداية: ابدأ ببطاقة فارغة. اختر نمط بطاقة، ثم قم بتعيين الألوان والصور والحقول والباركود والخيارات الأخرى بنفسك في الأقسام أدناه.
-
من قالب: انقر على تحميل قالب، واختر قالبًا مدمجًا في تحديد قالب (بطاقة صعود طائرة، قسيمة، تذكرة حدث، عام، أو بطاقة متجر)، وقم بالتأكيد. يملأ النموذج مسبقًا نمط البطاقة والألوان والصور وحقول البطاقة والباركود والمعلومات الأساسية. قم بتحرير أي قيمة أو تغيير النمط حسب الحاجة. يستبدل Pushwoosh معرفات الفريق ونوع البطاقة الخاصة بالقالب بقيم تطبيقك.
اختر نمط البطاقة
Anchor link toتحت نمط البطاقة، اختر أحد أنماط بطاقات Apple Wallet الخمسة. يتحكم النمط في التخطيط ومناطق الحقول والصور المتاحة:
- بطاقة صعود الطائرة
- قسيمة
- تذكرة حدث
- بطاقة متجر
- عام
إذا بدأت من البداية، فاختر النمط قبل إضافة الحقول والصور. تبديل النمط يعيد تعيين الحقول الخاصة بالنمط.
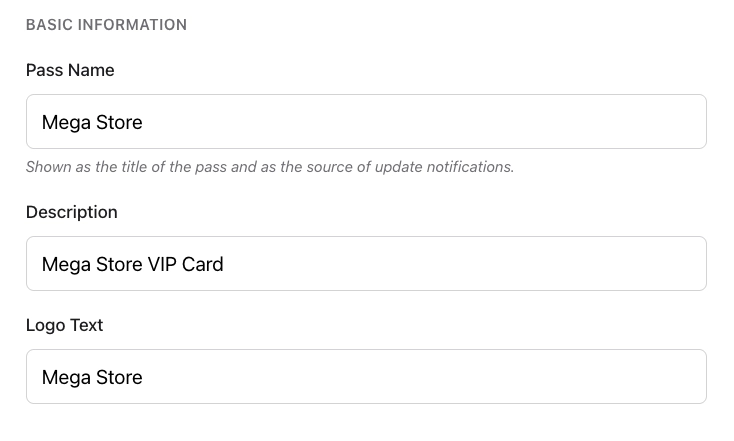
أضف اسم ووصف البطاقة
Anchor link toتحت المعلومات الأساسية، املأ ما يلي:
| اسم البطاقة | عنوان البطاقة، واسم المصدر المعروض في إشعارات التحديث. |
| الوصف | وصف قصير للبطاقة. |
| نص الشعار | نص يظهر بجانب الشعار (يستخدم عند عدم تحميل صورة للشعار). |
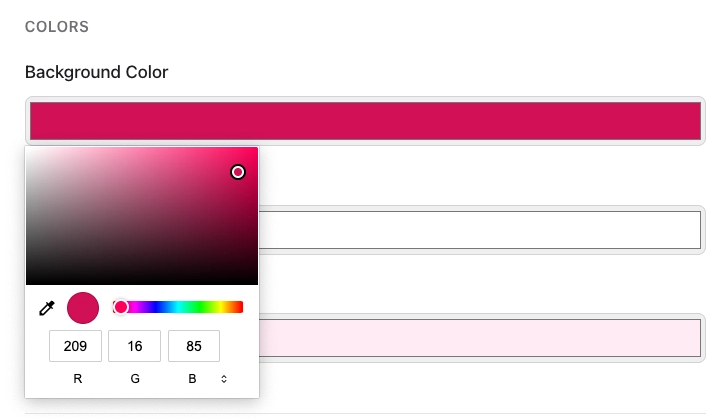
تعيين الألوان والصور
Anchor link toالألوان
Anchor link toتحت الألوان، قم بتعيين:
- لون الخلفية: خلفية البطاقة.
- لون الواجهة: النص الرئيسي والأيقونات على البطاقة.
- لون التسمية: لون تسميات الحقول (على سبيل المثال،
FROM,GATE).
لتعيين لون أو تغييره، انقر على حقله واختر لونًا من منتقي الألوان.
الصور
Anchor link toتحت الصور، قم بتحميل الأيقونة والشعار (كلاهما مطلوب). تعتمد الصور الاختيارية على نمط البطاقة.
انقر على اختر ملف بجانب كل خانة صورة. قم بتحميل ملفات PNG أو JPEG. يعالج Pushwoosh كل صورة إلى الدقات التي تطلبها Apple (@1x, @2x, @3x) عند إنشاء البطاقة.
املأ حقول البطاقة
Anchor link toتحت حقول البطاقة، أضف النص والقيم التي تظهر على البطاقة. تعتمد المجموعات التي تراها على نمط البطاقة:
- حقول الرأس (أعلى البطاقة): بطاقة صعود الطائرة، تذكرة حدث
- الحقول الأساسية (المحتوى الرئيسي): جميع الأنماط
- الحقول الثانوية (معلومات داعمة): جميع الأنماط
- الحقول المساعدة (تفاصيل إضافية): جميع الأنماط
- الحقول الخلفية (الجانب الخلفي للبطاقة): جميع الأنماط
انقر على + إضافة حقل في كل مجموعة تحتاجها.
لكل حقل، قم بتعيين:
| المفتاح (ID) | معرف حقل فريد (يتم إنشاؤه تلقائيًا). |
| التسمية | تسمية قصيرة على البطاقة (على سبيل المثال، FROM). |
| القيمة | قيمة معروضة على البطاقة (على سبيل المثال، SFO). |
| رسالة التغيير | نص في إشعار التحديث عند تغيير هذه القيمة. يظهر فقط عند تغيير القيمة. استخدم %@ للقيمة الجديدة (على سبيل المثال، تم تغيير البوابة إلى %@). |
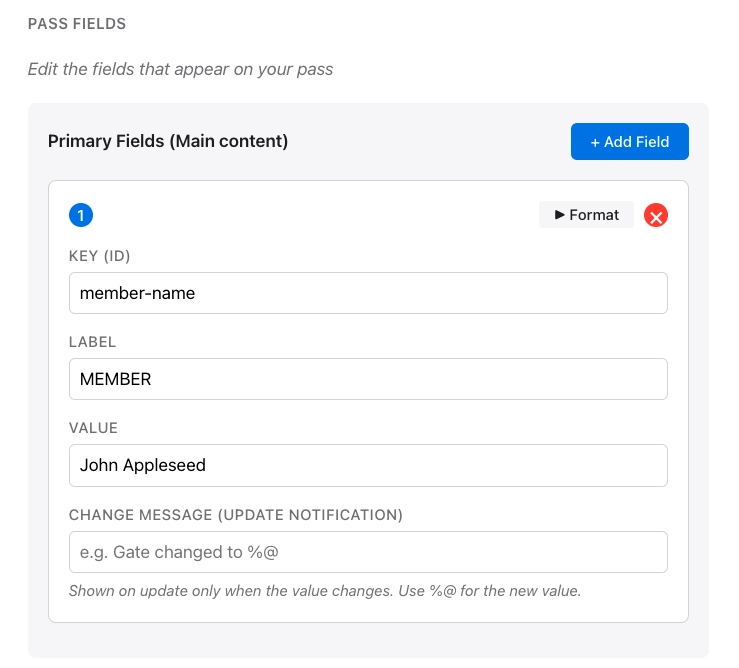
على بطاقة الحقل، انقر على تنسيق لإظهار خيارات التنسيق. انقر على X لإزالة الحقل.
خيارات التنسيق
Anchor link to- تنسيق القيمة: نص، تاريخ ووقت، أو رقم/عملة.
- محاذاة النص: افتراضي (طبيعي)، يسار، وسط، أو يمين.
- كاشفات البيانات (الحقول الخلفية فقط): تحويل أرقام الهواتف والروابط والعناوين وأحداث التقويم إلى محتوى قابل للنقر في الحقول الخلفية.
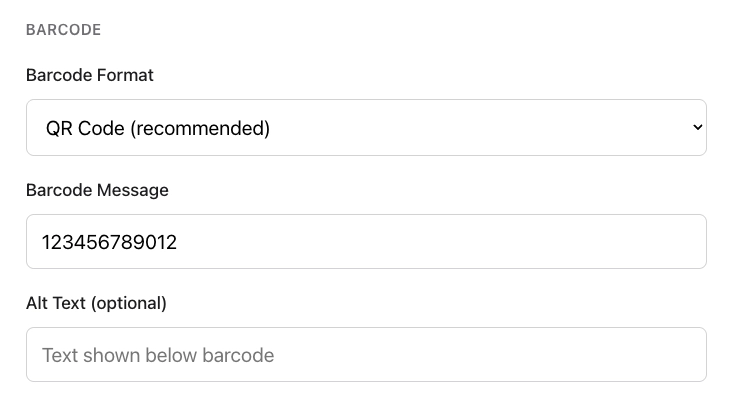
أضف باركود
Anchor link toتحت الباركود، اختر تنسيقًا وأدخل البيانات المراد تشفيرها:
- تنسيق الباركود: اختر كيف يبدو الباركود ونوع الماسح الضوئي الذي يمكنه قراءته.
- رمز الاستجابة السريعة (QR Code) (موصى به): رمز مربع تقرأه معظم الهواتف والماسحات الضوئية بسهولة. الأفضل للقسائم وبطاقات الولاء ومعظم البطاقات.
- PDF417: باركود عريض يتكون من عدة صفوف من الخطوط. غالبًا ما يكون مطلوبًا لبطاقات صعود الطائرات أو وسائل النقل العام.
- Aztec: رمز مربع مضغوط، مشابه لرمز الاستجابة السريعة. شائع في تذاكر الأحداث والنقل.
- Code 128: باركود كلاسيكي بخطوط عمودية. اختر هذا فقط إذا كان الماسح الضوئي أو نظام نقاط البيع الخاص بك يتطلب باركود أحادي البعد (1D).
- رسالة الباركود: القيمة المشفرة في الباركود (على سبيل المثال، رقم تذكرة أو عضوية).
- نص بديل (اختياري): نص يظهر أسفل الباركود على البطاقة.
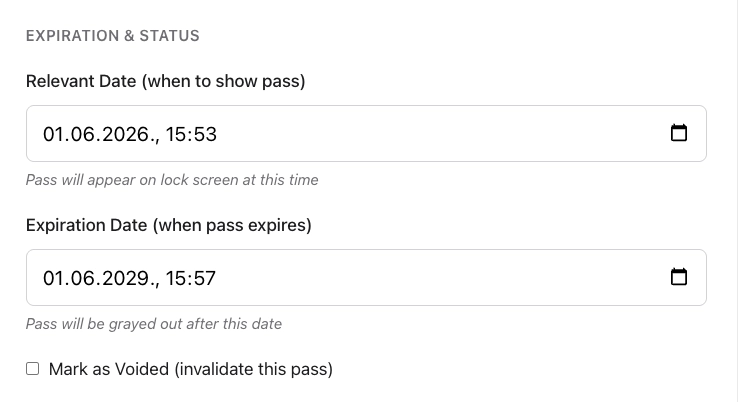
تعيين انتهاء الصلاحية والحالة
Anchor link toتحت انتهاء الصلاحية والحالة، تحكم في وقت عرض البطاقة، ومتى تنتهي صلاحيتها، وما إذا كانت لا تزال صالحة:
- التاريخ ذو الصلة (متى تظهر البطاقة): التاريخ والوقت الذي قد تظهر فيه البطاقة على شاشة القفل.
- تاريخ انتهاء الصلاحية (متى تنتهي صلاحية البطاقة): التاريخ والوقت الذي بعده تصبح البطاقة باهتة في Wallet.
- وضع علامة كملغاة (إلغاء صلاحية هذه البطاقة): مربع اختيار لإلغاء صلاحية البطاقة بحيث لا تكون قابلة للاستخدام.
خيارات خاصة بالنمط ومتقدمة
Anchor link to- نوع النقل (بطاقة صعود الطائرة فقط): جوي، قطار، حافلة، قارب، أو عام.
- معرف التجميع: تجميع البطاقات ذات الصلة معًا في Wallet.
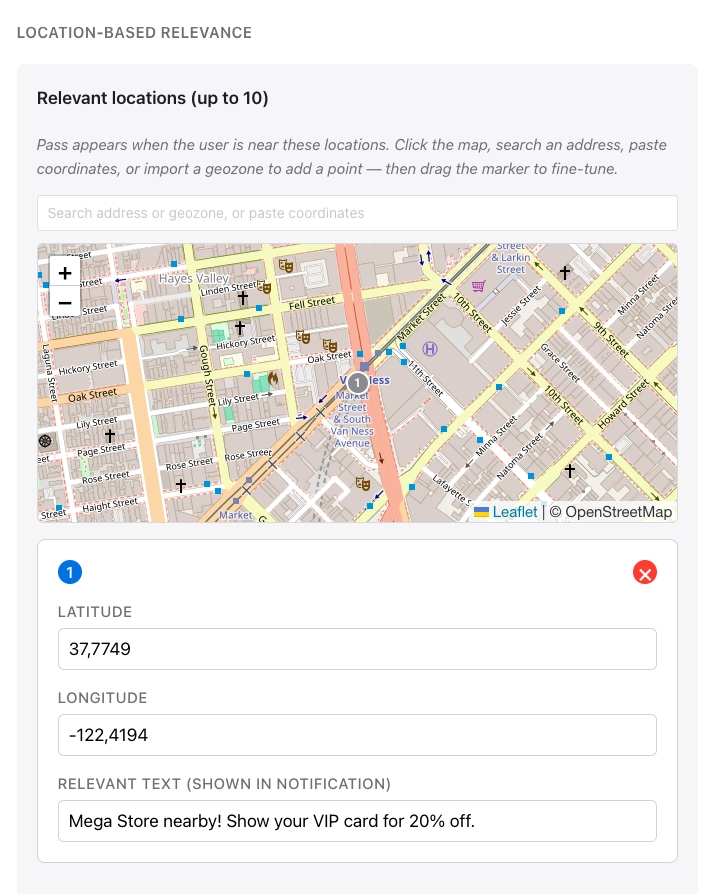
الصلة المستندة إلى الموقع (اختياري)
Anchor link toتحت الصلة المستندة إلى الموقع، تظهر البطاقة عندما يكون المستخدم بالقرب من المواقع التي تضيفها. لكل موقع، قم بتعيين النص المعروض على شاشة القفل عندما يكون المستخدم قريبًا. يمكنك إضافة ما يصل إلى 10 مواقع.
انقر على الخريطة، أو ابحث عن عنوان، أو الصق إحداثيات، أو استورد منطقة جغرافية لإضافة نقطة. اسحب العلامة لضبط الموقع بدقة.
تتحكم المسافة القصوى (بالأمتار) في مدى قرب المستخدم المطلوب لتبقى البطاقة ذات صلة.
أمثلة على حالات الاستخدام
- البيع بالتجزئة: تظهر بطاقة ولاء أو قسيمة عندما يكون العميل قريبًا من متجرك. قد يقول نص شاشة القفل أنك بالقرب من المتجر ويذكره باستخدام البطاقة.
- الأحداث: تظهر تذكرة حدث عندما يكون المستخدم بالقرب من المكان (ملعب، مسرح، أو أرض مهرجان) حتى يتمكن من العثور على البطاقة بسرعة عند الباب.
- السفر: تصبح بطاقة الصعود إلى الطائرة بارزة بالقرب من مطار أو صالة المغادرة، بحيث يرى الراكب تفاصيل البوابة أو الرحلة على شاشة القفل قبل فتح Wallet.
- الضيافة: يمكن أن تظهر قسيمة أو بطاقة عضوية بالقرب من مقهى أو فندق تحدده.
أدخل User ID
Anchor link toأدخل User ID الخاص بـ Pushwoosh للشخص الذي سيتلقى هذه البطاقة. يصدر Pushwoosh البطاقة لذلك المستخدم ويدرجها تحت المستخدم في جميع البطاقات.
معاينة والتحقق من الصحة
Anchor link toيتم تحديث معاينة مباشرة أثناء التحرير، حتى تتمكن من رؤية كيف ستبدو البطاقة تقريبًا في Wallet.
للتحقق من البطاقة مقابل مواصفات Apple دون إنشائها، انقر على التحقق من صحة البطاقة. يحدد المنشئ الصور المطلوبة المفقودة والمشاكل الأخرى.
إنشاء البطاقة
Anchor link toحدد إنشاء. يقوم Pushwoosh بالتحقق من صحة البطاقة، ومعالجة الصور، وتوقيع الحزمة. يستغرق الإنشاء بضع ثوانٍ، وبعد ذلك تظهر البطاقة في قائمة بطاقاتك.
لتحرير (بما في ذلك التحديث حسب الرقم التسلسلي)، وتنزيل، ومشاركة، وحذف البطاقات بعد إنشائها، راجع إدارة البطاقات الحالية.
إدارة البطاقات عبر API
Anchor link toكل ما يفعله منشئ البطاقات متاح أيضًا من خلال PassKit Designer API: إنشاء وتحديث وإدراج وتنزيل وحذف البطاقات.