Issue wallet pass
Use the Issue wallet pass element to give users a pass for Apple Wallet or Google Wallet, such as a loyalty card, a ticket, or a coupon. The element creates a personal pass for each user from a Wallet Pass Campaign.
Use cases
Anchor link to- Boarding pass after check-in: when a user checks in, issue a boarding pass with their seat and gate, and send it by push before departure.
- Loyalty card on signup: when someone joins your rewards program, issue a card with their starting points balance and add it to the welcome email. See How to issue a wallet pass on signup for the full walkthrough.
- Event ticket after purchase: after a purchase, issue a ticket with the seat and row, and include it in the order confirmation.
- Pass on store geozone entry: when a shopper enters a store’s geozone, issue a pass and push the pass link right away. See How to issue a wallet pass on geozone entry for the full walkthrough.
Prerequisites
Anchor link toBefore you add this element:
- Wallet Pass Campaign: create at least one Wallet Pass Campaign for the application. Issue wallet pass can only issue passes from an existing campaign. You design the pass in the campaign, not in this element.
- Apple Wallet: connect the iOS platform and complete Apple Wallet pass setup for the application. See also Getting started with Wallet passes.
- Google Wallet: configure Google Wallet for Android for the application.
Add the element
Anchor link toYou’ll find Issue wallet pass under Channels in the journey builder. To design the pass itself, see Wallet Pass Campaigns.
- Drag Issue wallet pass onto the canvas at the point where users should get the pass.
- Double-click the element to open its settings.
- Enter a recognizable name in Step Name, for example
Loyalty card. You’ll use this name later when you insert the pass link into a Push or Email element. - In Apple Wallet campaign and Google Wallet campaign, select a campaign for either platform, or both. Leave a dropdown empty to skip that platform.
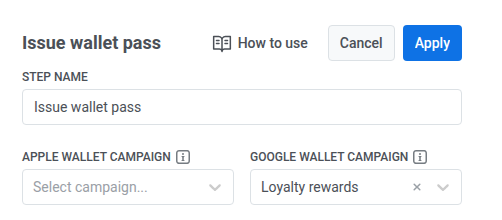
Each dropdown accepts one campaign and shows only this application’s campaigns for that platform, including Drafts. Archived campaigns aren’t listed. A Draft campaign issues passes just like an Active one, so you don’t need to activate it first.
Fill in personal fields
Anchor link toPersonal fields are the parts of the pass that can differ from one user to another. Here you choose where each field gets its value.
Under Personal fields on the pass, you see the fields that need a value for the campaign you selected. These are the same fields you fill in the campaign’s Issue pass dialog. If you select another campaign, the list changes to match.
Fields that fill in automatically aren’t listed:
- Tag placeholder: a field like
{Seat}is filled from the user’s tag with the same name. - Shared fields: the same value on every pass, set once in the campaign itself.
For each field, choose where its value comes from:
- Static value: the same value on every pass this element issues. For example,
SUMMER2026in the OFFER field.
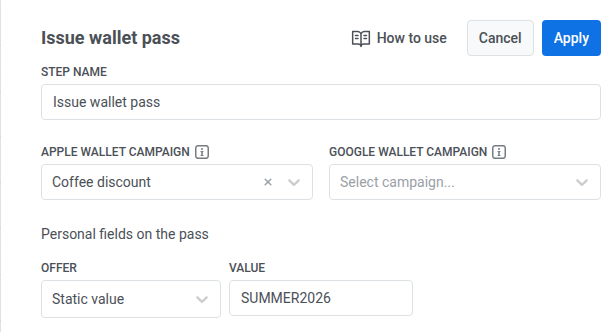
- An event from the journey: a value from an event earlier in the journey, so each user gets their own value. The dropdown lists the events of the journey: an entry or wait step shows as the step name and the event name, and an API-based entry, Webhook, or Issue wallet pass step shows as its step name only. Choose the event, then the Attribute, for example
offer_codefrom the entry event.
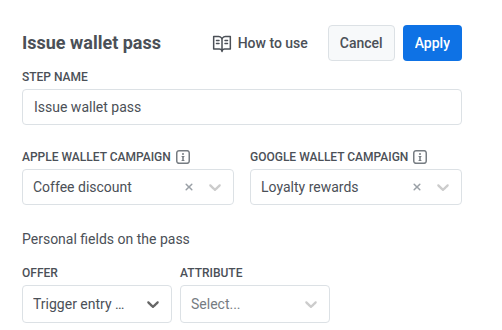
With campaigns selected for both platforms, the list shows fields from both. A field that exists in only one campaign is filled only on that platform’s pass.
When you’re done, click Apply to save the element settings.
What happens at this step
Anchor link to| Situation | What happens |
|---|---|
| The pass is issued | The user moves on to the next element. |
| The user already has a pass from this campaign, for example after a loop in the journey | The element reuses that pass instead of creating a new one, and the user moves on. Each user has at most one pass per campaign. |
| The user has no User ID | The user drops out of the journey. By default, the SDK uses the device HWID as the User ID, so this mostly happens when a user enters through the API or with an event that has no User ID. |
| The pass can’t be issued, for example because the campaign was deleted or archived after you added the element | The user drops out of the journey. |
| The wallet service doesn’t respond in time | The user drops out of the journey with the Internal error reason. |
A dropped user isn’t retried automatically. If both platforms are configured, Apple is attempted first. If Apple fails, the user drops before Google is attempted. If Apple succeeds and Google fails, the user still drops, and the Apple pass stays issued.
Send the pass link
Anchor link toAfter Issue wallet pass, add a push or email with a link the user taps to add the pass to their wallet. The link is available only for the platforms you selected in the element. Use apple_install_link for Apple Wallet and google_save_link for Google Wallet.
-
In the message, type the placeholder with vertical bars, for example
{apple_install_link|regular|}. Don’t use a plain{apple_install_link}.regularis a required format modifier that inserts the value unmodified, so leave it as is. See Dynamic Content or Liquid Templates for the full syntax. In Email, you can use the placeholder in the subject line too, not just the message body. -
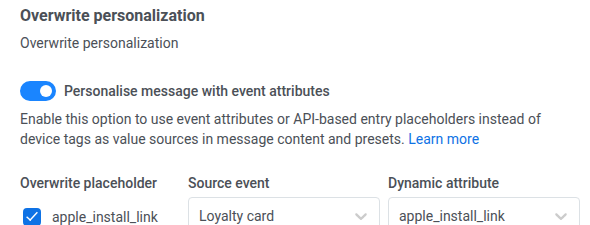
Turn on Personalise message with event attributes.
-
In the table, check Overwrite placeholder next to your placeholder. This unlocks the Source event and Dynamic attribute dropdowns.
-
In Source event, choose your Issue wallet pass step by the Step Name you gave it, for example
Loyalty card. -
In Dynamic attribute, choose
apple_install_linkorgoogle_save_linkto match the placeholder you used.
Track results
Anchor link toThe element’s panel shows entries and drop-offs. For a user who was dropped, it also shows the reason:
- No User ID
- Wallet pass wasn’t issued
- Internal error, when the wallet service doesn’t respond in time
Users who pass through the element without a drop have a pass issued or reused.
To check that the link reached users, see the statistics of the next Push or Email element.
Serial numbers
Anchor link toEach issued pass has a serial number: apple_serial_number or google_serial_number. Use it to:
- Log the pass in your CRM or support tool with a Data to app or Webhook element.
- Find the pass on the campaign’s Passes tab.
- Attach the pass to a campaign.