Amplitude: set user properties
Use Amplitude: set user properties to update the Amplitude user profile of the traveler from a journey step, through the HTTP API V2’s $identify operation, so segmentation and cohorts on the Amplitude side see the same data as Pushwoosh.
Pushwoosh sets Amplitude’s insert_id for you from the traveler and this step. That means the same traveler passing through this exact point twice, for example on a second lap of a looping journey, updates the same Amplitude profile instead of writing a duplicate identify event.
Typical uses:
- Sync tags into Amplitude segments: push plan tier, trial status, or another tag onto the Amplitude profile so Amplitude cohorts match Pushwoosh audiences.
- Keep profiles current without a separate sync job: update the profile at the exact journey step where the tag changed.
- Avoid duplicate identify calls on a loop: the built-in deduplication means a repeated pass through this point updates the same profile instead of writing twice.
Configure the point
Anchor link to- Drag Amplitude: set user properties from the Integrations section onto the canvas.
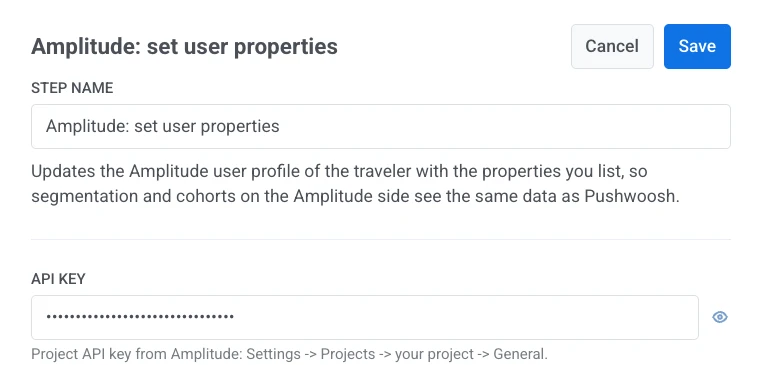
- Double-click the point and enter a Step Name.
- In API key, enter the project API key from Amplitude: Settings > Projects > your project > General. It’s stored masked, like a webhook secret header. Pushwoosh never displays or returns it once saved, and it never appears in the point’s stored request or in the Calls log.
- In Amplitude endpoint, pick the region the Amplitude project was created in:
api2.amplitude.comfor a US project,api.eu.amplitude.comfor an EU one. A key from one region is rejected by the other.

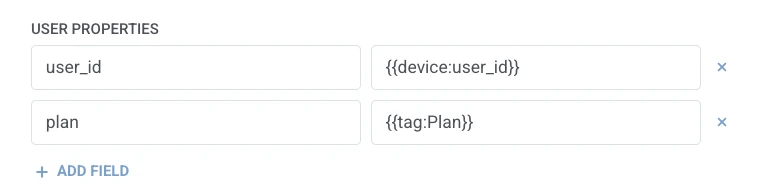
- In User properties, add one row per property to set on the Amplitude profile. Enter the property name and the value. Names must be non-empty and unique. A value that’s a single traveler macro keeps its own type in Amplitude (
{{tag:Age}}arrives as a number,{{tag:Trial Ends}}as a date). Any other text is sent as a string. Macros use the same syntax as a Webhook body. Or click Insert Dynamic Value to pick an attribute an earlier step in this journey produced, for example an LLM response or a mapped Webhook value.
- Click Save.
Response
Anchor link toThe traveler continues to whatever step you connect next on the canvas.
Attributes after the step runs
Anchor link to| Attribute | What it holds |
|---|---|
amplitude_events_ingested | The number of events Amplitude ingested |
How to use it in later steps
Anchor link toThe traveler already continued to the next step regardless of this attribute. Save it to a Tag with Update user profile if you need to confirm the update was ingested or branch on it with Condition split.
Failures and unexpected responses
Anchor link toA failed request drops the traveler from the journey. See Errors and failed requests.
Example scenario: Keeping a subscriber’s Amplitude profile in sync
Anchor link toA team wants a traveler’s plan tier to update on their Amplitude profile as soon as it changes in Pushwoosh.
- Add Amplitude: set user properties right after the step where the plan tier changes. In User properties, set
planto{{tag:Plan}}. - Click Save.
Once this runs, the Amplitude profile reflects the plan change without a separate sync job.