Pushwoosh ManyMoney AI
ManyMoney AI is an autonomous marketing copilot that optimizes your Pushwoosh account for revenue growth, not just engagement metrics.
It analyzes your specific project data, including user behavior, conversion patterns, and Conversion events, to automatically create campaigns, adjust targeting, stop underperforming initiatives, and scale what drives revenue. All decisions are tailored to your business model and actual user data, not generic recommendations.
What can you do with ManyMoney AI?
Anchor link toInformation retrieval and documentation
- Search through Pushwoosh documentation to quickly find specific information, guides, and best practices.
Application management
- Create, configure, and manage applications and platform settings (iOS, Android, Web, etc.).
Campaign and message management
- Send, manage, and analyze messages across all supported channels, including push, email, SMS, WhatsApp, etc.
User data and segmentation
- Manage user profiles, segmentation, and device information.
- Create and track custom user attributes and events.
Content creation and management
- Create and manage presets for push, email, SMS, and LINE messages.
- Build interactive in-app messages and rich media content.
Customer journeys
- Create, update, and control automated user journeys.
- Access detailed journey statistics and user flow data.
- Organize and manage journey workflows.
Analytics and reporting
- View detailed message statistics and delivery reports.
- Create and manage custom analytics dashboards.
- Export message data and campaign statistics.
- Analyze user segments and engagement behavior.
Troubleshooting
- Identify and resolve potential issues in campaigns before launch.
- Address customer journey malfunctions.
- Troubleshoot message delivery issues.
- Resolve integration and SDK problems.
Tip: For how to get faster diagnosis with structured prompts, see Troubleshooting with ManyMoney AI.
Advanced configuration
- Manage users, groups, and access permissions.
- Set up push certificates, FCM keys, and email domains.
- Configure integrations with third-party services (e.g., webhooks, Piano, Segment).
- Control message delivery rates and limits.
Developer tools
- Register devices for campaign testing.
- Define complex user targeting rules.
- Set up location-based messaging.
- Manage promotional codes and rewards.
Enterprise features
- Manage team access and permissions.
- Organize and switch between multiple applications.
- Monitor account usage and limits.
- Set up and manage custom email domains and sending configurations.
What data can ManyMoney AI collect and process?
Anchor link toTo provide the best possible assistance, ManyMoney AI collects and processes specific types of data. When you select Full Automation in the ManyMoney AI settings, you consent to this data being handled by authorized subprocessors.
What gets processed
Anchor link to| Your questions and prompts | The messages you send to ManyMoney AI to request information, perform tasks, or troubleshoot. |
| Tool call parameters | The data you provide when ManyMoney AI needs to call Pushwoosh APIs on your behalf (e.g., user ID, campaign ID). |
| API responses | The results returned from Pushwoosh services that ManyMoney AI uses to generate accurate and relevant answers. |
| Context from your session | Information such as your application code, current page URL, and conversation history that helps personalize and contextualize responses. |
What Is NOT collected
Anchor link to| Personal user data from your Pushwoosh apps | ManyMoney AI doesn’t collect or store your end-users’ information, but it may access it temporarily to help answer your requests. This information stays private and secure. |
| Sensitive credentials | API tokens and passwords are managed separately by Pushwoosh and are not exposed to ManyMoney AI. |
| Billing information | Payment details and financial data are securely handled and not accessed by ManyMoney AI. |
| Your browsing history | Only the current Pushwoosh Control Panel URL is used for contextual understanding; no full history is tracked. |
How your data is handled
Anchor link toSome data may be retained as part of standard system logging, in accordance with Pushwoosh data retention policies.
Your data is handled in compliance with GDPR rules and is protected during transfer through encryption. Access to your data is controlled, meaning only you and authorized systems can access it.
Your data is never sold or shared with third parties. You maintain control and can withdraw your consent at any time in the ManyMoney AI settings.
Start working with ManyMoney AI
Anchor link toKey concepts
Anchor link toUnderstanding a few key terms will help you get better results when using ManyMoney AI.
| ManyMoney AI chat | The main interface for interacting with ManyMoney AI. Use it to ask questions, request help, or perform actions within your project. |
| Context | Relevant information ManyMoney AI uses to interpret your request. |
| Prompt | Any input you provide (question, instruction, or command) to start a conversation or request information. Prompt quality affects response accuracy. |
Step 1. Grant consent
Anchor link toTo begin using ManyMoney AI, you must first grant consent in your settings. This enables ManyMoney AI to process your input and perform actions on your behalf.
To grant consent:
-
Log in to your Pushwoosh account.
-
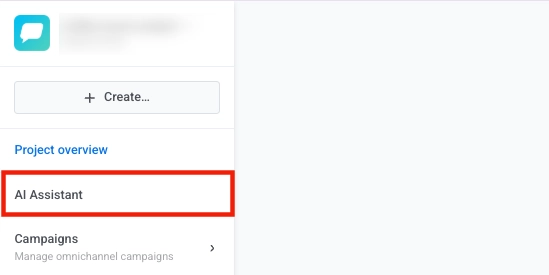
Click the AI Assistant button.
- At the top of the chat window, click Settings.
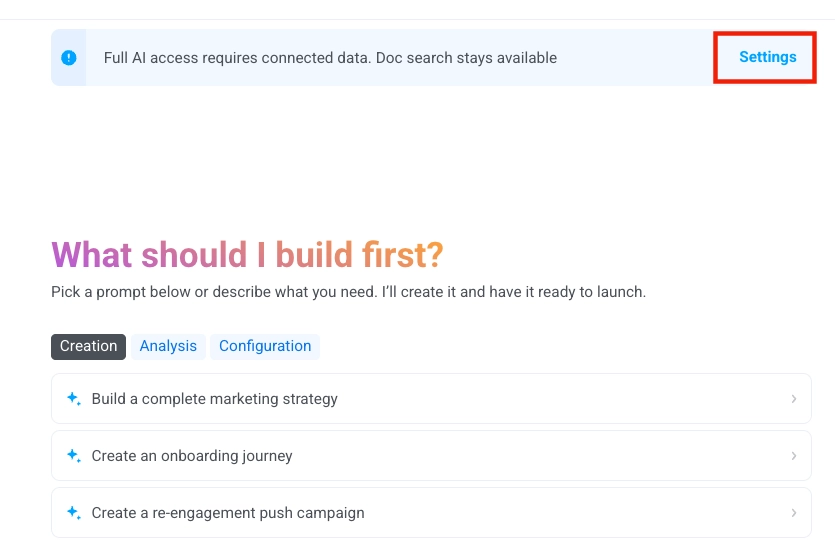
- In the Data processing consent window, select Full Automation, then click Apply.
Granting consent allows Pushwoosh to use authorized AI service providers (subprocessors) to:
-
Process your natural language queries.
-
Generate responses, suggestions, and code examples.
-
Execute tool calls via Pushwoosh APIs.

Step 2. Start the conversation
Anchor link toTo begin a new interaction with ManyMoney AI:
-
Click the chat name at the top of the ManyMoney AI window.
-
Select New conversation from the dropdown menu.

In the chat input, enter a clear and specific prompt describing what you need ManyMoney AI to do.
Step 3. Check and verify the results.
Anchor link toAfter ManyMoney AI completes an action or provides a response, review the results to ensure they meet your requirements. Confirm that any changes, configurations, or generated content are accurate and aligned with your intent.
If the outcome is not as expected or requires adjustments, you can ask ManyMoney AI to modify it. Provide additional details or clarify your request to guide ManyMoney AI in generating a more accurate result.
Manage conversations
Anchor link toThe Conversations menu allows you to create, switch between, and manage your active chat sessions. Each conversation can represent a different topic or campaign context, helping you keep your communication organized.
Create a new conversation
Anchor link to-
Click the Conversations dropdown at the top of the chat window.
-
Select New conversation.

- A blank chat opens where you can start a new query or workflow.
Switch between conversations
Anchor link to-
Open the Conversations dropdown.
-
Click the name of an existing conversation to switch to it. The current conversation name is shown in the dropdown title bar.

Delete a conversation
Anchor link to-
Open the Conversations dropdown.
-
Hover over the conversation you want to delete.
-
Click the trash icon to remove it.
Prompting strategies and best practices when working with ManyMoney AI
Anchor link toWriting clear, specific prompts helps ManyMoney AI provide accurate, relevant, and actionable responses. Use the following strategies to improve your interactions and results.
Be specific with your request
Anchor link toAvoid vague inputs. Clear, targeted requests enable ManyMoney AI to respond effectively.
| Effective prompt | Less effective prompt |
|---|---|
| ”Create a segment for users who abandoned cart in the last 7 days." | "Fix my pushes." |
| "Show me push notification statistics for campaign ‘Summer Sale’ from June 1–15." | "Show me stats." |
| "Help me debug why my iOS push notifications aren’t delivering." | "Something’s wrong.” |
Provide context and identifiers
Anchor link toInclude key identifiers (such as application codes, campaign names, journey UUIDs, and segment names) when referencing specific resources to help ManyMoney AI interpret your request accurately.
| Effective prompt | Less effective prompt |
|---|---|
| ”Journey ‘Welcome Flow’ (UUID: abc-123) stopped sending emails yesterday at 3 PM." | "My journey isn’t working.” |
Write detailed prompts
Anchor link toClearly describe what you’re trying to achieve. Include relevant background information, your intended outcome, and any specific parameters or constraints that may affect the response.
| Effective prompt | Less effective prompt |
|---|---|
| ”Build a segment for users who viewed a product but did not purchase in the last 14 days. The goal is to target them with a follow-up email." | "Help me target users.” |
Use consistent naming
Anchor link toOrganize your Pushwoosh workspace with clear, consistent names for events, journeys, tags, and campaigns to avoid confusion.
Add clear descriptions
Anchor link toProvide descriptive labels and notes for custom events, user segments, and tags so ManyMoney AI can interpret them correctly.
Always verify results
Anchor link toAfter receiving a response or seeing an action performed, check the output to ensure it’s accurate and meets your requirements. Review dashboards, settings, or logs if needed.
Understand workflow patterns
Anchor link toSome actions require multiple steps to complete. Read each step ManyMoney AI provides and let the process finish before moving forward. If the action makes permanent changes (like deleting data), review carefully before confirming.
Provide explicit confirmation for destructive operations
Anchor link toFor high-impact actions (e.g., deleting data or modifying live campaigns), ManyMoney AI requires an exact confirmation phrase.
Example:
If prompted to confirm with "DELETE_CAMPAIGN_ABC123", you must type that phrase exactly. Responses like “Yes, delete it” will be rejected.
Prompt and response examples
Anchor link toCustomer journey
Anchor link toPrompt
Anchor link toCreate a journey that starts when a customer adds shoes to their cart and leaves without making a purchase
Wait 1 hour to check if a purchase occurs—if it does, send a thank you message and exit the journey. If not, send a first reminder and wait 23 more hours.
If the customer completes the purchase during this period, send a thank you message and exit. If they still haven’t purchased, send a second reminder with a discount, wait 1 more hour, and then exit the journey.
Example result from ManyMoney AI
Anchor link to
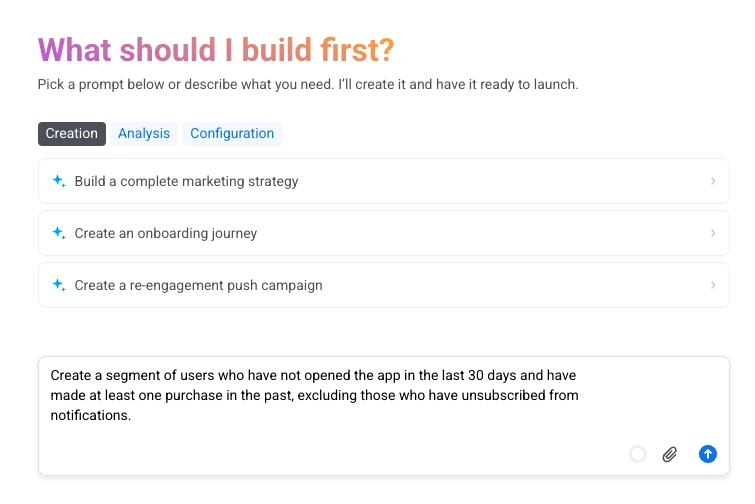
User data & segmentation
Anchor link toPrompt
Anchor link toCreate a segment of users who have not opened the app in the last 30 days and have made at least one purchase in the past, excluding those who have unsubscribed from notifications.
Example result from ManyMoney AI
Anchor link to
Content
Anchor link toPrompt
Anchor link toCreate email content for an online store aimed at reactivating previous purchasers by offering special incentives such as discounts or exclusive offers. The goal is to encourage repeat purchases and re-engage customers who haven’t shopped recently. Focus on clear, compelling messaging that highlights the value of the offer and includes a strong call to action.
Example result from ManyMoney AI
Anchor link to
Analytics & reporting
Anchor link toPrompt
Anchor link toGenerate a comprehensive report of message delivery rates, open rates, and click-through rates for all push notification campaigns launched in this app, segmented by campaign type and message content.
Further reading
Anchor link toLearn how companies in fintech and food delivery achieved 40%+ revenue growth in 90 days using ManyMoney AI.