Condition split
The Condition split element lets you split a flow so that users follow different paths depending on their segment or tag values.
Define the user flow
Anchor link toYou can split the flow in two ways:
- Segment: Split users based on whether they match an existing segment.
- Tag: Split users into multiple branches based on tag values.
- Event: Split users into branches based on values of an event attribute.
Split flow by segment
Anchor link toTo split a flow by segment:
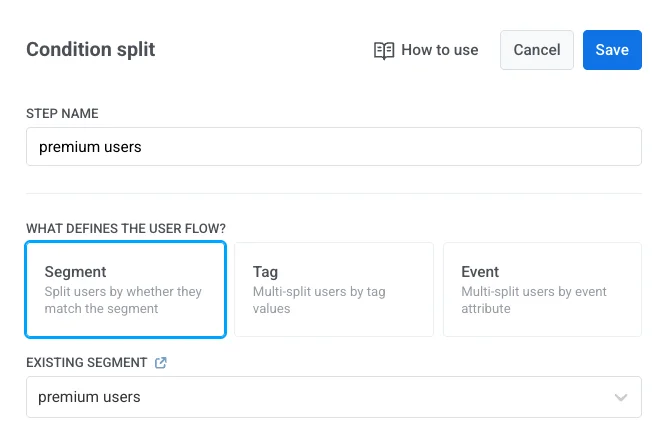
- Select Segment as the condition for the user flow.
- Choose the segment you want to use, or create it from scratch right from the element. Learn more about creating Segments
- Click Save to apply the changes.
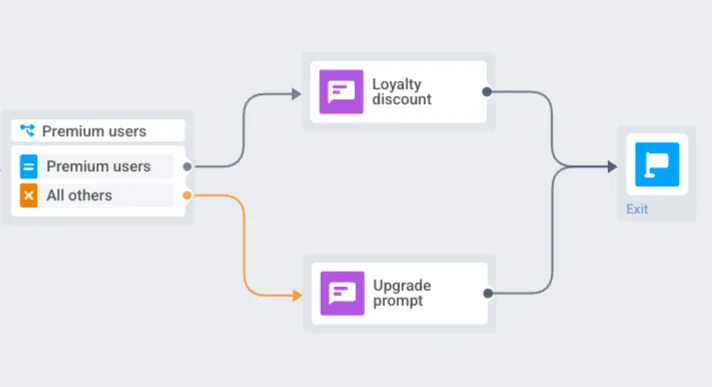
- The flow will automatically create two branches:
- Users in a segment: users who match the selected segment.
- All other users: users who do not match the segment.
Configure a separate flow for each branch so that users receive content relevant to them.
Example
If you split the flow by the segment Premium subscribers, users in this segment can be routed to a flow that delivers a loyalty discount, while all other users follow a flow that shows an upgrade prompt.
Split flow by Tag
Anchor link toTo split a flow by Tag:
- Select Tag as the condition type.
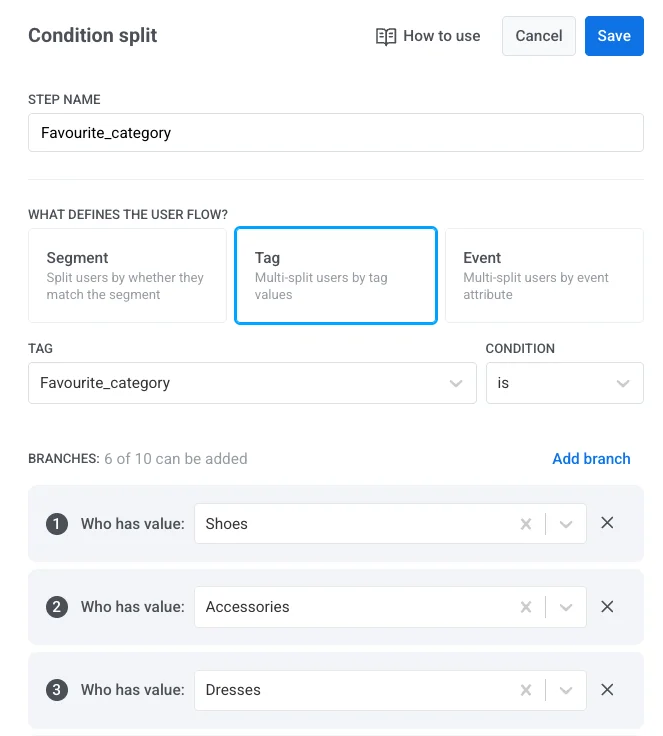
- From the Tag dropdown, choose the tag you want to use (for example, Favourite_category). Ensure the required tag is created in advance. Learn more about tags
- Select the Condition (for example, is).
- Add one or more branches by specifying tag values (for example, Shoes, Dresses, Accessories).
You can create up to 10 branches per condition split.
- Click Save to apply the changes.
- To compare the tag against another tag or an event attribute instead of a fixed value, see Compare branch values.
- Finally, create a separate flow for each branch to deliver personalized content based on the user’s tag.
Example
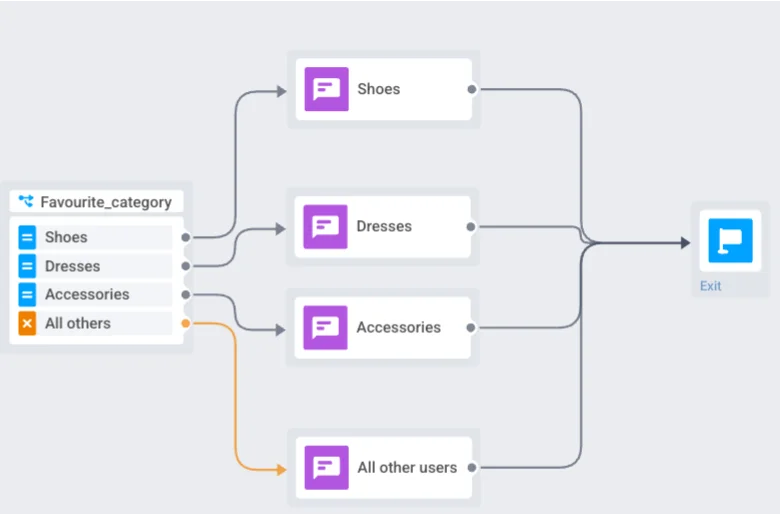
If you split the flow by the Favourite_category tag and define branches for Shoes, Dresses, and Accessories, users will be routed to the branch that matches their preference. All other users (for example, those without a specified category) will be routed to the All other users branch.
You need to create a separate flow for each branch, such as promotions for shoes, dresses, or accessories, to deliver personalized content.
Split flow by Event
Anchor link toUse this option when you want to branch the journey based on the value of an event attribute collected earlier in the journey.
To split a flow by event attribute:
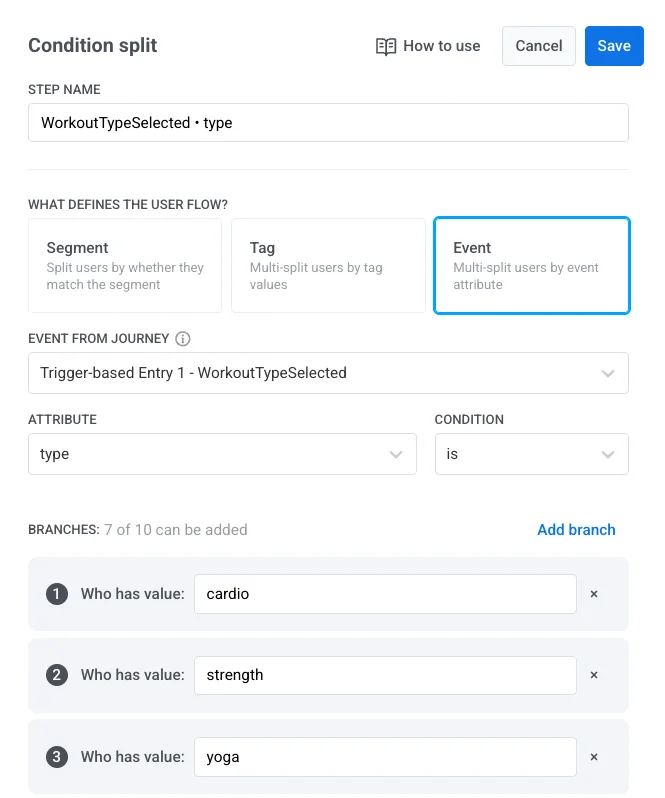
- Select Event as the condition type.
- In the Event from Journey dropdown, choose the event triggered earlier in the journey.
- Under Attribute, select the event attribute.
- For Date attributes, a Date frame dropdown appears next to Attribute:
Specific date(default — pick an exact calendar date, same as before),Days ago, orDays ahead. Changing the attribute resets Date frame back toSpecific date.
-
Choose the condition logic, such as
is,is not,is one of,is not one of, etc. -
Add one or more branches and specify a value for each. The value field’s label and how you fill it in depend on the operator:
Operator Value field label How to fill it in isWho has value STRING attributes: search suggested values based on previously recorded data as you type, or type your own value directly. Other attribute types: type the value directly. is notWho does not have value Same as is.starts withWho has value starting with Same as is, STRING attributes only.ends withWho has value ending with Same as is, STRING attributes only.containsWho has value containing Same as is, STRING attributes only.is one ofWho has any of Search suggested values based on previously recorded data, for any attribute type. Type your own value and press Enter to add it as a separate branch value. is not one ofWho does not have any of Same as is one of.greater or eqWho has value greater or equal INTEGER, DECIMAL, and DATE attributes only: type the value directly. less or eqWho has value less or equal Same as greater or eq.Picking a suggestion always fills the field with that suggestion’s full value — for
contains, that means the full matching value, not just the substring you typed. The suggestion list is empty until Pushwoosh has recorded values for the selected event and attribute, which is expected for a newly created event or attribute. -
To compare the attribute against a tag or another event attribute instead of a typed value, see Compare branch values.
-
Click Save to apply the configuration.
Example
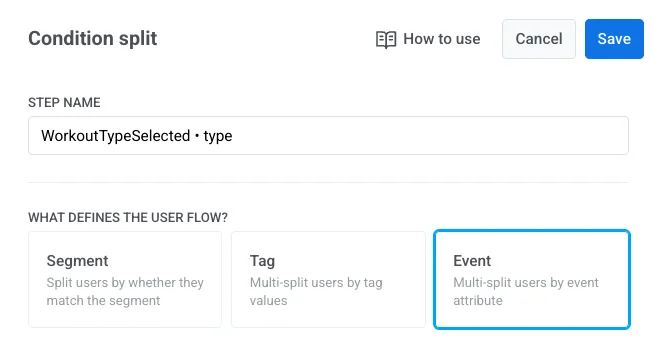
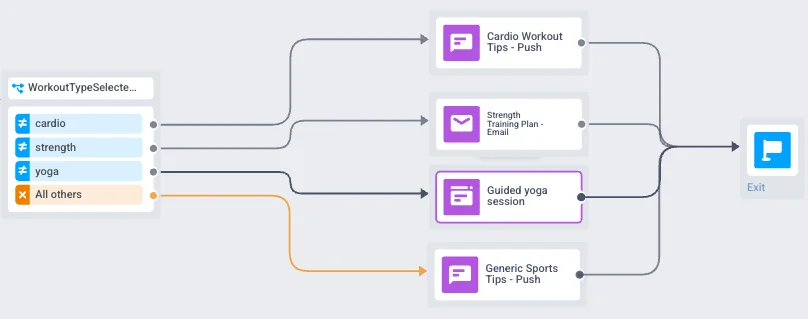
If you split the flow based on the event WorkoutTypeSelected and the attribute type, you can route users to personalized onboarding flows depending on their selected workout:
- Users with
type = cardio→ receive cardio workout tips - Users with
type = strength→ receive a strength training plan - Users with
type = yoga→ receive a guided yoga session - Users who did not select a workout type (All others) → receive a push message with generic sports tips, ensuring they still get relevant onboarding content even without a specific preference.
Each branch then contains targeted message elements that deliver relevant content.
Choose which devices to check
Anchor link toAvailable for Segment and Tag splits. It doesn’t apply to Event splits, which compare a value already captured from a specific event rather than device data.
A user can have several devices. For example, they might enter the journey on an Android phone but also own an iPhone. By default, Segment and Tag checks look across all of the user’s devices, so a user who entered on Android can still be routed by data tied to their iPhone.
Under Which devices to check, choose All devices of the user to keep that behavior, or Only the device that entered to check the entry device only.

The entry device isn’t limited to a push-registered one. Only the device that entered checks whichever device is tied to how the user entered the journey, including an email- or SMS-only device, or the specific device matched by an Audience-based entry.
If you leave both options unselected, Pushwoosh falls back to your account’s default scope, named in the hint under the radio buttons. Points built before this update keep that same default. Nothing is preselected for them. Switching between Segment and Tag keeps your choice.
The chosen scope also shows in the read-only view of a running journey version, as a line under the branch list. Points using the account default don’t show this line.

Reachability check uses the same Which devices to check control. See Choose which devices to check on that page for how it behaves there.
Compare branch values
Anchor link toEach branch condition checks a selected field against a comparison target. The target can be a fixed value you define, another field from the same user’s profile, or a value captured from an earlier step in the journey.
Which option you choose determines how dynamic the comparison is: a fixed value applies the same rule to everyone, while a tag or event attribute evaluates each user against their own data.
Next to the value field, choose one of three comparison modes:
| Mode | When to use | Example |
|---|---|---|
| Value | You decide a fixed target. The same value applies to every user. Use when one answer works for the whole audience. | Send a shoes promo only when Favourite_category is Shoes. |
| Tag | The target is another field on the same user’s profile. Each user is compared against their own data. Only tags of a compatible type appear in the list. | Send a “ready to redeem” message only when integer_tag is greater or equals that user’s Points. |
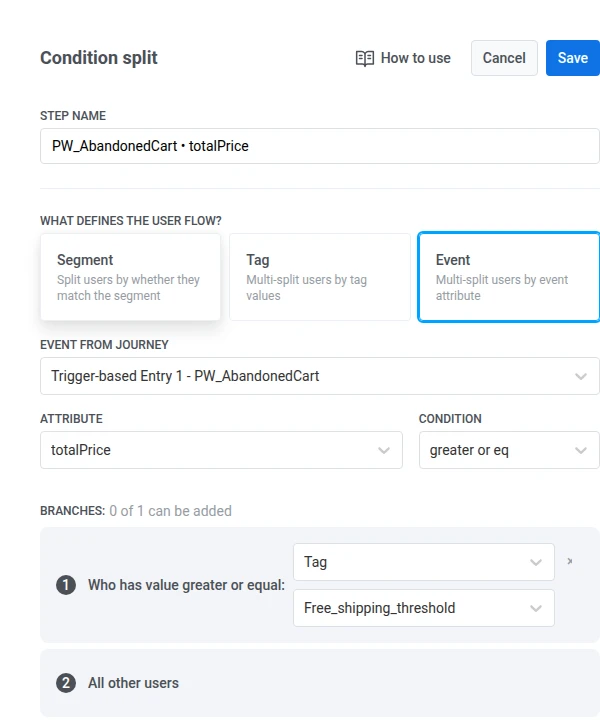
| Event attribute | The target comes from something the user did earlier in this journey. Select the event, then the attribute. Only type-compatible attributes are listed. | From abandoned cart, check if totalPrice is greater or equals the user’s Free_shipping_threshold tag. |
Dynamic comparison is available for the following operators:
- Tag branches:
isandis notfor any tag type except LIST;greater or equalsandless or equalsfor INTEGER, DECIMAL, and DATE tags;is one of/is not one offor LIST tags. The LIST count conditions (number of values is,number of values is not,number of values is less or eq,number of values is greater or eq) always take a typed number. Tag and Event attribute targets aren’t available for them. - Event branches:
isandis notfor any attribute type except LIST;greater or equalsandless or equalsfor INTEGER, DECIMAL, and DATE attributes;is one of/is not one offor LIST attributes.
Example scenarios
Anchor link toTag compared to another tag
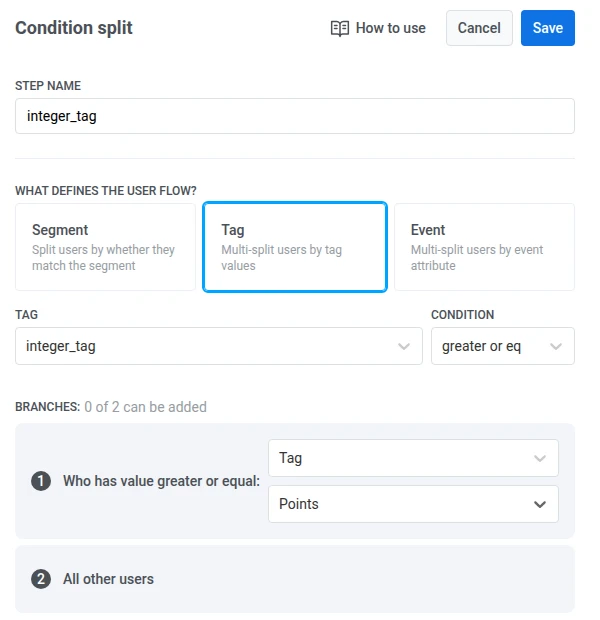
Anchor link toUse case: reward or unlock content only when a user’s score reaches a personal target stored on their profile.
Why: a fixed threshold (for example, greater or equals 100) treats everyone the same. Comparing integer_tag to each user’s own Points tag routes people based on their individual target.
How to set it up:
- Select Tag as the condition type.
- From the Tag dropdown, choose
integer_tag. - Set the condition to greater or equals.
- For the branch value, choose Tag, then select
Points.
Users whose integer_tag is greater than or equal to their own Points follow this branch. Everyone else goes to All other users.
Tag compared to an event attribute
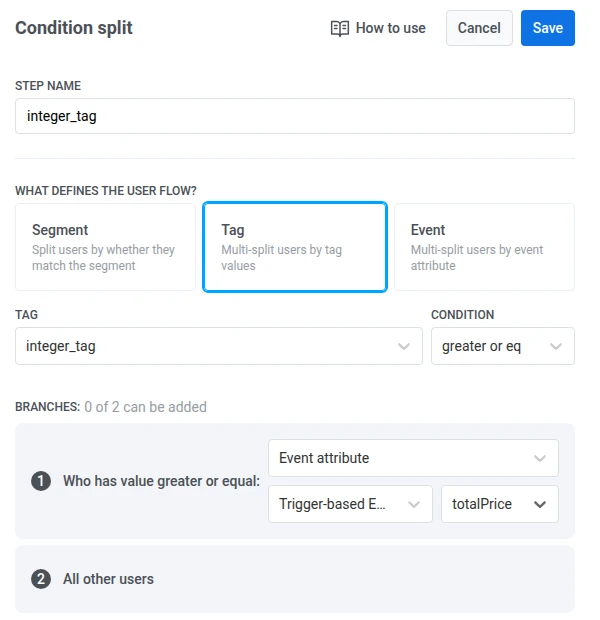
Anchor link toUse case: after a purchase or cart event, decide whether the user’s stored score still covers the amount from that step.
Why: the amount is different for each session. Comparing the profile tag to the event’s totalPrice uses the real value from earlier in the journey instead of guessing a fixed value.
How to set it up:
- Select Tag as the condition type.
- From the Tag dropdown, choose
integer_tag. - Set the condition to greater or equals.
- For the branch value, choose Event attribute, then select the trigger event and the
totalPriceattribute.
Users whose integer_tag is greater than or equal to the totalPrice from that earlier event follow this branch. Everyone else goes to All other users.
Event attribute compared to a tag
Anchor link toUse case: after abandoned cart, check whether the cart already qualifies for free shipping or a bonus, then send the matching recovery message.
Why: cart total comes from the journey event. The free-shipping threshold can differ per user and is stored on the profile as the Free_shipping_threshold tag. Comparing totalPrice to each user’s own Free_shipping_threshold puts qualified carts on one branch (for example, “complete checkout for free shipping”) and the rest on another (for example, “add more to unlock free shipping”).
How to set it up:
- Select Event as the condition type.
- From Event from Journey, choose
PW_AbandonedCart. - Under Attribute, select
totalPrice. - Set the condition to greater or equals.
- For the branch value, choose Tag, then select
Free_shipping_threshold.
Users whose abandoned-cart totalPrice is greater than or equal to their Free_shipping_threshold follow this branch. Everyone else goes to All other users.