Data requests
Use Data requests to permanently erase personal data from Pushwoosh for people you identify by User ID, HWID, or Email, and to review past erasures on this account.
To open it, click My account in the top bar or sidebar, then select Data requests.
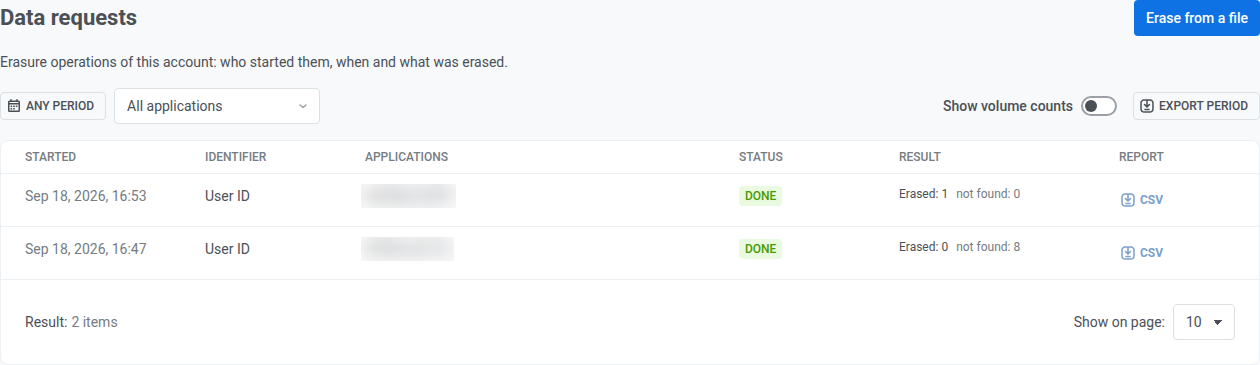
Any team member can open the page, but running Erase from a file requires modify rights on the selected application.
To erase a single subscriber instead of a file, use Erase personal data on their card in User Explorer. Those erasures land in this same table.
Pushwoosh keeps this journal, including the per-identifier report, for 3 years.
Erase from a file
Anchor link toClick Erase from a file to bulk-erase personal data by a list of identifiers.
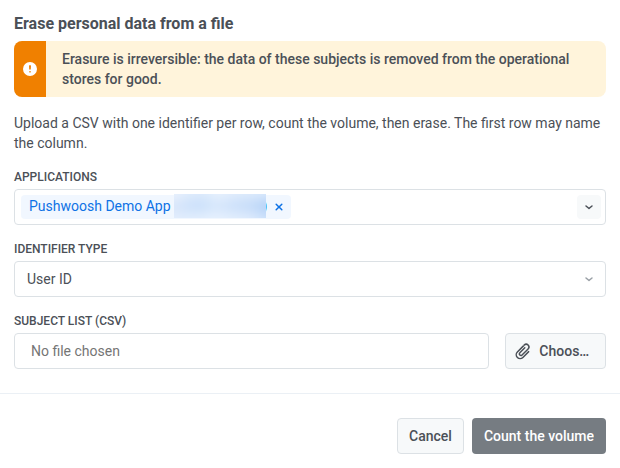
The subject list is a CSV with one identifier per row, up to 5 MB and 10,000 identifiers. Select up to 50 applications, and keep identifiers × applications to 50,000 or fewer, because that’s how many rows the report holds. The first row may name the column.
-
In Applications, select which applications to search for the identifiers.
-
In Identifier type, choose User ID, HWID, or Email, matching what the CSV column contains.
-
Under Subject list (CSV), click Choose a file.
-
Select the CSV to upload.
-
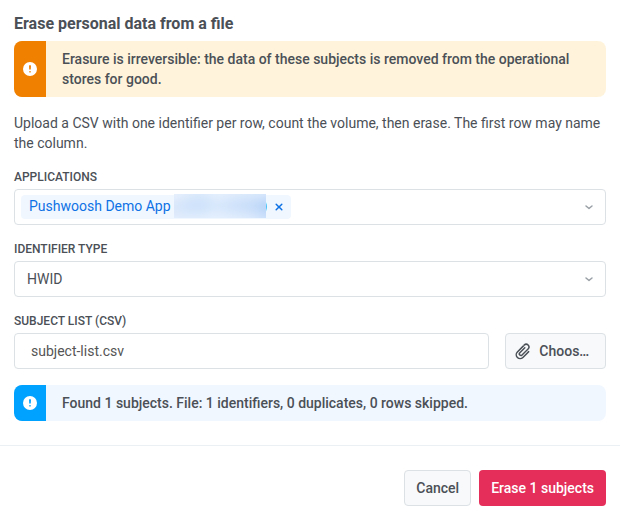
Click Count the volume to see how many records match, plus duplicate and skipped-row counts from the file, before erasing anything. You can stop after this step without erasing. To see those count-only runs in the table later, turn on Show volume counts.
-
Click Erase N subjects once the count looks right, where N is the number of matched records. This step cannot be undone.
An account can start up to 20 data erasure runs in a rolling 24 hours, including volume checks. Past that, Erase from a file and Erase personal data refuse to start another one until enough of those 24 hours have passed.
Review past erasures
Anchor link toThe table lists erasure operations on this account. Each row is one run.
- Started by: check who started the run. It shows the address of the Control Panel user, or API token if the run was started through the API. A dash marks older runs from before this was recorded.
- Status: for example Done.
- Result: how many identifiers were Erased and how many were not found.
- Report: click CSV to download the per-identifier outcome for that operation.
Show volume counts
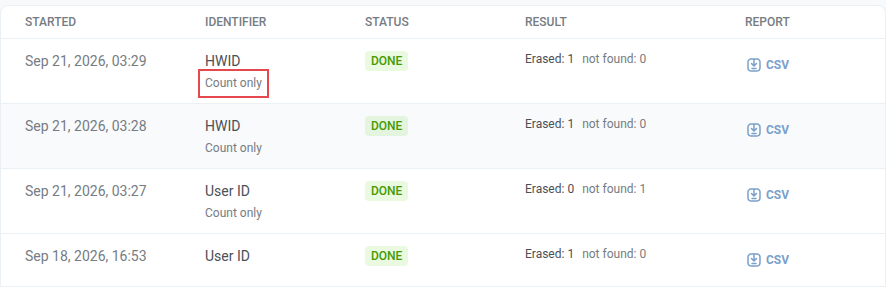
Anchor link toTo see runs where you only clicked Count the volume and didn’t erase anyone, turn on Show volume counts. By default, the table hides them and shows only completed erasures.
These runs show Count only in the Identifier column, under the identifier type (HWID, User ID, or Email).
To narrow or export the list:
- In ANY PERIOD, choose the period.
- Choose an application in All applications, or leave All applications selected.
- In Any initiator, pick a team member from the list or type any address. This also finds someone no longer on the account, because their past erasures stay in the journal under their address.
- Click Export period to download a CSV of the operations shown for the selected period.