WhatsApp platform configuration
Pushwoosh enables you to send personalized messages to customers via WhatsApp. Follow this guide to set up the WhatsApp platform.
Prerequisites
Anchor link toBefore beginning the setup, ensure the following requirements are met:
- Access to Facebook Business Manager: You need a Facebook account with permissions to manage the WhatsApp Business Account within Facebook Business Manager.
- Payment method for WhatsApp: Meta charges for each message sent via WhatsApp. Pushwoosh does not handle billing, so ensure your payment information is configured in the Payment settings of your WhatsApp account.
Setting up the WhatsApp configuration
Anchor link toTo set up the WhatsApp configuration, follow these steps:
- Navigate to Campaigns > WhatsApp messages.
- Click Login with Facebook to start the configuration process.
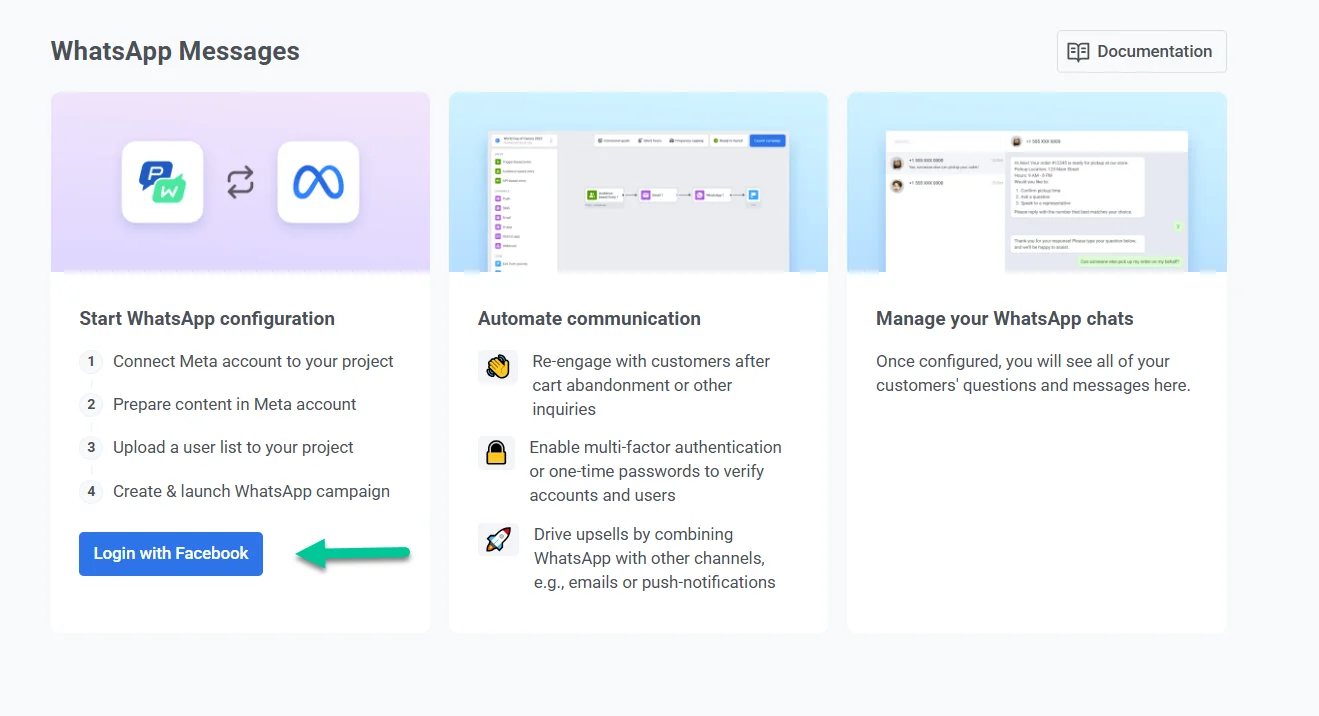
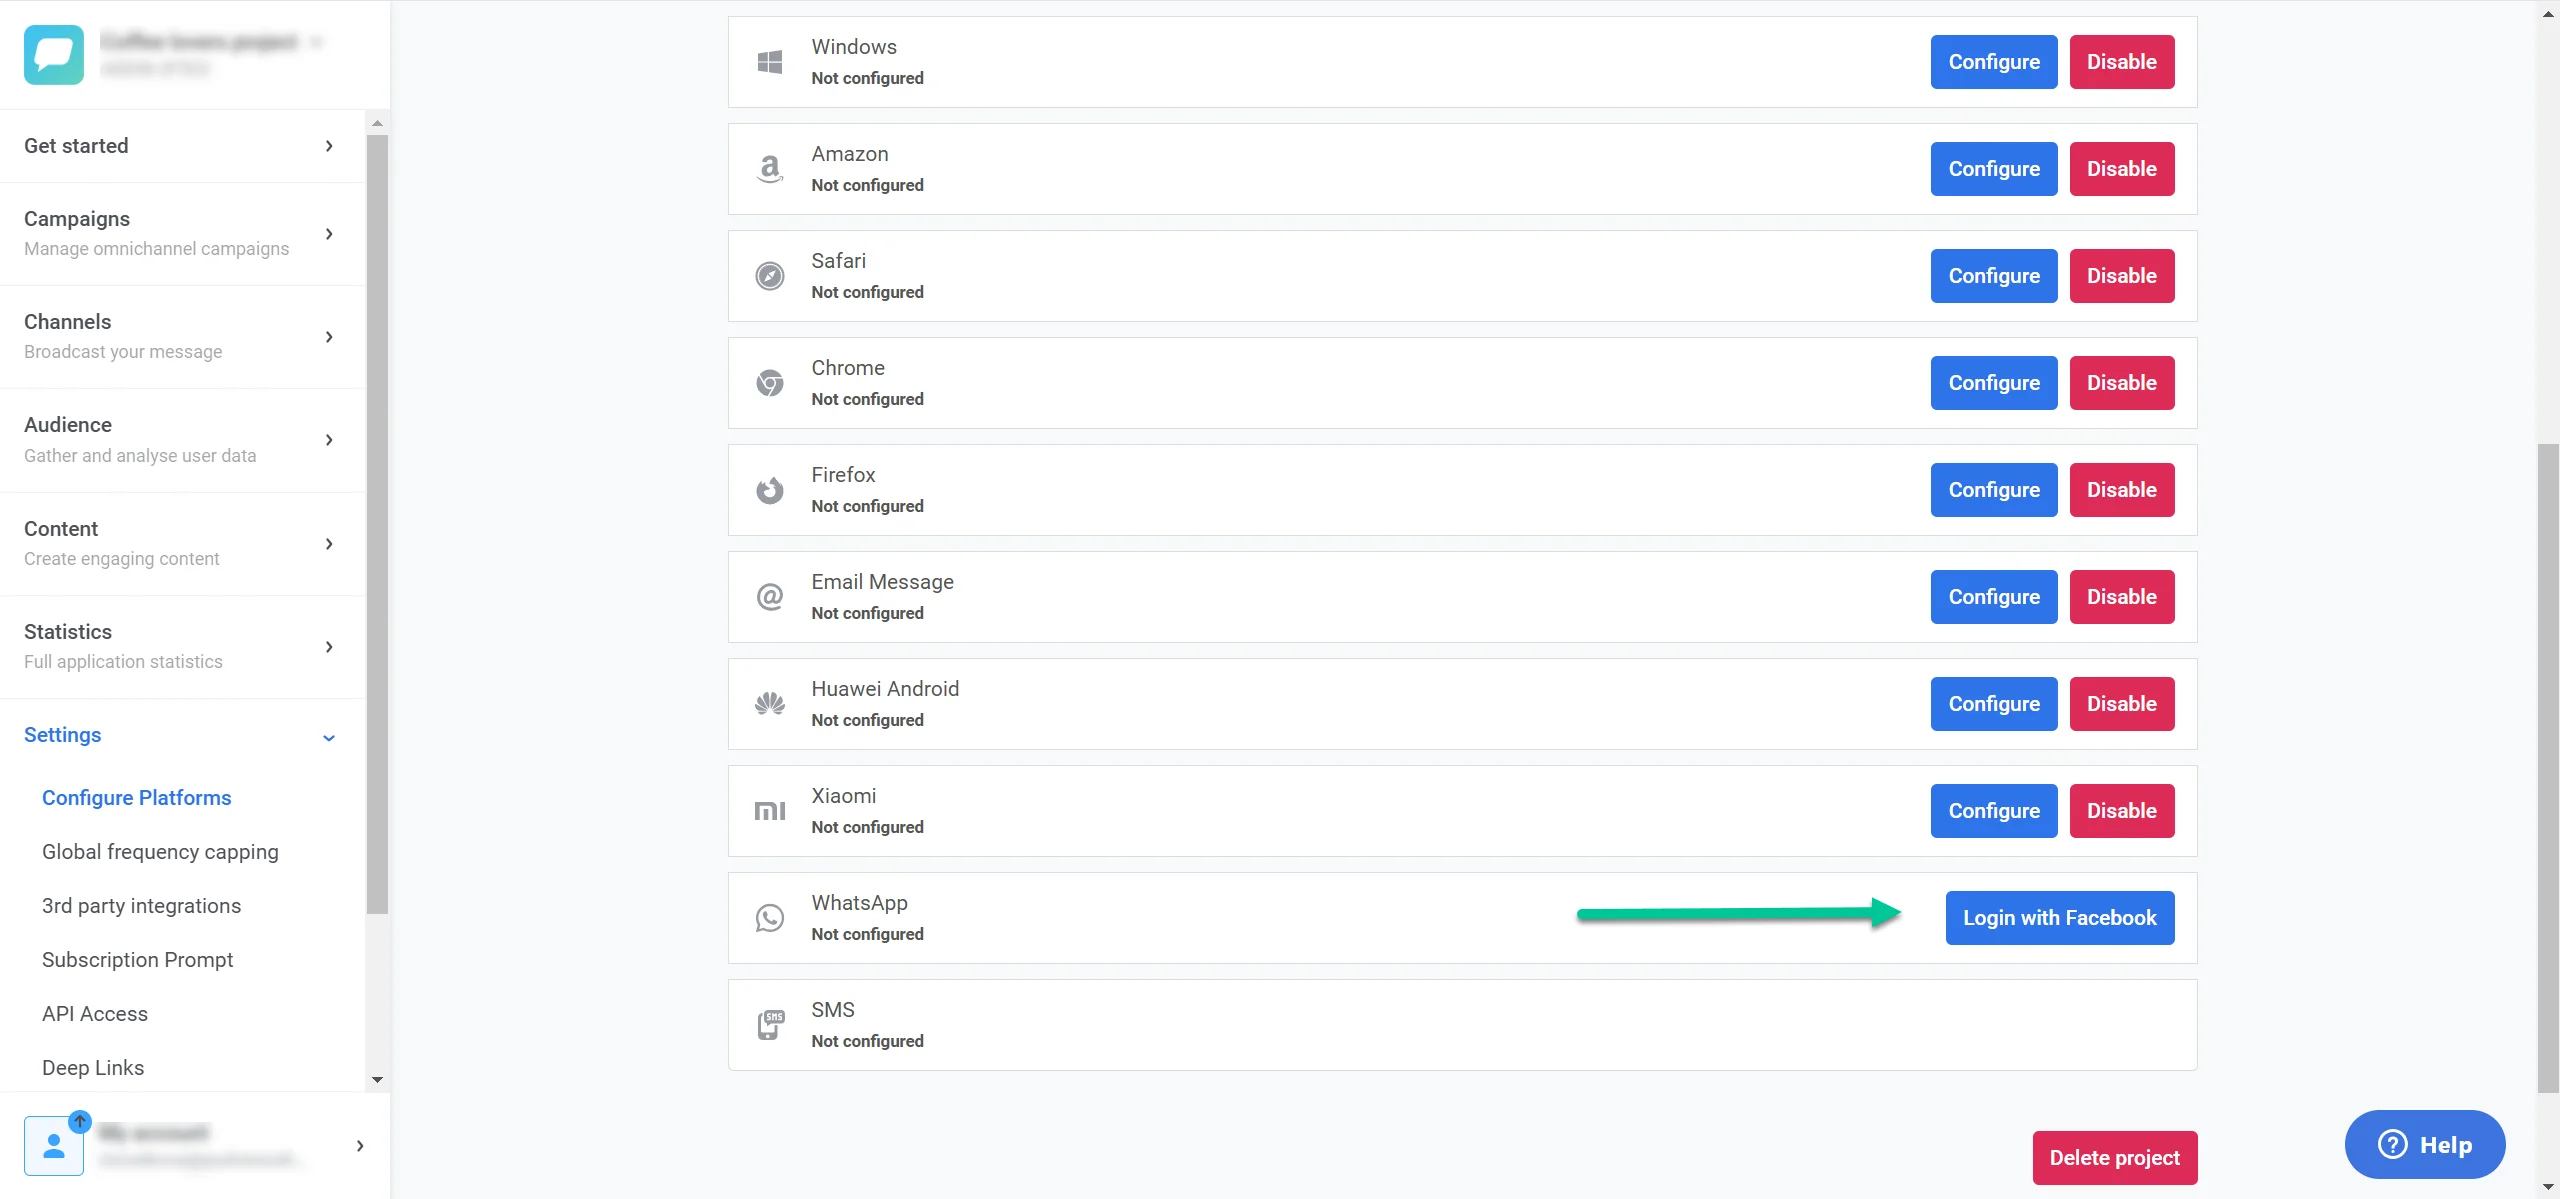
Alternatively, navigate to Settings > Configure Platforms. Locate WhatsApp in the list of available platforms and click Login with Facebook next to the WhatsApp option.
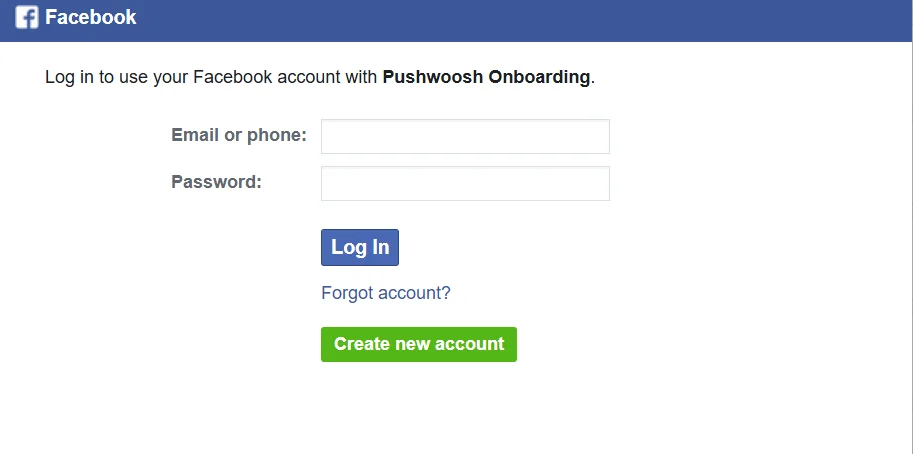
- Follow the on-screen prompts to log in with your Facebook Business account.
- To proceed with onboarding, click Continue as [Your Name] to grant Pushwoosh access to your Facebook profile information, which includes your name and profile picture. This does not allow Pushwoosh to post on Facebook on your behalf.
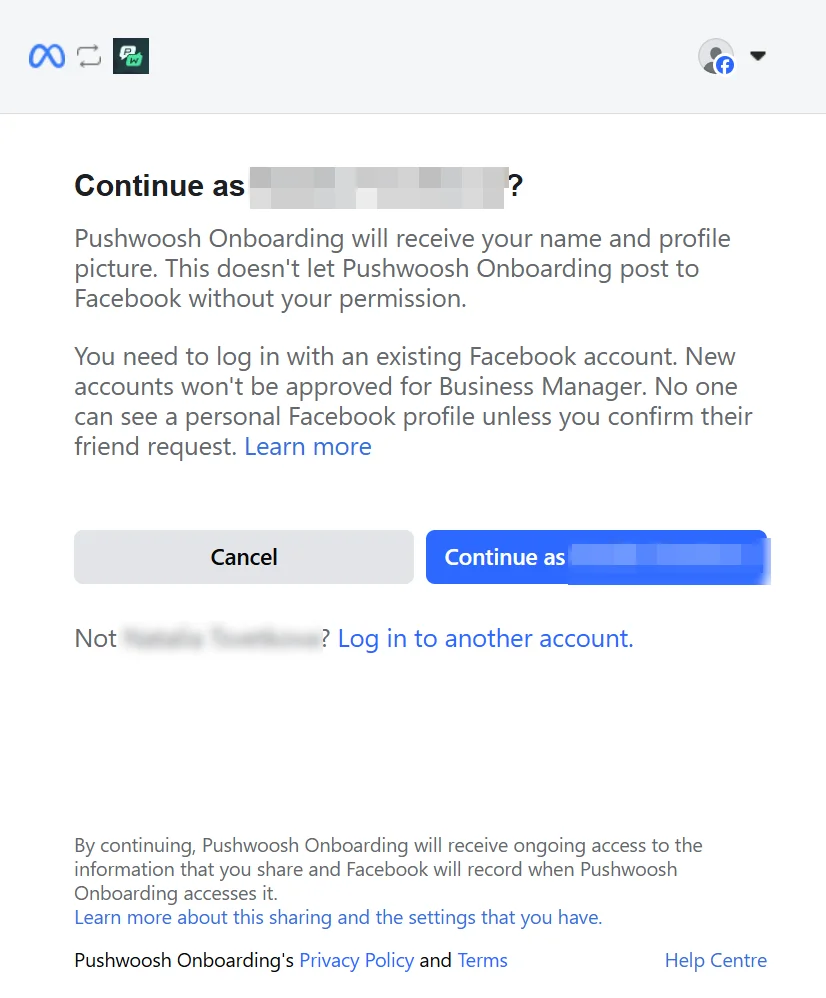
If the displayed account is incorrect, click Log in to another account to switch to the appropriate Facebook account with Business Manager access. Ensure you are using an existing Facebook account, as new accounts cannot be approved for Business Manager.
Connect your account to Pushwoosh and enter your business information
Anchor link to- After logging in, you’ll see a screen titled Connect your account to Pushwoosh. This screen outlines the permissions Pushwoosh will need to send WhatsApp messages on your behalf.
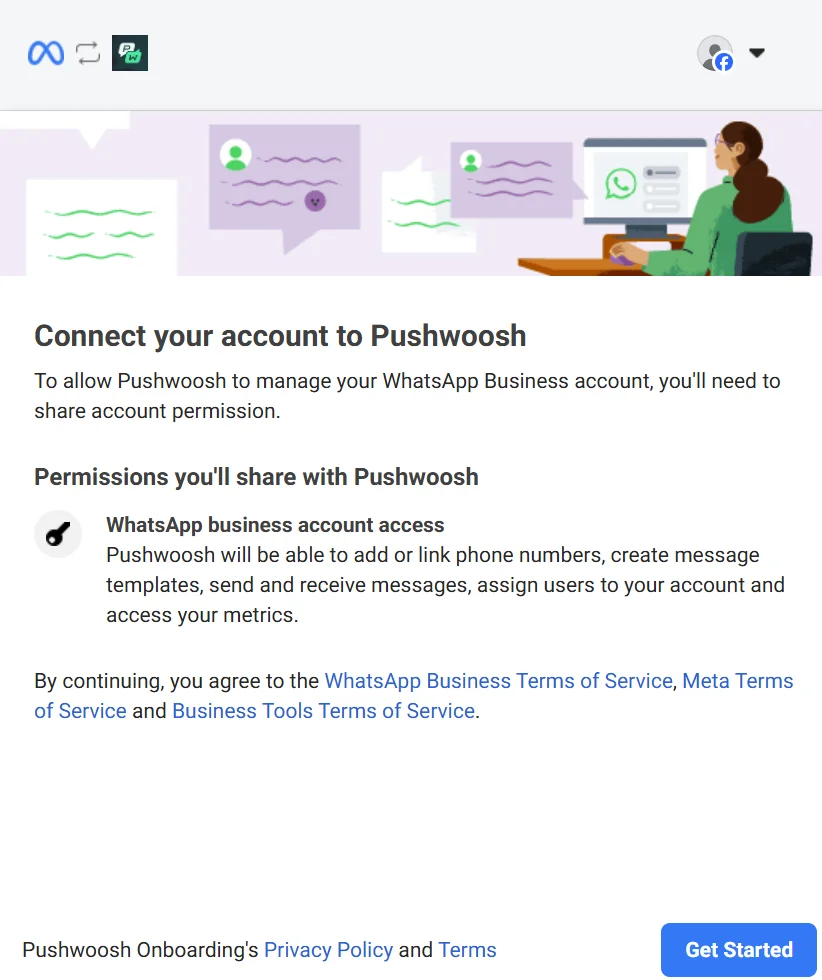
Pushwoosh will request permission to:
- Add or link phone numbers to your WhatsApp Business Account.
- Create and manage message templates.
- Send and receive messages on your behalf.
- Assign users to your account.
- Access your metrics.
Carefully review each permission and the applicable terms of service, including the WhatsApp Business Terms of Service, Meta Terms of Service, and Business Tools Terms of Service. Review Pushwoosh’s Privacy Policy and Terms for details on how your data is managed.
Once you’re ready, click Get started to continue.
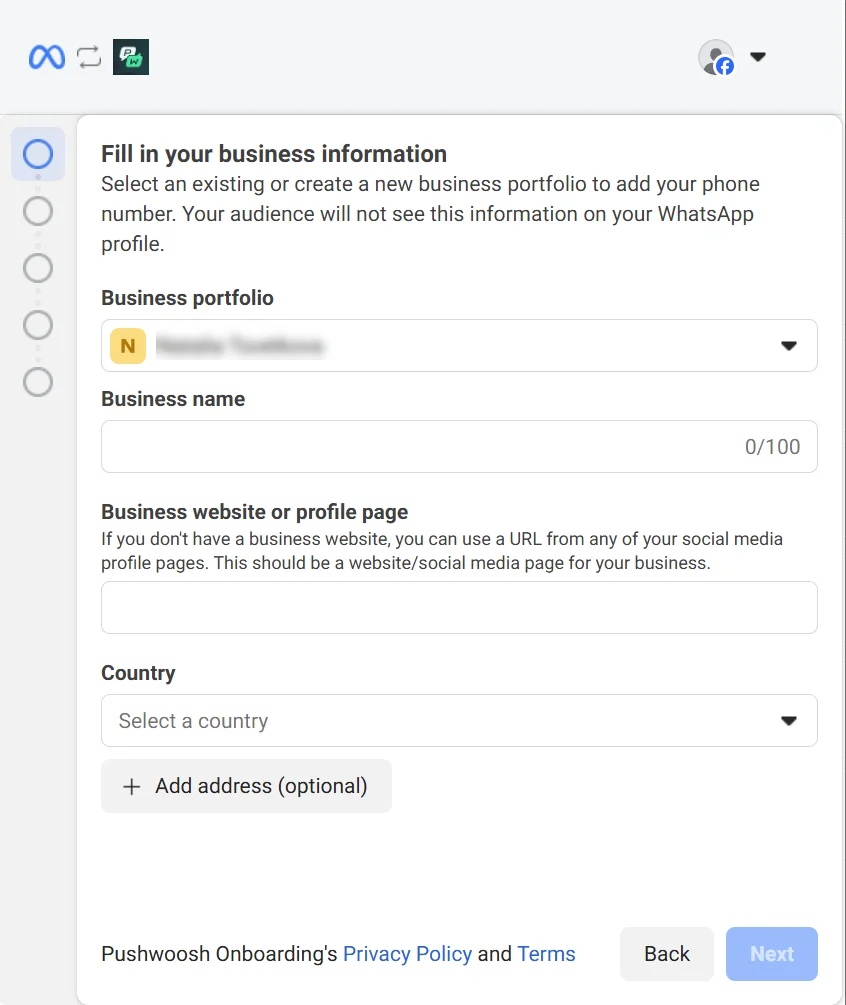
- To complete the setup, provide your business details. These details are used internally and will not be visible to customers on WhatsApp.
In the Business portfolio section, either select an existing portfolio or create a new one. Then, fill in the required business details:
- Business name
- Business website
- Country
- Address (optional)
-
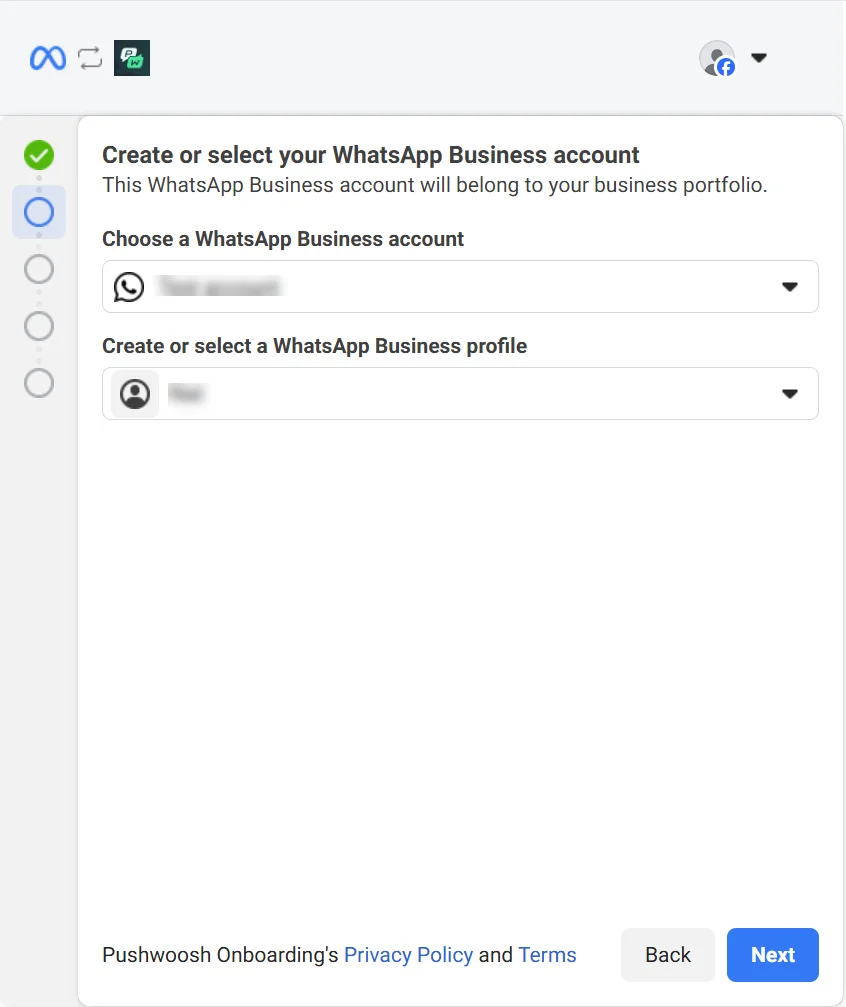
In the Choose a WhatsApp Business Account section, select an existing account from the dropdown menu. This account will be linked to your business portfolio in Pushwoosh. If you don’t have a WhatsApp Business account, select Create a WhatsApp Business Account.
-
In the Create or Select a WhatsApp Business Profile section, choose an existing profile or create a new one to represent your business on WhatsApp.
- Add the phone number your customers will receive messages from, and verify it with the code Meta sends.
- Review the permissions Pushwoosh will have to manage your WhatsApp account. These include:
- Managing your selected WhatsApp account.
- Accessing and managing conversations via your selected WhatsApp account.
-
Click Continue.
-
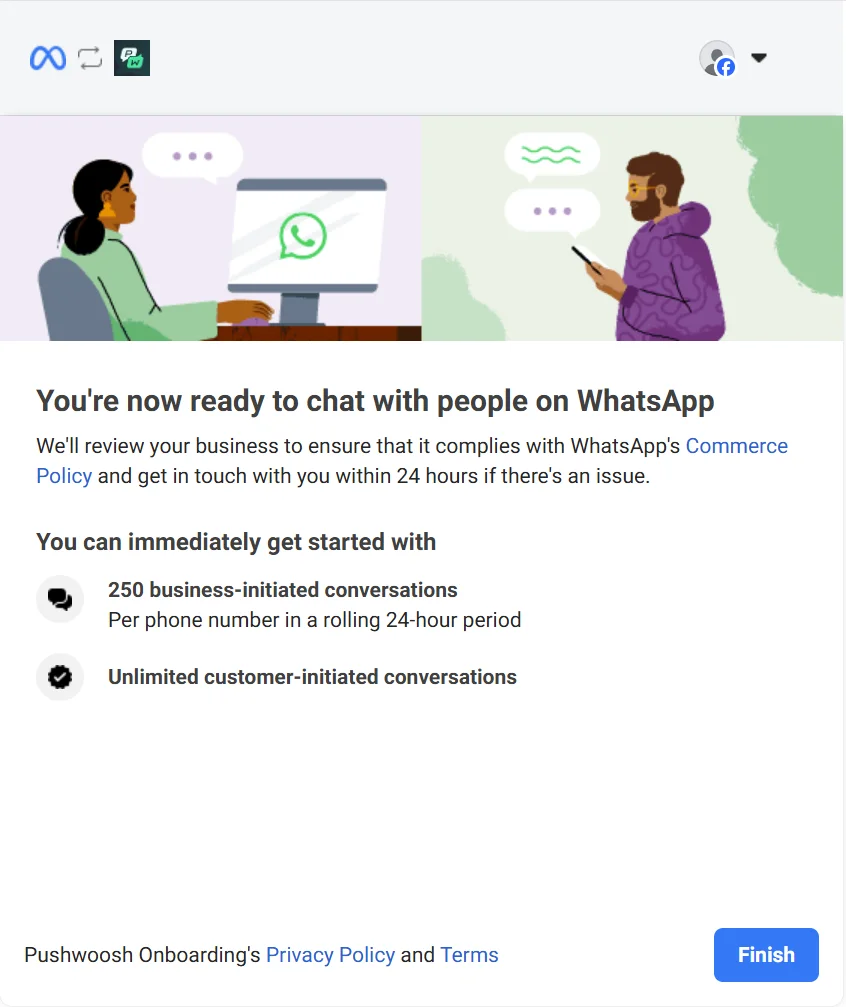
Next, you will see a confirmation screen indicating that the WhatsApp connection steps are done. Do not close the window yet. Facebook will then review your business to ensure compliance with their Commerce Policy. This review typically occurs in the background, and you will only be contacted if there is an issue, usually within 24 hours.
-
Review the conversation quotas Meta shows for this sender:
- Business-initiated conversations: conversations your business starts by messaging a customer first. You can initiate up to 250 conversations per phone number within a rolling 24-hour period.
- Customer-initiated conversations: conversations where the customer messages your business first. There are no limits on these, so you can respond without restriction.
-
Click Finish to close the setup wizard.
After setup, the live cap Meta allows for this sender appears on the Message limit tile under Check your sender status and quality rating.
Once configured and after the review process is complete, the status and basic information of your WhatsApp integration will appear in the list of configured platforms in Pushwoosh, enabling you to start interacting with customers on WhatsApp.
Check your sender status and quality rating
Anchor link toAfter you connect a WhatsApp Business Account, go to Settings > Configure Platforms > WhatsApp. The management screen opens instead of the login wizard. Use it to monitor your sender and reconnect it if Meta reports a problem.
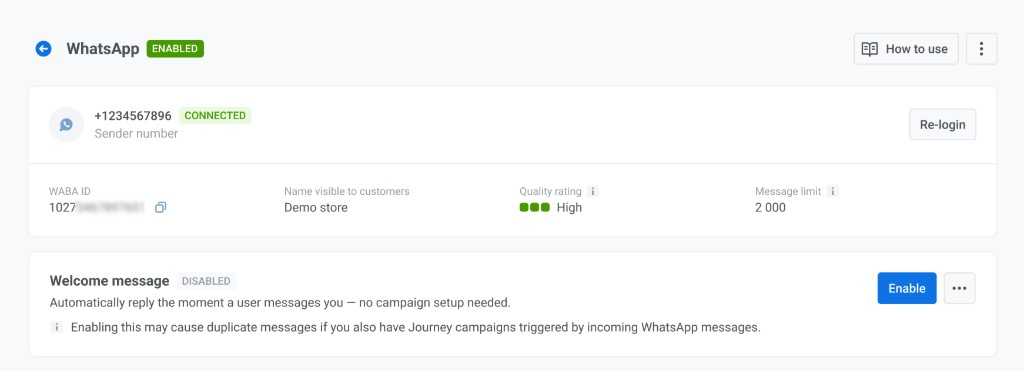
The page header shows two independent statuses, one from Pushwoosh and one from Meta:
- Enabled / Disabled: whether you turned the platform on or off in Pushwoosh.
- Sender number: the WhatsApp phone number linked to this account. Next to it, Connected or Sending blocked shows whether Meta currently accepts messages from this sender. This badge only appears while the platform is enabled.
From the same screen you can:
- Click Re-login to repeat the Facebook connection steps above, for example if Meta reports a connection problem.
- Open the three-dot menu (⋮) and choose Disable platform (or Enable platform if it’s already disabled). Disabling disconnects the channel, so campaigns and automations can’t send WhatsApp messages until you enable it again.
Sender details
Anchor link toBelow the header, check these four tiles for your sender’s current details:
- WABA ID: your WhatsApp Business Account ID. Click the copy icon to copy it.
- Name visible to customers: the business name Meta displays to WhatsApp users you message.
- Message limit: the maximum number of unique customers your sender can message in a rolling 24-hour period. For example,
1 000or100 000, or Unlimited once Meta lifts the cap. - Quality rating: how Meta rates your sender based on recent recipient feedback.
Meta reports quality rating as one of the following levels:
| Rating | Meaning |
|---|---|
| High | No significant negative feedback on recent messages. |
| Medium | Meta has flagged some negative feedback. Review your messaging content and frequency. |
| Low | Meta has flagged significant negative feedback. Your message limit may drop. |
| Unknown | Meta hasn’t returned a rating yet for this sender. |
How to fix a blocked or limited sender
Anchor link toWhen Meta restricts sending, check the banner above the sender details:
- A warning banner means Meta has temporarily reduced your sending capacity. Messages still go through, but at a lower rate.

- An error banner means Meta has stopped your sender from sending entirely. The Sender number badge shows Sending blocked instead of Connected.

To restore sending:
- Open WhatsApp Manager and resolve the issue described by the banner. An error code appears when Meta provides one.
- Reload Settings > Configure Platforms > WhatsApp.
- Confirm the banner is gone and the Sender number badge shows Connected.
Accept Meta’s Marketing Messages API terms
Anchor link toTo keep sending WhatsApp marketing templates from October 13, 2027, accept Meta’s Marketing Messages API terms. From that date, Meta sends marketing templates only for businesses that have accepted these terms. Meta tracks acceptance for each WhatsApp Business Account separately, so if you’ve connected more than one, accept the terms for each of them.
Utility, authentication, and service messages are not affected. You don’t need to change your templates or campaigns, because Pushwoosh sends marketing templates through the Marketing Messages API automatically.
If you connect WhatsApp to Pushwoosh now, you accept these terms in the Meta connection window during setup. The steps below are for WhatsApp Business Accounts connected earlier, and for any account where Pushwoosh still shows a warning.
What happens if you don’t accept the terms
Anchor link toBefore October 13, 2027, your marketing templates are sent as before. From that date, Meta stops sending marketing templates from a WhatsApp Business Account that hasn’t accepted the terms, so campaigns and Journeys that use marketing templates won’t reach customers. Other message types keep working.
Where Pushwoosh shows that the terms aren’t accepted
Anchor link toWhile the terms aren’t accepted, Pushwoosh shows a warning in these places:
- Settings > Configure Platforms: a warning icon on the WhatsApp row, with the text Accept Meta’s Marketing Messages API terms to keep sending marketing templates after October 13, 2027.
- Settings > Configure Platforms > WhatsApp: a warning banner titled Accept Meta’s new terms for marketing messages, with an Open WhatsApp Manager link.
- Notification center: a warning titled [Pushwoosh Alert] Accept Meta’s new terms for WhatsApp marketing messages, with an Open WhatsApp Manager link.
How to accept the terms
Anchor link toOnly someone with full control of the Meta business portfolio that owns the connected WhatsApp Business Account can accept the terms. If you don’t have that access, ask your portfolio admin.
- In the warning banner on Settings > Configure Platforms > WhatsApp, click Open WhatsApp Manager, or open WhatsApp Manager in Meta Business Suite directly.
- Go to Overview.
- In Alerts, find the alert about the Marketing Messages API and accept the terms.
After you accept, Meta needs some time to finish setting up your account. The warnings in Pushwoosh disappear after Meta reports the setup as complete. The banner on the WhatsApp screen can take up to an hour to update, and the Notification center warning is cleared within a day.
Set up an automatic welcome message
Anchor link toYou can set up an automatic first reply for customers who message your WhatsApp number for the first time. Each customer receives it only once.
To turn on a welcome message for the first time:
- Open Settings > Configure Platforms > WhatsApp.
- On the Welcome message card, click Enable.

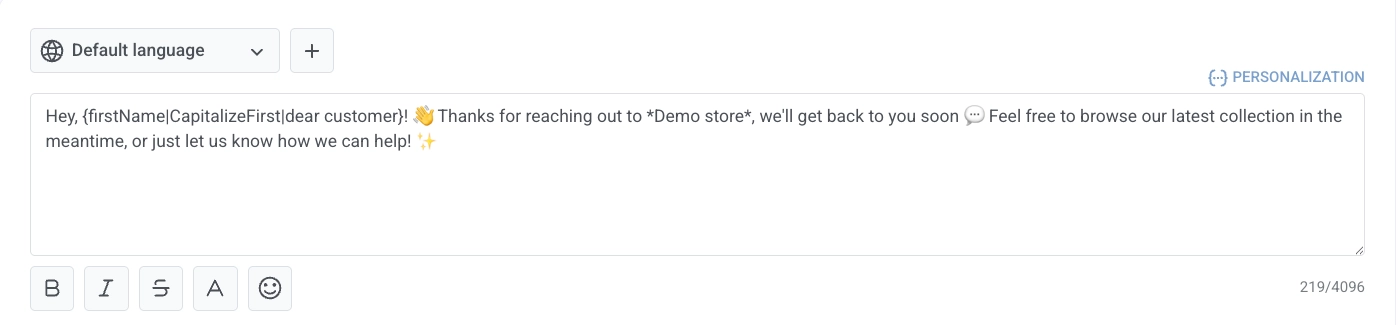
- At the top of the editor, pick the language to write and send this version of the message in. If the language you need isn’t listed yet, click + to add it: each language keeps its own message text, separate from the others.

- Send the same language to everyone: select that language, write its text, and click Save while it’s still selected. Every customer gets that text, no matter their own Language tag. If you leave the text empty, customers get the Default language text instead.
- Let Pushwoosh pick per customer: write text for every language you want to cover, then select Default language before you click Save. Pushwoosh matches each customer’s own Language tag to a language you’ve written, trying an exact match first, then the base language ignoring region (
en-USmatchesen), then Default language’s text if nothing matches. Give Default language its own text too. Otherwise, a customer who doesn’t match any language you’ve written gets no greeting at all.
-
Use the toolbar under the field to apply bold, italic, strikethrough, or text color, or to insert an emoji.
-
To insert a Tag or the customer’s User ID:
- Place the cursor where the value should appear.
- Click Personalization above the message field.
- Under Tag, choose a Tag or User ID.
- In the next dropdown, choose a format modifier (for example, CapitalizeFirst).
- Optionally enter a Default tag value for customers who don’t have that Tag set.
- Click Insert.
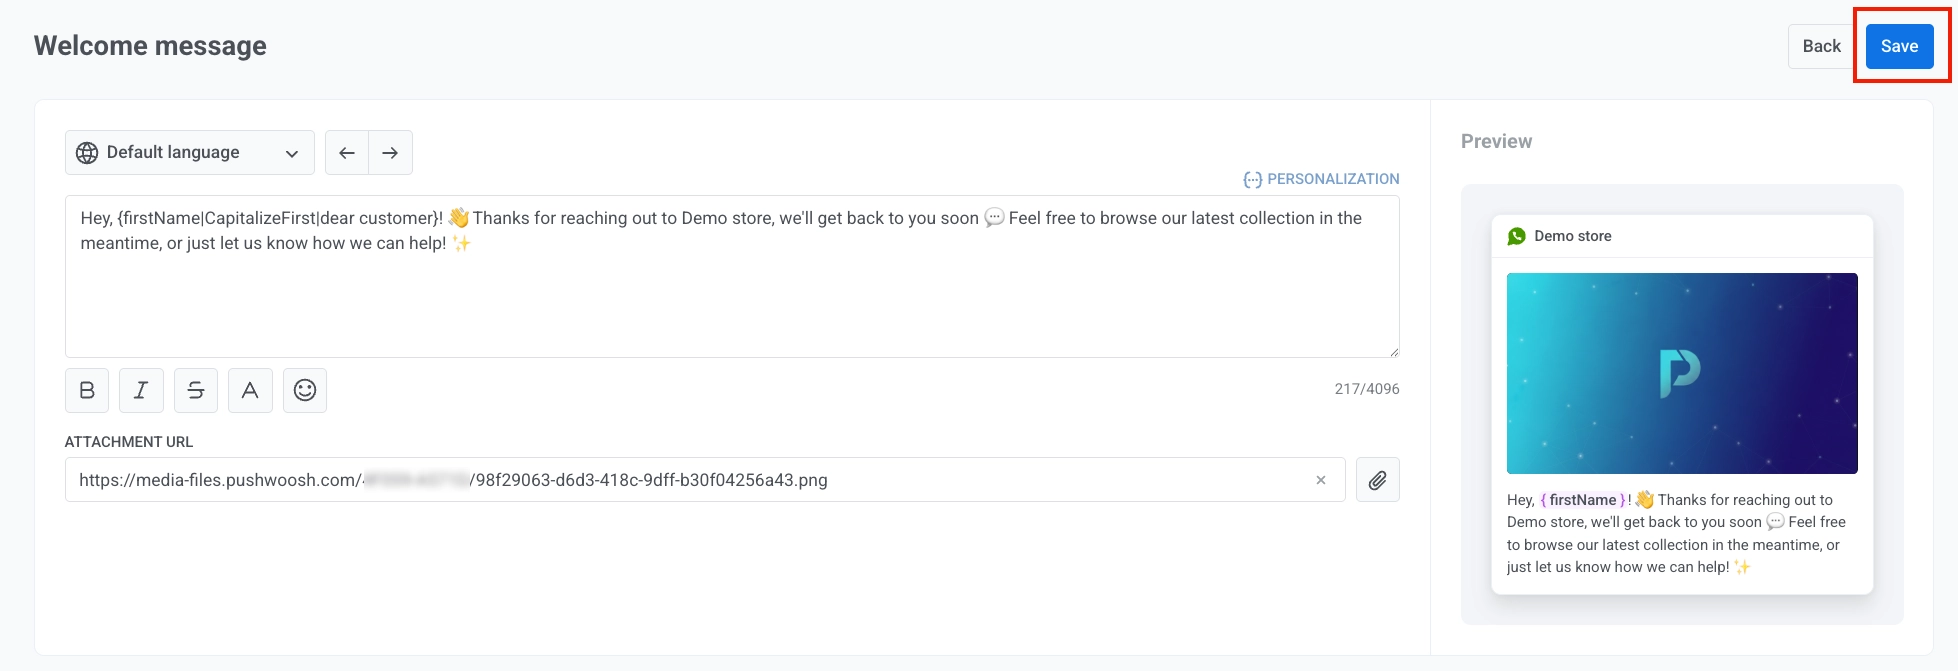
- Optionally, add an image in Attachment URL: paste a URL, or click the paperclip icon to pick a file from the Media storage. Unlike the text, this image is shared across every language you’ve added.

- Click Save.
Manage the welcome message
Anchor link toUse the same Welcome message card to turn the reply on or off, edit it, check statistics, or delete it.
When the welcome message is Enabled
Anchor link toEnabled means the welcome message is saved and sending automatic replies.
- Click Disable to stop automatic replies without deleting the saved text.
- Open the three-dot menu and choose Edit message to change the text.
- Open the three-dot menu and choose Delete to remove the saved welcome message entirely (not just turn it off).
- Click View detailed statistics for the current campaign’s numbers.
When the welcome message is Disabled
Anchor link toDisabled covers two different situations:
No message yet
The message was never set up, or was removed with Delete. Only Enable is available. Click it to create the message.
Message saved but turned off
The message exists but isn’t sending.
- Click Enable to turn automatic replies back on without rewriting the text.
- Open the three-dot menu and choose Delete to remove the saved message, or View detailed statistics for the current campaign’s numbers.
After you delete the welcome message
Anchor link toDelete removes the welcome message from this card, but Campaigns keeps the statistics for messages already sent.
To send welcome messages again, set up a new welcome message. This starts a new campaign, so View detailed statistics then opens the new campaign, not the deleted one.
To check the statistics from before the deletion, go to Statistics > Aggregated messages and open the older WhatsApp welcome message entry. Both the old and the new welcome-message campaigns share this same name, so tell them apart by creation date.
Things to know
Anchor link to- The welcome message depends on Meta delivery status. If your sender is currently blocked, the welcome message won’t be delivered until Meta restores sending. See How to fix a blocked or limited sender.
- If a Journey campaign is also triggered by incoming WhatsApp messages, a customer’s first message can trigger both the welcome message and the Journey, so they may receive two messages back to back. Adjust your Journey trigger or disable the welcome message to avoid this.