HubSpot: create or update contact
Use HubSpot: create or update contact to upsert one HubSpot contact by email from a journey step: it creates a new contact when the email isn’t found, or updates the listed properties when it is. This point authenticates with its own HubSpot private app token. It doesn’t use any account-level HubSpot integration configured elsewhere in Settings.
Typical uses:
- Sync journey activity into CRM: create or update a contact so sales sees journey progress without checking Pushwoosh.
- Enrich a contact: set properties like plan or last purchase as the traveler’s tags update through the journey.
- Trigger a HubSpot workflow: update a property a HubSpot workflow watches, from inside a Pushwoosh journey.
Configure the point
Anchor link to- Drag HubSpot: create or update contact from the Integrations section of the left panel onto the canvas.
- Double-click the point and enter a Step Name.
- In Private app token, enter a HubSpot private app token with permission to write contacts. It’s stored masked, like a webhook secret header.
- In Contact email, enter the email HubSpot uses to find an existing contact. It takes the same macros as Properties, for example
{{tag:Email}}, so each traveler upserts their own contact instead of all of them colliding on one fixed address. Don’t repeat it in Properties.
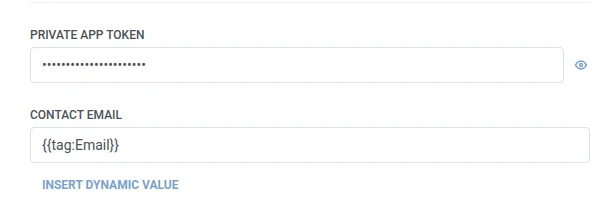
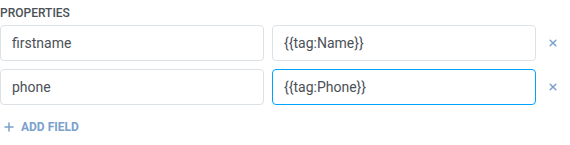
- In Properties, add one row per HubSpot property to set. Enter HubSpot’s internal property name (for example
firstname,phone) and the value. Names must be non-empty and unique. A value can be fixed text or a traveler macro such as{{tag:Name}}, the same macros as in a Webhook body. Or click Insert Dynamic Value to pick an attribute an earlier step in this journey produced, for example an LLM response or a mapped Webhook value.
- Click Save.
Response
Anchor link toThe traveler continues to whatever step you connect next on the canvas.
Attributes after the step runs
Anchor link to| Attribute | What it holds |
|---|---|
hubspot_contact_id | The HubSpot contact’s ID |
How to use it in later steps
Anchor link toThe traveler already continued to the next step regardless of this attribute. Save it to a Tag with Update user profile if you need to link back to this contact later, for example through HubSpot’s own API.
Failures and unexpected responses
Anchor link toA failed request drops the traveler from the journey. See Errors and failed requests.
Example scenario: Syncing a new signup into HubSpot
Anchor link toA team wants every new signup to exist as a HubSpot contact, without a separate import step.
- Add a Trigger-based entry element and set it to fire on a
SignupCompletedevent. - Add HubSpot: create or update contact right after it. Set Contact email to
{{tag:Email}}. In Properties, setfirstnameto{{tag:Name}}. - Click Save.
Once this runs, every new signup exists as a HubSpot contact, created or updated by email so a repeat signup doesn’t create a duplicate.