Google Ads integration
Google Ads integration lets you sync Pushwoosh audiences to a Google Ads account as Customer Match audiences. Use it to target or exclude users in ad campaigns and add paid ads as another channel in your customer journey.
Use cases
Anchor link toUse this integration to:
- target high-value users in multiple channels to increase purchases or engagement
- retarget users who are less responsive in other channels
- build suppression audiences so loyal customers do not receive unnecessary ads
Prerequisites
Anchor link toBefore you connect Google Ads, make sure:
- You have the Admin role in your Pushwoosh account. See Manage user access and permissions for how roles and permissions work.
- You have a Google Ads account with Customer Match available.
- Your Google Ads account has Customer Match enabled. Google enables it per account after a manual review, so a newly created account may not have it yet.
Set up Google Ads in Pushwoosh
Anchor link to-
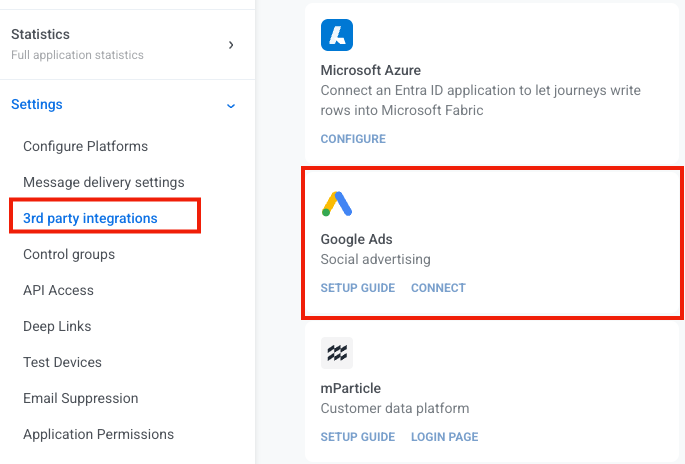
In Pushwoosh, go to Settings > 3rd party integrations.
-
In the Google Ads card, click Connect.
-
Sign in to your Google account, then allow the permissions Pushwoosh requests. Leave the Data Manager permission on alongside Google Ads. Without it, Customer Match uploads will not work.
-
Select the ad accounts you want to connect. Choose the client ad account where the Customer Match audience will live. Connecting only the manager (MCC) account is not enough. Google does not keep Customer Match audiences on manager accounts, so you will not have an audience to sync to.
Review connection status
Anchor link toAfter setup, you stay on the 3rd party integrations page, and the Google Ads card shows as connected. Click Settings on the card to open the Google Ads page in Pushwoosh.
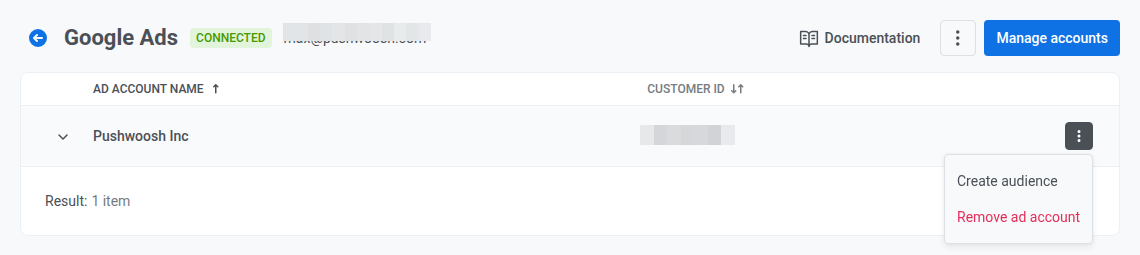
Each connected ad account shows its name and ID.
Open the three dots at the end of a row and choose:
- Create audience: add a Customer Match audience (see Manage Customer Match audiences)
- Remove ad account: delete that ad account from the list in Pushwoosh
Reconnect if audience uploads fail
Anchor link toIf you connected Google Ads before Pushwoosh started using Google’s Data Manager permission for Customer Match uploads, that older connection cannot upload audiences. Reconnect it once:
- On the Google Ads page, click Connect again (or repeat Set up Google Ads in Pushwoosh from step 2).
- Sign in with the same Google user and grant the Data Manager permission on the consent screen.
You only need to do this once per connected Google account. Every ad account connected under it picks up the Data Manager permission.
Manage Customer Match audiences
Anchor link toA journey’s Audience sync point needs an existing Customer Match audience to target. Pushwoosh does not create one for you automatically.
- On the Google Ads page, click the expand arrow on an ad account row to open Customer Match audiences.
- Click Create audience (also available from the row’s three dots). Either path opens the same create flow.
- Enter an Audience name. Description is optional.
- Click Create.
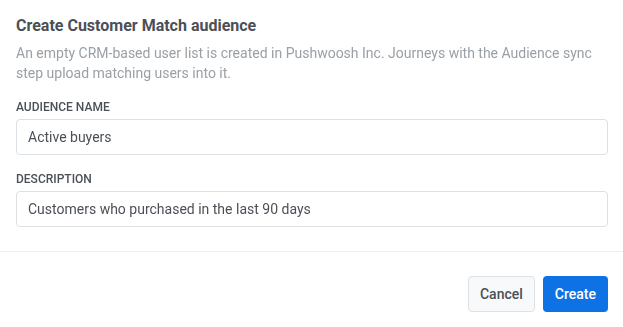
This creates an empty Customer Match audience on that Google Ads account. Journeys with an Audience sync point upload matching users into it.
In Customer Match audiences, check each audience’s name, ID, and size.
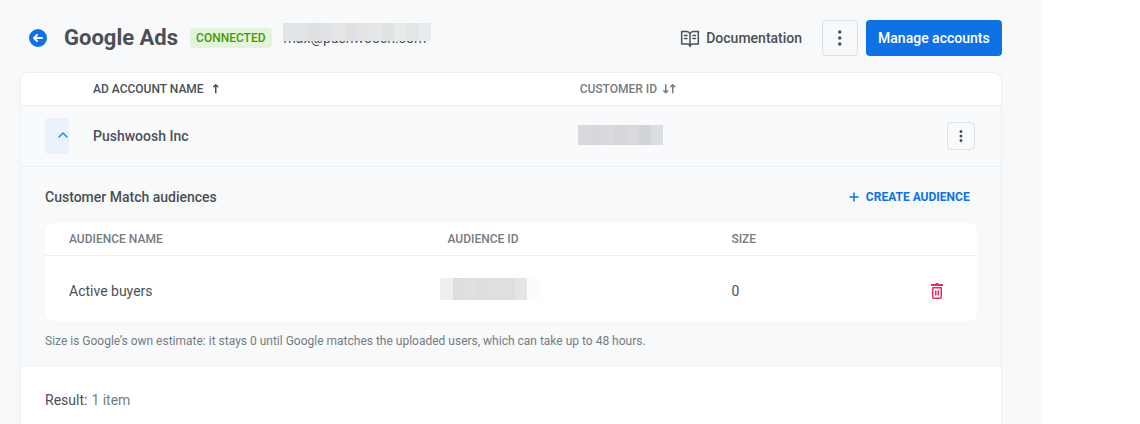
To delete an audience, click the trash icon on its row, then click Delete to confirm.
Manage connected ad accounts
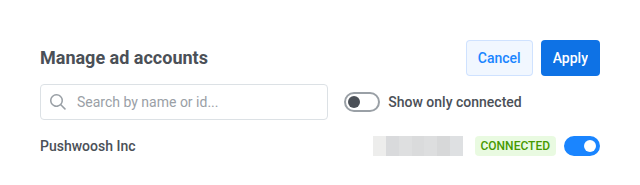
Anchor link to- On the Google Ads page, click Manage accounts.
- Use the toggle on each row to include or exclude that ad account from the integration.
- Click Apply to save changes, or Cancel to close without saving.
Sync audiences in journeys
Anchor link toThe Audience sync point in Journey Builder links your journey to a Google Ads Customer Match audience. Every time a user reaches that point, Pushwoosh asks Google to either add them to the audience or remove them from it.
For example, you may use this to stop showing an ad to users who already converted, so you do not waste ad spend on people who do not need to see it anymore.
To configure audience sync:
-
Open Journey Builder.
-
Add an Audience-based entry. In Audience source, choose a Pushwoosh segment or list that defines who enters this journey. For example, a segment of users who already purchased. Only those users move through the journey and reach Audience sync.
-
Add the Audience sync point.
-
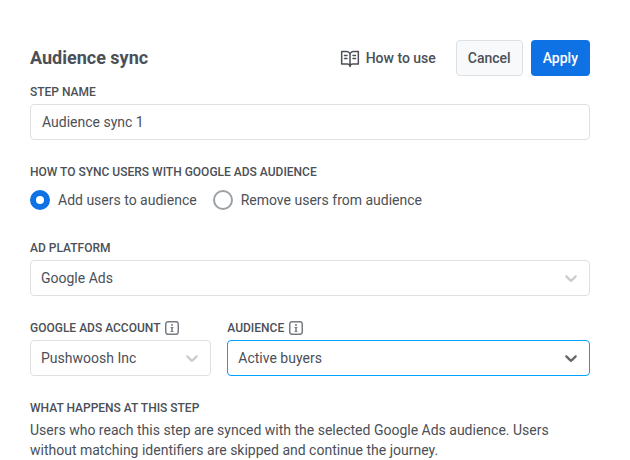
Under How to sync users info to the ad audience, pick one option:
- Add users to audience. Adds each user who reaches this step to the audience you select. For example, use this to start showing an ad to users who browsed but have not purchased.
- Remove users from audience. Removes each user who reaches this step from that audience. In the suppression example, select this option to stop showing the ad to users who already purchased.
-
In AD PLATFORM, choose Google Ads.
-
In Google Ads account, select the connected ad account.
-
In Audience, select the Google Ads audience. Create one first if none exists yet.
-
Click Apply to save the point or Cancel to close without saving.
-
Finish configuring the journey, then launch it.
Behavior and error handling
Anchor link to- Google matches a user only by email, phone, or mobile advertising ID (MADID). There is no tag-based fallback. Pushwoosh hashes email and phone before sending them. MADID goes to Google as is. A user with none of these identifiers on their profile is skipped and continues the journey.
- Sync to Google runs in the background. The Audience sync point accepts the user and moves them to the next step immediately, then applies the add or remove afterward. A delay between reaching the step and the change appearing in Google Ads is expected.
- If the selected ad account is disconnected when a profile reaches Audience sync, Pushwoosh pauses that journey version and sends system and email notifications. An older connection that is missing the Data Manager permission has the same pause outcome, with a separate audience-sync-failure status in statistics. See Reconnect if audience uploads fail.
- Google does not use an audience for targeting until it has about 1,000 matched users. A smaller audience keeps accepting syncs and reports success, but Google will not show ads to it until it crosses that threshold.
Audience sync statistics
Anchor link toAfter launch, check that sync is working:
- Open statistics for the Audience sync step. Check entry volume, adds and removals, and skipped profiles.
- On the Google Ads page in Pushwoosh, open Customer Match audiences and check the audience size. Size can stay 0 for up to 48 hours while Google matches users. See Behavior and error handling for when Google starts using the audience for targeting.
For metric details, see Audience sync in Customer Journey statistics.