Using webhook response data in your journey
Overview
Anchor link toWhen you map values from a webhook response, Pushwoosh stores them as variables you can use later in the journey in Update user profile, Time Delay, and content personalization, the same way you’d use an Event attribute. The one exception is Condition split: it can’t branch on a webhook variable directly, because it needs a value with a declared type (a Tag or an Event attribute), and a mapped webhook value has no type. See Compare a webhook value in Condition split below.
Save a webhook value as a Tag with Update user profile
Anchor link toA Webhook can return data from an external system, such as a CRM user ID or subscription status, that Pushwoosh does not store on the user profile yet. Update user profile saves mapped values as Tags so you can use them in segments, dynamic content, and later journey steps.
Example: save a CRM user ID as a Tag
Anchor link toA new user signs up in your app, and the journey creates a matching record in your CRM. Saving the returned CRM user ID as a Tag lets you reference or update the same CRM record later, for example from another journey or a follow-up Webhook call, instead of creating a duplicate record each time the user re-enters the journey.
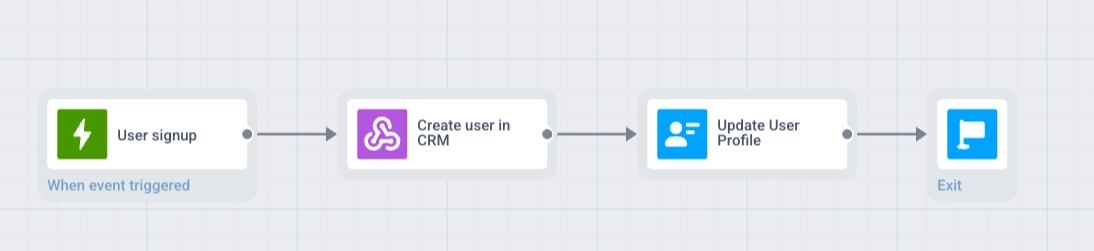
Journey flow: Trigger-based Entry → Webhook → Update user profile → end the branch
- Create a journey with Trigger-based Entry on the
SignUpevent. - Add a Webhook element after the entry step. Name it (for example,
Create user in CRM) and set the request URL to your CRM create-user endpoint. - In Response mapping, set Path to the ID field in the response (for example,
data.user.id) and Attribute tocrm_user_id.

-
Add an Update user profile element after the Webhook step.
-
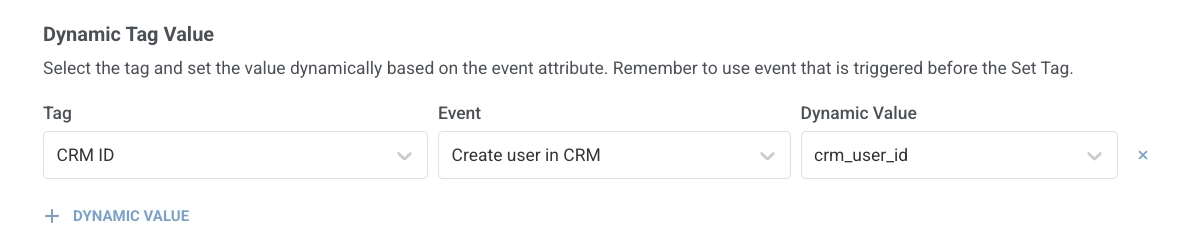
In Dynamic Tag Value, click + Dynamic Value. In Tag, select the Tag that stores the CRM ID (create it in advance if needed). In Event, select the webhook step by the name you gave it (
Create user in CRM). In Dynamic Value, selectcrm_user_id.
- End the branch — add an Exit element or leave it without an outgoing connection.
Schedule a delay from a webhook value with Time Delay
Anchor link toVisit dates, renewal deadlines, and delivery windows often live in an external booking or billing system. After a Webhook maps the date from the API response, Time Delay can pause the journey until that moment, for example 2 days before an appointment, so the next message goes out on time.
Example: schedule a reminder from a date in the response
Anchor link toA user books an appointment in your app. The journey fetches the visit date from your booking system and sends a push reminder 2 days before the visit.
- Create a journey with Trigger-based Entry on the
AppointmentBookedevent. - Add a Webhook element after the entry step. Name it (for example,
Get appointment details) and set the request URL to your booking system API. - In Response mapping, set Path to the date field in the response (for example,
appointment.date) and Attribute tovisit_date.

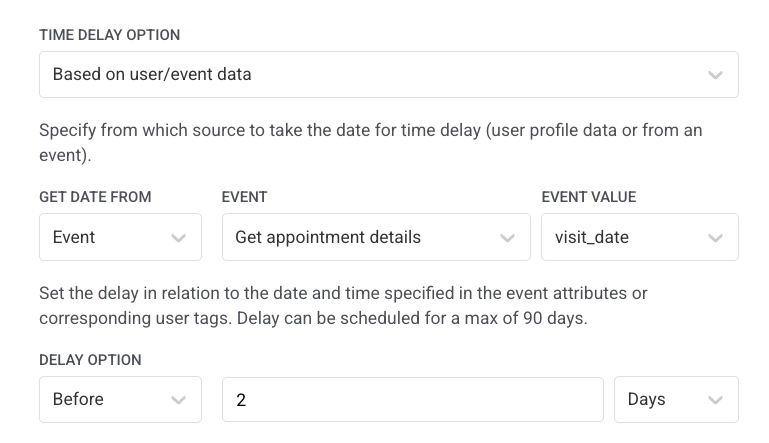
- Add a Time Delay element after the Webhook step. Select Based on user/event data, set Get date from to Event, set Event to the webhook step by the name you gave it (
Get appointment details), set Event value tovisit_date, and set the delay to Before2Days.
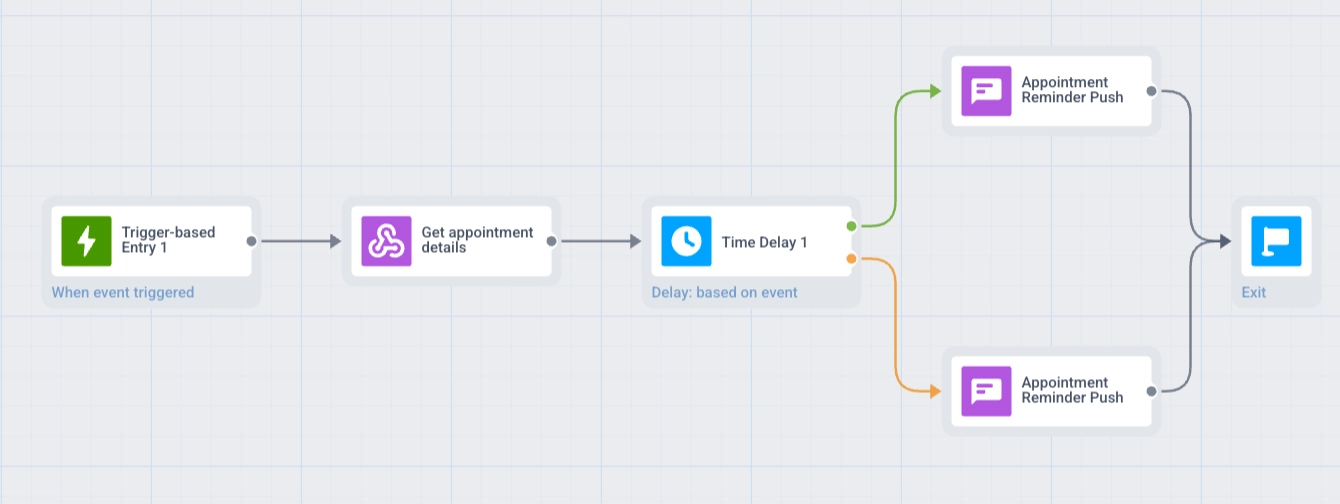
- If users can book less than 2 days before the visit, enable Split to branches if the date’s in the past or date is empty on the Time Delay element. This creates two branches, In the past and In the future. See Split branches when the date is in the past or empty.
- Add a Push step with your reminder message. If split is enabled, add this Push in both branches: In the past (send immediately) and In the future (after Time Delay).
- End each branch — add an Exit element or leave it without an outgoing connection.
Compare a webhook value in Condition split
Anchor link toCondition split branches on a Segment, a Tag, or an Event attribute with a declared type. A value mapped from a webhook response has no type, so it doesn’t appear in Condition split’s dropdowns and can’t be compared directly.
To branch on a webhook value, first save it as a Tag of the matching type with Update user profile, then compare that Tag in Condition split.
Example: branch on a webhook balance against the triggering event’s amount
Anchor link toA user requests a purchase, and the journey checks whether their CRM balance covers the price from the triggering event before continuing.
Journey flow: Trigger-based Entry → Webhook → Update user profile → Condition split
- Create a journey with Trigger-based Entry on the
PurchaseRequestedevent, with a numericrequired_amountattribute. - Add a Webhook element after the entry step. In Response mapping, set Path to the balance field in the response (for example,
current_balance) and Attribute tocurrent_balance. - Add an Update user profile element after the Webhook step. In Dynamic Tag Value, set Tag to a numeric Tag of type Integer or Price (create it in advance if needed, for example
Current_balance), Event to the webhook step, and Dynamic Value tocurrent_balance. - Add a Condition split element after Update user profile. Set the condition to Tag
Current_balance, operator greater or equals, and for the value select Event attribute → the entry event →required_amountinstead of a constant. - Connect each branch to the next steps.
Things to keep in mind
Anchor link to- Path syntax: use a dot-separated path (for example,
data.user.id), or a*segment to map every element of an array. Filters aren’t supported. See Map every element of an array for details. - Response size: responses larger than 64 KB are not processed for mapping.
- Condition split: a mapped webhook value has no type and can’t be used directly. Save it as a Tag first. See Compare a webhook value in Condition split.
- Testing: run Test webhook in the Webhook element before you use mapped values in a live journey. Confirm the request succeeds, then check the response body against each Path in the Calls log tab. If a value looks wrong for a specific traveler once the journey is live, check that traveler’s row in Calls log.
- Lists in the response: use
*in Path to map every item. Chooseitem_{n}for separate attributes or a name without{n}for one comma-separated string. Path indexes start at 0.{n}names start at 1. At most the first 50 elements are mapped. See Map every element of an array.