Import and export translations
Instead of generating translations with AI Translate, bring your own from a translation vendor, a spreadsheet, or another Pushwoosh preset.
Open Content → Push presets, open the preset, then use Import or Export next to the language selector in the Push presets editor.

- Export: download the current title, subtitle, and message for every language as a CSV to translate elsewhere or reuse in another preset.
- Import: upload a CSV or JSON file to apply translations to this preset.
Export the current content
Anchor link toClick Export to download the preset’s title, subtitle, and message for every language it currently has, including the default one, as a CSV file. The download name looks like welcome-series-translations.csv (the preset name, slugified, then -translations.csv).
The file looks like this:
| language | title | subtitle | message |
|---|---|---|---|
| default | Welcome to our app! | Thanks for installing. | |
| es | ¡Bienvenido a nuestra app! | Gracias por instalar. | |
| de | Willkommen in unserer App! | Danke fürs Installieren. |
Import translations into the preset
Anchor link toPrepare the file
Anchor link toUse the CSV from Export after you edit it, or build a file that matches the same layout. Import also accepts .json.
- language: required header column. Write each code the same way it appears in the language selector, for example
zh-Hantfor Traditional Chinese. Letter case does not matter (ESandesboth work). If the import preview lists a code Pushwoosh does not recognize, fix it in the file and import again. That language will not be sent to anyone until the code is valid. - title, subtitle, and message: optional. Columns can be in any order. A column you leave out is treated as blank for every row, the same as an empty cell in a column you kept. Each following row is one language.
Use a JSON file instead of CSV
Anchor link toIf your vendor or team already sends a .json file, Import accepts it too. You do not need JSON if you work with the CSV from Export.
-
Same fields as the CSV:
title,subtitle, andmessage, grouped by language code:{"default": { "title": "Welcome to our app!", "message": "Thanks for installing." },"es": { "title": "¡Bienvenido a nuestra app!", "message": "Gracias por instalar." }} -
The same shape the Presets API uses for
localizedTitle,localizedSubtitle, andlocalizedContent(these match the CSV columnstitle,subtitle, andmessage). Useful if you already export presets through the API:{"localizedTitle": { "default": "Welcome to our app!", "es": "¡Bienvenido a nuestra app!" },"localizedContent": { "default": "Thanks for installing.", "es": "Gracias por instalar." }}
Import the file
Anchor link to- Click Import next to the language selector.
- Choose a
.csvor.jsonfile. The preview shows how many languages will be applied, how many of those are new to this preset, and how many are skipped. - Check Overwrite languages that already have text only if you want the file to replace existing translations. Leave it unchecked to fill empty languages and add new ones without changing text you already wrote.
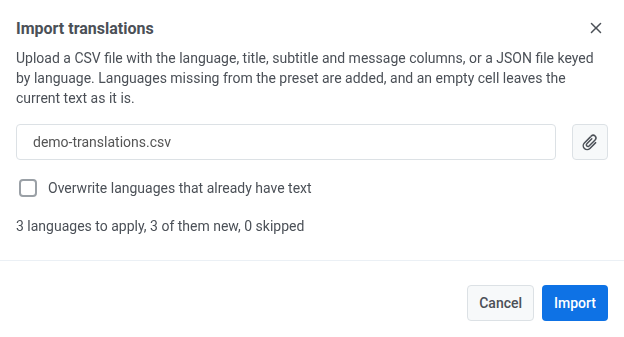
- Click Import.
After import, switch the language selector to a language from the file and confirm the title and message look right.
If Pushwoosh can’t read the file
Anchor link toInstead of a preview, you see one of these messages:
| Message | When it happens |
|---|---|
| The file is empty. | The file has no content. |
| The file is not valid JSON. | A .json file (or a file starting with {) can’t be parsed as JSON, or its top level isn’t an object. |
| The CSV file has no “language” column. | The header row of a CSV file is missing the language column. |
| The file has no translations. | Every row, or every JSON entry, is missing a language code. |