การเข้า Journey ตามทริกเกอร์ (Trigger-based entry)
Trigger-based entry จะเริ่มต้น Journey เมื่อผู้ใช้ทำ Event ที่ระบุ (ตัวอย่างเช่น ดำเนินการบางอย่าง)
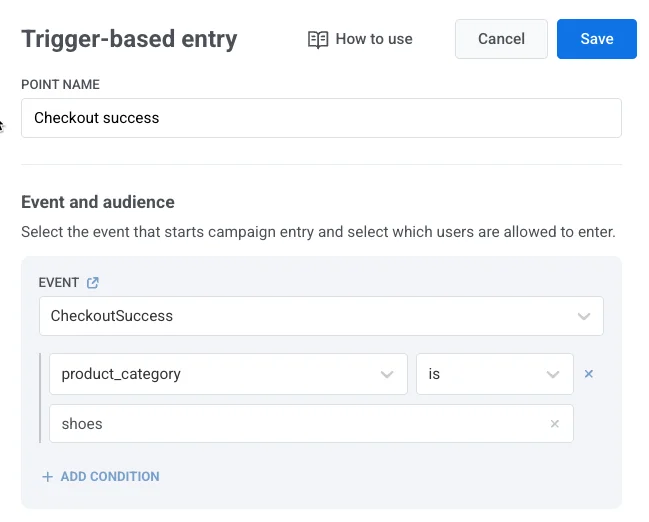
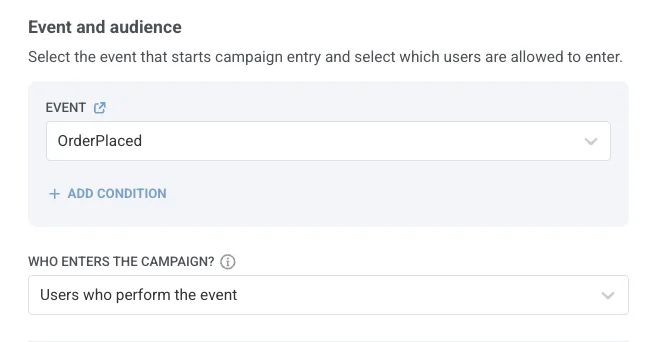
ในการตั้งค่า Trigger-based entry ให้ค้นหาองค์ประกอบการเข้าบน canvas และเลือก Event ที่จะใช้เป็นทริกเกอร์
สำหรับข้อมูลเพิ่มเติมเกี่ยวกับวิธีกำหนดค่า Event โปรดดูเอกสาร Events
หาก Event ที่เลือกมี attribute คุณสามารถจำกัดเงื่อนไขการเข้าให้แคบลงได้โดยใช้ attribute เหล่านั้น คลิก Add condition เมื่อแก้ไของค์ประกอบ จากนั้นเลือก attribute จากรายการดรอปดาวน์และกำหนด operator และ value ของมัน
กำหนดว่าใครจะเข้าสู่แคมเปญ
Anchor link toกำหนดว่าผู้ใช้คนใดควรเข้าสู่ Journey เมื่อมี Event ที่ระบุเกิดขึ้น
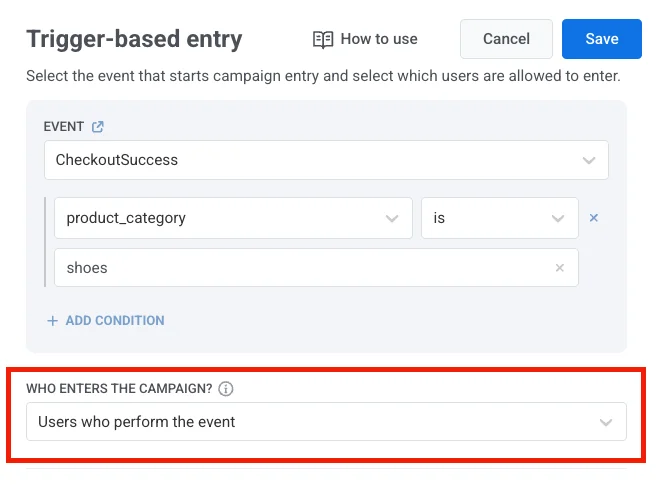
ใช้ดรอปดาวน์ Who enters the campaign? เพื่อเลือกระหว่างสองโหมดที่มีอยู่:
ผู้ใช้ที่ทำ Event (ค่าเริ่มต้น)
Anchor link toผู้ใช้ที่ทริกเกอร์ Event คือผู้ที่จะเข้าสู่ Journey
ตัวอย่าง
ผู้ใช้ทำการซื้อเสร็จสิ้น (Event CheckoutSuccess) ผู้ใช้คนเดียวกันนั้น (เช่น User ID: 123) จะเข้าสู่ Journey หลังการซื้อ ซึ่งรวมถึงข้อความขอบคุณ คำแนะนำผลิตภัณฑ์ หรือแบบสำรวจความพึงพอใจ
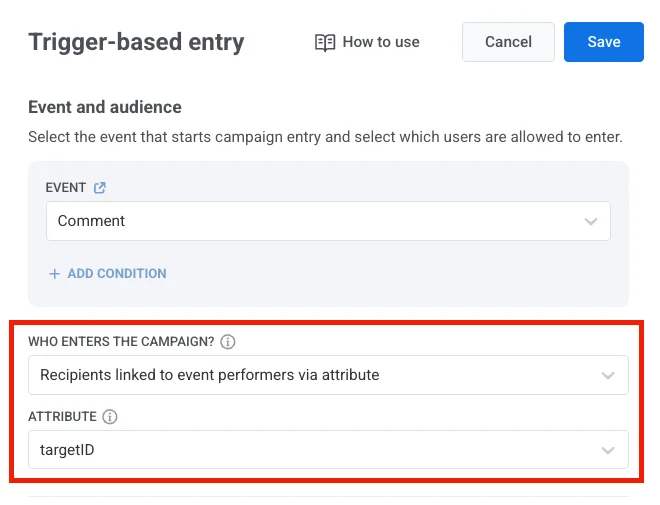
ผู้ใช้จาก attribute ของ Event
Anchor link toแทนที่จะลงทะเบียนผู้ใช้ที่ทริกเกอร์ Event คุณสามารถส่ง User IDs หนึ่งรายการหรือมากกว่าใน attribute ของ Event แบบกำหนดเองได้ ผู้ใช้ที่ระบุไว้ใน attribute นั้นจะเข้าสู่ Journey
สำหรับสิ่งนี้ ให้เลือก Users from an event attribute และเลือก key ของ attribute (เช่น recipient_ids, target_user_id) key นี้ควรตรงกับโครงสร้าง payload ของ Event ของคุณ
ตัวอย่าง payload (ผู้ใช้คนเดียว)
Anchor link to{ "application": "XXXXX-XXXXX", "event": "invitation", "attributes": { "targetId": 321 }, "userId": 123}ผู้ใช้ 321 (จาก targetId) จะเข้าสู่ Journey
ตัวอย่าง payload (ผู้ใช้หลายคน)
Anchor link toหากคุณระบุ User ID หลายรายการ ให้ใช้อาร์เรย์ JSON ของสตริง
{ "application": "XXXXX-XXXXX", "event": "invitation", "attributes": { "targetIds": [1,2,3,4] }, "userId": 123}ผู้ใช้ 1, 2, 3, และ 4 จะเข้าสู่ Journey
กรณีการใช้งาน
Anchor link toการแจ้งเตือนความคิดเห็น
เมื่อมีคนแสดงความคิดเห็นในโพสต์ของผู้ใช้ เจ้าของโพสต์จะได้รับการแจ้งเตือน
ตัวอย่าง: Event การแสดงความคิดเห็นจะรวม ID ของเจ้าของโพสต์ไว้ใน attribute target_user_id ผู้ใช้นั้นจะเข้าสู่ Journey เพื่อรับการแจ้งเตือน
โปรแกรมแนะนำเพื่อน
เมื่อผู้ใช้ที่ถูกแนะนำสมัครสมาชิกหรือทำการซื้อ ผู้ที่แนะนำพวกเขาจะถูกเพิ่มเข้าไปใน Journey
ตัวอย่าง: ผู้ใช้ 123 ทริกเกอร์ Event และผู้แนะนำ 456 (จาก attribute referrer_id) จะเข้าสู่แคมเปญรางวัล
การซื้อของขวัญ
เมื่อผู้ใช้ซื้อของขวัญ ผู้รับจะถูกเพิ่มเข้าไปใน Journey โดยใช้ recipient_user_id จาก payload ของ Event
ตัวอย่าง ผู้ใช้ 123 ซื้อของขวัญให้ผู้ใช้ 456 ซึ่งจะได้รับการแจ้งเตือน ขั้นตอนการเริ่มต้นใช้งาน หรือข้อความขอบคุณ
กำหนดความพร้อมในการเข้า
Anchor link toควบคุมว่าผู้ใช้จะสามารถเข้าสู่ Journey ผ่าน Trigger-based entry ได้เมื่อใด คุณมีสองตัวเลือก:
-
Allow entry at any time: ผู้ใช้สามารถเข้าสู่ Journey ได้ทุกเมื่อที่เกิด Event ที่เป็นทริกเกอร์
-
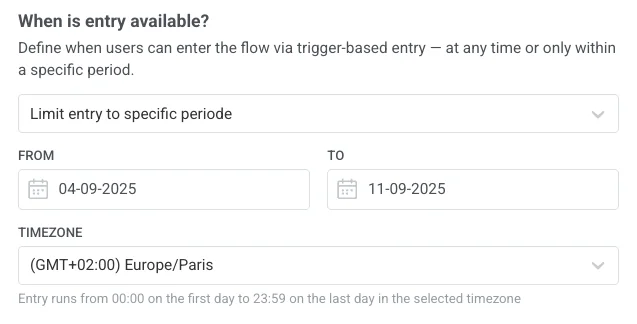
Limit entry to a specific period: ผู้ใช้สามารถเข้าสู่ Journey ได้ก็ต่อเมื่อ Event ที่เป็นทริกเกอร์เกิดขึ้นภายในช่วงวันที่ที่เลือก
เมื่อจำกัดการเข้า ให้เลือก start date, end date, และ timezone หน้าต่างการเข้าจะเริ่ม ณ เวลา 00:00 ของวันที่เริ่มต้น และสิ้นสุด ณ เวลา 23:59 ของวันที่สิ้นสุด โดยอิงตาม timezone ที่เลือก
ควบคุมจำนวน session ที่ผู้ใช้สามารถมีได้ในเวลาเดียวกัน
Anchor link toตัดสินใจว่าผู้ใช้แต่ละคนสามารถเข้าร่วม Journey ได้เพียงหนึ่ง Journey ในแต่ละครั้ง หรือเข้าร่วมในหลาย Journey พร้อมกันได้
เลือกหนึ่งในตัวเลือกต่อไปนี้จากดรอปดาวน์:
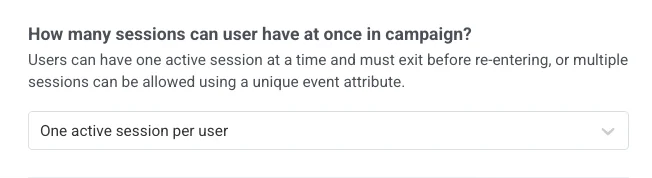
- One active session per user
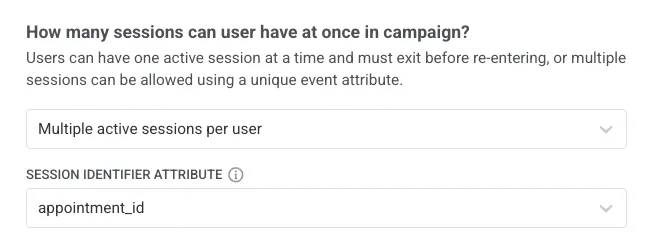
- Multiple active sessions per user
One active session per user
Anchor link toผู้ใช้แต่ละคนสามารถมี session ที่ใช้งานอยู่ในแคมเปญได้เพียงหนึ่ง session เท่านั้น พวกเขาต้องทำให้ session ปัจจุบันเสร็จสิ้นหรือออกจาก session ก่อนที่จะเริ่ม session ใหม่
กรณีการใช้งาน
Anchor link to- ขั้นตอนการเริ่มต้นใช้งาน (Onboarding flows) ที่ผู้ใช้ไม่ควรเริ่มต้นใหม่จนกว่าจะเสร็จสิ้น Journey ปัจจุบัน
- การแจ้งเตือนการต่ออายุสมาชิก ที่ผู้ใช้ไม่ควรได้รับการแจ้งเตือนที่ทับซ้อนกัน
- ข้อเสนอหรือการทดลองใช้แบบจำกัดเวลา ที่อนุญาตให้มีแคมเปญที่ใช้งานอยู่เพียงหนึ่งครั้งต่อผู้ใช้
- แคมเปญรวบรวมข้อเสนอแนะ เพื่อให้แน่ใจว่าผู้ใช้แต่ละคนให้ข้อมูลเพียงครั้งเดียวก่อนที่จะกลับเข้ามาใหม่
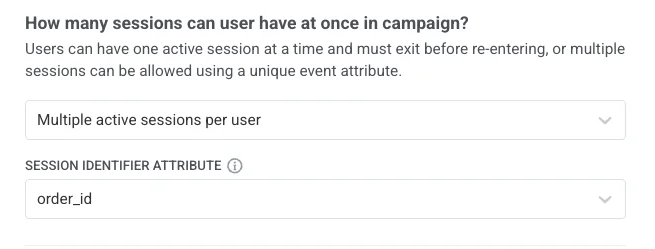
Multiple active sessions per user
Anchor link toผู้ใช้สามารถมี session ที่ใช้งานอยู่ในแคมเปญได้มากกว่าหนึ่ง session แต่ละ session ต้องถูกระบุด้วย attribute ของ Event ที่ไม่ซ้ำกัน (เช่น order_id, product_id)
ในการตั้งค่านี้:
-
เลือก Multiple active sessions per user ในดรอปดาวน์
-
เลือก attribute ตัวระบุ session (เช่น
order_id,product_id) attribute นี้จะใช้แยกแยะ session หนึ่งออกจากอีก session หนึ่ง
ตัวอย่าง
-
OrderPlacedพร้อมorder_id = "1001"→ เริ่ม Session 1 -
OrderPlacedพร้อมorder_id = "1002"→ เริ่ม Session 2
หากมีการส่ง Event OrderReady โดยไม่มี order_id ทั้ง Session 1 และ Session 2 จะถูกทำเครื่องหมายว่า “พร้อม” แม้ว่าจะมีเพียงคำสั่งซื้อเดียวที่พร้อมจริงๆ ก็ตาม
กรณีการใช้งาน
Anchor link to- การซื้อสินค้าอีคอมเมิร์ซ: แต่ละคำสั่งซื้อจะเริ่มต้น Journey ของตัวเอง ดังนั้นคำสั่งซื้อหลายรายการจากผู้ใช้คนเดียวสามารถติดตามได้อย่างอิสระ (attribute:
order_id) - โปรแกรมแนะนำเพื่อน: การแนะนำแต่ละครั้งจะสร้าง session ใหม่ ทำให้ผู้ใช้คนเดียวสามารถแนะนำเพื่อนได้หลายคน (attribute:
referral_id) - โปรแกรมสะสมคะแนน: ติดตามคะแนนหรือรางวัลจากธุรกรรมต่างๆ ที่ทำงานพร้อมกัน (attribute:
transaction_id) - การจองตั๋ว: การจองแต่ละครั้งจะเปิด Journey ของตัวเอง เพื่อให้ผู้ใช้สามารถจัดการตั๋วหลายใบได้พร้อมกัน (attribute:
booking_id) - การนัดหมาย: การนัดหมายทุกครั้งจะถูกจัดการเป็น session แยกต่างหาก (attribute:
appointment_id)
เมื่อคุณกำหนดค่าองค์ประกอบการเข้าเสร็จแล้ว คลิก Apply เพื่อบันทึกการเปลี่ยนแปลง
สถานการณ์ตัวอย่าง: Journey คำสั่งซื้ออีคอมเมิร์ซที่มีหลาย session
Anchor link toสมมติว่าคุณต้องการส่งการแจ้งเตือนสำหรับทุกคำสั่งซื้อที่ผู้ใช้สั่งซื้อ แต่ละคำสั่งซื้อควรมี session Journey ของตัวเอง ในการทำเช่นนี้ คุณจะใช้ Event OrderPlaced เป็นทริกเกอร์และ attribute order_id เป็นตัวระบุ session
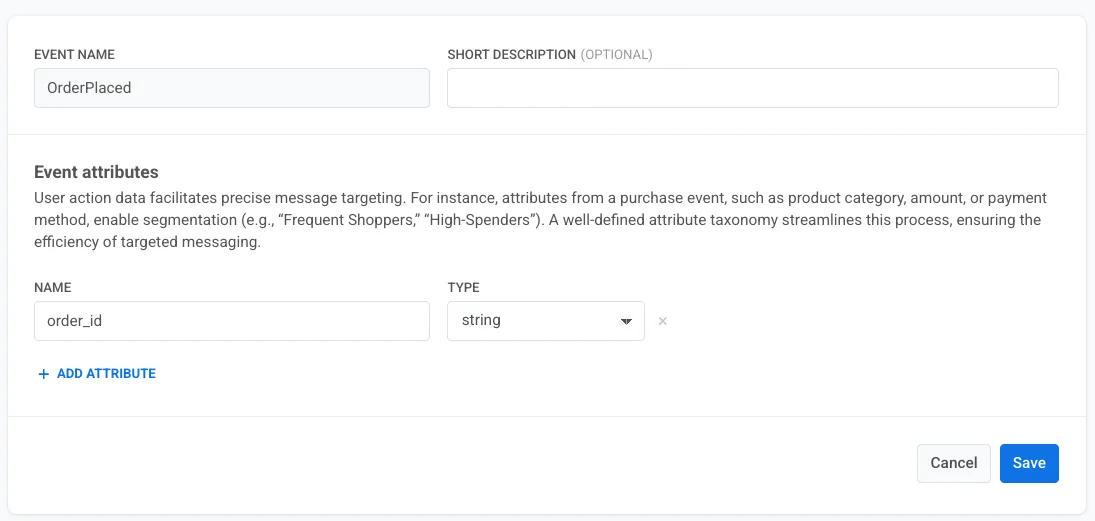
- สร้าง Event
OrderPlacedและตรวจสอบให้แน่ใจว่ามี attributeorder_idรวมอยู่ด้วย เรียนรู้เพิ่มเติมเกี่ยวกับการสร้าง Event
- ในการตั้งค่า session ให้เลือก Multiple active sessions per user และเลือก
order_idเป็นตัวระบุ session
ในการตั้งค่านี้ คำสั่งซื้อใหม่แต่ละรายการจะเริ่มต้น session Journey แยกต่างหาก
OrderPlacedพร้อมorder_id = 1001เริ่ม Session 1OrderPlacedพร้อมorder_id = 1002เริ่ม Session 2
- ถัดไป เพิ่มองค์ประกอบ Wait for Trigger เพื่อติดตามเมื่อคำสั่งซื้อพร้อมสำหรับการรับหรือจัดส่ง ใช้ Event
OrderReadyซึ่งต้องมีorder_idเดียวกันด้วย สิ่งนี้ทำให้แน่ใจว่าแต่ละคำสั่งซื้อได้รับการอัปเดตใน session ที่ถูกต้อง:
OrderReadyพร้อมorder_id = 1001ใช้กับ Session 1 เท่านั้นOrderReadyพร้อมorder_id = 1002ใช้กับ Session 2 เท่านั้น

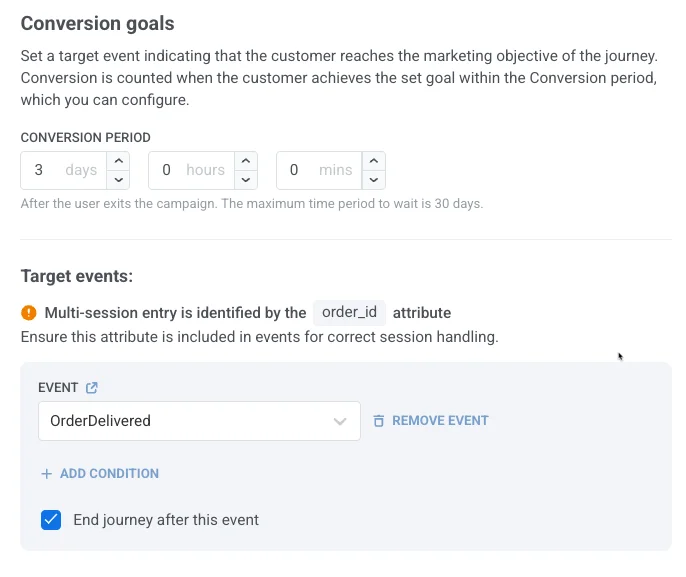
- สุดท้าย เพิ่ม conversion goal ตัวอย่างเช่น Event
OrderDeliveredEvent นี้ต้องมีorder_idเดียวกันด้วยเพื่อให้สามารถจับคู่กับ session ที่ถูกต้องได้
-
หาก
OrderDeliveredมีorder_id = "1001"จะบันทึก conversion สำหรับ Session 1 -
หาก
OrderDeliveredมีorder_id = "1002"จะบันทึก conversion สำหรับ Session 2