पास बिल्डर में Google Wallet पास डिज़ाइन करें
Google Wallet पास बिल्डर कंट्रोल पैनल में एक विज़ुअल डिज़ाइनर है। आप एक पास प्रकार चुनते हैं, ब्रांडिंग, फ़ील्ड और एक बारकोड भरते हैं, एक लाइव प्रीव्यू देखते हैं, और पास बनाते हैं। जब आप पास जेनरेट करते हैं, तो Pushwoosh Google Wallet में पास ऑब्जेक्ट बनाता है और एक “Google Wallet में जोड़ें” सेव लिंक लौटाता है।
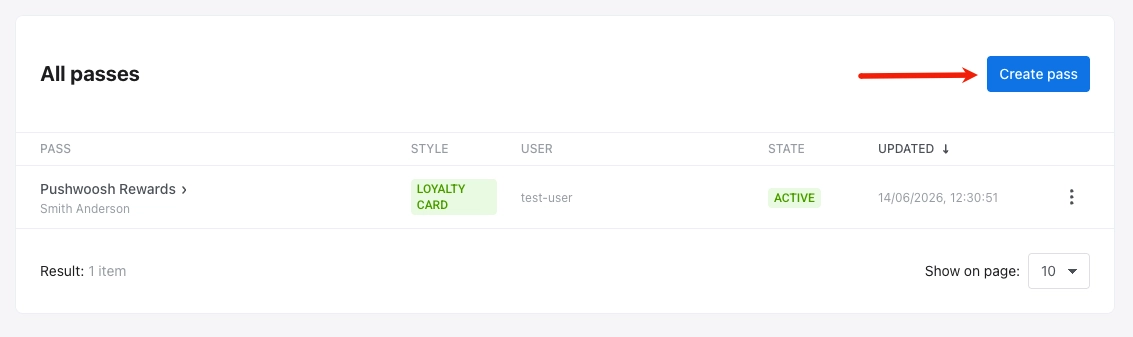
एक पास बनाएं
Anchor link toकंट्रोल पैनल में, कैंपेन → वॉलेट पास पर जाएं, Google Wallet टैब खोलें, और पास बनाएं पर क्लिक करें।
पास को कॉन्फ़िगर करें
Anchor link to-
शुरू से: एक खाली पास से शुरू करें। एक पास प्रकार चुनें, फिर नीचे दिए गए अनुभागों में फ़ील्ड, दिखावट, एक बारकोड और अन्य विकल्प स्वयं सेट करें।
-
एक टेम्पलेट से: टेम्पलेट लोड करें पर क्लिक करें, टेम्पलेट चुनें में एक अंतर्निहित पास चुनें (जेनेरिक, ऑफ़र, लॉयल्टी, इवेंट टिकट, गिफ़्ट कार्ड, फ़्लाइट, या ट्रांज़िट), और पुष्टि करें। फ़ॉर्म पास प्रकार, फ़ील्ड, रंग और बारकोड को पहले से भर देता है। किसी भी मान को संपादित करें या आवश्यकतानुसार प्रकार बदलें।
एक पास प्रकार चुनें
Anchor link toपास प्रकार के तहत, सात Google Wallet पास प्रकारों में से एक चुनें। प्रकार कार्ड लेआउट और कौन से फ़ील्ड उपलब्ध हैं, इसे नियंत्रित करता है। टाइप किए गए पास Google के मूल लेआउट का उपयोग करते हैं। जेनेरिक पास फ़्री-फ़ॉर्म होता है।
- जेनेरिक: आपके अपने फ़ील्ड से फ़्री-फ़ॉर्म कार्ड।
- ऑफ़र: कूपन और छूट।
- लॉयल्टी कार्ड: लॉयल्टी और सदस्यता कार्ड।
- इवेंट टिकट: इवेंट के लिए टिकट।
- गिफ़्ट कार्ड: गिफ़्ट और प्रीपेड कार्ड।
- फ़्लाइट: बोर्डिंग पास।
- ट्रांज़िट: रेल, बस, ट्राम और फ़ेरी टिकट।
पास फ़ील्ड भरें
Anchor link toआपके द्वारा देखे जाने वाले फ़ील्ड पास प्रकार पर निर्भर करते हैं। आवश्यक फ़ील्ड चिह्नित हैं। प्रति प्रकार सामान्य फ़ील्ड:
| पास प्रकार | मुख्य फ़ील्ड |
|---|---|
| जेनेरिक | कार्ड शीर्षक*, हेडर*, सबहेडर, कार्ड फ़ील्ड |
| ऑफ़र | शीर्षक*, प्रदाता*, विवरण, फाइन प्रिंट, रिडेम्पशन चैनल (इन-स्टोर / ऑनलाइन / दोनों), जारीकर्ता का नाम |
| लॉयल्टी | प्रोग्राम का नाम*, सदस्य का नाम, सदस्य आईडी, पॉइंट्स बैलेंस, पॉइंट्स लेबल, रिवॉर्ड्स टियर, टियर लेबल, जारीकर्ता का नाम |
| इवेंट टिकट | इवेंट का नाम*, स्थल, पता, प्रारंभ/समाप्ति तिथि और समय, टिकट धारक, टिकट नंबर, प्रकार, अनुभाग, पंक्ति, सीट, गेट |
| गिफ़्ट कार्ड | व्यापारी का नाम*, कार्ड नंबर*, पिन, बैलेंस + मुद्रा |
| फ़्लाइट | कैरियर IATA कोड*, फ़्लाइट नंबर*, मूल*, गंतव्य*, प्रस्थान*, यात्री का नाम*, बोर्डिंग समय, सीट, क्लास, बोर्डिंग समूह, पुष्टि कोड |
| ट्रांज़िट | ट्रांज़िट प्रकार* (बस / रेल / ट्राम / फ़ेरी / अन्य), ऑपरेटर*, यात्री*, यात्रा प्रकार, यात्रा के चरण (मूल*, गंतव्य*, समय, प्लेटफ़ॉर्म, कोच, सीट) |
* Google द्वारा आवश्यक।
पास सामग्री को व्यक्तिगत बनाएं
Anchor link toप्रत्येक पास एक यूज़र आईडी से जुड़ा होता है। उस उपयोगकर्ता के लिए अद्वितीय डेटा दिखाने के लिए टैग प्लेसहोल्डर का उपयोग करें, उदाहरण के लिए एक लॉयल्टी कार्ड पर पॉइंट्स बैलेंस या एक गिफ़्ट कार्ड पर प्राप्तकर्ता का नाम। प्रति यूज़र आईडी एक पास जारी करें ताकि प्रत्येक प्राप्तकर्ता को अपने स्वयं के मान मिलें।
एक टैग प्लेसहोल्डर डालने के लिए:
- एक समर्थित टेक्स्ट फ़ील्ड के आगे (उदाहरण के लिए, व्यापारी, कार्ड शीर्षक, या हेडर), एक टैग डालने के लिए
{}पर क्लिक करें। - टैग में, फ़ील्ड में डालने के लिए टैग का चयन करें।
- फ़ॉर्मेट में, चुनें कि टैग मान कैसे प्रदर्शित किया जाए: जैसा है (संग्रहीत मान का उपयोग करें), पूर्णांक (एक पूर्ण संख्या में गोल करें), मूल्य (0.00) (दो दशमलव स्थान दिखाएं), या पहला अक्षर बड़ा करें (पहले अक्षर को बड़ा करें)।
- फ़ॉलबैक में, वैकल्पिक रूप से प्राप्तकर्ता के पास टैग के लिए कोई मान नहीं होने पर दिखाने के लिए टेक्स्ट दर्ज करें।
- डालें पर क्लिक करें।
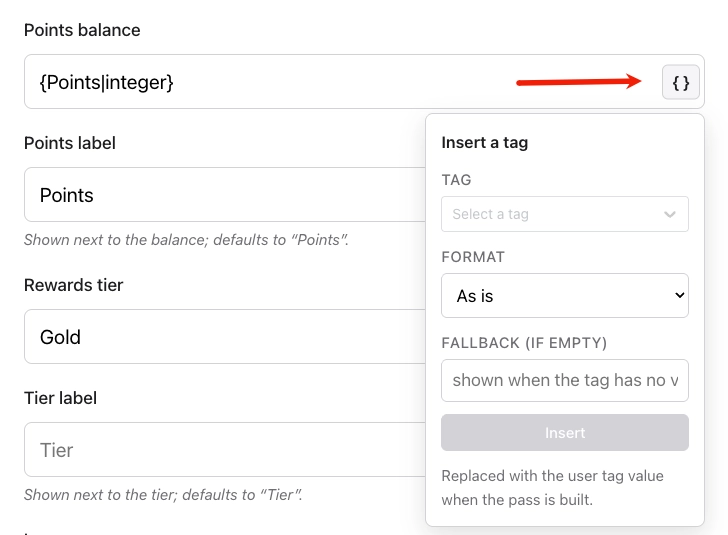
Pushwoosh टैग मानों को भरता है जब आप पास बनाते हैं और उन्हें हर अपडेट पर ताज़ा करता है।
दिखावट सेट करें
Anchor link toदिखावट के तहत, रंग, छवियाँ, पास कौन सेव कर सकता है, और समाप्ति को कॉन्फ़िगर करें।
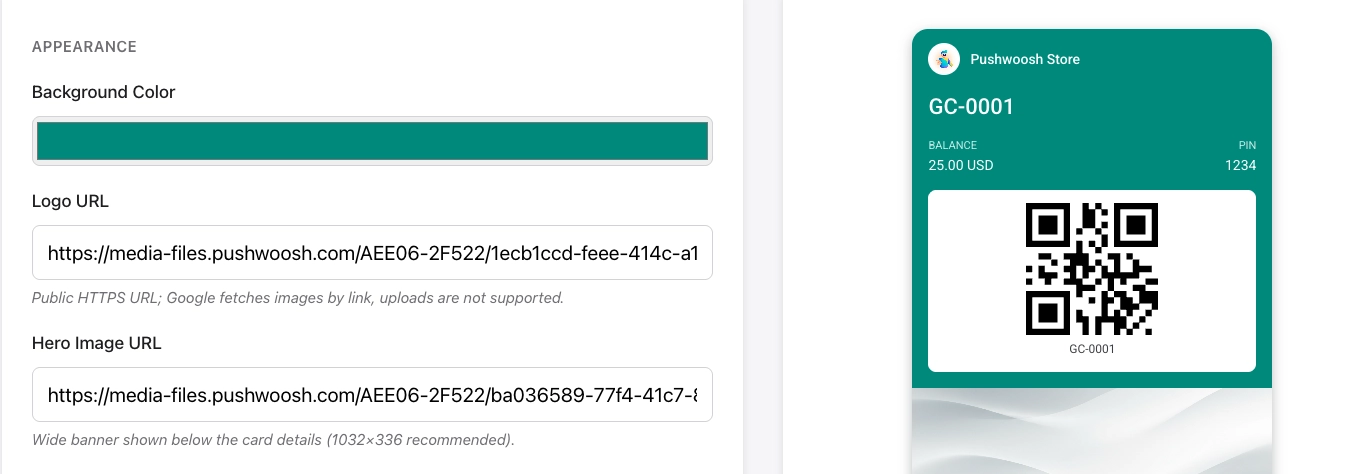
पृष्ठभूमि रंग में एक हेक्स कोड दर्ज करें, उदाहरण के लिए सफ़ेद के लिए #FFFFFF। अग्रणी # और छह वर्ण शामिल करें।
छवियाँ
Anchor link toलोगो URL में एक सार्वजनिक HTTPS लिंक पेस्ट करें। लॉयल्टी और ट्रांज़िट पास के लिए आवश्यक है।
वैकल्पिक रूप से, पास के सामने कार्ड विवरण के नीचे एक विस्तृत बैनर के लिए हीरो छवि URL में एक लिंक पेस्ट करें। अनुशंसित आकार 1032×336 px है।
पास कौन सेव कर सकता है
Anchor link toपास कौन सेव कर सकता है में, चुनें कि कौन पास को Google Wallet में जोड़ सकता है:
- एक उपयोगकर्ता, उनके सभी डिवाइस (डिफ़ॉल्ट): पास एक Google खाते से जुड़ा होता है और उस खाते के डिवाइसों में सिंक होता है।
- एक उपयोगकर्ता, एक डिवाइस: पास केवल एक ही डिवाइस पर सेव होता है।
- लिंक के साथ कोई भी: प्रत्येक Google खाता जो सेव लिंक खोलता है, उसे वही साझा पास ऑब्जेक्ट मिलता है। जब आप पास को अपडेट करते हैं, तो Google स्वचालित रूप से सभी धारकों को परिवर्तन वितरित करता है।
समाप्ति
Anchor link toसमाप्ति तिथि सेट करें जब Google को पास को समाप्त करना चाहिए, या बिना समाप्ति के लिए इसे खाली छोड़ दें।
एक बारकोड जोड़ें
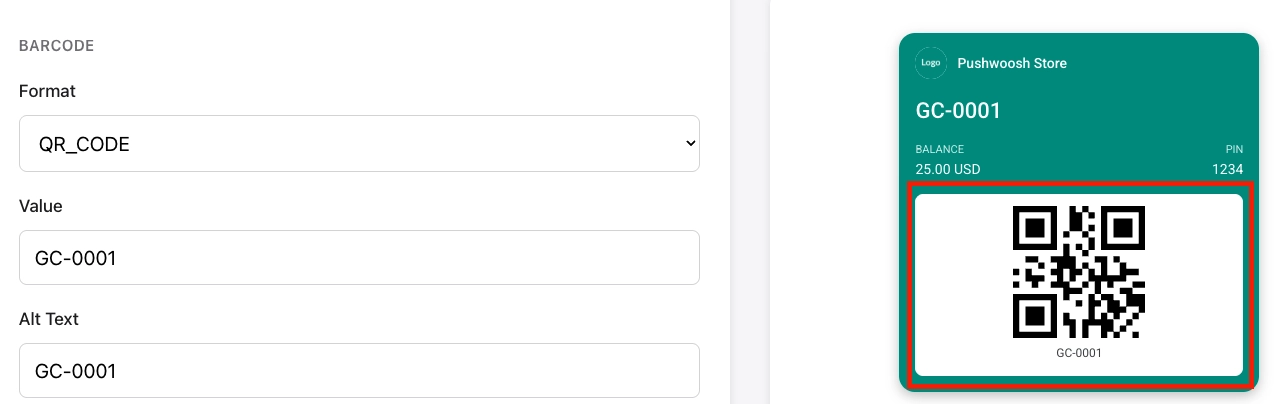
Anchor link toबारकोड के तहत, एक प्रारूप चुनें और एन्कोड करने के लिए मान दर्ज करें:
- प्रारूप: चुनें कि बारकोड कैसा दिखता है और किस प्रकार का स्कैनर इसे पढ़ सकता है।
- QR_CODE: वर्गाकार कोड जिसे अधिकांश फ़ोन और स्कैनर आसानी से पढ़ सकते हैं। अधिकांश पासों के लिए सर्वश्रेष्ठ।
- PDF_417: कई पंक्तियों की लाइनों से बना चौड़ा बारकोड। अक्सर बोर्डिंग पास के लिए आवश्यक होता है।
- AZTEC: कॉम्पैक्ट वर्गाकार कोड, QR के समान। इवेंट और ट्रांज़िट टिकटों पर आम।
- CODE_128 / EAN_13: 1D बारकोड। इन्हें केवल तभी चुनें जब आपके स्कैनर या POS सिस्टम को इनकी आवश्यकता हो।
- मान: बारकोड में एन्कोड किया गया डेटा (उदाहरण के लिए, एक टिकट या सदस्यता संख्या)। प्रति उपयोगकर्ता एक अद्वितीय मान का उपयोग करने के लिए, फ़ील्ड के आगे
{}पर क्लिक करें और एक टैग प्लेसहोल्डर डालें। - ऑल्ट टेक्स्ट: पास पर बारकोड के नीचे दिखाया गया टेक्स्ट।
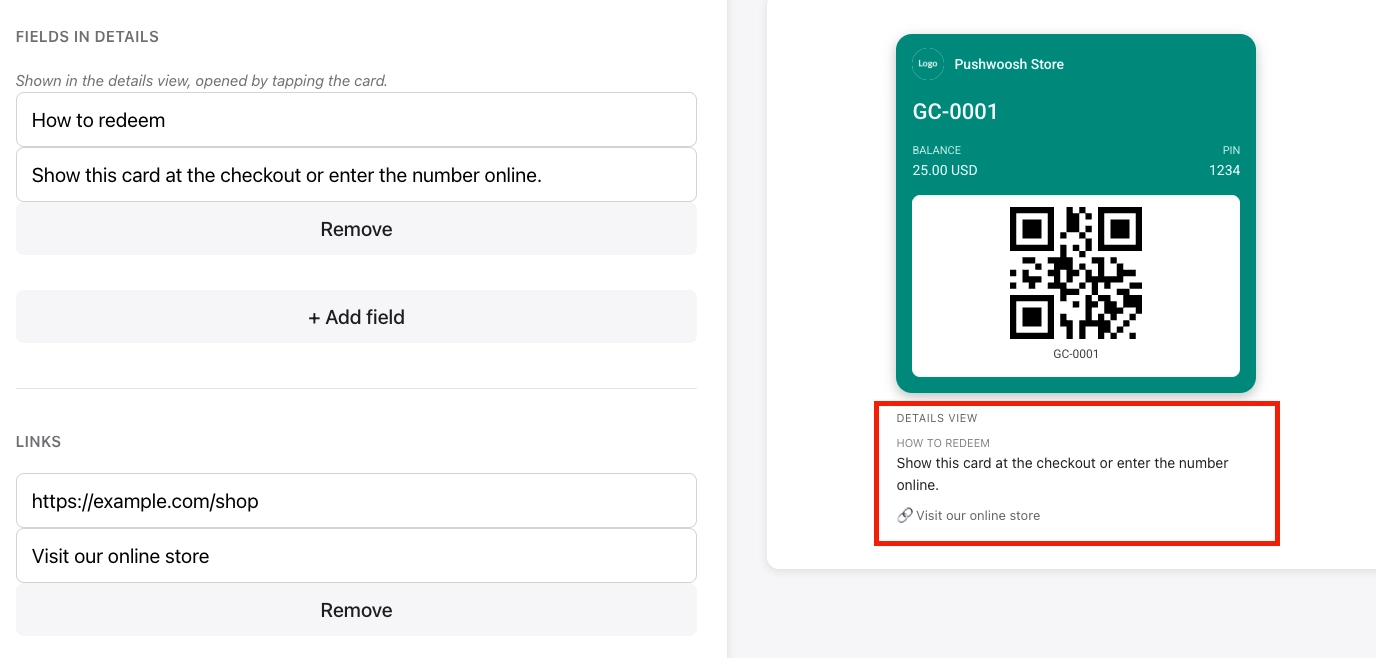
विवरण फ़ील्ड और लिंक जोड़ें
Anchor link toपास के सामने, उपयोगकर्ता मुख्य कार्ड देखते हैं। जब वे पास विवरण (पीछे) खोलते हैं, तो वे अतिरिक्त अनुभाग पढ़ सकते हैं और आपके द्वारा यहां जोड़े गए लिंक पर टैप कर सकते हैं।
- टेक्स्ट मॉड्यूल: पास के पीछे अतिरिक्त टेक्स्ट ब्लॉक। एक हेडर (अनुभाग शीर्षक) और एक बॉडी (टेक्स्ट) सेट करें। उनका उपयोग शर्तों, निर्देशों, या अन्य जानकारी के लिए करें जो सामने फिट नहीं होती है।
- लिंक: पास के पीछे टैप करने योग्य लिंक। एक URL और एक छोटा विवरण सेट करें (उदाहरण के लिए, “स्टोर लोकेटर” या “नियम और शर्तें”)।
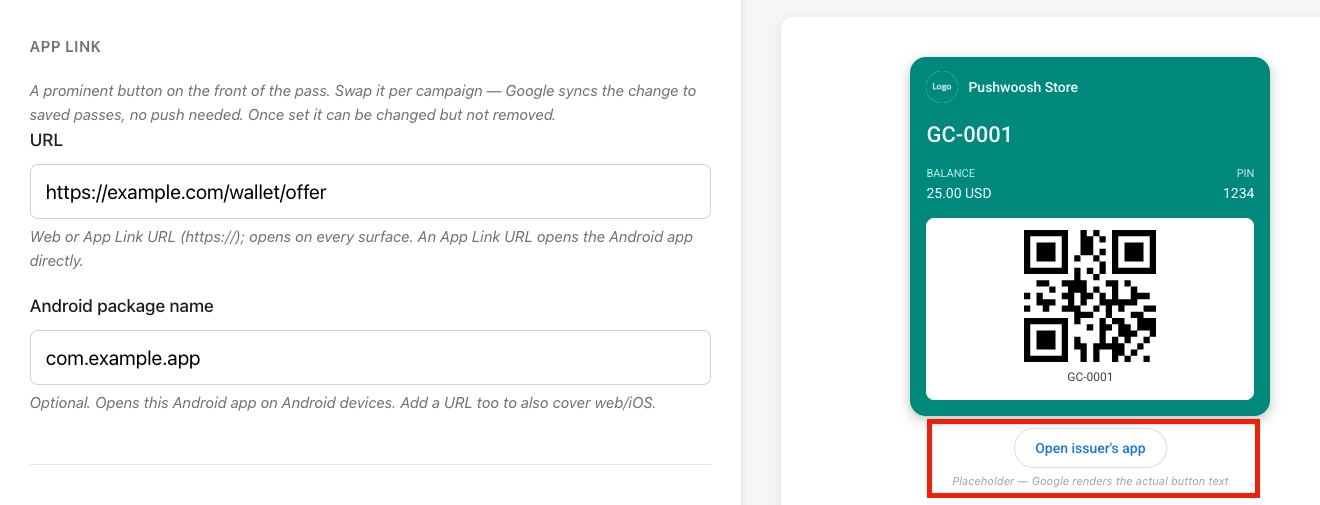
एक ऐप लिंक जोड़ें (वैकल्पिक)
Anchor link toऐप लिंक के तहत, पास के सामने एक बटन जोड़ें जो टैप करने पर एक वेब पेज या आपका Android ऐप खोलता है। आप एक URL, एक Android पैकेज नाम, या दोनों सेट कर सकते हैं।
यदि आप केवल URL सेट करते हैं, तो बटन किसी भी डिवाइस पर उस वेब पते को खोलता है। यदि आप केवल एक पैकेज नाम सेट करते हैं, तो बटन उन Android डिवाइसों पर काम करता है जिनमें ऐप इंस्टॉल है, बिना वेब फ़ॉलबैक के।
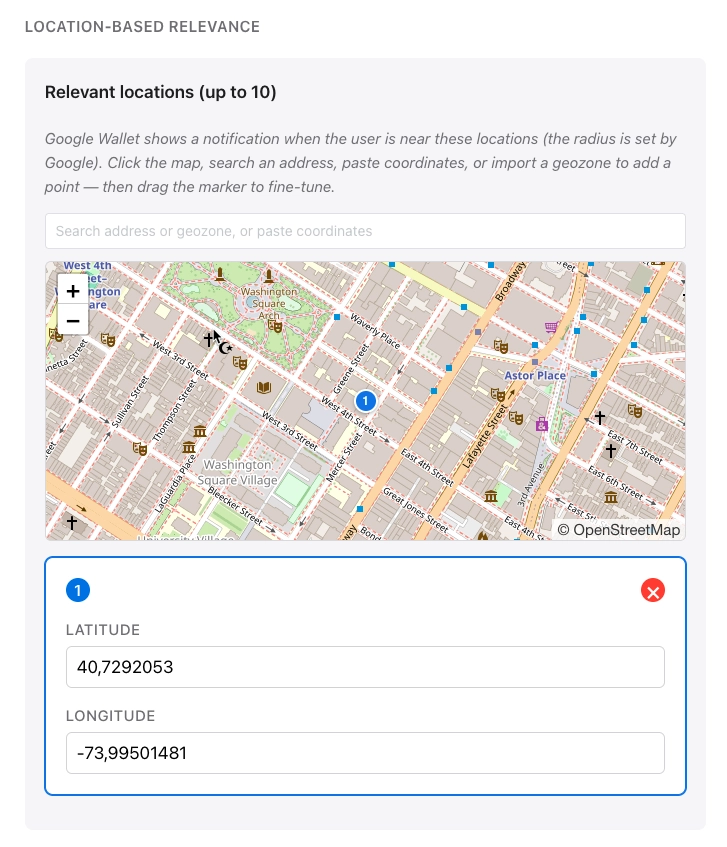
स्थान जोड़ें (वैकल्पिक)
Anchor link toस्थान-आधारित प्रासंगिकता के तहत, रुचि के बिंदु जोड़ें। जब उपयोगकर्ता आपके द्वारा जोड़े गए स्थान के पास होता है तो Google एक जियोफ़ेंस्ड सूचना दिखाता है। उदाहरण के लिए, अपने स्टोर के पास एक लॉयल्टी कार्ड, स्थल के पास एक इवेंट टिकट, या हवाई अड्डे के पास एक बोर्डिंग पास सतह पर लाएं।
आप 10 तक स्थान जोड़ सकते हैं, प्रत्येक अक्षांश और देशांतर द्वारा सेट किया गया है।
एक यूज़र आईडी दर्ज करें
Anchor link toउस व्यक्ति के लिए Pushwoosh यूज़र आईडी दर्ज करें जो इस पास को प्राप्त करेगा।
Pushwoosh उस उपयोगकर्ता को पास जारी करता है और इसे सभी पास पर उपयोगकर्ता के तहत सूचीबद्ध करता है।
प्रीव्यू और वैलिडेट करें
Anchor link toजैसे ही आप संपादित करते हैं, एक लाइव प्रीव्यू अपडेट होता है, ताकि आप मोटे तौर पर देख सकें कि पास Google Wallet में कैसा दिखेगा।
पास को बनाए बिना Google की आवश्यकताओं के विरुद्ध जांचने के लिए, वैलिडेट करें पर क्लिक करें। बिल्डर गुम आवश्यक फ़ील्ड और अन्य समस्याओं को फ़्लैग करता है।
पास जेनरेट करें
Anchor link toजेनरेट करें पर क्लिक करें। Pushwoosh पास की जाँच करता है और इसे Google Wallet में बनाता है। आपको उपयोगकर्ताओं के साथ साझा करने के लिए एक Google Wallet में जोड़ें सेव लिंक मिलता है। कुछ सेकंड के भीतर, पास सभी पास में दिखाई देता है।
बनाने के बाद पास को संपादित करने, सेव लिंक प्राप्त करने, अमान्य करने और हटाने के लिए, मौजूदा पास प्रबंधित करें देखें।
API के माध्यम से पास प्रबंधित करें
Anchor link toपास बिल्डर जो कुछ भी करता है वह Google Wallet API के माध्यम से भी उपलब्ध है: पास बनाएं, अपडेट करें, सूचीबद्ध करें, एक सेव लिंक प्राप्त करें, स्थिति सेट करें और हटाएं।