Разовая push-рассылка
Как отправить push-уведомление с помощью формы разовой рассылки
Anchor link toЧтобы отправить разовое push-уведомление в Pushwoosh, перейдите в раздел Campaigns. Выберите One-time messaging и нажмите Send message → One-time push.

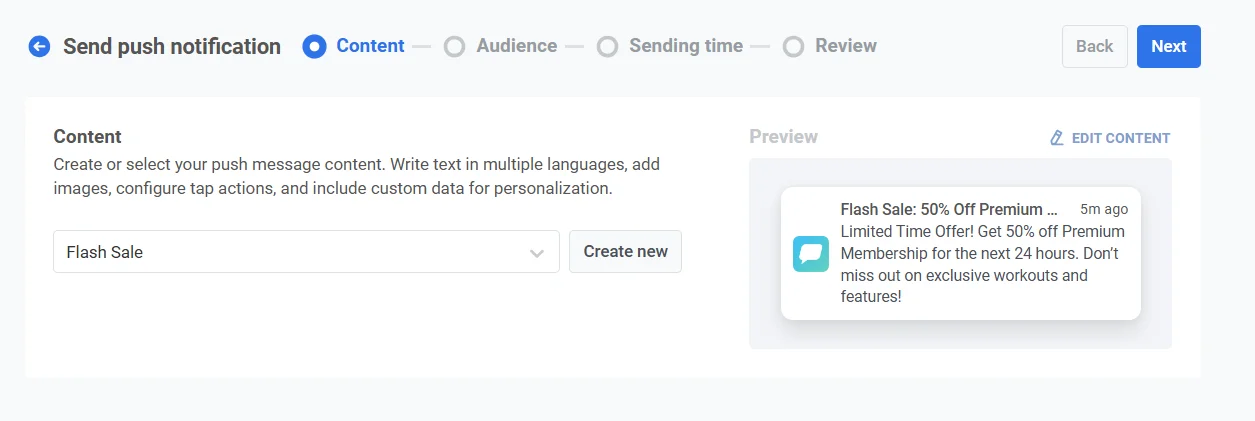
Выберите или создайте контент push-сообщения
Anchor link toДля начала создайте новый контент или выберите существующий для вашего push-уведомления. Если вы хотите использовать готовый пресет, выберите его из выпадающего меню доступных опций.

Чтобы создать новое сообщение, нажмите Create new и следуйте этому руководству, чтобы настроить новый push-пресет.
Если вам нужно отредактировать существующий пресет, нажмите Edit Content, чтобы изменить сообщение.
Предварительный просмотр уведомления будет отображаться справа, показывая, как оно будет выглядеть для пользователей.
Выберите тип сообщения
Anchor link toНа шаге Content выберите Marketing message или Transactional message:
- Marketing message: Учитывает предпочтения подписки, отказы от подписки, ограничение частоты и период тишины. Не отправляется глобальной контрольной группе.
- Transactional message: Отправляется всем пользователям независимо от статуса подписки. Доставляется контрольной группе.
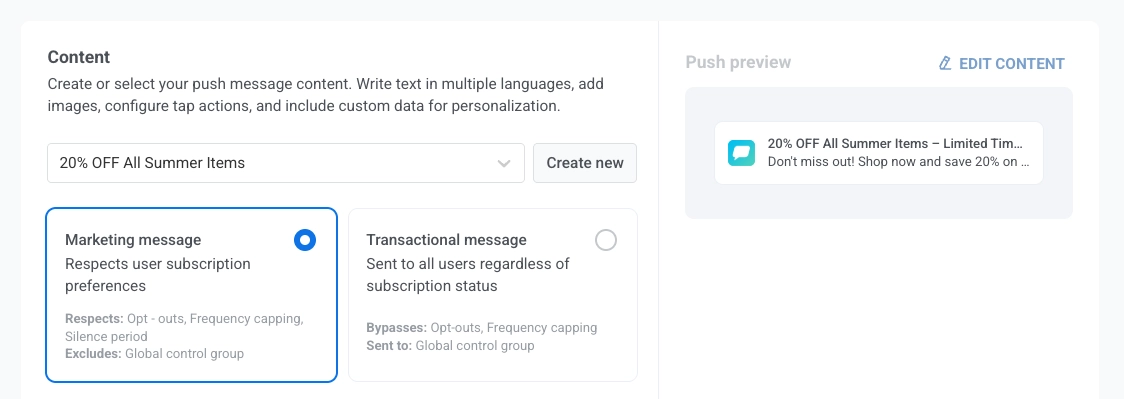
Узнайте, как тип сообщения влияет на доставку.
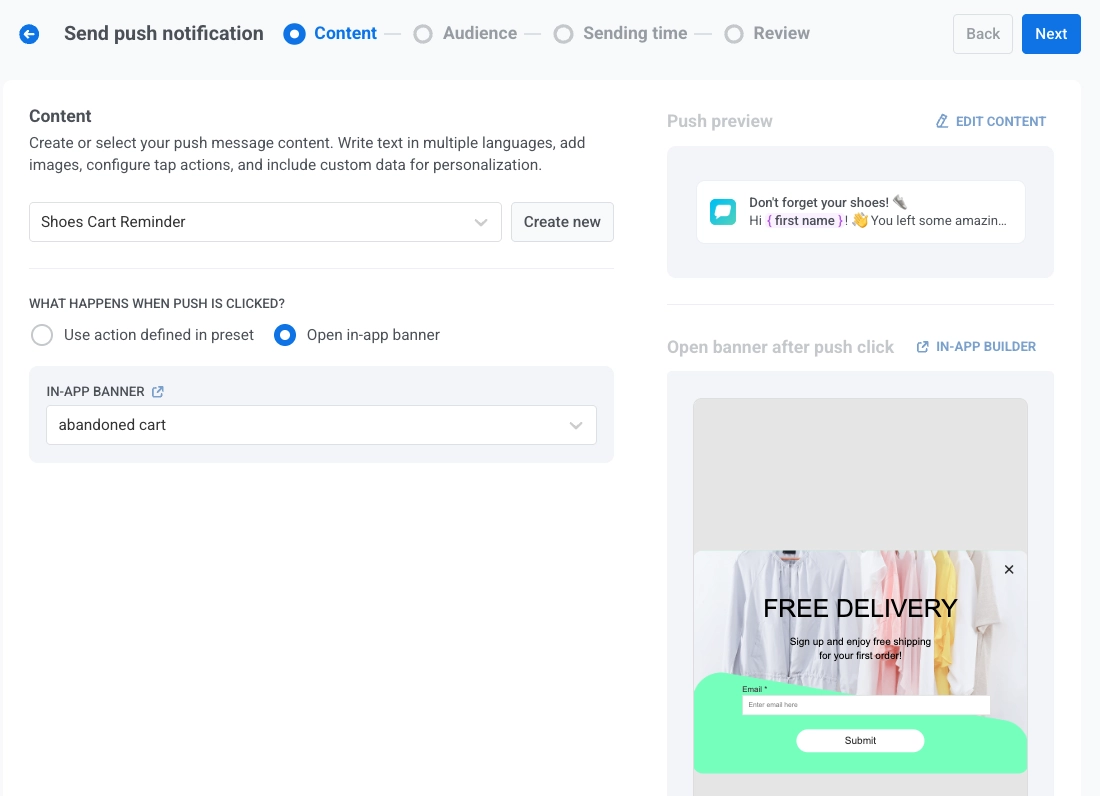
Определите, что произойдет при нажатии на push-уведомление
Anchor link toПосле выбора или создания контента для вашего push-уведомления настройте, что произойдет, когда пользователь нажмет на уведомление, с помощью переключателя Show in-app banner when message is clicked.
По умолчанию переключатель выключен, и при нажатии на push-уведомление будет выполнено действие, настроенное в push-пресете. Используйте это поведение по умолчанию, когда ваш push-пресет уже включает четко определенное действие по клику.
Чтобы вместо этого отобразить in-app баннер, включите переключатель Show in-app banner when message is clicked, а затем выберите in-app сообщение для отображения из выпадающего списка in-app banner. Это полезно для предоставления дополнительной информации, рекламных акций или форм непосредственно в приложении. Предварительный просмотр выбранного баннера появится справа.
Понимание языкового поведения для push- и in-app сообщений
Anchor link toPush-уведомления и in-app сообщения могут поддерживать разные наборы языков. Язык, отображаемый пользователю, зависит от доступности этого языка в каждом типе контента и языка устройства пользователя.
Пример
Anchor link toВы отправляете push-уведомление с использованием пресета, который поддерживает английский (по умолчанию), испанский и немецкий языки. Связанный in-app баннер поддерживает только английский и французский языки. Язык устройства пользователя установлен на немецкий.
-
Push-уведомление будет показано на немецком языке, так как он поддерживается на устройстве пользователя.
-
In-app баннер будет отображен на английском языке, так как немецкий язык недоступен в языковых настройках баннера.
Сохранить сообщение в Inbox
Anchor link toВы можете сохранять push-уведомления в Inbox приложения, позволяя пользователям получать доступ и просматривать важные сообщения в удобное для них время. Узнайте больше о Message Inbox.
Чтобы включить эту функцию, переключите опцию Save message to Inbox. Когда она включена, заголовок и сообщение берутся из push-пресета.
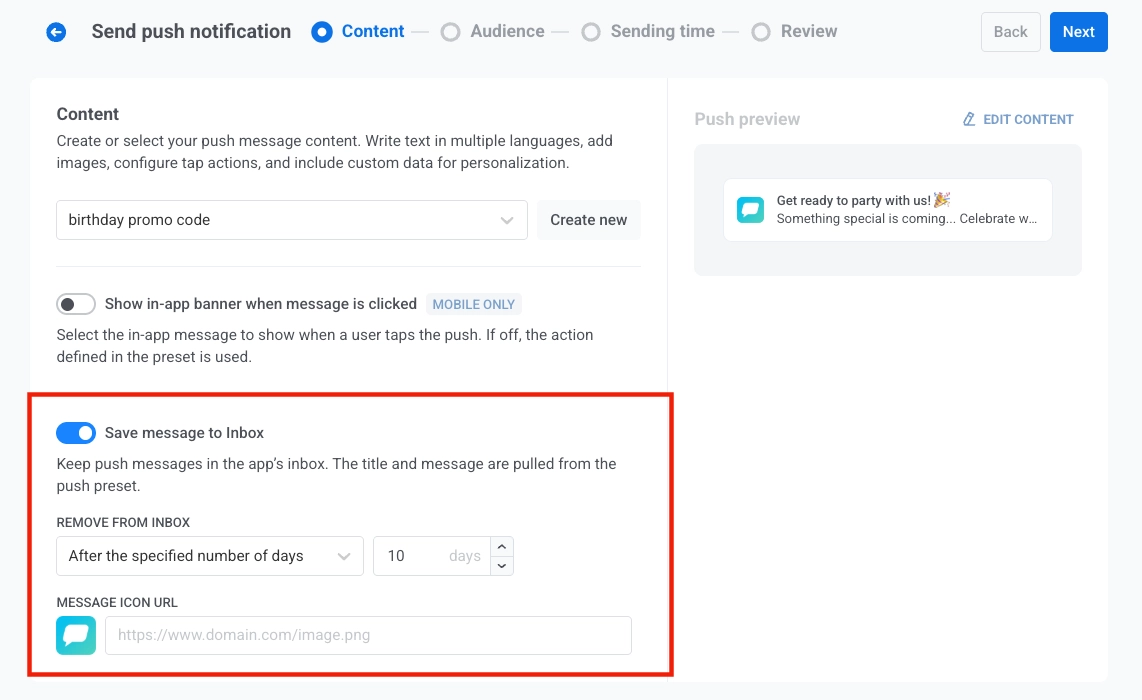
Удалить из Inbox
Anchor link toКонтролируйте, как долго сообщения остаются в Inbox, выбрав одну из следующих опций в выпадающем списке Remove from Inbox:
-
After the specified number of days: Установите количество дней, в течение которых сообщение должно оставаться в Inbox перед автоматическим удалением. Используйте поле ввода для указания количества дней.
-
On a specific date: Выберите точную дату, когда сообщение будет удалено из Inbox.
URL иконки сообщения
Anchor link toНастройте внешний вид сохраненного уведомления, указав URL иконки в поле MESSAGE ICON URL. Эта иконка будет отображаться рядом с сообщением в Inbox, служа визуальным идентификатором уведомления.
Если URL иконки не указан, рядом с сообщением будет отображаться иконка по умолчанию.
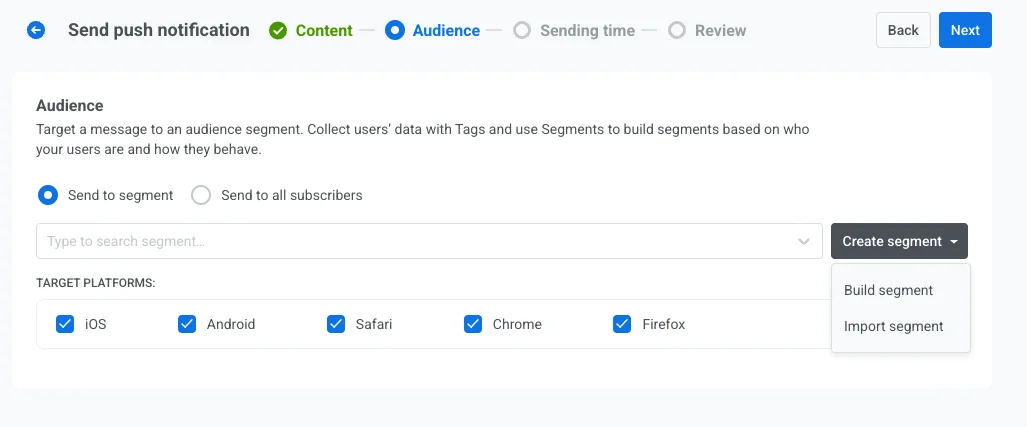
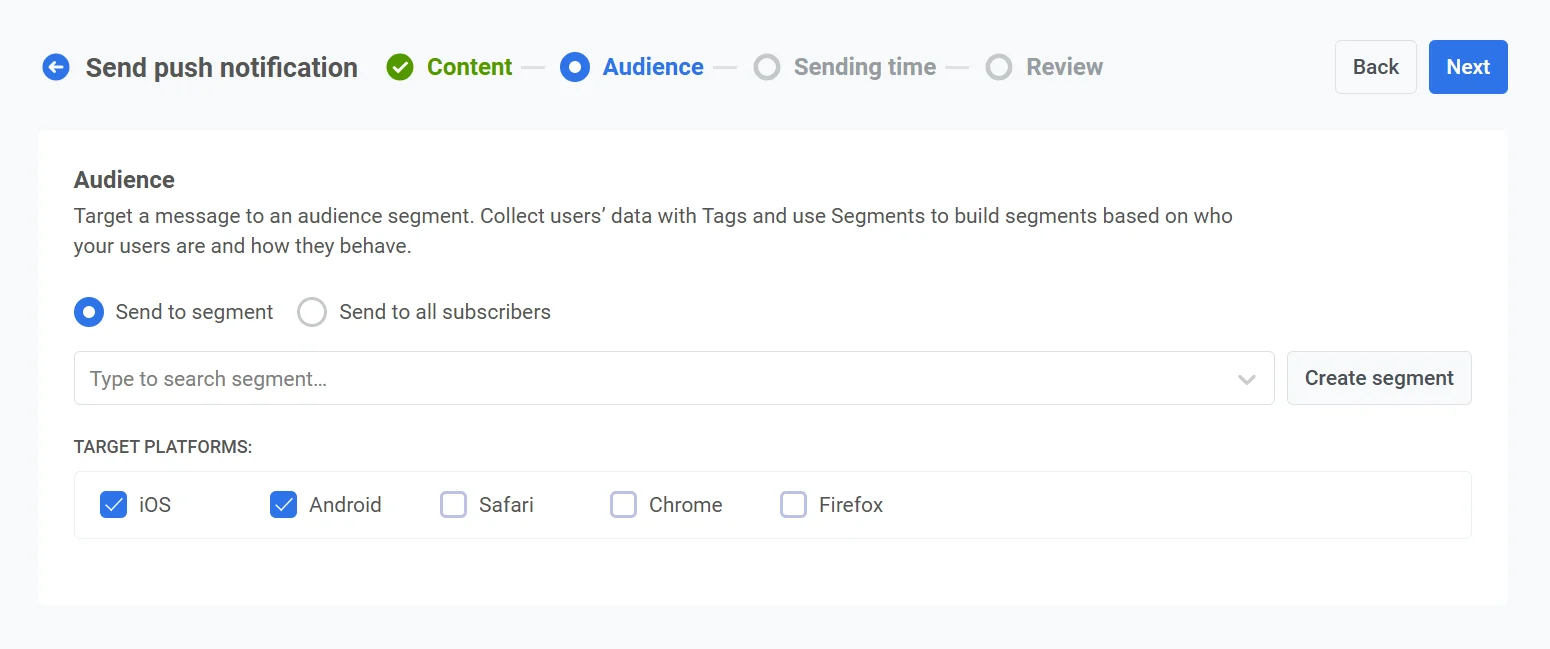
Выберите аудиторию для push-уведомления
Anchor link toДалее выберите аудиторию для вашего push-уведомления. Вы можете отправить уведомление всем пользователям или нацелиться на определенный сегмент на основе поведения или демографических данных пользователей.
Отправить сегменту
Anchor link toВыберите эту опцию, чтобы нацелиться на определенный сегмент аудитории. Выберите готовый сегмент из выпадающего меню или создайте новый, нажав Create Segment.
Затем выберите одно из следующих действий из выпадающего меню:
- Build segment: Создайте новый сегмент с помощью конструктора сегментов. Узнать больше
- Import segment: Импортируйте сегмент из CSV-файла. Узнать больше.
Отправить всем пользователям
Anchor link toВыберите эту опцию, чтобы отправить уведомление всем вашим подписчикам. Это идеально подходит для общих объявлений или рекламных акций, которые относятся ко всей вашей пользовательской базе.

Целевые платформы
Anchor link toВыберите платформы, на которые вы хотите доставить уведомление. Доступные платформы включают:
- iOS
- Android
- Safari
- Chrome
- Firefox
Выбор целевых платформ гарантирует, что ваше сообщение достигнет пользователей на соответствующих устройствах. Уведомление получат только пользователи на выбранных платформах.
После того как вы настроили аудиторию и выбрали целевые платформы, нажмите Next, чтобы продолжить настройку вашего push-уведомления.
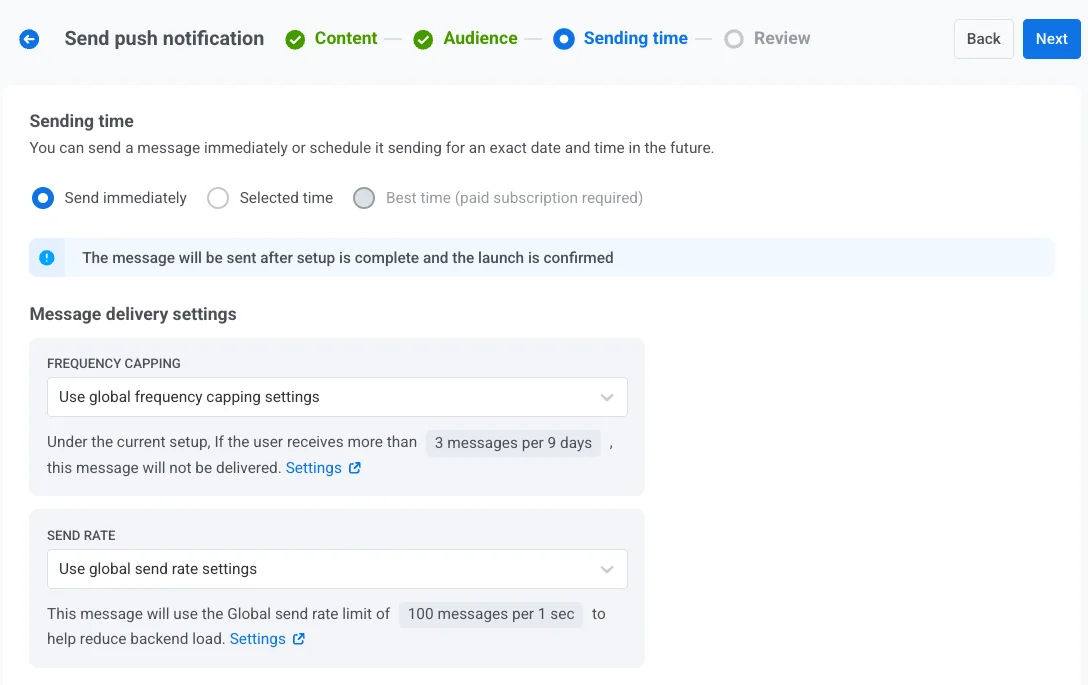
Запланируйте push-уведомление
Anchor link toДалее выберите, когда отправить ваше push-уведомление. У вас есть следующие опции:
- отправить его немедленно
- запланировать его на определенное время
- позволить Pushwoosh определить оптимальное время для каждого пользователя на основе его поведения.
Отправить немедленно
Anchor link toВыберите эту опцию, если вы хотите отправить push-уведомление сразу после настройки кампании. Это полезно для срочных или чувствительных ко времени сообщений.
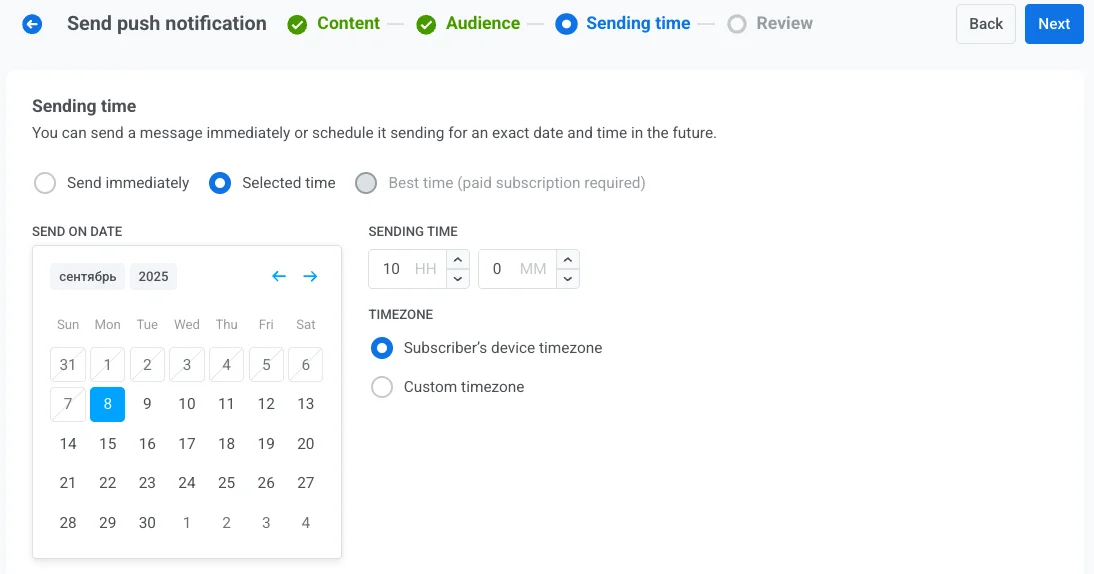
Выбранное время
Anchor link toВыберите эту опцию, чтобы запланировать ваше push-уведомление на определенную дату и время.
- Используйте календарь, чтобы выбрать точную дату для вашего уведомления.
- Установите время в часах и минутах (в 24-часовом формате), когда должно быть отправлено уведомление.
- Выберите соответствующий часовой пояс:
- Subscriber’s device timezone. Уведомление будет отправлено в соответствии с местным временем получателя, обеспечивая доставку в указанное время в его часовом поясе.
- Custom timezone. Выберите определенный часовой пояс, чтобы запланировать уведомление для всех получателей, что полезно для таргетинга на пользователей в определенном регионе.
Лучшее время (требуется платная подписка)
Anchor link toЭта опция позволяет системе отправить уведомление в оптимальное для каждого пользователя время, определенное на основе его прошлой истории взаимодействия. Вам нужно только выбрать дату начала отправки уведомления. Pushwoosh позаботится о времени, отправив уведомление в оптимальное для каждого пользователя время в выбранный день.
Если система не может определить лучшее время для пользователя (например, из-за отсутствия данных о часовом поясе), вы можете указать резервное время. Введите резервное время в часах и минутах и выберите соответствующий резервный часовой пояс.
Чтобы использовать функцию Best time, убедитесь, что:
- События приложения по умолчанию включены.
- Вы ранее отправляли сообщения в разное время, чтобы собрать достаточно данных о пользователях для определения системой оптимального времени отправки.
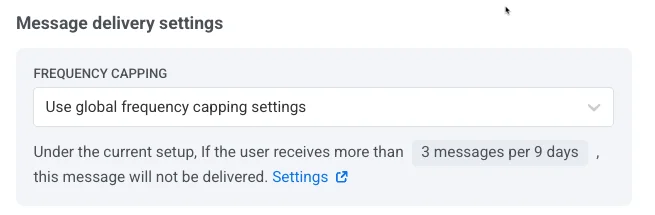
Настройка параметров доставки сообщений
Anchor link toУстановить ограничение частоты
Anchor link toИспользуйте Frequency capping, чтобы ограничить частоту получения пользователями push-сообщений, предотвращая избыточную рассылку и снижая отток. Выберите одну из следующих опций:
- Use Global frequency capping settings
Примените лимиты, настроенные для всего проекта в ваших настройках Global frequency capping.
Например, если глобальный лимит установлен на 3 сообщения за 9 дней, дополнительные сообщения, превышающие этот лимит, будут пропущены.
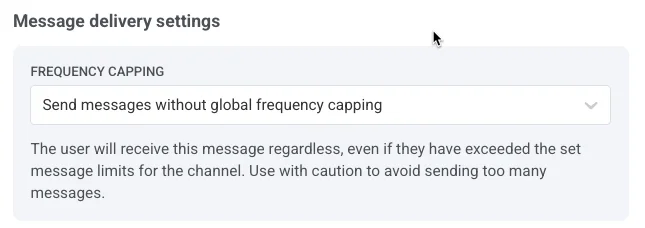
- Ignore Global frequency capping
Пользователь получит это сообщение, даже если он превысил лимиты сообщений для канала. Используйте эту опцию с осторожностью, чтобы избежать избыточной рассылки.
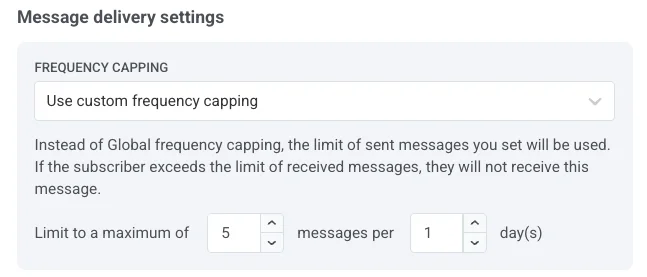
- Use custom frequency capping
Установите пользовательский лимит для этого сообщения. Если пользователь превысит этот лимит, сообщение будет пропущено, и пользователь перейдет к следующему шагу.
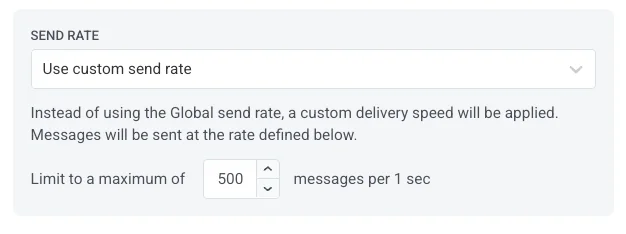
Установить лимиты скорости отправки
Anchor link toНастройка Send rate контролирует, как быстро сообщения доставляются вашей аудитории. Регулировка скорости отправки помогает управлять скоростью доставки, предотвращать перегрузку бэкенда и улучшать общую доставляемость.
Выберите одну из следующих опций:
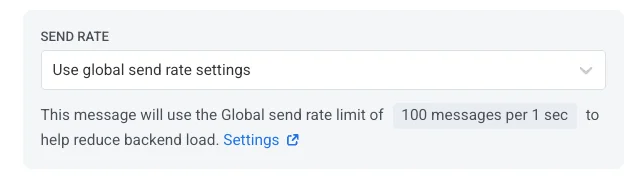
- Use global send rate settings
Применяет лимиты скорости отправки, настроенные в параметрах доставки сообщений вашего проекта. Если лимиты не установлены, все сообщения будут отправлены немедленно. Используйте эту опцию, когда хотите, чтобы скорость доставки соответствовала правилам вашего проекта по умолчанию. Узнайте больше о глобальных лимитах скорости отправки
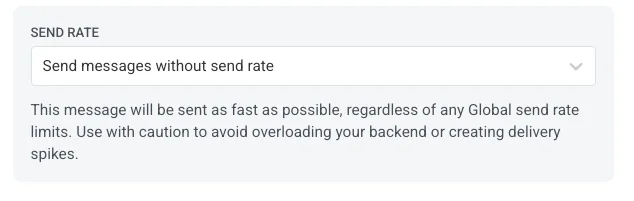
- Send messages without send rate
Отправляет сообщения как можно быстрее, игнорируя любые глобальные лимиты скорости отправки. Используйте с осторожностью, чтобы избежать перегрузки вашего бэкенда или создания пиков доставки.
- Use custom send rate
Переопределяет глобальную скорость отправки только для этого сообщения. Позволяет указать количество сообщений, отправляемых в минуту, давая вам полный контроль над скоростью доставки. Сообщения будут отправляться с пользовательской скоростью, которую вы определите в элементе сообщения.
После настройки желаемых опций нажмите Next, чтобы перейти к шагу подтверждения.
Проверьте и отредактируйте ваш контент
Anchor link toПеред завершением проверьте контент, действия по клику, аудиторию, платформу и опции планирования, чтобы убедиться, что все настроено правильно. Вы также увидите предварительный просмотр вашего push-уведомления на каждом выбранном языке. При необходимости вы можете изменить любые настройки.

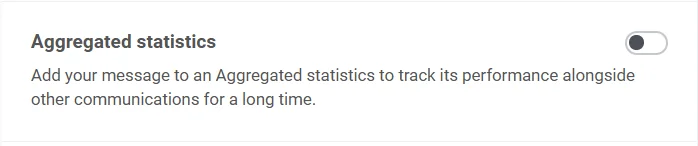
При желании вы можете связать ваше push-уведомление с Aggregated Campaign, что позволит вам ассоциировать это сообщение с более крупной, текущей кампанией и отслеживать его эффективность вместе с другими связанными уведомлениями с течением времени.
Как только все будет подтверждено, нажмите Schedule push, чтобы запланировать его на более позднее время, или Send now, чтобы отправить его немедленно.
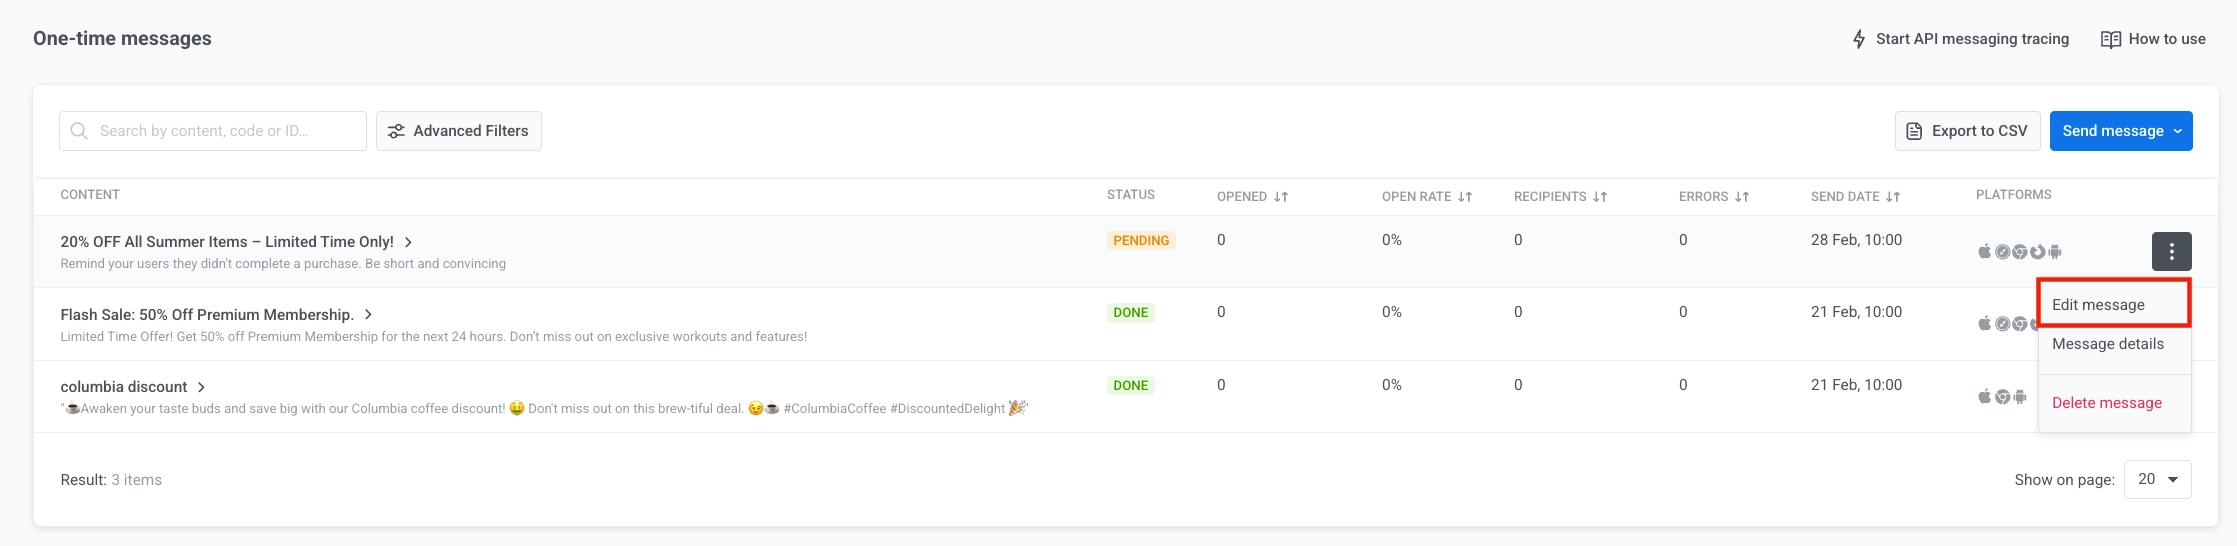
Отменить или отредактировать запланированное сообщение
Anchor link toДля сообщений, которые запланированы и еще не отправлены (статус PENDING), вы можете изменить или отменить их.
Откройте список сообщений в одном из этих мест: Campaigns → One-time messaging или Statistics → Message History. Откройте меню действий (⋮) для сообщения, которое вы хотите изменить или отменить:
- Delete message: отменяет запланированную доставку и изменяет статус на Canceled.

- Edit message: открывает форму разовой push-рассылки с загруженными данными сообщения. Вы можете изменить контент или аудиторию.
Пример сценария
Anchor link toПредставьте, что вы менеджер по маркетингу фитнес-приложения и хотите отправить разовое push-уведомление о мгновенной распродаже премиум-подписок. Сделайте это следующим образом:
Создайте кампанию
Anchor link toПерейдите в Campaigns, выберите One-time messaging и нажмите Send message → One-time push, чтобы начать настройку вашей кампании.
Создайте контент сообщения
Anchor link toПоскольку вы хотите создать новое сообщение для этой мгновенной распродажи, нажмите Create new и настройте push-пресет с названием Flash Sale: 50% Off Premium Membership.
Пример текста для push-сообщения:
«Ограниченное предложение! Получите скидку 50% на премиум-подписку в течение следующих 24 часов. Не упустите эксклюзивные тренировки и функции!»
В push-пресете добавьте глубокую ссылку (deep link), чтобы направить пользователей на страницу подписки в приложении. Как только вы будете довольны дизайном и контентом, нажмите Next, чтобы перейти к шагу выбора аудитории.
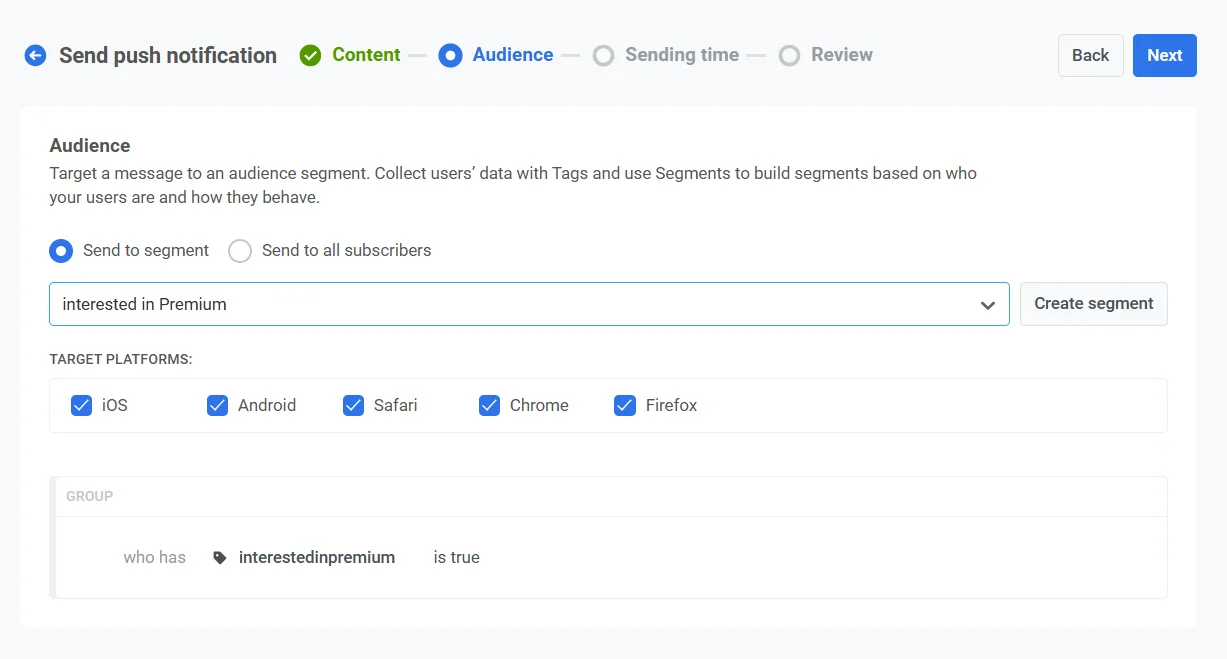
Выберите аудиторию
Anchor link toДля этой мгновенной распродажи вы хотите нацелиться на пользователей, которые проявили интерес к премиум-услугам, но еще не подписались. Выберите Send to segment и из выпадающего меню выберите сегмент Interested in Premium. Этот сегмент включает пользователей, которые просматривали страницу премиум-подписки, но не обновились.
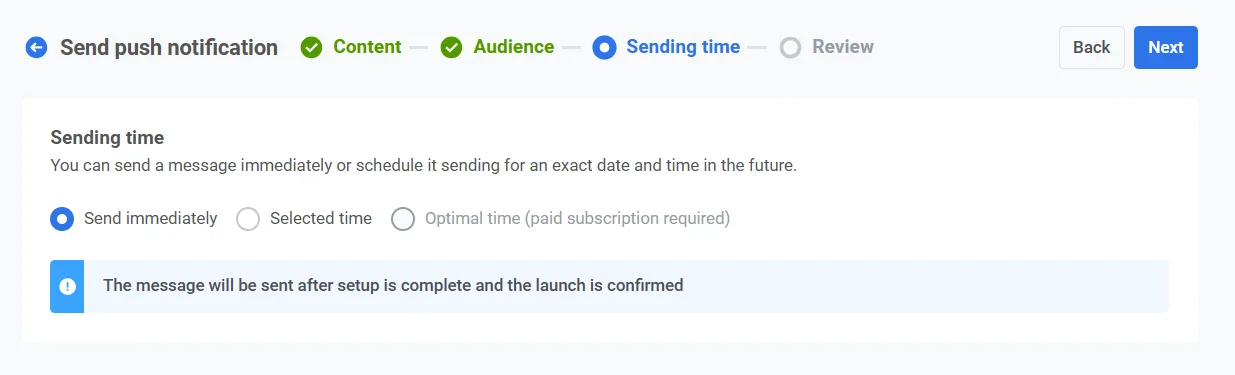
Установите время
Anchor link toПоскольку мгновенная распродажа ограничена по времени, вы хотите, чтобы уведомление было отправлено немедленно. Выберите Send immediately, чтобы отправить уведомление сразу после завершения настройки кампании.
Проверьте и отправьте
Anchor link toПроверьте все детали кампании, чтобы убедиться, что уведомление выглядит правильно.

Связать с агрегированной кампанией (опционально)
Anchor link toЕсли это уведомление является частью долгосрочной маркетинговой кампании с несколькими сообщениями (например, сезонная распродажа или текущие акции), вы можете включить опцию Link to Aggregated Campaign. Это позволит вам отслеживать эффективность этого уведомления вместе с другими связанными сообщениями в рамках более широкой кампании.
Как только все будет подтверждено, нажмите Send message, чтобы немедленно отправить уведомление.
Вы также можете отправить разовое push-уведомление с помощью Customer Journey Builder. Узнайте, как отправить разовое push-уведомление через Customer Journey.