Устаревшая форма пресетов Push-уведомлений
Устаревшая форма пресетов Push-уведомлений (legacy push preset form) — это шаблон, который вы создаете и сохраняете один раз, чтобы отправить Push-уведомление немедленно или отредактировать и использовать повторно позже. Используйте ее, когда вам нужны тихие Push-уведомления (silent push notifications), сохранение сообщений в Inbox пользователя или специфичные для платформы настройки (пользовательские звуки, бейджи, время истечения срока действия, уровни прерывания iOS). Текущий редактор контента Push-уведомлений и форма одноразового Push-уведомления (one-time push) не предоставляют этих опций. В устаревшем пресете вы определяете контент и настройки, связанные с платформой для вашего Push-уведомления. Чтобы отправить его вашим пользователям, используйте форму одноразового Push-уведомления или Pushwoosh Journey.
Создание пресетов
Anchor link toПерейдите в Content > Presets и нажмите Add new preset.
Элементы контента
Anchor link toВсе пресеты состоят из контента (вкладка Message) и дополнительных настроек Push-уведомления (вкладка Action).
Вкладка Message
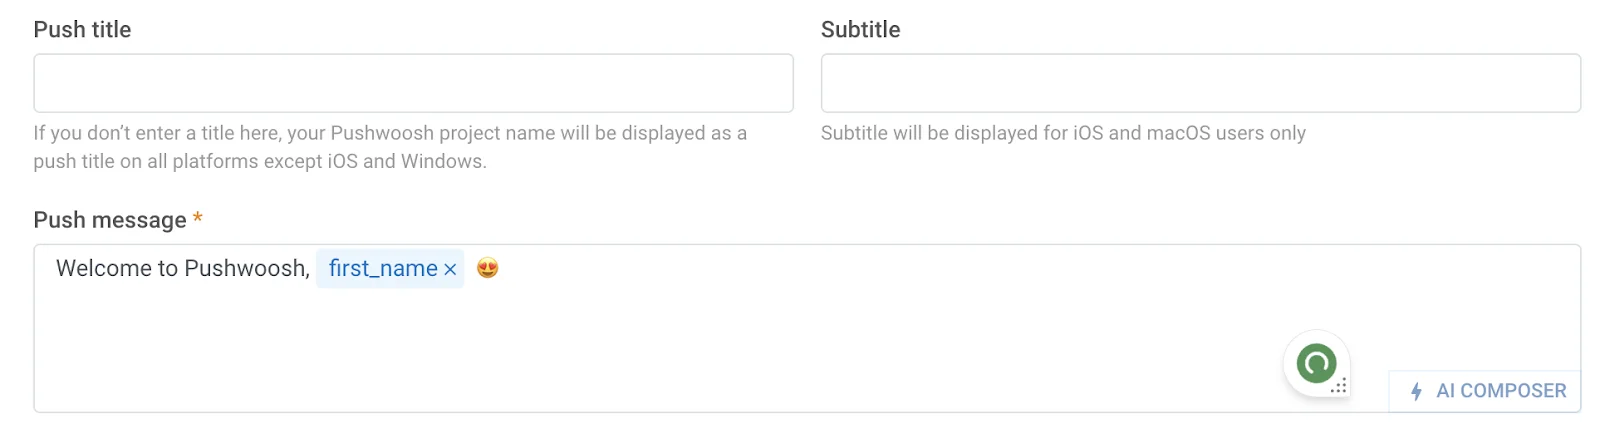
Anchor link toЗаголовок Push-уведомления (Push Title)
Сообщение Push-уведомления (Push message)
Мультиязычность (Multi-language)
Персонализация (Personalization)
Настройки платформ (iOS, Android, Safari и другие)
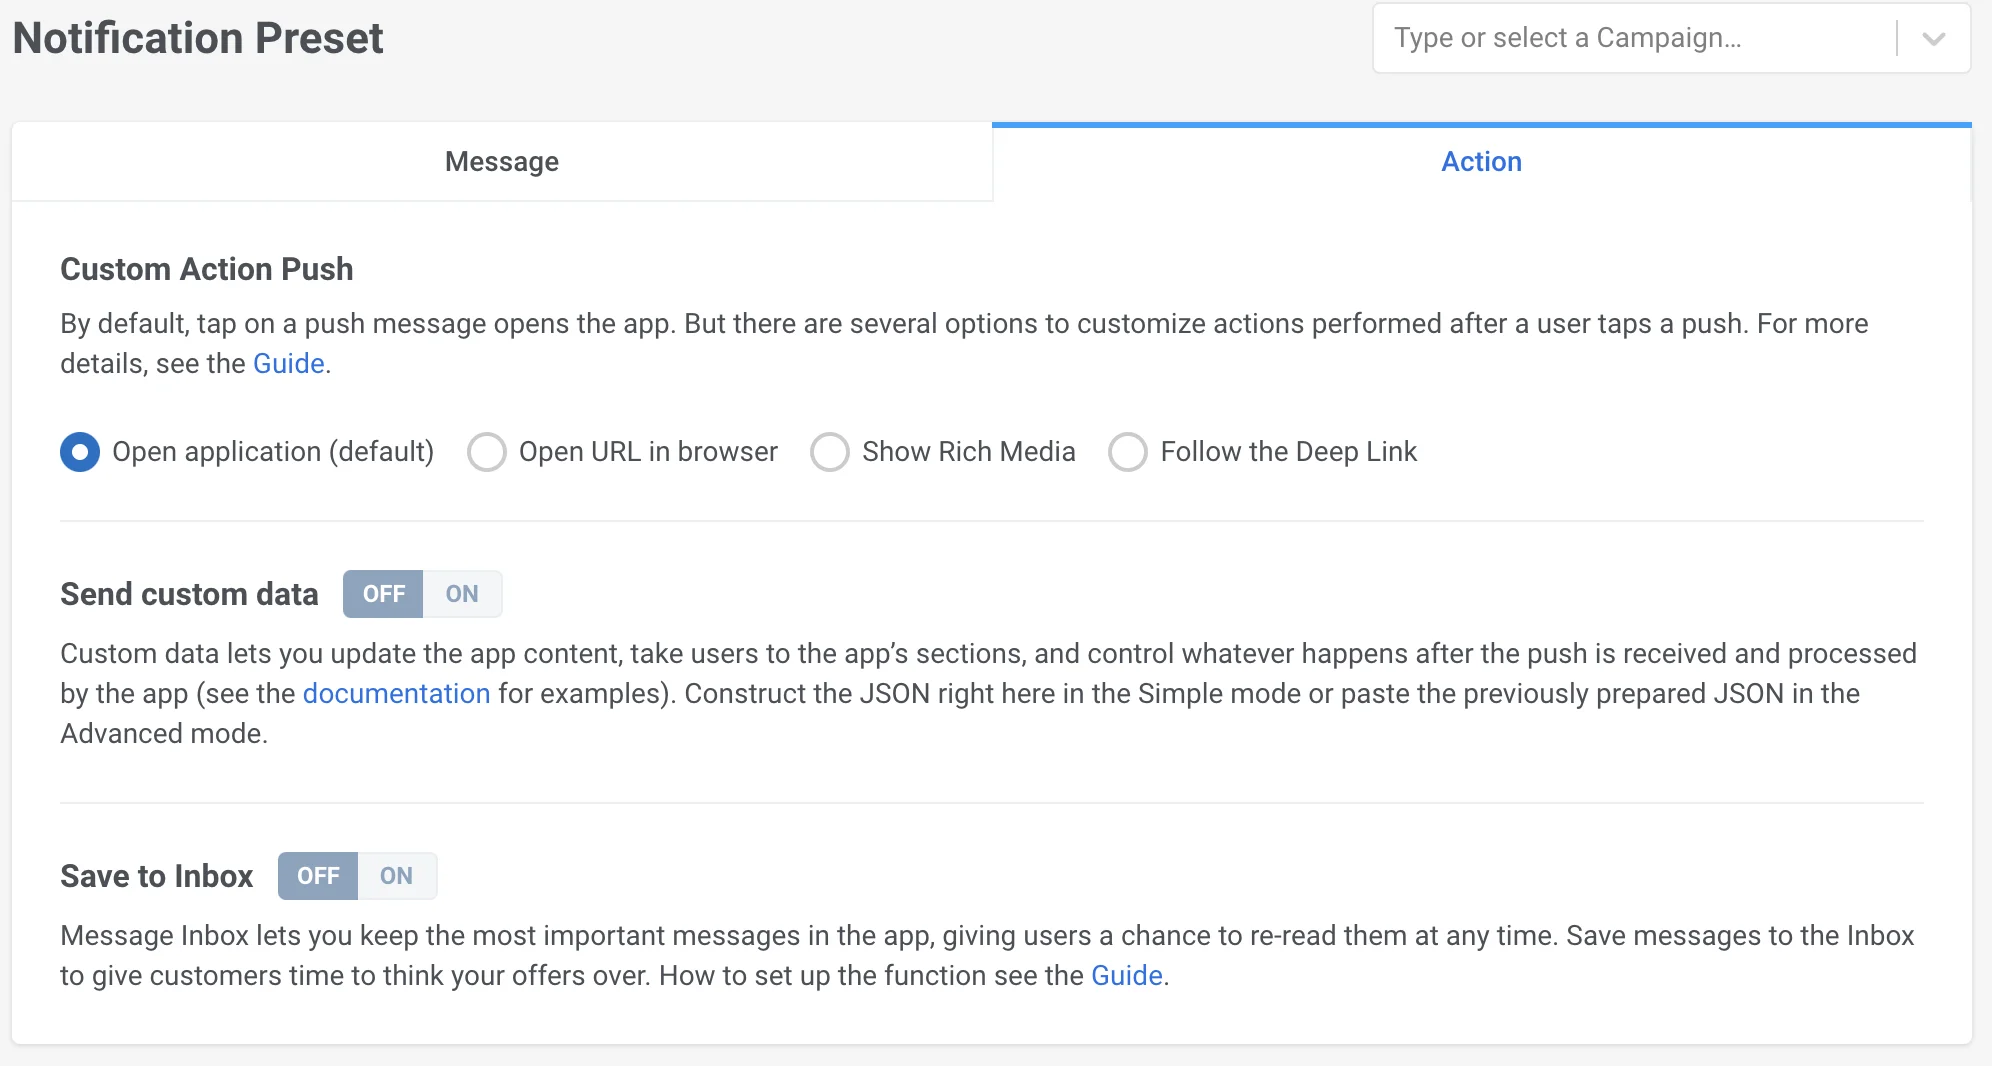
Вкладка Action
Anchor link toПользовательское действие (Custom Action)
Отправка пользовательских данных (Custom Data)
Сохранение в Inbox (Save to Inbox)
Заголовок Push-уведомления (Push Title)
Anchor link toЗаголовки необязательны. Добавьте его, если хотите, чтобы вместо названия вашего приложения отображался ваш заголовок.
Подзаголовок (Subtitle)
Anchor link toПодзаголовок работает только для iOS-приложений. Если вы добавите его для Android или любой другой платформы, он не будет виден вашим пользователям.
Сообщение Push-уведомления (Push message)
Anchor link toЭто сообщение, которое ваши пользователи получат в Push-уведомлении. Здесь вы можете ввести текст и эмодзи, создать сообщение с помощью нашего AI Composer, добавить персонализацию (например, приветствие по имени) и локализованные версии вашего сообщения на разных языках.
Мультиязычность (Multi-language)
Anchor link toPushwoosh знает языки, установленные на устройствах ваших пользователей. Язык, который установлен у большинства подписчиков на их телефонах, является языком по умолчанию. Если вы хотите отправить Push-уведомление на разных языках, нажмите Edit languages, чтобы просмотреть все доступные языки, а также количество устройств рядом с ними.
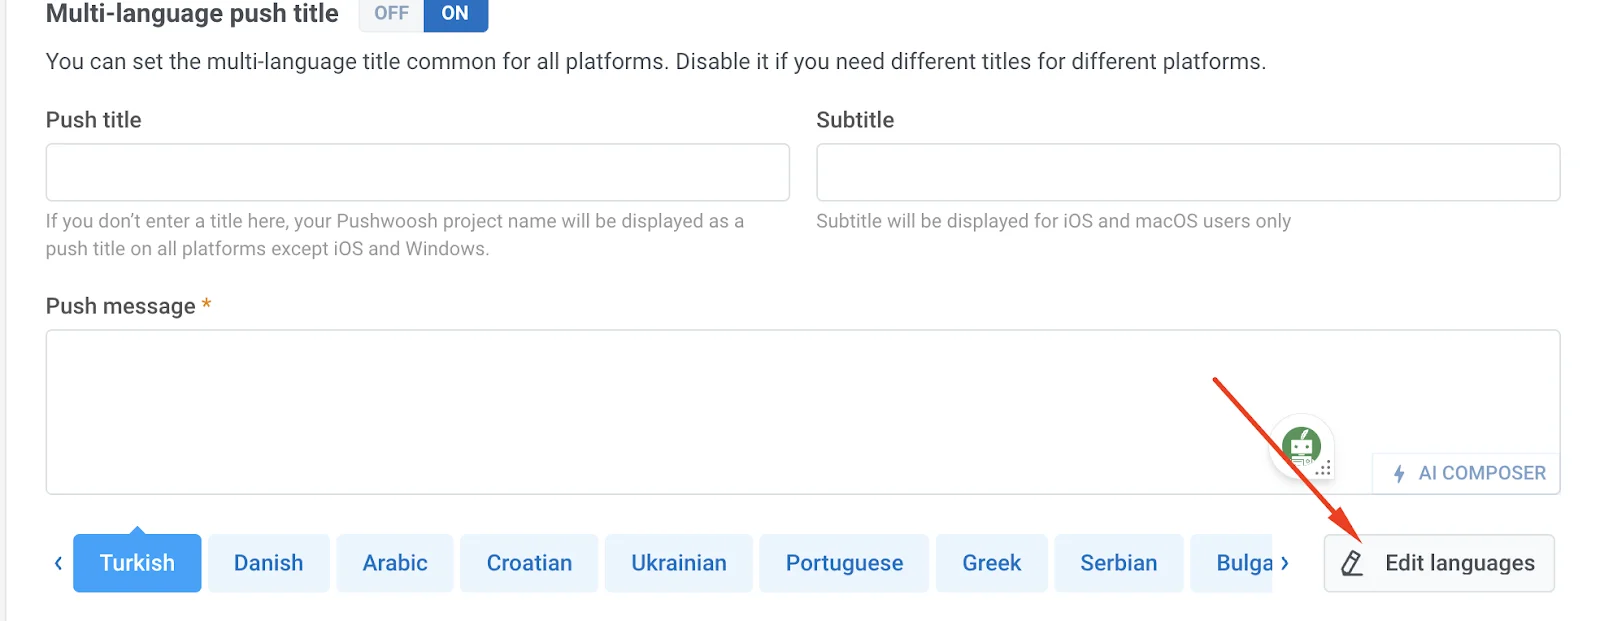
По умолчанию выбраны все языки. Снимите галочки, если вы не хотите переводить свое Push-уведомление на них. Затем нажмите Apply.
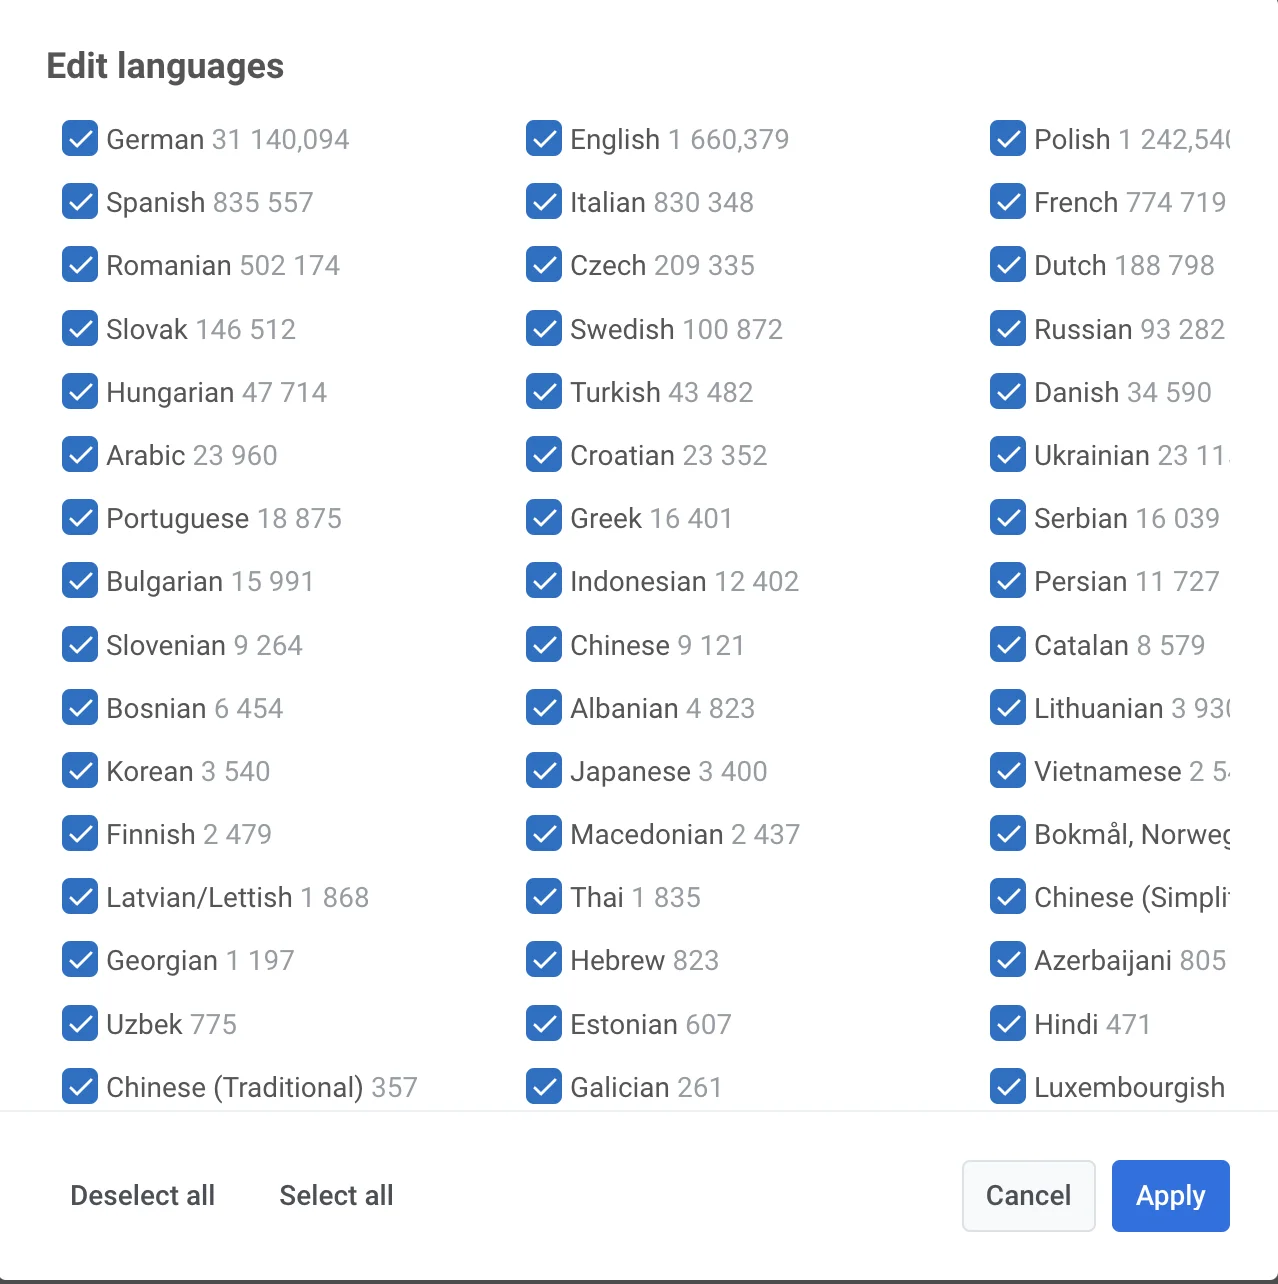
Чтобы добавить перевод к вашему Push-уведомлению, выберите язык и скопируйте-вставьте ваше сообщение на выбранном языке.

Персонализация (Personalization)
Anchor link toПерсонализация работает в заголовках Push-уведомлений, подзаголовках, сообщениях, заголовках (headers), иконках и корневых параметрах (root params). Вы можете настроить тег Name (имя, email ID, город и т.д.) и модификатор формата («alexander» или «Alexander»).
AI Composer
Anchor link toНажмите на кнопку AI Composer, чтобы быстро сгенерировать контент для вашего Push-уведомления. Вам нужно только ввести ключевые слова, и ИИ создаст сообщение на их основе. Нажмите Copy Content, чтобы вставить его в ваше сообщение и отредактировать при необходимости.
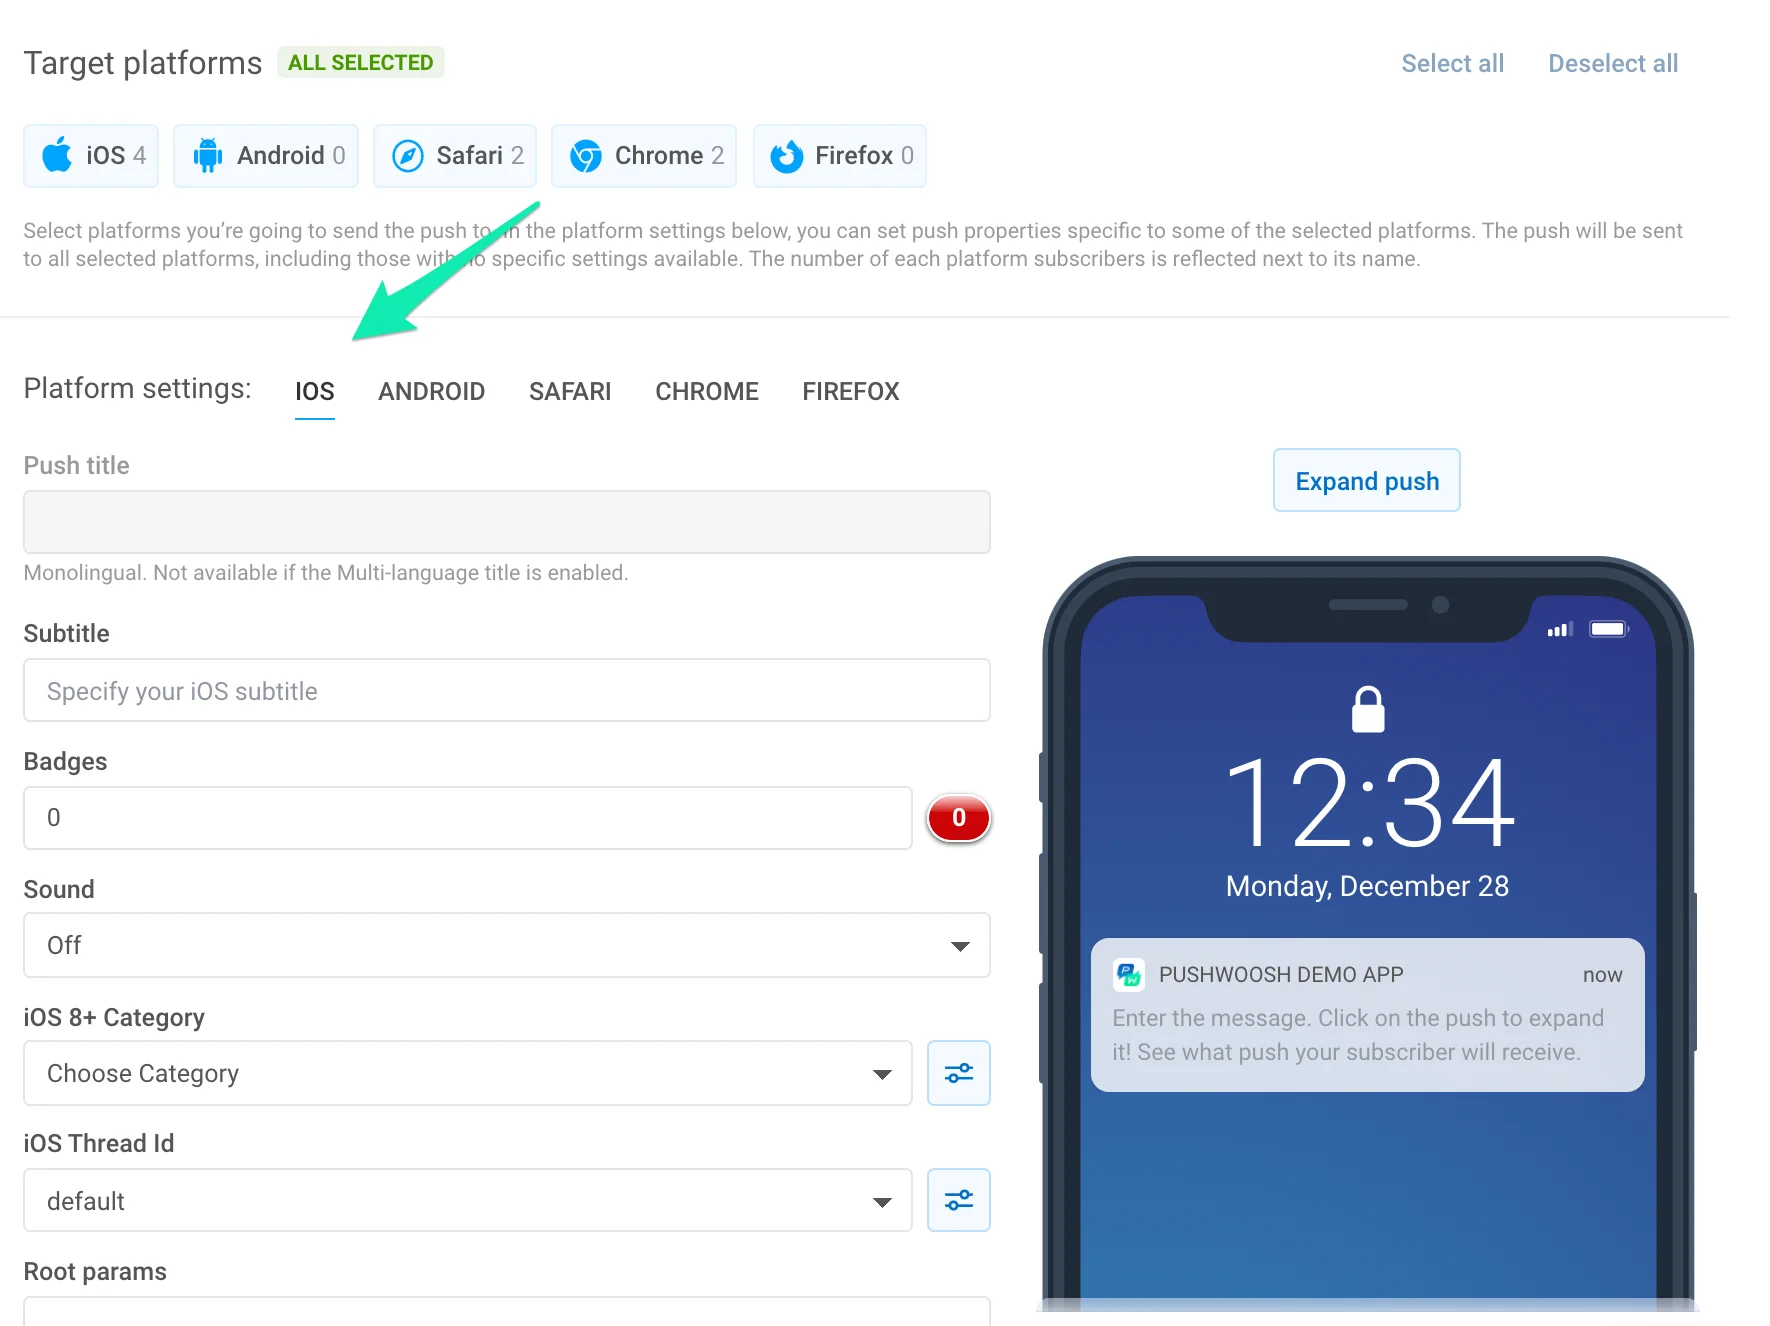
Платформы (Platforms)
Anchor link toВ разделе Targeted platforms вы определяете, куда будет отправлено ваше Push-уведомление:
Мобильные: iOS, Android, Huawei
Веб: Chrome, Firefox, Safari, Windows
По умолчанию выбраны все платформы. Чтобы отключить отправку Push-уведомлений на определенную платформу, нажмите на название платформы.
Число рядом с иконкой платформы указывает, сколько устройств настроено на этой платформе. В нашем примере цифра 2 рядом с iOS означает, что в приложении есть 2 пользователя iOS, добавленных в качестве подписчиков в Pushwoosh.
Настройки платформ (Platform settings)
Anchor link toСпецифичные для платформы опции ниже доступны только в этой устаревшей форме. Текущий редактор контента Push-уведомлений не отображает эти поля.
Title. Укажите пользовательский заголовок Push-уведомления, отличный от названия приложения. Чтобы повысить показатель открываемости (open rate), персонализируйте заголовок сообщения с помощью Dynamic Content. Обратите внимание, что заголовок одинаков для всех языков, на которые переведено ваше Push-уведомление. Если вам нужен мультиязычный заголовок, включите его в разделе Message; мультиязычный заголовок одинаков для всех платформ.
Subtitle. Укажите подзаголовок для Push-уведомления iOS. Он будет отображаться между заголовком и текстом сообщения Push-уведомления. Подзаголовки можно персонализировать с помощью плейсхолдеров Dynamic Content.
Badges. Установите номер бейджа iOS, который будет отправлен с вашим Push-уведомлением. Используйте +n / -n для увеличения / уменьшения текущего значения бейджа. Отправка 0 очищает бейдж с иконки вашего приложения.
Sound. Укажите пользовательский звук из основного бандла вашего приложения. Убедитесь, что аудиофайл находится в корне вашего iOS-проекта.
iOS8 Category. Выберите категорию с набором кнопок для iOS8.
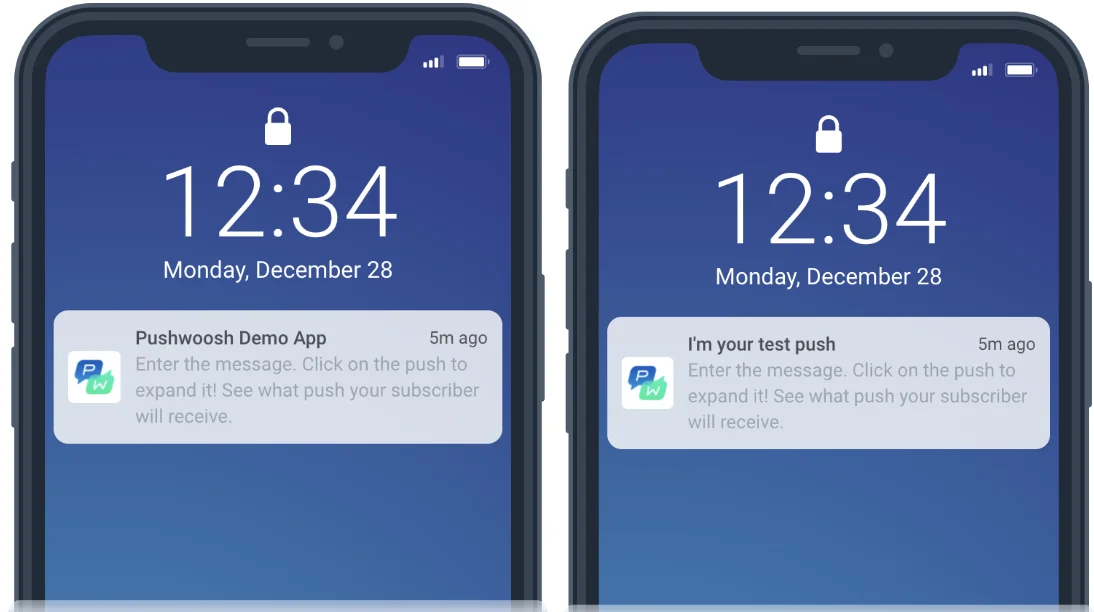
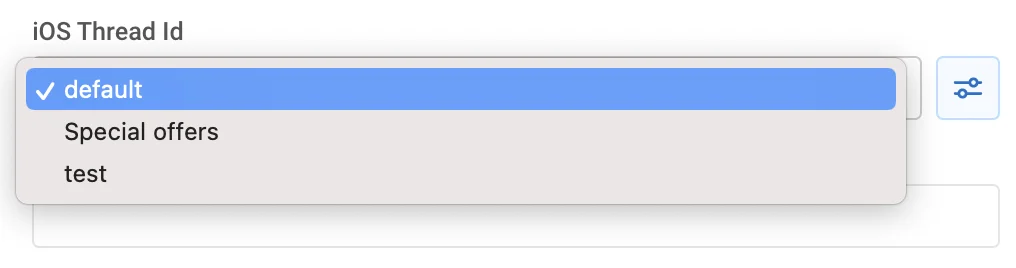
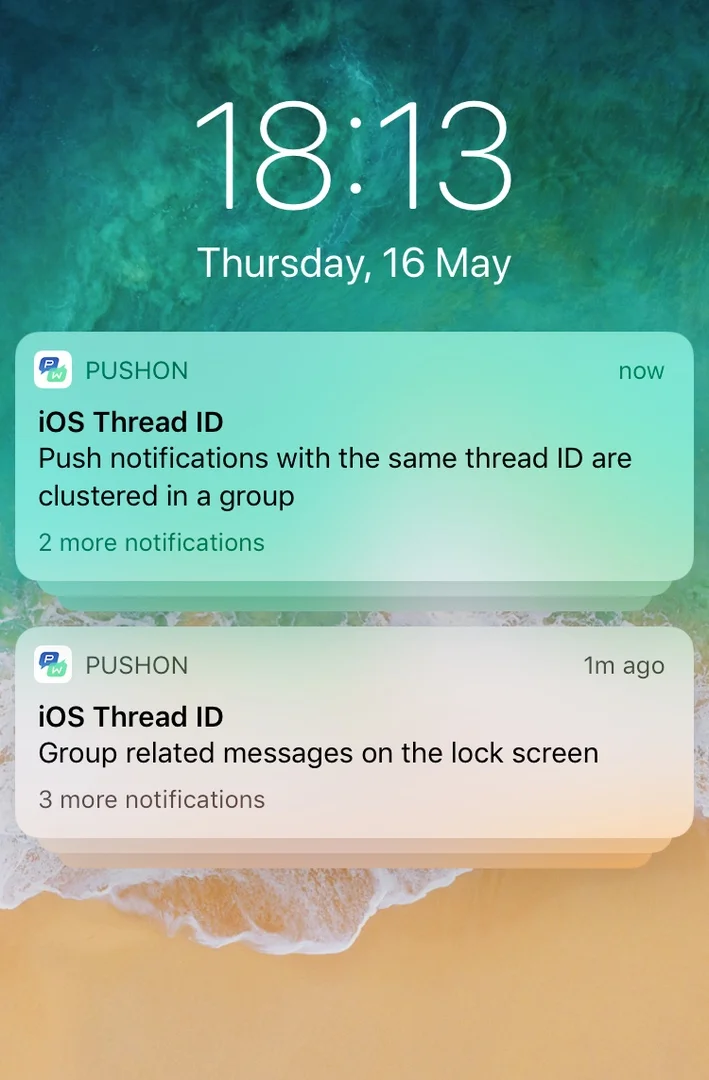
iOS Thread ID. Идентификатор для группировки связанных уведомлений по тредам. Сообщения с одинаковым Thread ID группируются на экране блокировки и в Центре уведомлений. Чтобы создать Thread ID, нажмите Edit.
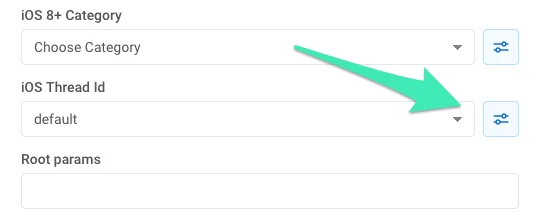
Введите имя и ID в открывшемся окне, затем нажмите Save.
Выберите Thread ID из выпадающего списка:
Посмотрите, как сгруппированные Push-уведомления с двумя разными Thread ID выглядят на устройстве:
iOS Root Params. Параметры корневого уровня для словаря APS.
iOS10+ Media attachment. URL-адрес любого видео, аудио, изображения или GIF для iOS Rich Notification. Смотрите это руководство для получения более подробной информации об iOS 10 Rich Notifications.
Send silent notification. Позволяет отправить тихое Push-уведомление (silent push) со свойством content-available. Когда приходит тихое Push-уведомление, iOS пробуждает ваше приложение в фоновом режиме, чтобы вы могли получить новые данные с вашего сервера или выполнить фоновую обработку информации.
Critical Push. Означает критические оповещения iOS, которые воспроизводят звук, даже если включен режим «Не беспокоить» (Do Not Disturb) или на iPhone отключен звук. Критические оповещения разрешены только для приложений, получивших разрешение от Apple. Чтобы включить критические оповещения для вашего приложения, отправьте запрос на получение прав (entitlement request) на портале разработчиков Apple.
Expiration time. Устанавливает период, по истечении которого Push-уведомление не будет доставлено, если устройство было не в сети.
Уровни прерывания уведомлений iOS 15
Anchor link toНачиная с iOS 15, режимы фокусирования (Focus modes) управляют уровнями прерывания уведомлений на устройствах пользователей. Используя режимы фокусирования, пользователи iPhone могут настраивать свои предпочтения уведомлений различными способами, включая настройку собственных режимов уведомлений для работы, сна и личного времени. Эти режимы могут разрешать уведомления от определенных приложений, выбранных пользователем, и блокировать отправку Push-уведомлений от других, пока режим включен. Например, пользователь может настроить режим «Работа», чтобы разрешить уведомления только от рабочих приложений.
В iOS 15 представлены четыре варианта уровня прерывания:
Active Pushes (по умолчанию)
Anchor link toАктивные Push-уведомления (Active Pushes) ведут себя как обычные уведомления до iOS 15: уведомление отображается сразу после получения, экран загорается при получении Push-уведомления, могут воспроизводиться звуки и вибрация. Если режим фокусирования блокирует уведомления приложения, Active Pushes не смогут пробиться через этот режим.
Passive Pushes
Anchor link toЧто касается пассивных Push-уведомлений (Passive Pushes), система добавляет их в список уведомлений без включения экрана или воспроизведения звука. Этот тип Push-уведомлений используется для уведомлений, которые не требуют немедленного внимания пользователя, например, персональные рекомендации, предложения или обновления. Эти уведомления не смогут пробиться через режимы фокусирования.
Time Sensitive Pushes
Anchor link toУровень прерывания Time-Sensitive позволяет отображать Push-уведомления при доставке, даже когда режим фокусирования блокирует уведомления приложения. Эти уведомления отображаются с желтым баннером Time-Sensitive. Однако пользователь может отключить возможность прерывания для уведомлений, чувствительных ко времени. Уровень прерывания Time Sensitive следует использовать для уведомлений, требующих немедленного внимания пользователя, таких как оповещения о безопасности аккаунта или доставке посылок.
Critical Pushes
Anchor link toPush-уведомления с критическим уровнем прерывания (Critical Pushes) отображаются системой немедленно, даже когда активен режим «Не беспокоить». Эти Push-уведомления включают экран и обходят переключатель беззвучного режима для воспроизведения звука. Critical Pushes следует использовать для критических случаев, таких как суровые погодные условия или оповещения о безопасности, и они требуют одобренного разрешения (entitlement).
Android
Anchor link to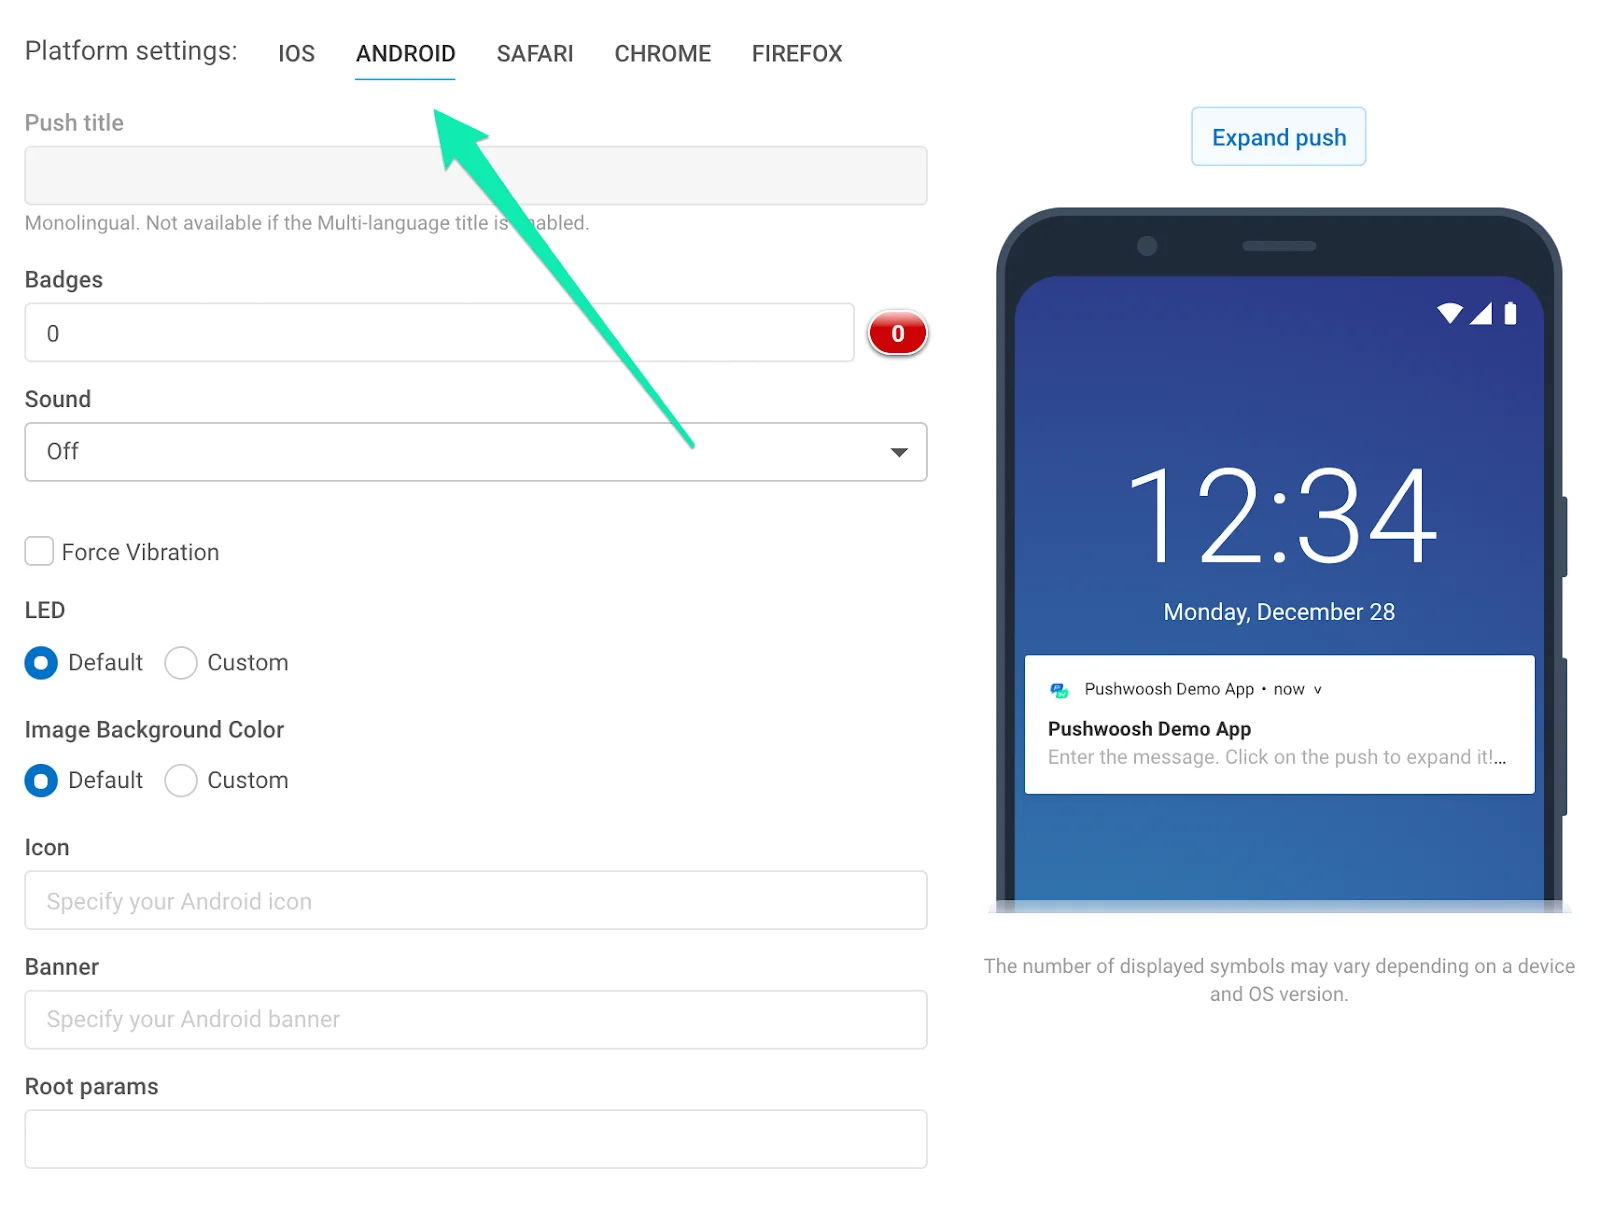
Push title. Укажите здесь заголовок уведомления для Android. Персонализируйте заголовок с помощью плейсхолдеров Dynamic Content. Обратите внимание, что заголовок одинаков для всех языков, на которые переведено ваше Push-уведомление. Если вам нужен мультиязычный заголовок, включите его в разделе Message; мультиязычный заголовок одинаков для всех платформ.
Badges. Укажите значение бейджа; используйте +n для увеличения.
Sound. Укажите имя файла пользовательского звука в папке «res/raw» вашего приложения. Опустите расширение файла.
LED. Выберите цвет светодиода (LED), устройство сделает наилучшее приближение.
Image Background Color. Цвет фона иконки на Android Lollipop.
Force Vibration. Вибрация при получении; используйте только для срочных сообщений.
Icon. Путь к иконке уведомления. Вставьте плейсхолдеры Dynamic Content для персонализации иконки.
Banner. Введите здесь URL-адрес изображения. Изображение должно быть шириной ≤ 450px, с соотношением сторон ~2:1, и оно будет обрезано по центру. Вставьте плейсхолдеры Dynamic Content для персонализации баннера.
Android root params. Параметры корневого уровня для полезной нагрузки (payload) Android, пользовательский объект ключ-значение.
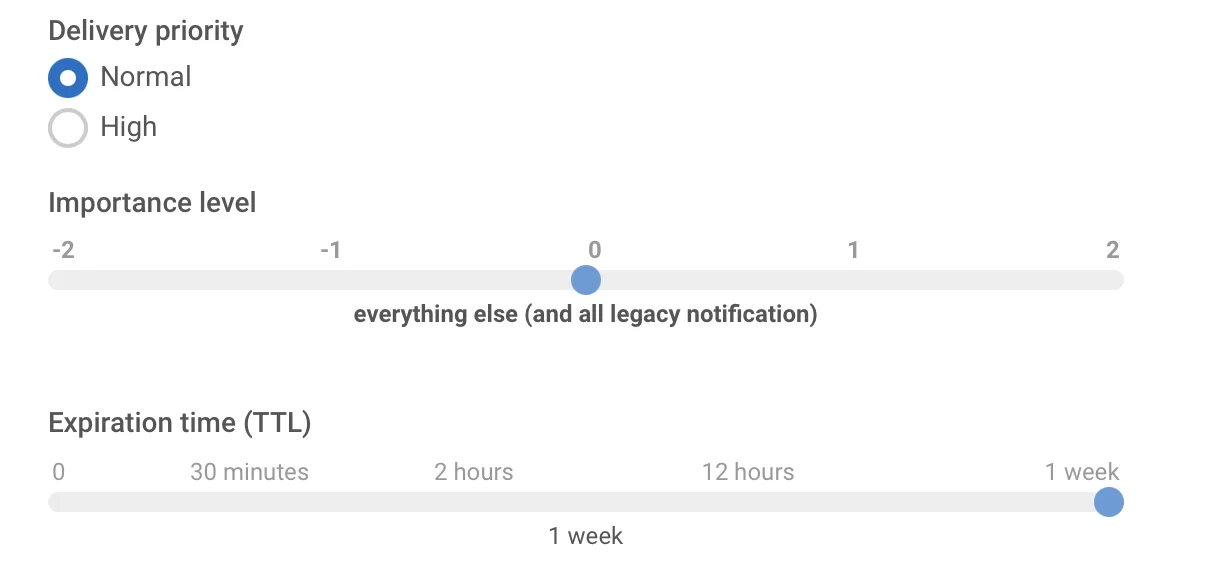
Delivery priority. Включает доставку уведомления, когда устройство находится в режиме энергосбережения. Уведомления с приоритетом доставки high будут доставлены в любом случае, в то время как приоритет доставки normal означает, что уведомление будет доставлено после отключения режима энергосбережения.
Importance level. Устанавливает параметр «importance» для устройств с Android 8.0 и выше, а также параметр «priority» для устройств с Android 7.1 и ниже. Этот параметр с допустимыми значениями от -2 до 2 устанавливает уровень прерывания канала уведомлений или конкретного уведомления.
- Срочный уровень важности (1-2) — уведомление издает звук и появляется как всплывающее уведомление (heads-up notification)
- Высокий уровень важности (0) — уведомление издает звук и появляется в строке состояния
- Средний уровень важности (-1) — уведомление не издает звука, но все равно появляется в строке состояния
- Низкий уровень важности (-2) — уведомление не издает звука и не появляется в строке состояния
Expiration time. Установите период, по истечении которого Push-уведомление не будет доставлено, если устройство было не в сети.
Notifications Channels. Начиная с Android 8.0, вы можете создавать Notification Channels. Чтобы создать канал, вам нужно выполнить два шага:
- Настройте конфигурацию канала. Укажите все необходимые параметры, такие как звук, вибрация, LED и приоритет;
- Укажите имя канала, добавив следующую пару ключ-значение в Android root params:
{"pw_channel":"NAME OF CHANNEL"}Чтобы отправить уведомление в существующий канал, вам нужно указать ту же самую пару ключ-значение в Android root params.
Невозможно изменить параметры канала после его создания на устройстве.
Safari
Anchor link to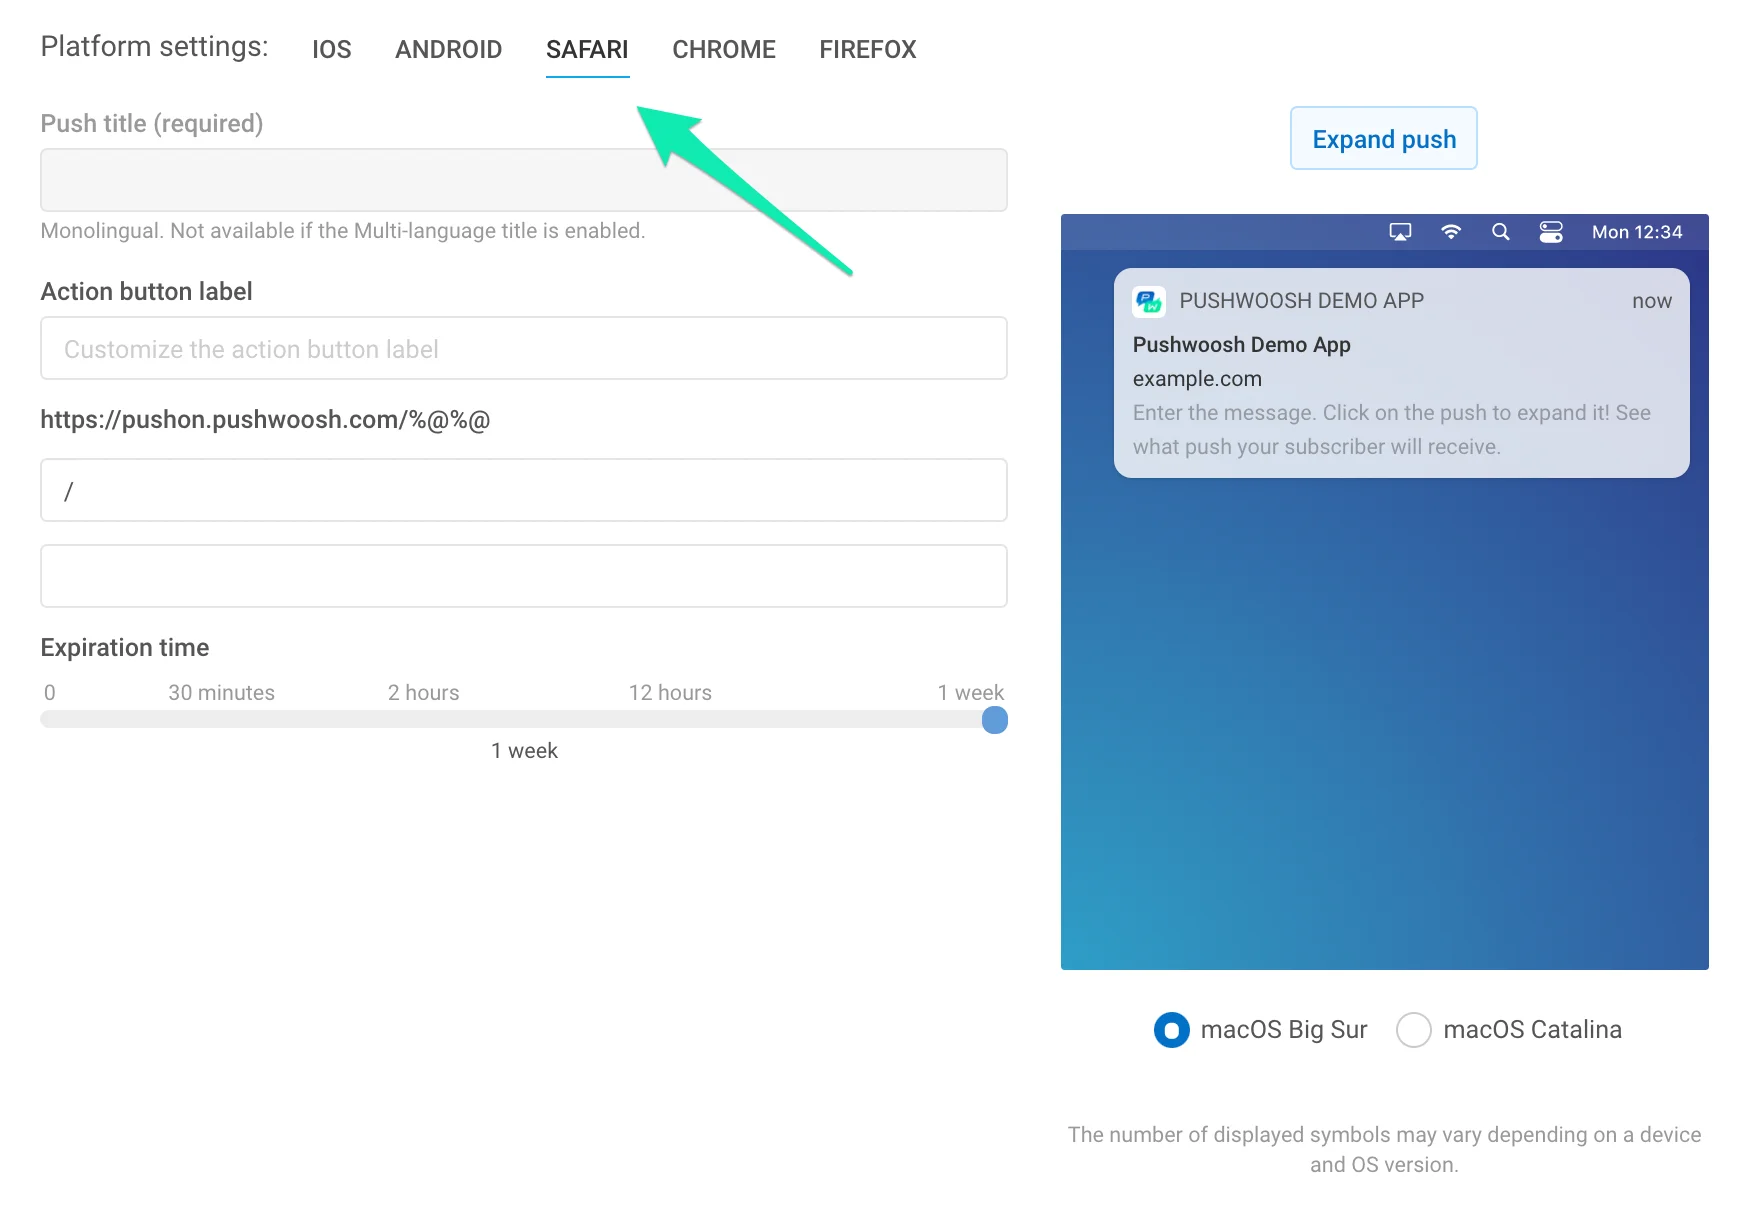
Title. Укажите здесь заголовок уведомления Safari. Это поле обязательно для заполнения, иначе Push-уведомление не будет отправлено. Персонализируя заголовок Push-уведомления Safari с помощью Dynamic Content, вы повышаете показатель открываемости и увеличиваете уровень лояльности аудитории.
Обратите внимание, что заголовок одинаков для всех языков, на которые переведено ваше Push-уведомление. Если вам нужен мультиязычный заголовок, включите его в разделе Message; мультиязычный заголовок одинаков для всех платформ.
Action button label (optional). Укажите здесь пользовательскую метку кнопки действия. Если не задано, по умолчанию будет отображаться «Show».
URL field. Замените плейсхолдер частью URL-адреса, который вы указали в конфигурации Safari приложения. Пользователи будут перенаправлены на этот URL-адрес в Safari при открытии вашего уведомления.
Expiration time. Установите период, по истечении которого Push-уведомление не будет доставлено, если устройство было не в сети.
Chrome
Anchor link to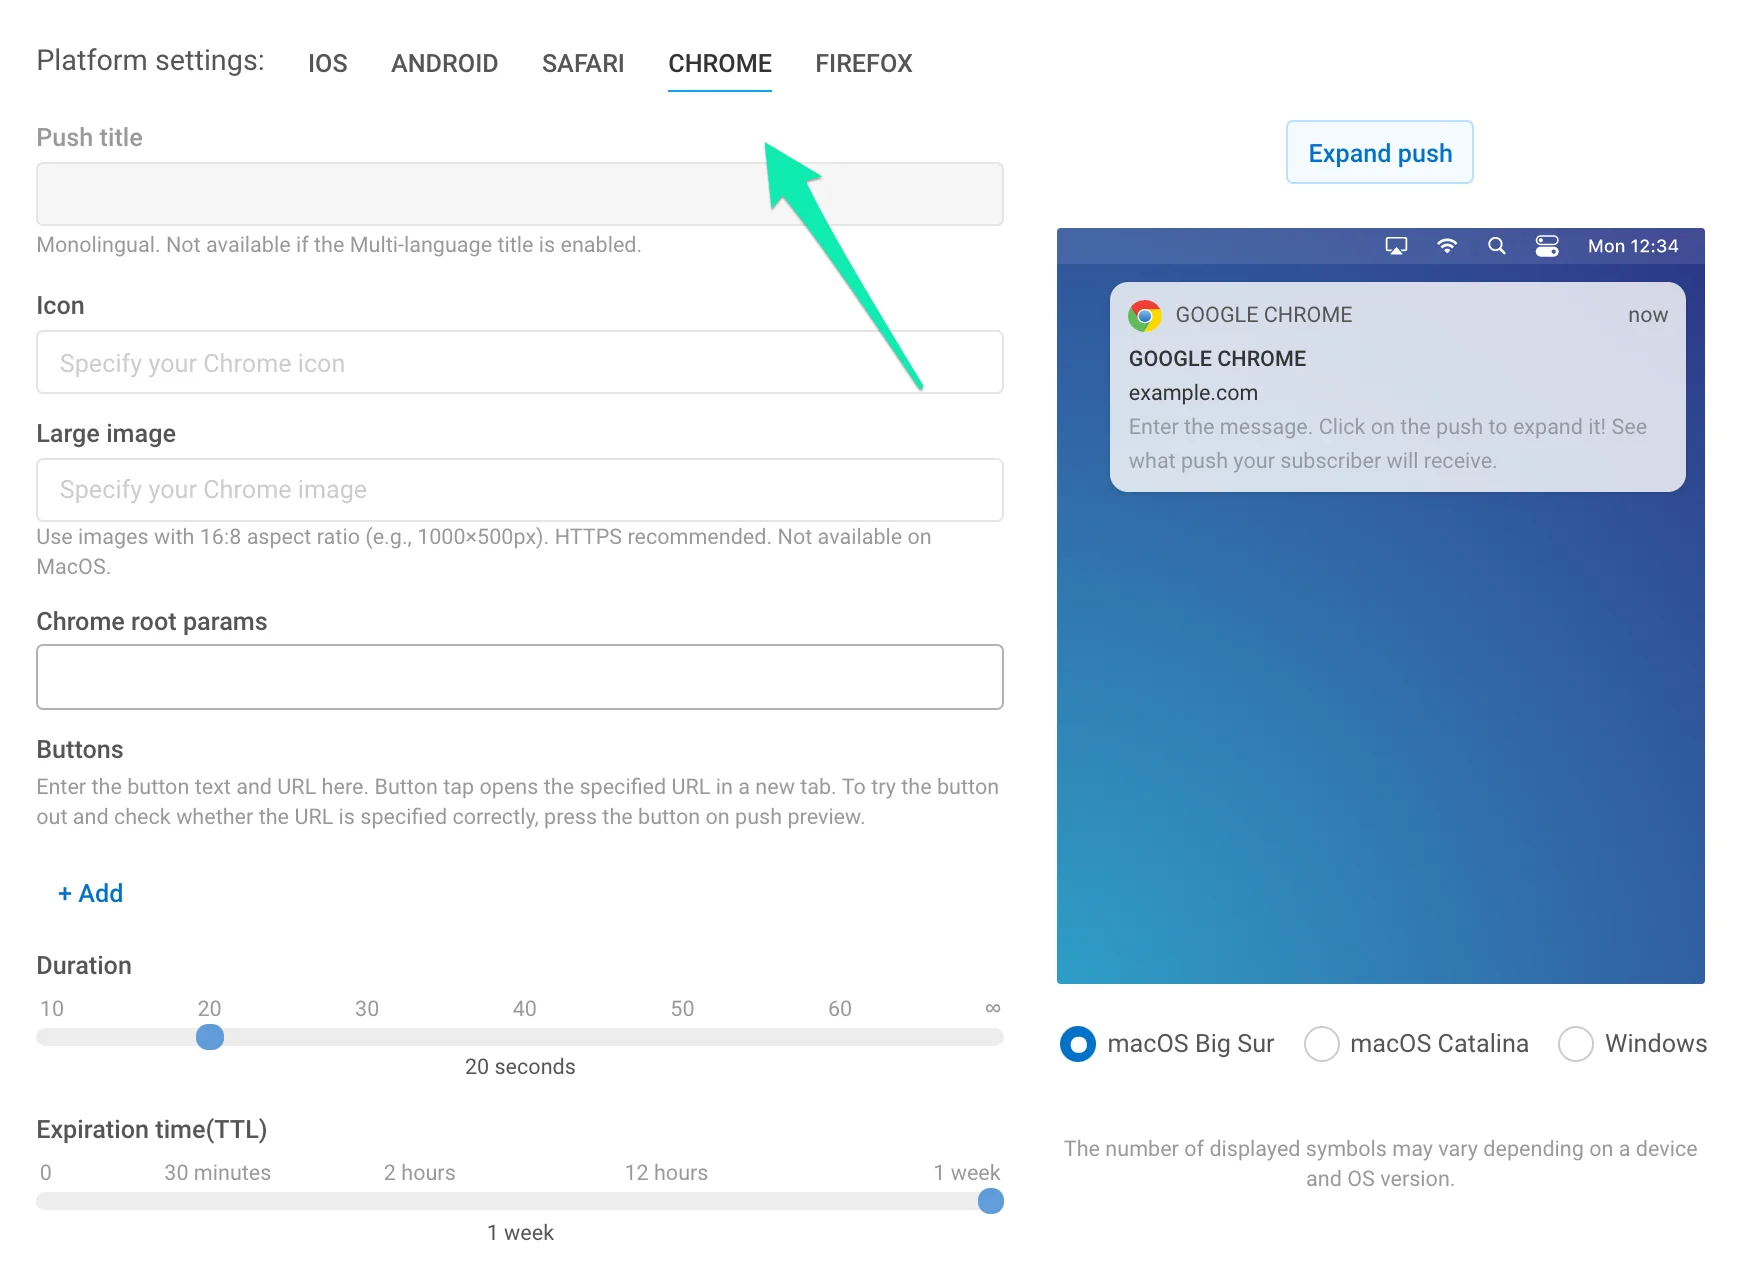
Icon. Укажите имя иконки из ресурсов вашего расширения или полный URL-адрес. Персонализируется с помощью плейсхолдеров Dynamic Content.
Title. Укажите заголовок уведомления Chrome. Персонализируется с помощью плейсхолдеров Dynamic Content.
Обратите внимание, что заголовок одинаков для всех языков, на которые переведено ваше Push-уведомление. Если вам нужен мультиязычный заголовок, включите его в разделе Message; мультиязычный заголовок одинаков для всех платформ.
Large image. Добавьте большое изображение к вашему уведомлению, указав полный URL-адрес изображения.
Chrome root params. Установите параметры, специфичные для Push-уведомлений, отправляемых в Chrome. Например, чтобы отправить обычную ссылку на платформу Chrome параллельно с Deep Link, отправленным на мобильные устройства, введите ссылку здесь следующим образом:
{"l": "http://example.com"}Chrome root params имеют приоритет над общими параметрами Push-уведомлений для Push-уведомлений, отправляемых в Chrome. Таким образом, подписчики Chrome получат ссылку, которую вы укажете здесь, в то время как пользователи мобильных устройств получат Deep Link.
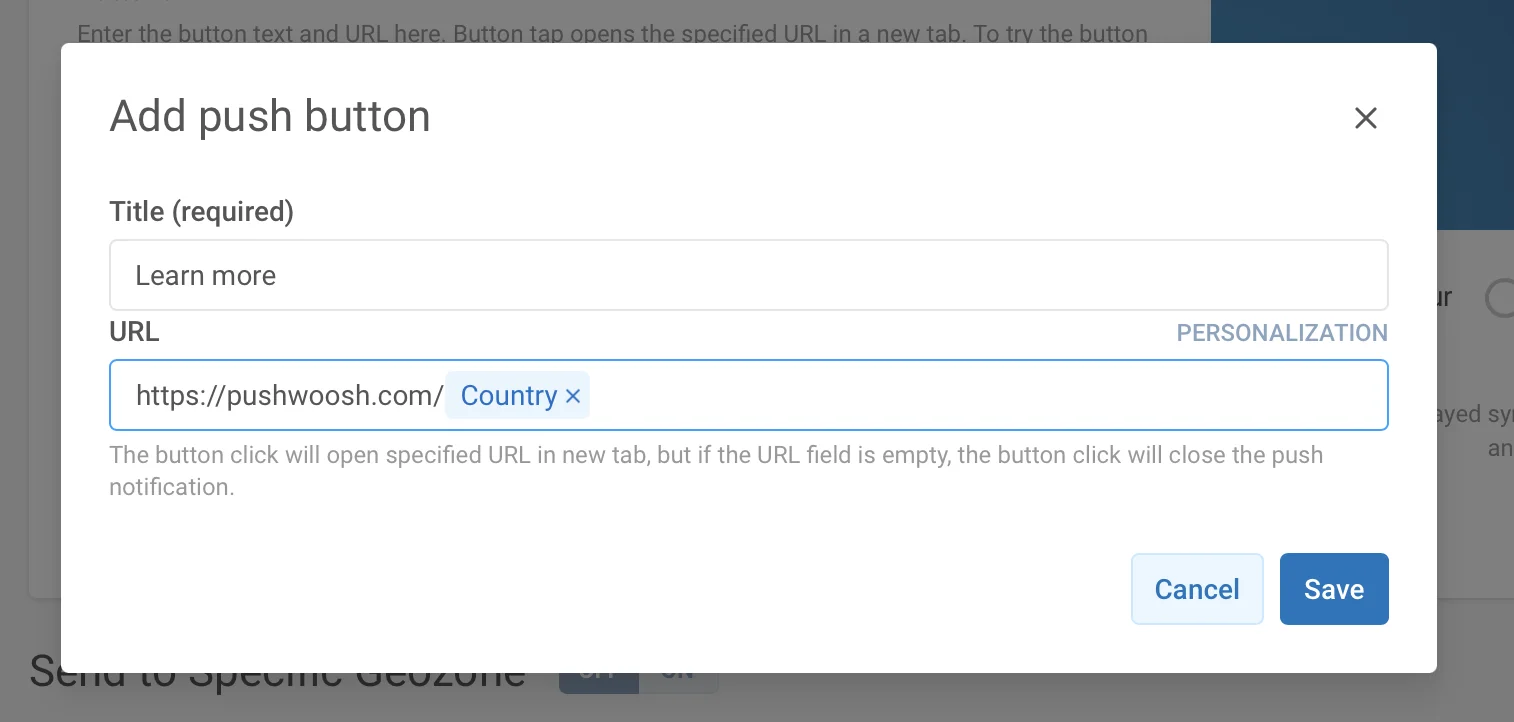
Buttons. Создавайте пользовательские кнопки для ваших Push-уведомлений. Укажите заголовок кнопки (Title) и URL-адрес, который нужно открыть (необязательно). Если URL-адрес опущен, нажатие кнопки закрывает Push-уведомление.
Для URL-адресов кнопок доступна персонализация для большей релевантности интересам, предпочтениям и активности ваших пользователей. Динамические данные (значения Tag, назначенные устройству) вставляются в URL-адрес так же, как и любой Dynamic Content.
При вводе URL-адреса нажмите кнопку Personalization рядом с полем ввода.
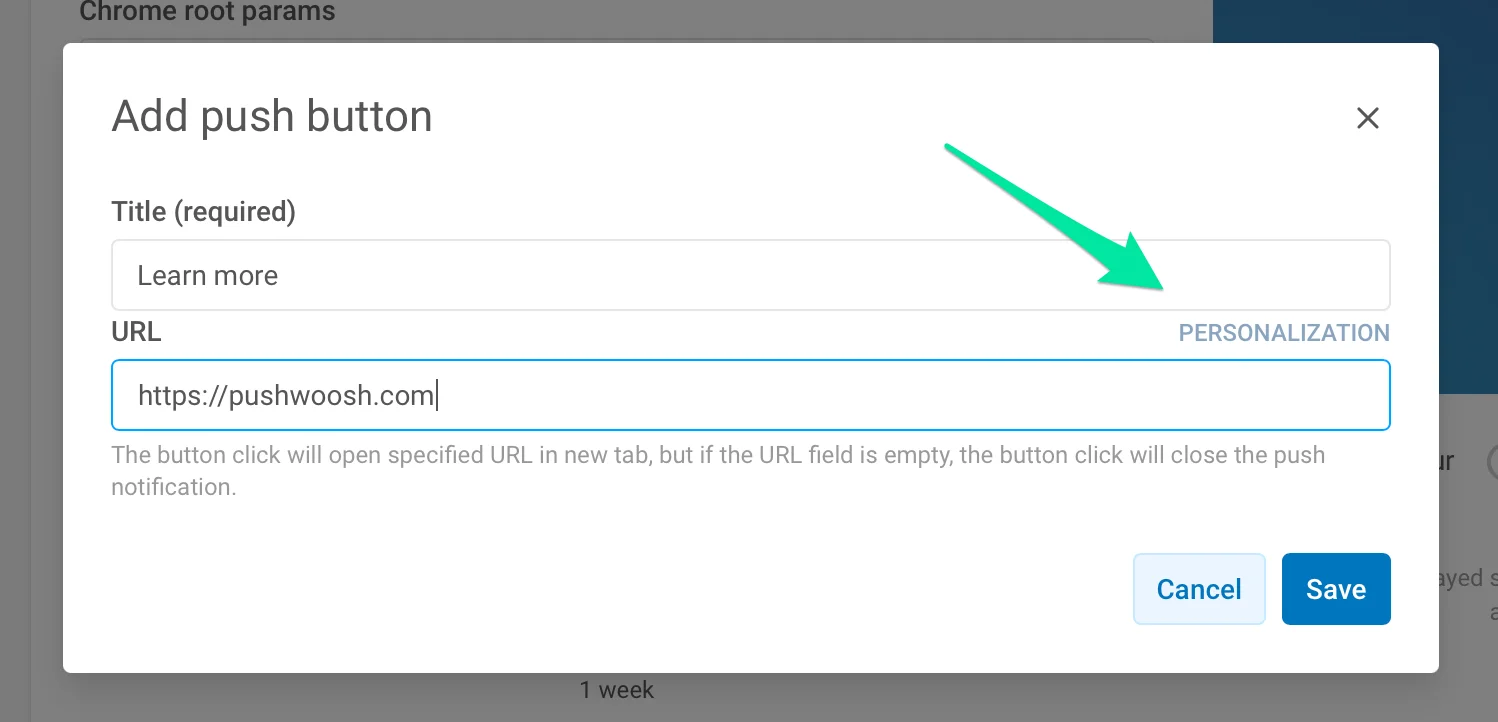
Затем выберите тег, который вы хотите использовать для персонализации страницы, на которую перейдет пользователь после нажатия кнопки. Например, чтобы перенаправить пользователя в раздел вашего сайта в зависимости от того, откуда он, добавьте тег Country в URL-адрес. Таким образом, например, пользователь из США, нажавший кнопку «Узнать больше» (Learn more), перейдет на https://www.pushwoosh.com.
Duration. Укажите время отображения Push-уведомления. Установите значение «infinity» (бесконечность), если вы хотите отображать уведомление до тех пор, пока пользователь не взаимодействует с ним.
Expiration time. Установите период, по истечении которого Push-уведомление не будет доставлено, если устройство было не в сети.
Firefox
Anchor link to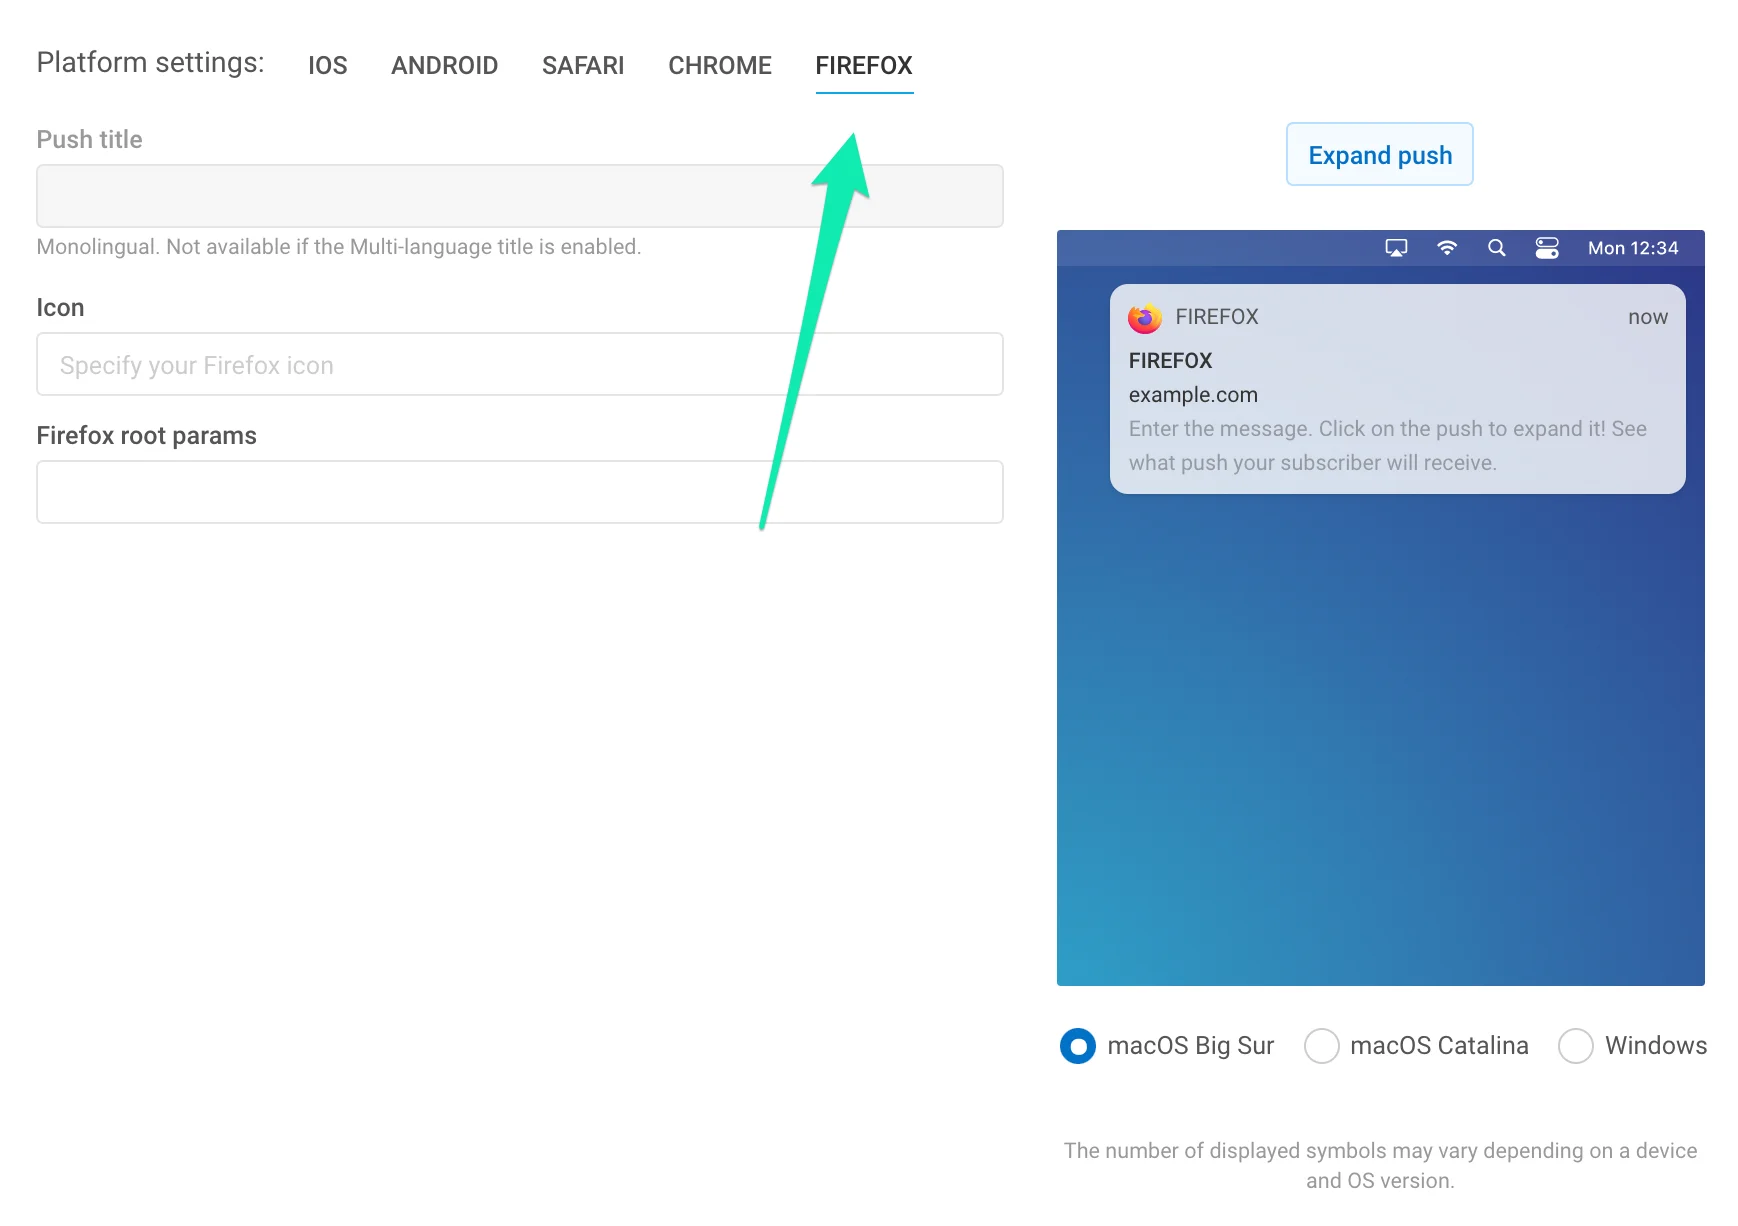
Icon. Укажите имя иконки в ресурсах вашего расширения или полный URL-адрес. Персонализируется с помощью плейсхолдеров Dynamic Content.
Title. Укажите заголовок уведомления Firefox. Персонализируется с помощью плейсхолдеров Dynamic Content.
Обратите внимание, что заголовок одинаков для всех языков, на которые переведено ваше Push-уведомление. Если вам нужен мультиязычный заголовок, включите его в разделе Message; мультиязычный заголовок одинаков для всех платформ.
Firefox root params. Установите параметры, специфичные для Push-уведомлений, отправляемых в Firefox. Например, чтобы отправить обычную ссылку на платформу Firefox параллельно с Deep Link, отправленным на мобильные устройства, введите ссылку здесь следующим образом:
{l: "http://example.com"}Firefox root params имеют приоритет над общими параметрами Push-уведомлений для Push-уведомлений, отправляемых в Firefox. Таким образом, подписчики Firefox получат ссылку, которую вы укажете здесь, в то время как пользователи мобильных устройств получат Deep Link.
Windows 8, 10
Anchor link to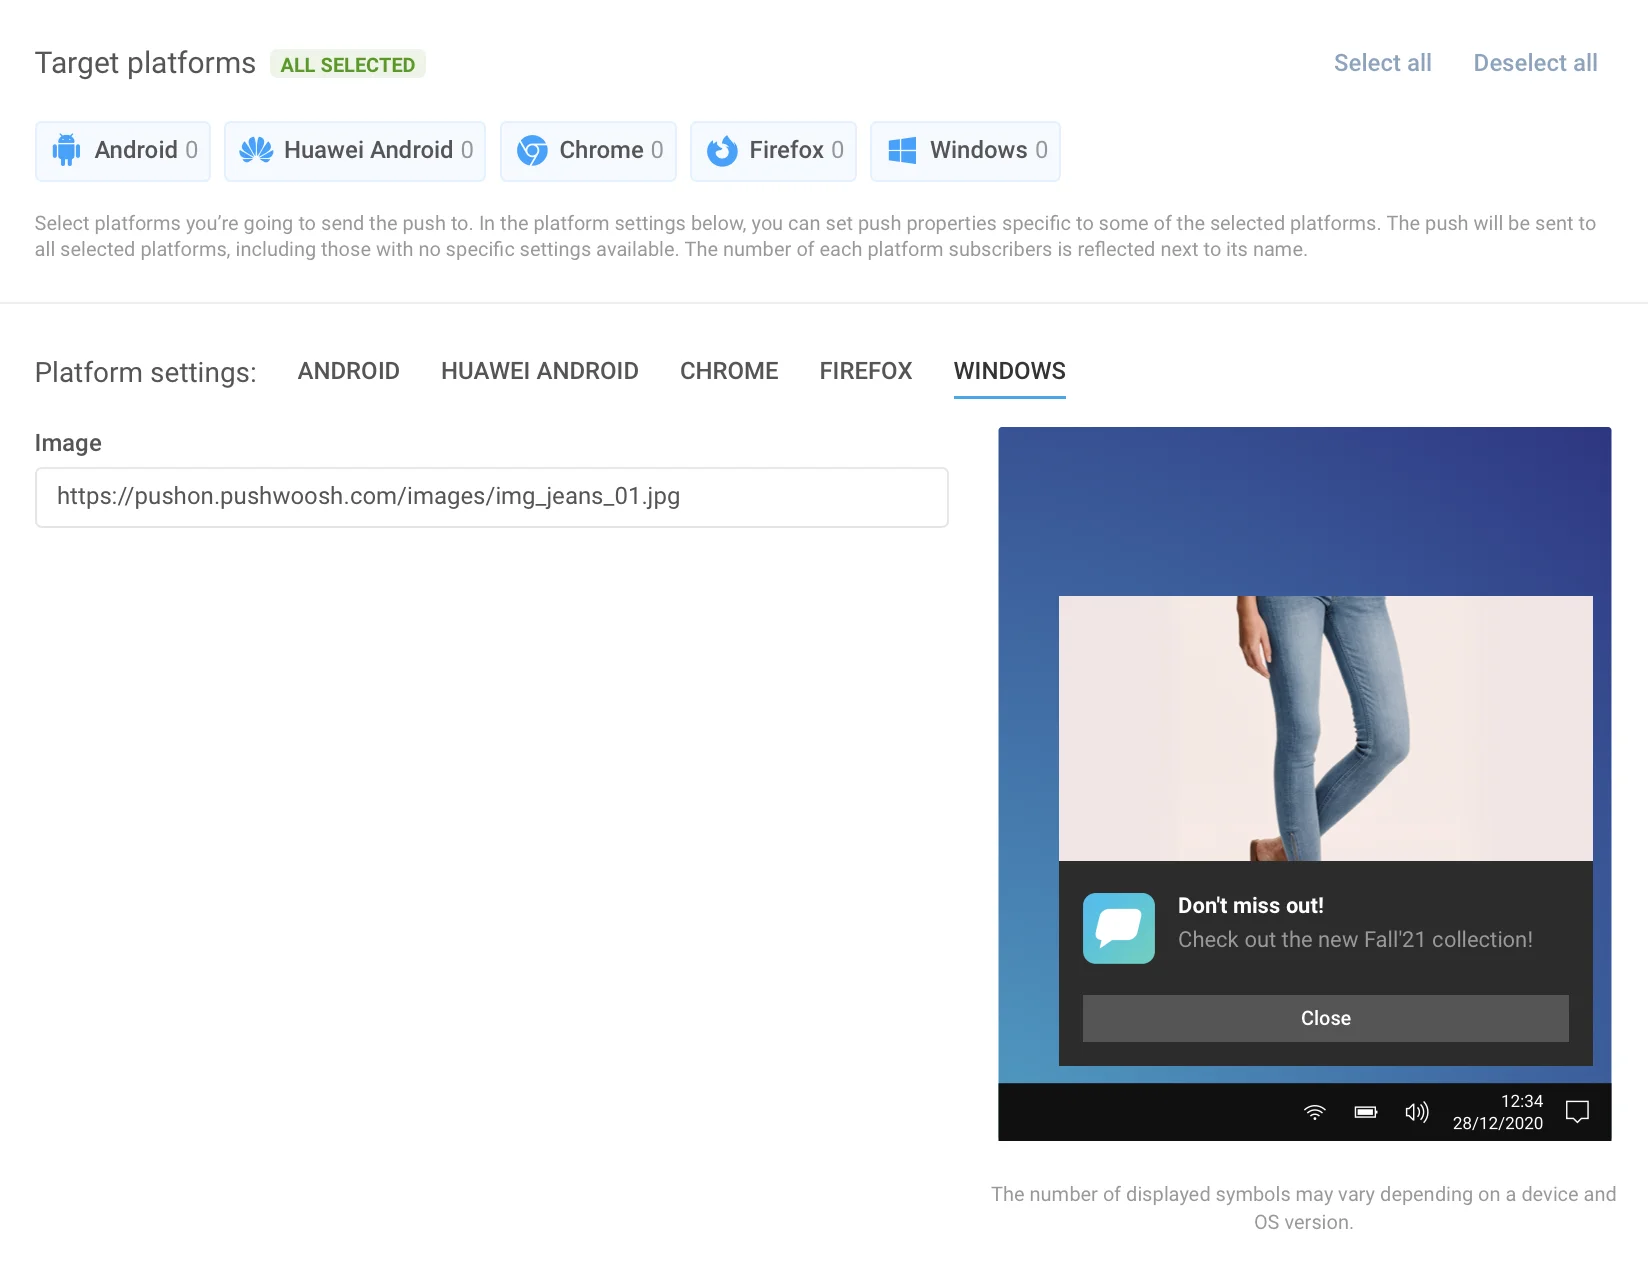
Windows 8 предоставляет более 60 шаблонов toast, tile, raw и badge, поэтому мы добавили в наш графический интерфейс только шаблоны toast, так как они наиболее популярны. Шаблоны tile, raw и badge доступны только через Remote API.
Сначала выберите шаблон из списка справа, чтобы разблокировать соответствующие поля ввода. Затем вы можете ввести контент для всех нужных вам языков. Количество полей в шаблонах Push-уведомлений Windows 8 отличается, поэтому нам пришлось отделить его от всех других платформ. Он имеет собственный набор языковых вкладок, которые используются так же, как и общие языковые вкладки.
Amazon
Anchor link to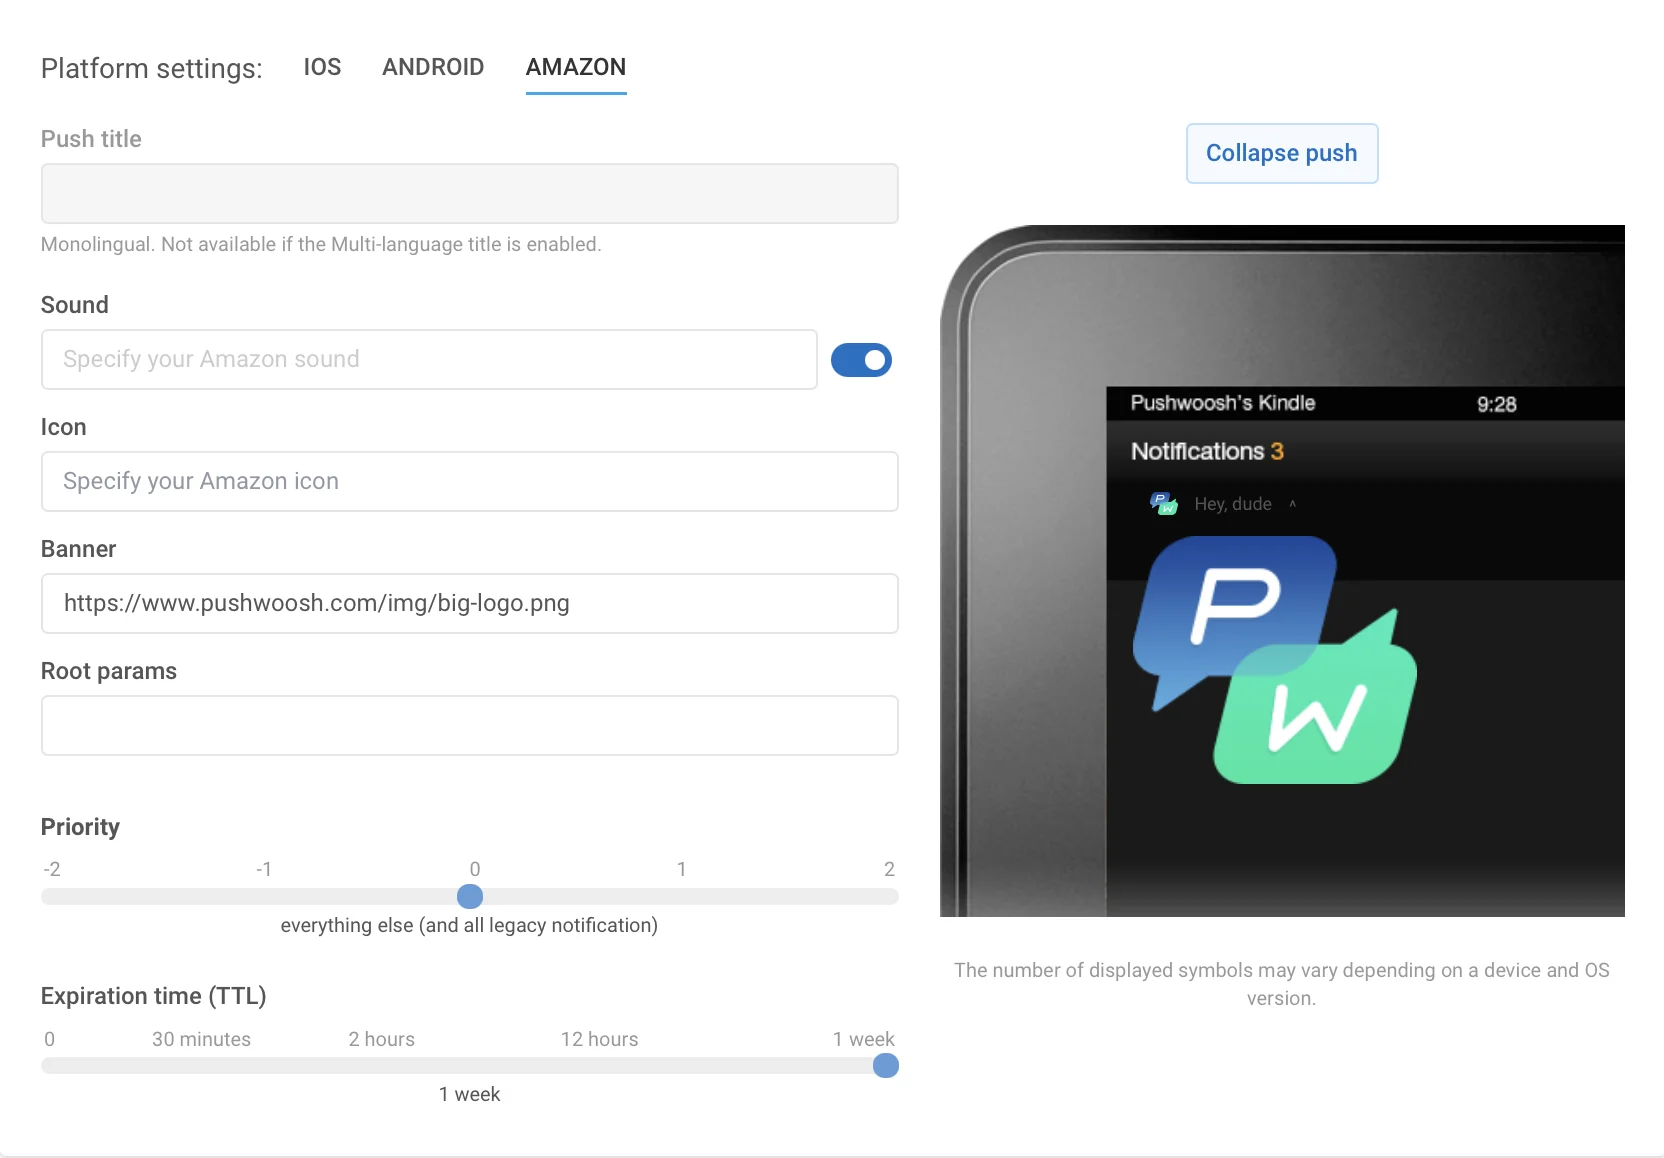
Header. Укажите здесь заголовок уведомления Amazon.
Sound. Укажите имя файла пользовательского звука в папке «res/raw» вашего приложения. Опустите расширение файла.
Icon. Путь к иконке уведомления.
Banner. Полный путь к баннеру уведомления.
Expiration time. Период, по истечении которого Push-уведомление не будет доставлено, если устройство было не в сети.
Вкладка Action
Anchor link toПо умолчанию нажатие на сообщение Push-уведомления открывает приложение. Вы можете настроить действия, выполняемые после того, как пользователь нажмет на Push-уведомление:
- Открыть URL-адрес в браузере пользователя,
- Перенаправить пользователей непосредственно на определенные страницы внутри приложения,
- Или привлечь их внимание с помощью Rich-контента.
Пользовательское действие (Custom Action)
Anchor link toURL
Добавьте ссылку, которая откроется в браузере после того, как пользователь нажмет на Push-уведомление. Выберите опцию URL и вставьте URL-адрес в соответствующее поле. Обратите внимание, что размер полезной нагрузки (payload) Push-уведомления ограничен, поэтому рассмотрите возможность использования сервиса сокращения URL-адресов, чтобы оставаться в пределах лимита.
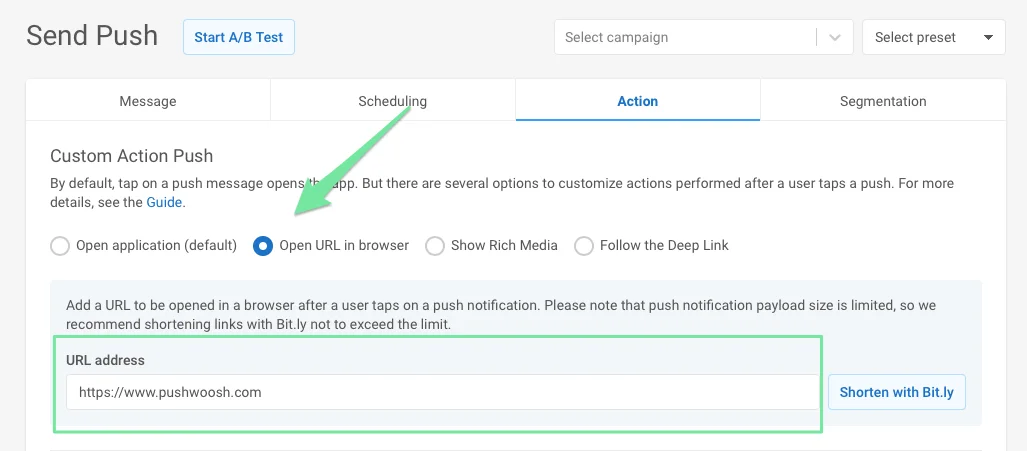
Для URL-адреса доступно динамическое связывание (dynamic linking). Вы можете добавить Dynamic Content к веб-адресу, который вы указываете в поле URL, чтобы веб-страница открывалась, когда пользователь нажимает на Push-уведомление, с учетом значений Tag пользователя. Например, вы можете показать специальное предложение на основе последнего продукта, который купил пользователь, или перенаправить его в ленту новостей, похожих на те, что он читал недавно.
Чтобы добавить динамический URL-адрес к вашему сообщению Push-уведомления, поместите Dynamic Content в конец URL-адреса (часть после знака /):
https://example.com/{TagName|lowercase|default}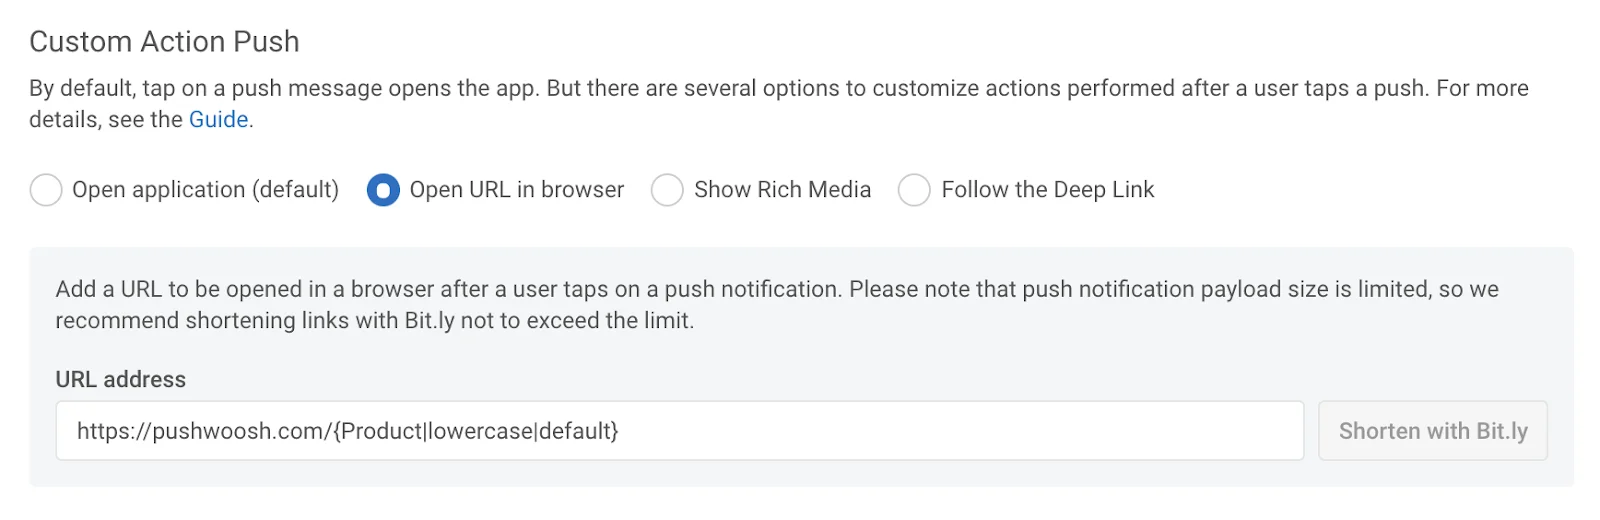
Используйте тот же синтаксис, что и для Dynamic Content в тексте Push-уведомления, заголовке и т.д.:
{Tag|format_modifier|default_value}Обратитесь к руководству по Dynamic Content для получения подробной информации.
Rich Media
Anchor link toRich Media — это контент, отображаемый, пока пользователи находятся в приложении. Он может содержать изображения, видео, заполняемые формы и другие элементы. Если пользователи нажимают на него, он открывается для прикрепления изображений, видео, призывов к действию (CTA) или других интерактивных форм. Чтобы узнать больше о создании и редактировании Rich Media, обратитесь к этому руководству.
Чтобы открыть одну из страниц Rich Media, созданных в вашем аккаунте, выберите опцию Show Rich Media и выберите Rich Media для отображения. Чтобы открыть удаленную страницу Rich-контента, выберите источник Remote Page и вставьте URL-адрес Rich-страницы.
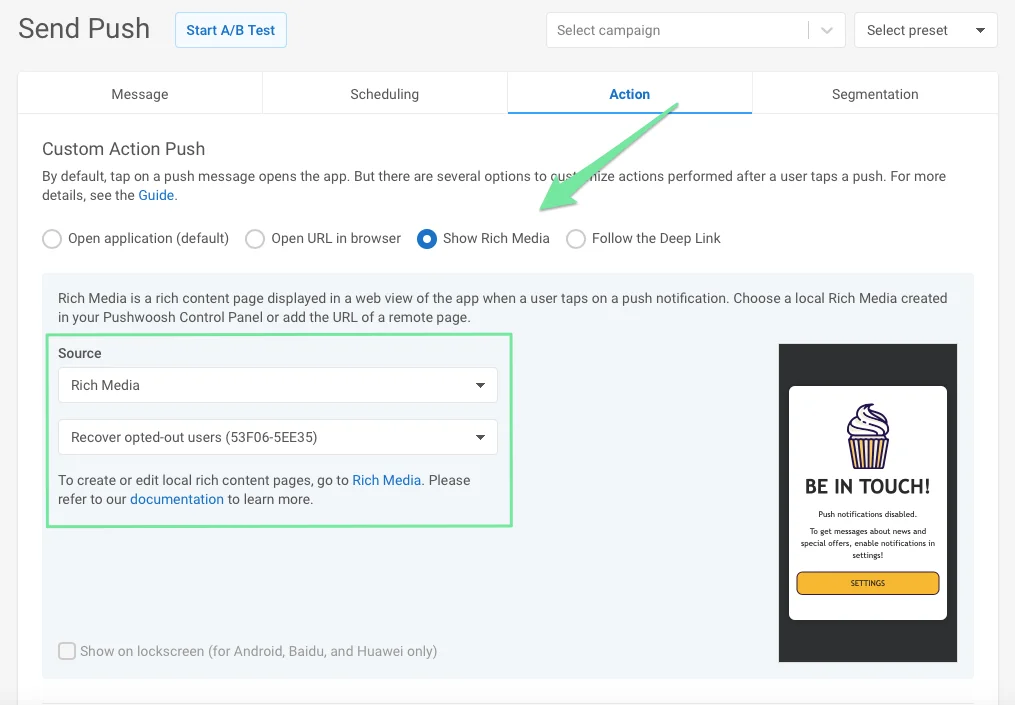
Для устройств Android вы можете включить опцию Show on lockscreen, чтобы отображать Rich Media прямо на экране блокировки устройства пользователя.
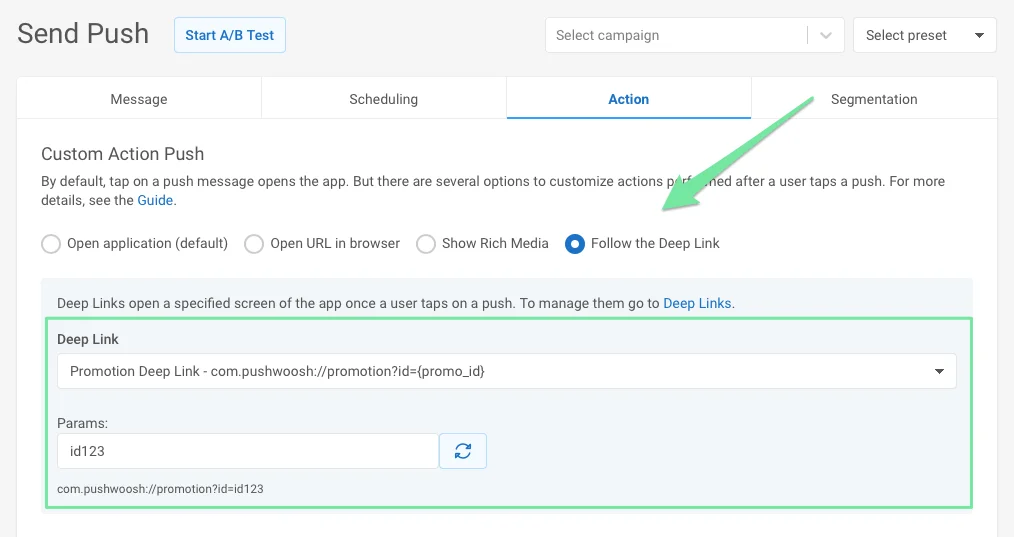
Deep Link
Anchor link toС помощью Deep Links вы можете перенаправлять пользователей непосредственно на новый контент внутри приложения, промо-страницы, специальные предложения и т.д. В пресетах вы можете добавлять только те Deep Links, которые вы настроили в настройках.
Пожалуйста, следуйте руководству по настройке Deep Links.
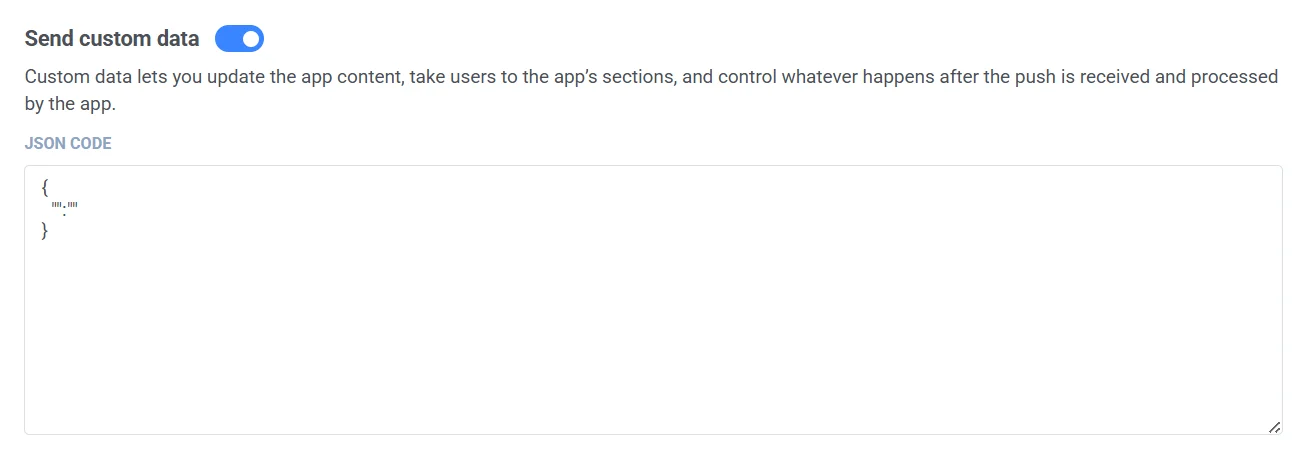
Пользовательские данные (Custom Data)
Anchor link toCustom Data — это объект JSON, описывающий действия, которые необходимо выполнить, например:
{"key": "value"}Вы можете добавить Custom Data к вашему сообщению Push-уведомления, чтобы указать дополнительные параметры Push-уведомления.
Включите Send custom Data. Вставьте данные JSON в поле JSON Code.
Чтобы узнать больше о Custom Data, обратитесь к нашему руководству.
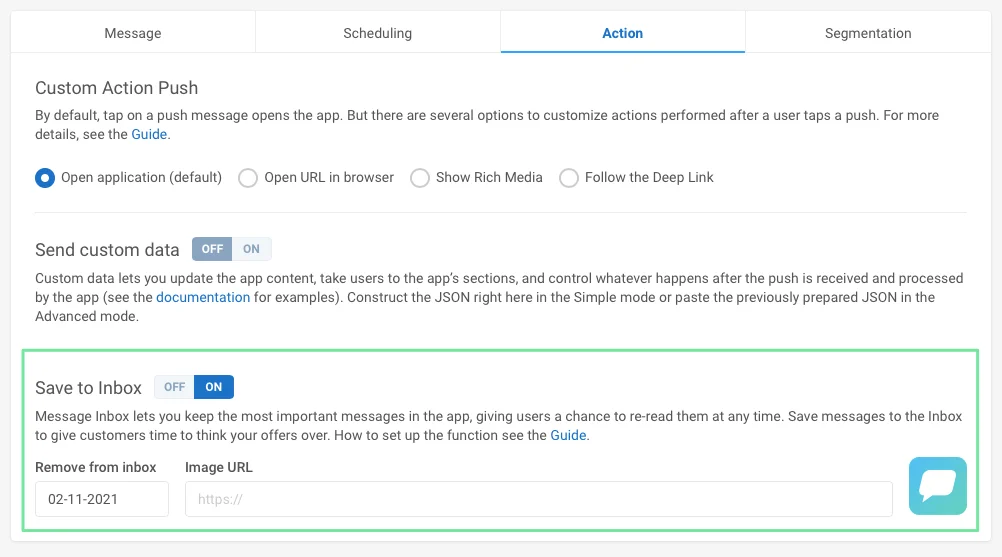
Сохранение в Inbox (Save to Inbox)
Anchor link toЧтобы сохранить сообщение в Inbox пользователей, установите флажок и задайте дату удаления Push-уведомления. По умолчанию сообщения удаляются из Inbox на следующий день после их отправки. Чтобы установить иконку, которая будет отображаться рядом с сообщением в Inbox, укажите URL-адрес изображения в соответствующем поле.
Сообщение будет удалено из Inbox в 00:00:01 UTC указанной даты, поэтому предыдущая дата является последним днем, когда пользователь может увидеть сообщение в своем Inbox.
После того как вы настроили все параметры, нажмите Save Preset.
Затем вы можете отправить ваше Push-уведомление аудитории.