Push único
Cómo enviar una notificación push utilizando el formulario de push único
Anchor link toPara enviar una notificación push única en Pushwoosh, ve a la sección Campaigns. Selecciona One-time messaging y haz clic en Send message → One-time push.

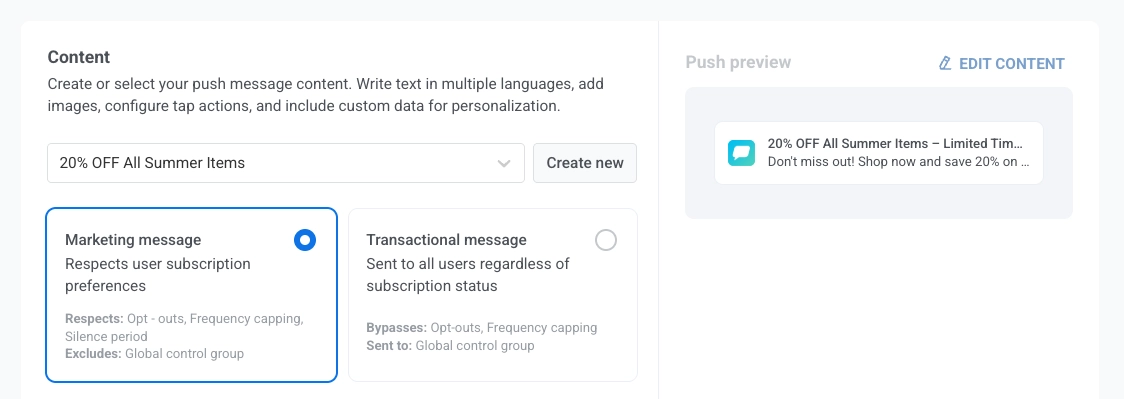
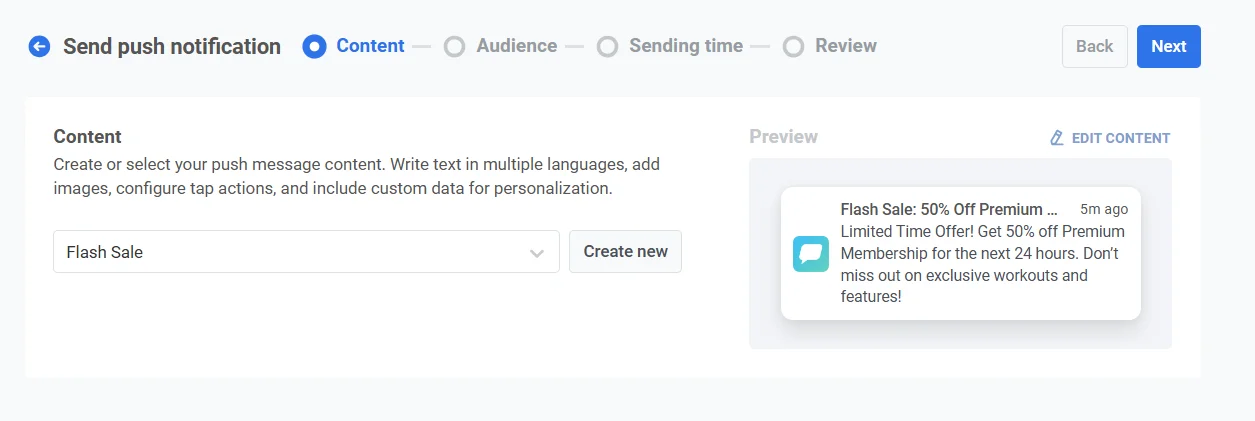
Selecciona o crea el contenido del mensaje push
Anchor link toPara empezar, crea contenido nuevo o selecciona contenido existente para tu notificación push. Si deseas utilizar un preset de push predefinido, elígelo en el menú desplegable de opciones disponibles.

Para crear un nuevo mensaje, haz clic en Create new y sigue esta guía para configurar un nuevo preset de push.
Si necesitas editar un preset existente, haz clic en Edit Content para modificar el mensaje.
A la derecha se mostrará una vista previa de la notificación, que te permitirá ver cómo la verán los usuarios.
Selecciona el tipo de mensaje
Anchor link toEn el paso Contenido, elige Mensaje de marketing o Mensaje transaccional:
- Mensaje de marketing: Respeta las preferencias de suscripción, las exclusiones voluntarias, el límite de frecuencia y el período de silencio. No se envía al grupo de control global.
- Mensaje transaccional: Se envía a todos los usuarios independientemente de su estado de suscripción. Se entrega al grupo de control.
Aprende cómo el tipo de mensaje afecta a la entrega.
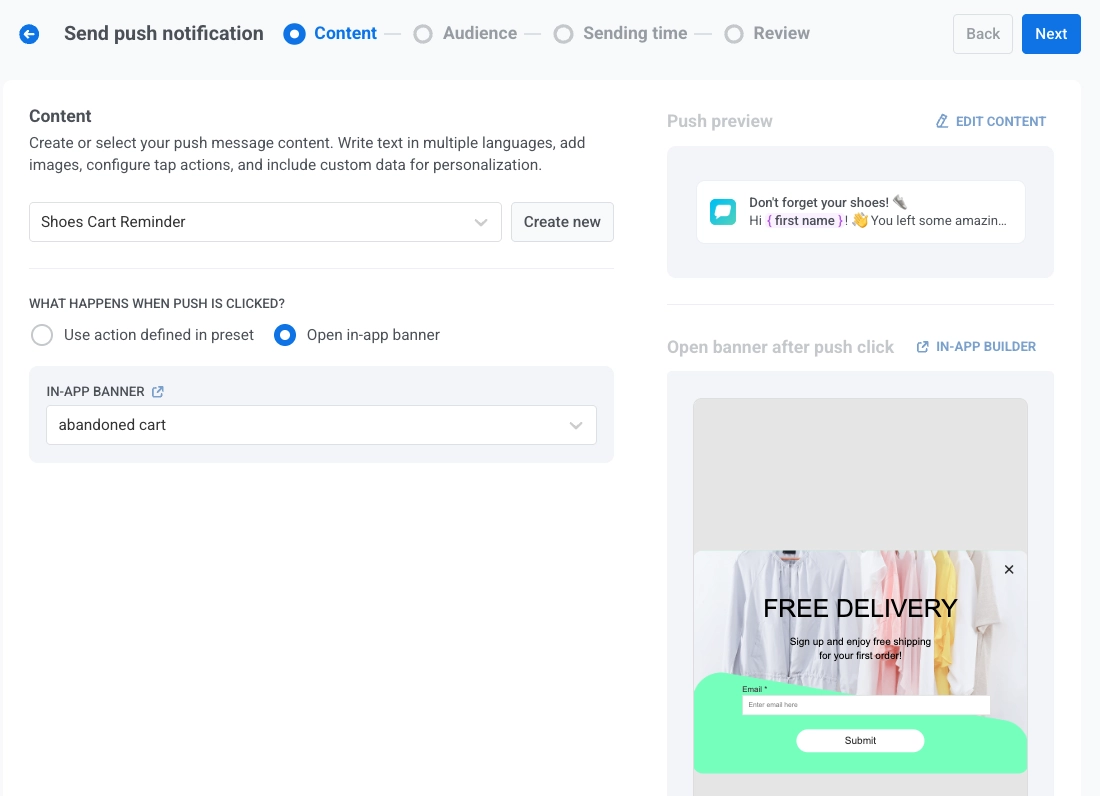
Define qué sucede cuando se hace clic en el push
Anchor link toDespués de seleccionar o crear el contenido de tu notificación push, configura qué sucede cuando un usuario toca la notificación utilizando el interruptor Show in-app banner when message is clicked.
Por defecto, el interruptor está desactivado y la acción configurada en el preset de push se ejecutará cuando el usuario toque la notificación push. Utiliza este comportamiento predeterminado cuando tu preset de push ya incluya una acción de clic bien definida.
Para mostrar un banner in-app en su lugar, activa el interruptor Show in-app banner when message is clicked y, a continuación, selecciona el mensaje in-app que deseas mostrar en el menú desplegable in-app banner. Esto es útil para entregar información adicional, promociones o formularios directamente dentro de la aplicación. A la derecha aparecerá una vista previa en vivo del banner seleccionado.
Comprende el comportamiento del idioma para los mensajes push e in-app
Anchor link toLas notificaciones push y los mensajes in-app pueden admitir diferentes conjuntos de idiomas. El idioma que se muestra al usuario depende de la disponibilidad de ese idioma en cada tipo de contenido y del idioma del dispositivo del usuario.
Ejemplo
Anchor link toEnvías una notificación push utilizando un preset que admite inglés (predeterminado), español y alemán.
El banner in-app vinculado solo admite inglés y francés.
El idioma del dispositivo del usuario está configurado en alemán.
-
La notificación push se mostrará en alemán, ya que es compatible con el dispositivo del usuario.
-
El banner in-app recurrirá al inglés, ya que el alemán no está disponible en la configuración de idioma del banner.
Guardar mensaje en la Bandeja de entrada
Anchor link toPuedes guardar las notificaciones push en la bandeja de entrada de la aplicación, lo que permite a los usuarios acceder y revisar mensajes importantes a su conveniencia. Aprende más sobre la Bandeja de entrada de mensajes.
Para habilitar esta función, activa la opción Save message to Inbox. Cuando está activada, el título y el mensaje se extraen del preset de push.
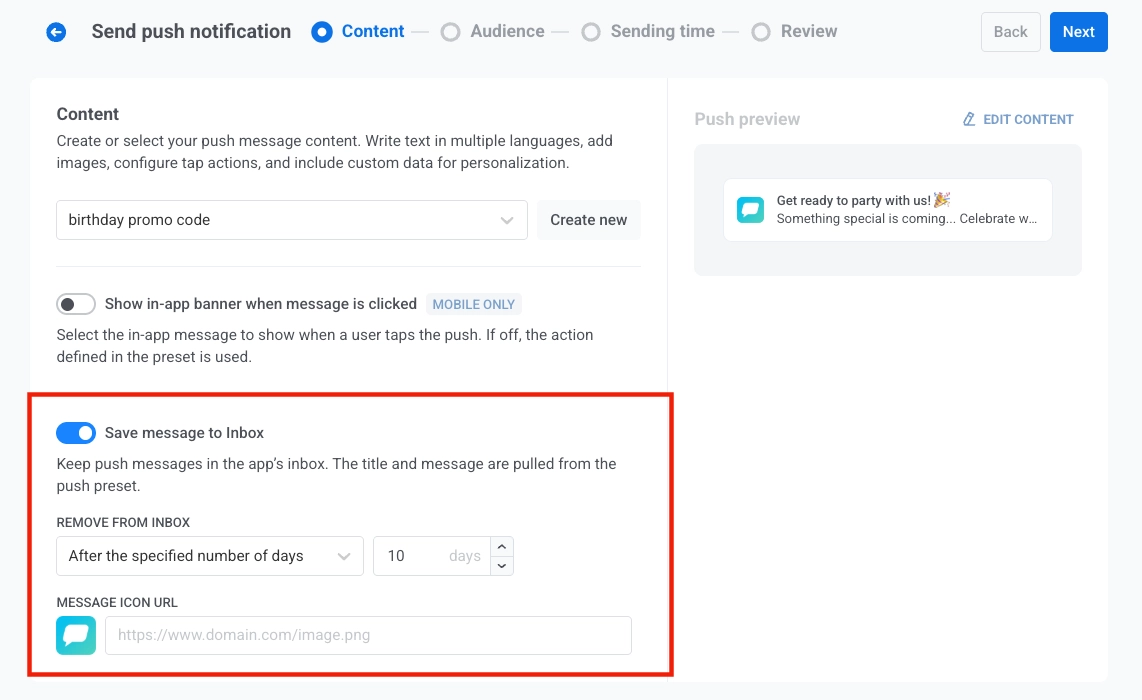
Eliminar de la Bandeja de entrada
Anchor link toControla cuánto tiempo permanecen los mensajes en la bandeja de entrada seleccionando una de las siguientes opciones en el menú desplegable Remove from Inbox:
-
Después del número de días especificado: Establece el número de días que un mensaje debe permanecer en la bandeja de entrada antes de ser eliminado automáticamente. Utiliza el campo de entrada para especificar el número de días.
-
En una fecha específica: Selecciona una fecha exacta en la que el mensaje se eliminará de la bandeja de entrada.
URL del icono del mensaje
Anchor link toPersonaliza la apariencia de la notificación almacenada especificando una URL de icono en el campo MESSAGE ICON URL. Este icono se mostrará junto al mensaje en la bandeja de entrada, sirviendo como un identificador visual de la notificación.
Si no se proporciona una URL de icono, se mostrará un icono predeterminado junto al mensaje.
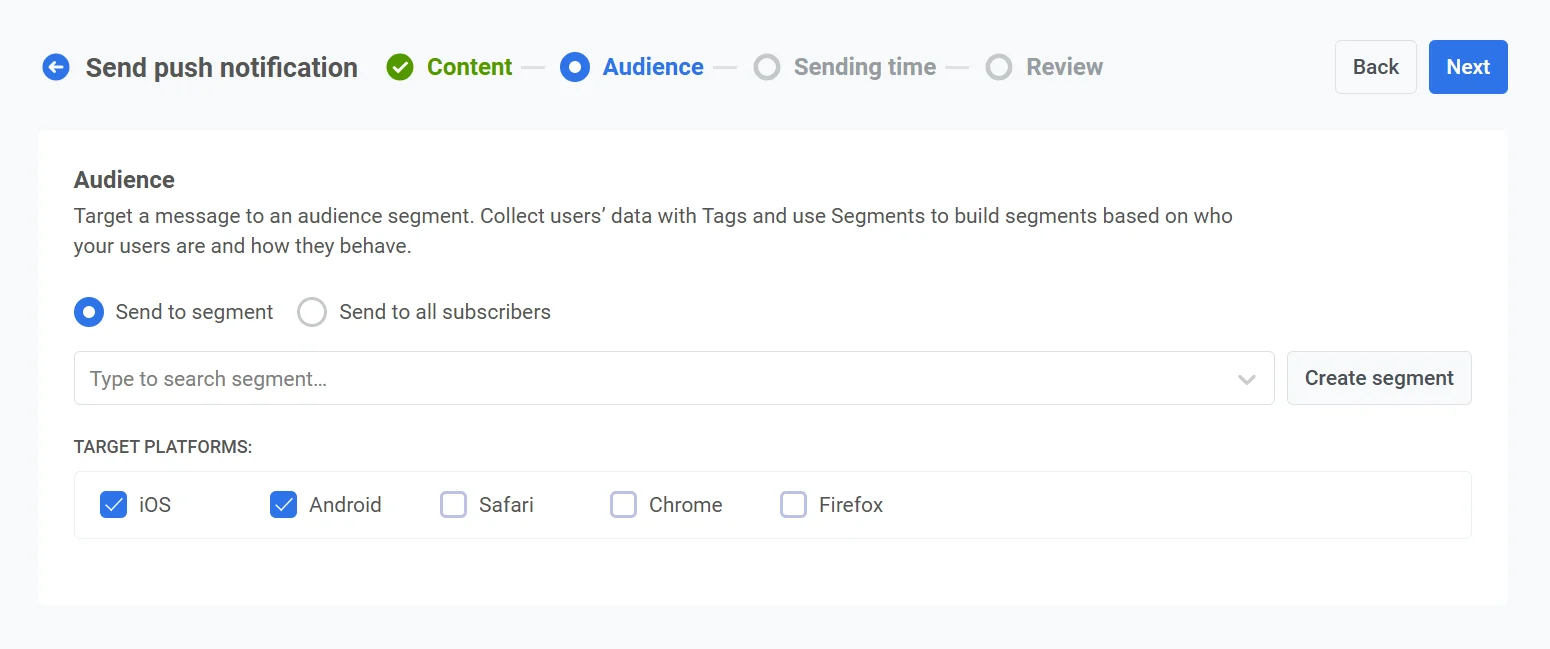
Selecciona la audiencia para la notificación push
Anchor link toA continuación, elige la audiencia para tu notificación push. Puedes enviar la notificación a todos los usuarios o dirigirte a un segmento específico basado en el comportamiento del usuario o en datos demográficos.
Enviar a segmento
Anchor link toSelecciona esta opción para dirigirte a un segmento de audiencia específico. Elige un segmento predefinido en el menú desplegable, o crea un nuevo segmento haciendo clic en Create Segment.
A continuación, selecciona una de las siguientes acciones en el menú desplegable:
- Crear segmento: Crea un nuevo segmento utilizando el creador de segmentos. Aprende más
- Importar segmento: Importa un segmento desde un archivo CSV. Aprende más.
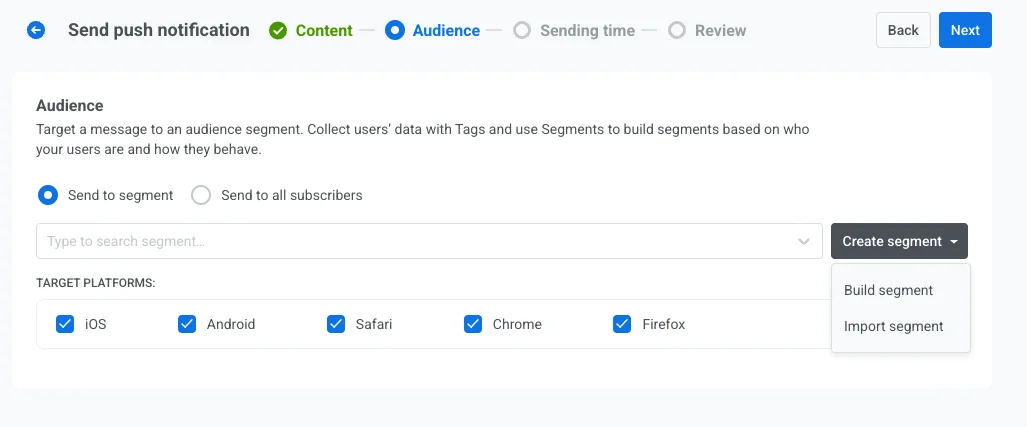
Enviar a todos los usuarios
Anchor link toElige esta opción para enviar la notificación a todos tus suscriptores. Es ideal para anuncios generales o promociones que se aplican a toda tu base de usuarios.

Plataformas de destino
Anchor link toSelecciona las plataformas en las que deseas que se entregue la notificación. Las plataformas disponibles incluyen:
- iOS
- Android
- Safari
- Chrome
- Firefox
La elección de las plataformas de destino garantiza que tu mensaje llegue a los usuarios en los dispositivos adecuados. Solo los usuarios de las plataformas seleccionadas recibirán la notificación.
Una vez que hayas configurado tu audiencia y seleccionado las plataformas de destino, haz clic en Next para continuar con la configuración de tu notificación push.
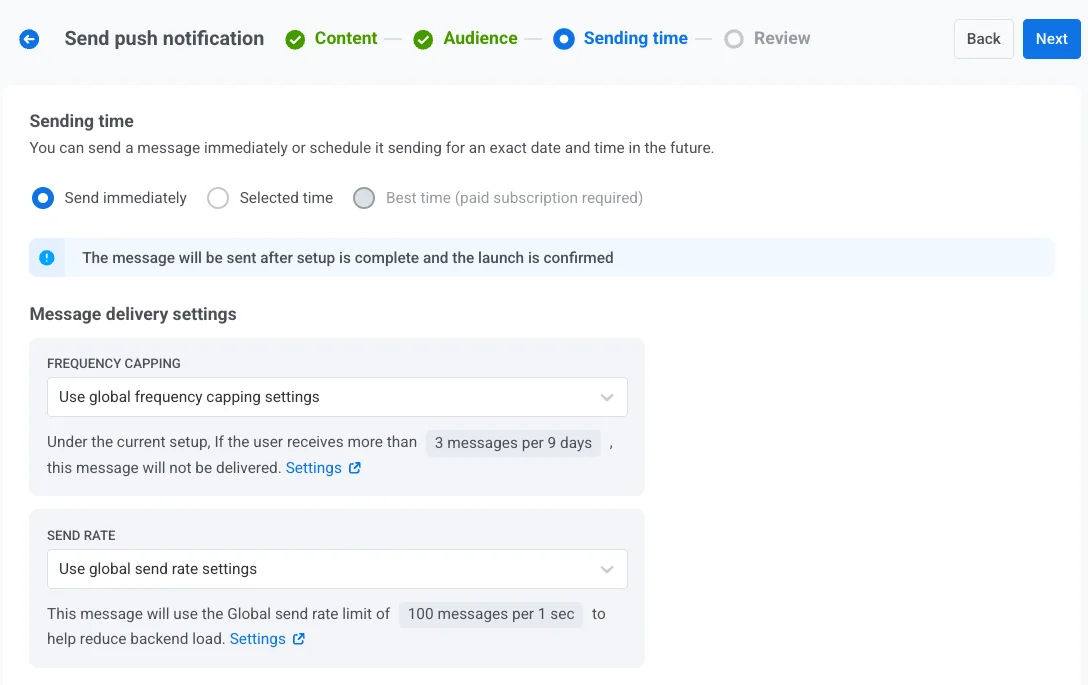
Programar notificación push
Anchor link toA continuación, elige cuándo enviar tu notificación push. Tienes las siguientes opciones:
- enviarla inmediatamente
- programarla para una hora específica
- dejar que Pushwoosh determine la hora óptima para cada usuario en función de su comportamiento.
Enviar inmediatamente
Anchor link toSelecciona esta opción si deseas enviar la notificación push inmediatamente después de configurar la campaña. Es útil para mensajes urgentes o sensibles al tiempo.
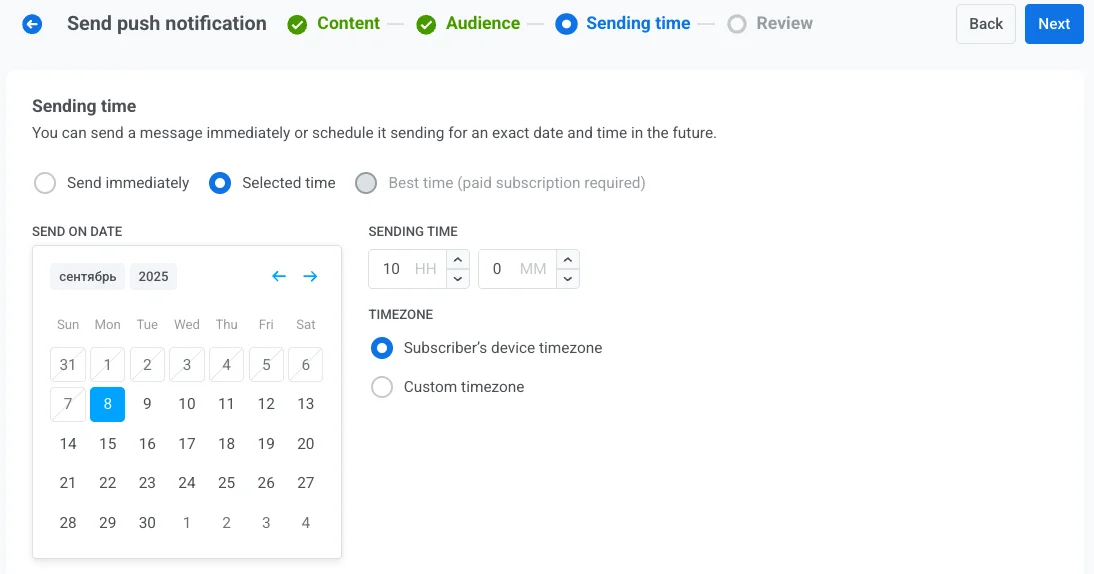
Hora seleccionada
Anchor link toElige esta opción para programar tu notificación push para una fecha y hora específicas.
- Utiliza el calendario para seleccionar la fecha exacta de tu notificación.
- Establece la hora en horas y minutos (utilizando el formato de 24 horas) para el envío de la notificación.
- Elige la zona horaria adecuada:
- Zona horaria del dispositivo del suscriptor. La notificación se enviará en función de la hora local del destinatario, garantizando la entrega a la hora especificada en su zona horaria.
- Zona horaria personalizada. Selecciona una zona horaria específica para programar la notificación para todos los destinatarios, útil para dirigirse a usuarios de una región específica.
Mejor hora (se requiere suscripción de pago)
Anchor link toEsta opción permite al sistema enviar la notificación a la hora óptima de cada usuario, determinada por su historial de interacción anterior. Solo tienes que elegir la fecha para empezar a enviar la notificación. Pushwoosh se encargará de la sincronización, enviando la notificación a la hora óptima de cada usuario en el día seleccionado.
Si el sistema no puede determinar la mejor hora para un usuario (por ejemplo, por falta de datos de zona horaria), puedes especificar una hora de reserva. Introduce la hora de reserva en horas y minutos, y selecciona la zona horaria de reserva adecuada.
Para utilizar la función Mejor hora, asegúrate de que:
- Los Eventos predeterminados de la aplicación están activados.
- Has enviado mensajes previamente a diferentes horas para recopilar suficientes datos de usuario para que el sistema determine las horas de envío óptimas.
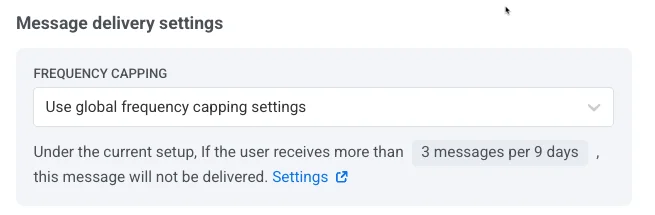
Configurar los ajustes de entrega de mensajes
Anchor link toEstablecer el límite de frecuencia
Anchor link toUtiliza el Límite de frecuencia para limitar la frecuencia con la que los usuarios reciben mensajes push, evitando el exceso de mensajes y reduciendo la pérdida de clientes. Elige una de las siguientes opciones:
-
Usar la configuración del límite de frecuencia global
Aplica los límites de todo el proyecto configurados en tus ajustes del límite de frecuencia global.
Por ejemplo, si el límite global se establece en 3 mensajes en 9 días, los mensajes adicionales que superen este límite se omitirán.
-
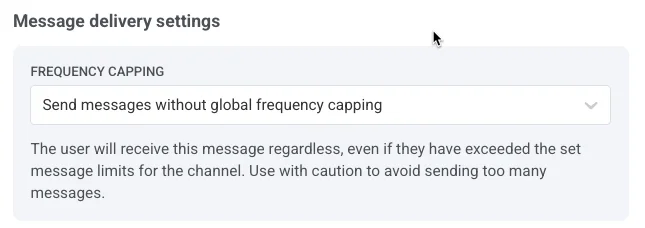
Ignorar el límite de frecuencia global
El usuario recibirá este mensaje aunque haya superado los límites de mensajes del canal. Utiliza esta opción con precaución para evitar el exceso de mensajes.
-
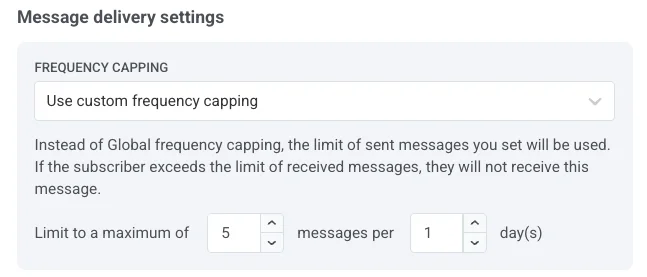
Usar límite de frecuencia personalizado
Establece un límite de mensajes personalizado para este mensaje. Si el usuario supera este límite personalizado, el mensaje se omitirá y el usuario pasará al siguiente paso.
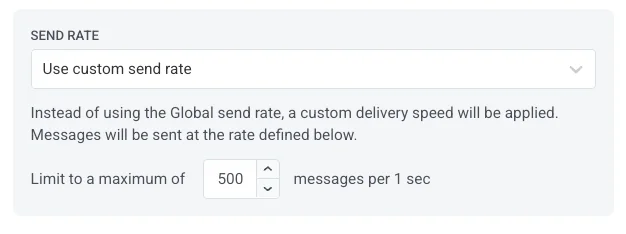
Establecer límites de velocidad de envío
Anchor link toEl ajuste Velocidad de envío controla la rapidez con la que se entregan los mensajes a tu audiencia. Ajustar la velocidad de envío te ayuda a gestionar la velocidad de entrega, evitar la sobrecarga del backend y mejorar la entregabilidad general.
Elige una de las siguientes opciones:
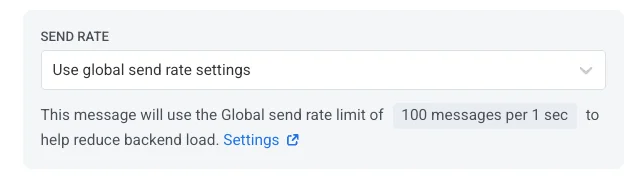
- Usar la configuración de la velocidad de envío global
Aplica los límites de velocidad de envío configurados en los ajustes de entrega de mensajes de tu proyecto. Si no se establecen límites, todos los mensajes se enviarán inmediatamente. Utiliza esta opción cuando desees que la velocidad de entrega siga las reglas predeterminadas de tu proyecto. Aprende más sobre los límites de velocidad de envío globales
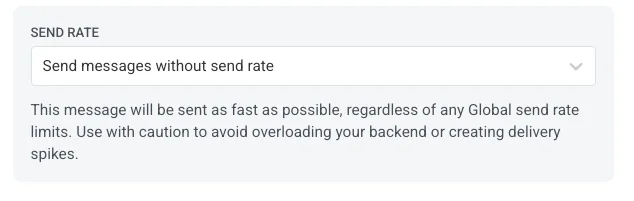
- Enviar mensajes sin velocidad de envío
Envía los mensajes lo más rápido posible, ignorando cualquier límite de velocidad de envío global. Úsalo con precaución para evitar sobrecargar tu backend o crear picos de entrega.
- Usar velocidad de envío personalizada
Anula la velocidad de envío global solo para este mensaje. Te permite especificar el número de mensajes enviados por minuto, dándote un control total sobre la velocidad de entrega. Los mensajes se enviarán a la velocidad personalizada que definas en el elemento del mensaje.
Una vez que hayas configurado las opciones deseadas, haz clic en Next para pasar al paso de confirmación.
Revisa y edita tu contenido
Anchor link toAntes de finalizar, revisa el contenido, las acciones al hacer clic, la audiencia, la plataforma y las opciones de programación para asegurarte de que todo está configurado correctamente. También verás una vista previa de tu notificación push en cada idioma seleccionado. Puedes ajustar cualquier configuración según sea necesario.

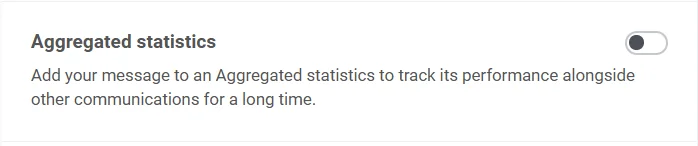
Opcionalmente, puedes optar por vincular tu notificación push a una Campaña Agregada, lo que te permite asociar este mensaje con una campaña más grande y en curso y hacer un seguimiento de su rendimiento junto con las notificaciones relacionadas a lo largo del tiempo.
Una vez que todo esté confirmado, haz clic en Schedule push para programar su entrega posterior o en Send now para enviarlo inmediatamente.
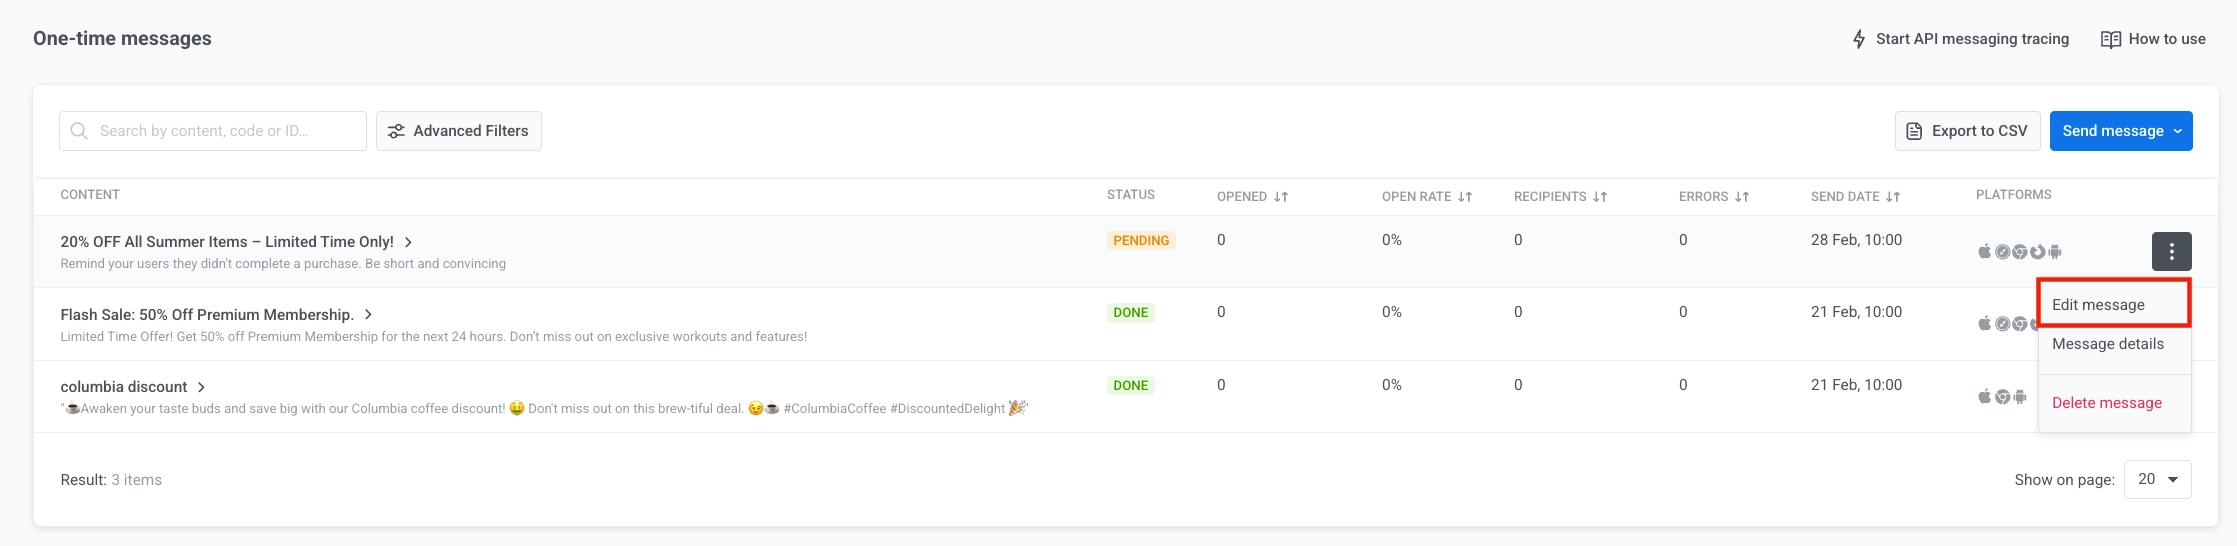
Cancelar o editar un mensaje programado
Anchor link toPara los mensajes que están programados y aún no se han enviado (estado PENDING), puedes cambiarlos o cancelarlos.
Abre la lista de mensajes en uno de estos lugares: Campaigns → One-time messaging, o Statistics → Message History. Abre el menú de acciones (⋮) para el mensaje que deseas cambiar o cancelar:
- Eliminar mensaje: cancela la entrega programada y cambia el estado a Cancelado.

- Editar mensaje: abre el formulario de push único con los datos del mensaje cargados. Puedes cambiar el contenido o la audiencia.
Escenario de ejemplo
Anchor link toImagina que eres el director de marketing de una aplicación de fitness y quieres enviar una notificación push única sobre una venta flash en las membresías premium. Hazlo de la siguiente manera:
Crea la campaña
Anchor link toVe a Campaigns, selecciona One-time messaging y haz clic en Send message → One-time push para empezar a configurar tu campaña.
Crea el contenido del mensaje
Anchor link toComo quieres crear un nuevo mensaje para esta venta flash, haz clic en Create new y configura un preset de push titulado Venta Flash: 50% de descuento en la membresía Premium.
Texto de ejemplo para un mensaje push:
“¡Oferta por tiempo limitado! Consigue un 50% de descuento en la membresía Premium durante las próximas 24 horas. ¡No te pierdas los entrenamientos y funciones exclusivas!”
En el preset de push, añade un enlace profundo para dirigir a los usuarios a la página de membresía de la aplicación. Una vez que estés satisfecho con el diseño y el contenido, haz clic en Next para pasar al paso de selección de audiencia.
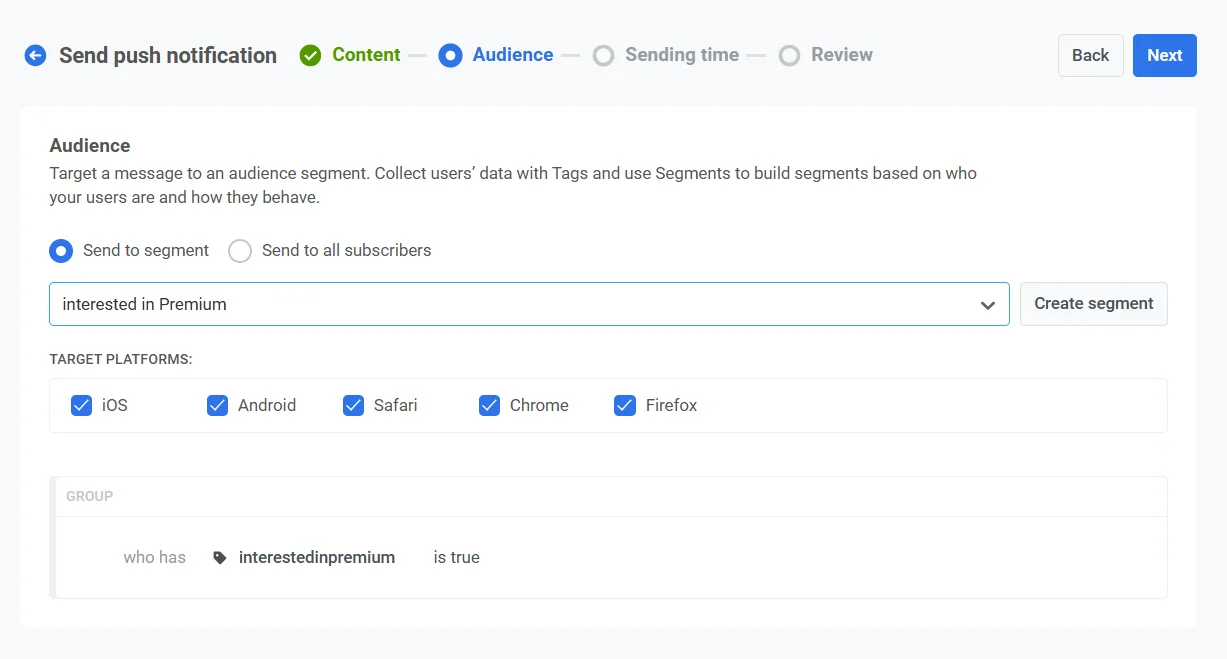
Selecciona la audiencia
Anchor link toPara esta venta flash, quieres dirigirte a los usuarios que han mostrado interés en los servicios premium pero que aún no se han suscrito. Selecciona Send to segment y, en el menú desplegable, elige el segmento Interesados en Premium. Este segmento incluye a los usuarios que han visto la página premium pero no se han actualizado.
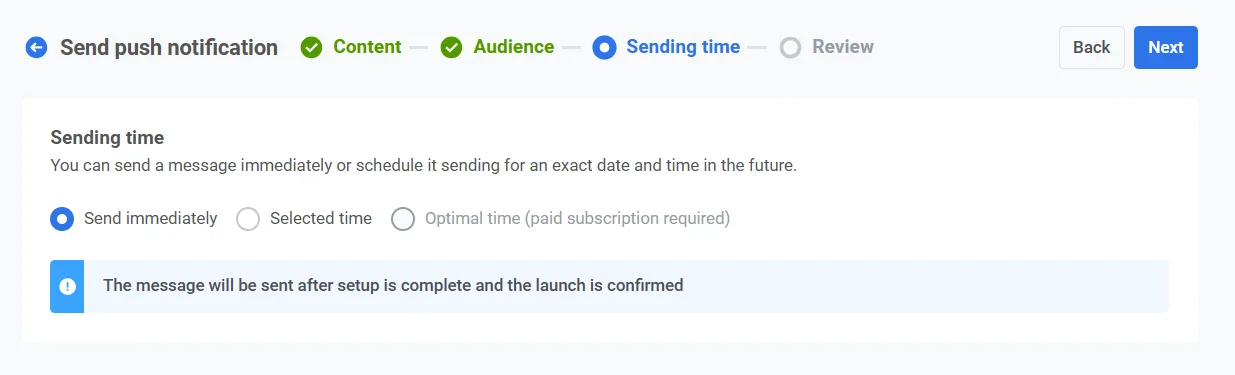
Establece la hora
Anchor link toComo la venta flash es sensible al tiempo, quieres que la notificación se envíe inmediatamente. Selecciona Send immediately para despachar la notificación tan pronto como se complete la configuración de la campaña.
Revisa y envía
Anchor link toRevisa todos los detalles de la campaña para asegurarte de que la notificación se ve correctamente.

Vincular a campaña agregada (opcional)
Anchor link toSi esta notificación forma parte de una campaña de marketing a largo plazo con múltiples mensajes (por ejemplo, una venta de temporada o promociones en curso), puedes activar la opción Link to Aggregated Campaign. Esto te permitirá hacer un seguimiento del rendimiento de esta notificación junto con otros mensajes relacionados en la campaña más amplia.
Una vez que todo esté confirmado, haz clic en Send message para despachar inmediatamente la notificación.
También puedes enviar un push único utilizando el Creador de Customer Journey. Aprende a enviar un push único a través de Customer Journey.