예약 푸시
일회성 푸시 양식을 통해 예약하기
Anchor link toPushwoosh에서 일회성 푸시 알림을 보내려면 Campaigns 섹션으로 이동하세요. One-time messaging을 선택하고 Send message → One-time push를 클릭합니다.

푸시 메시지 콘텐츠 선택 또는 생성하기
Anchor link to시작하려면 푸시 알림에 대한 새 콘텐츠를 만들거나 기존 콘텐츠를 선택하세요. 미리 만들어진 푸시 프리셋을 사용하려면 사용 가능한 옵션의 드롭다운 메뉴에서 선택하세요.

새 메시지를 만들려면 Create new를 클릭하고 이 가이드에 따라 새 푸시 프리셋을 설정하세요.
기존 프리셋을 편집해야 하는 경우 Edit Content를 클릭하여 메시지를 수정하세요.
알림 미리보기가 오른쪽에 표시되어 사용자에게 어떻게 보일지 보여줍니다.
콘텐츠와 모양에 만족하면 Next를 클릭하여 Audience 설정 단계로 진행하세요.
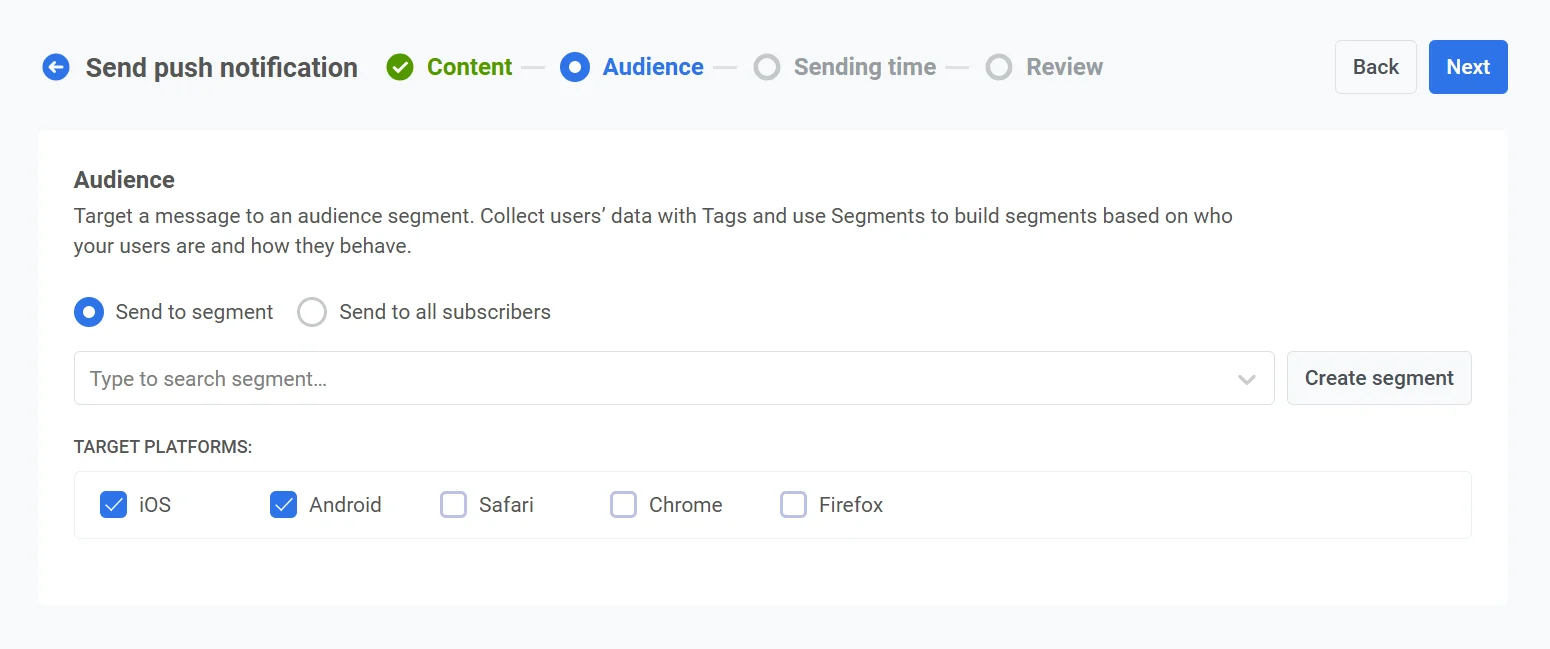
푸시 알림 대상 선택하기
Anchor link to다음으로, 푸시 알림의 대상을 선택합니다. 모든 사용자에게 알림을 보내거나 사용자 행동 또는 인구 통계를 기반으로 특정 세그먼트를 타겟팅할 수 있습니다.
세그먼트로 보내기
Anchor link to특정 대상 세그먼트를 타겟팅하려면 이 옵션을 선택하세요. 드롭다운 메뉴에서 미리 만들어진 세그먼트를 선택하거나 Create Segment를 클릭하여 새 세그먼트를 만드세요. 자세한 내용은 세그먼트 생성 가이드를 참조하세요.
모든 사용자에게 보내기
Anchor link to모든 구독자에게 알림을 보내려면 이 옵션을 선택하세요. 이는 전체 사용자 기반에 적용되는 일반적인 공지나 프로모션에 이상적입니다.

타겟 플랫폼
Anchor link to알림을 전달할 플랫폼을 선택하세요. 사용 가능한 플랫폼은 다음과 같습니다:
- iOS
- Android
- Safari
- Chrome
- Firefox
타겟 플랫폼을 선택하면 메시지가 적절한 기기의 사용자에게 도달하도록 보장합니다. 선택된 플랫폼의 사용자만 알림을 받게 됩니다.
대상을 구성하고 타겟 플랫폼을 선택했으면 Next를 클릭하여 푸시 알림 설정을 계속 진행하세요.
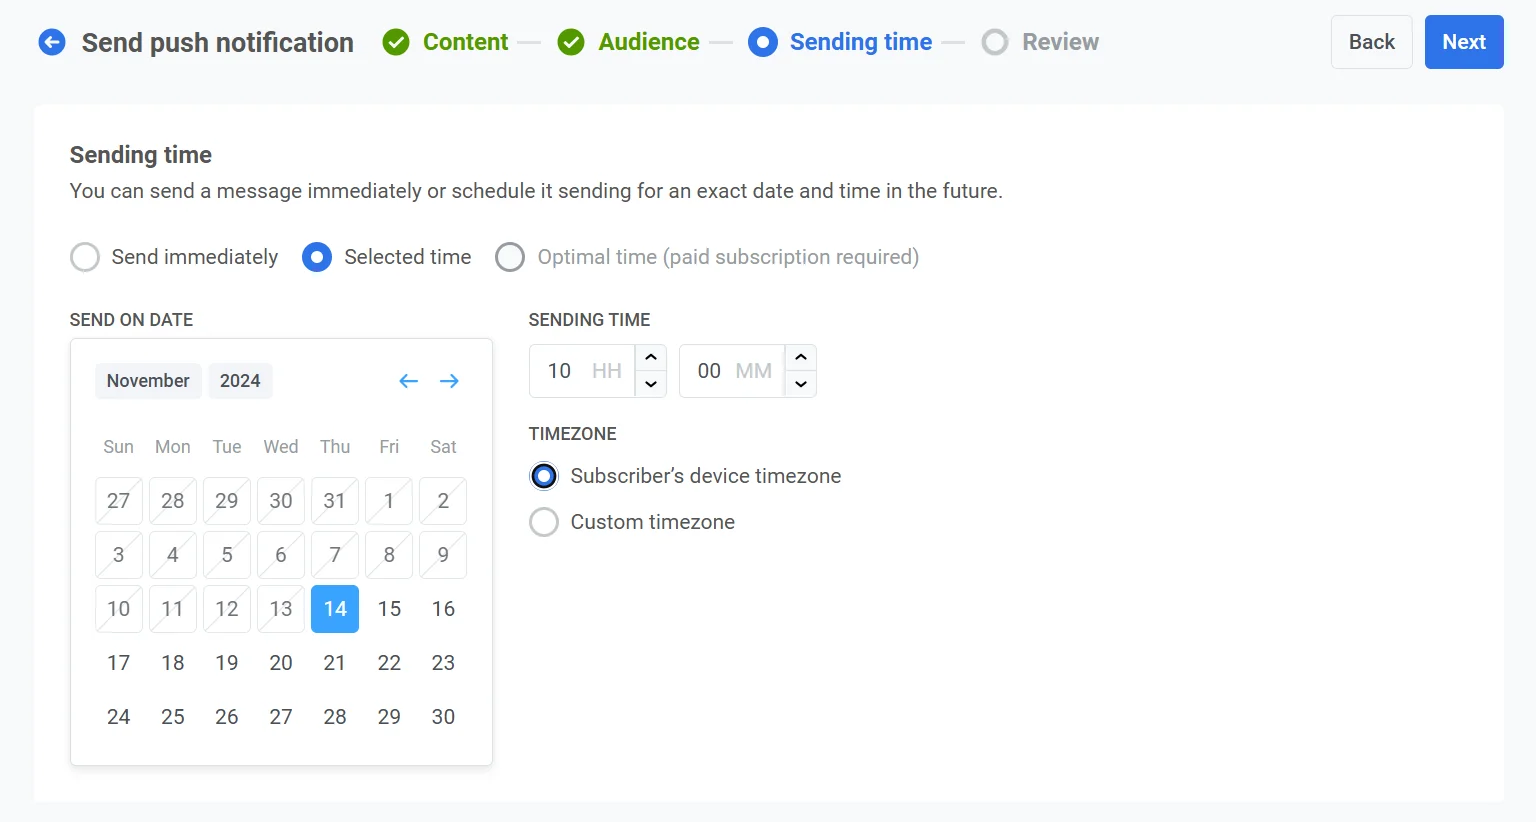
푸시 알림 예약하기
Anchor link to다음으로, Selected time을 선택하여 특정 날짜와 시간에 푸시 알림을 예약하세요.
- 캘린더를 사용하여 알림을 보낼 정확한 날짜를 선택합니다.
- 알림이 전송되어야 할 시간을 시와 분(24시간 형식 사용)으로 설정합니다.
- 적절한 시간대를 선택하세요:
- Subscriber’s device timezone: 알림은 수신자의 현지 시간을 기준으로 전송되어 해당 시간대에서 지정된 시간에 배달되도록 보장합니다.
- Custom timezone: 특정 시간대를 선택하여 모든 수신자에 대해 알림을 예약합니다. 이는 특정 지역의 사용자를 타겟팅할 때 유용합니다.
콘텐츠 검토 및 편집하기
Anchor link to최종 확정 전에 콘텐츠, 클릭 시 액션, 대상, 플랫폼 및 예약 옵션을 검토하여 모든 것이 올바르게 구성되었는지 확인하세요. 또한 선택한 각 언어로 된 푸시 알림의 미리보기도 볼 수 있습니다. 필요에 따라 설정을 조정할 수 있습니다.

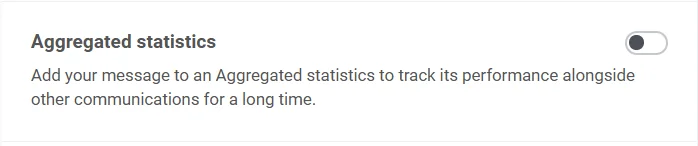
선택적으로, 푸시 알림을 Aggregated Campaign에 연결하여 이 메시지를 더 큰 진행 중인 캠페인과 연관시키고 관련 알림과 함께 시간 경과에 따른 성과를 추적할 수 있습니다.
모든 것이 확인되면 Schedule push를 클릭하여 나중에 배달되도록 설정하거나 Send now를 클릭하여 즉시 보내세요.
예약된 메시지 취소 또는 편집하기
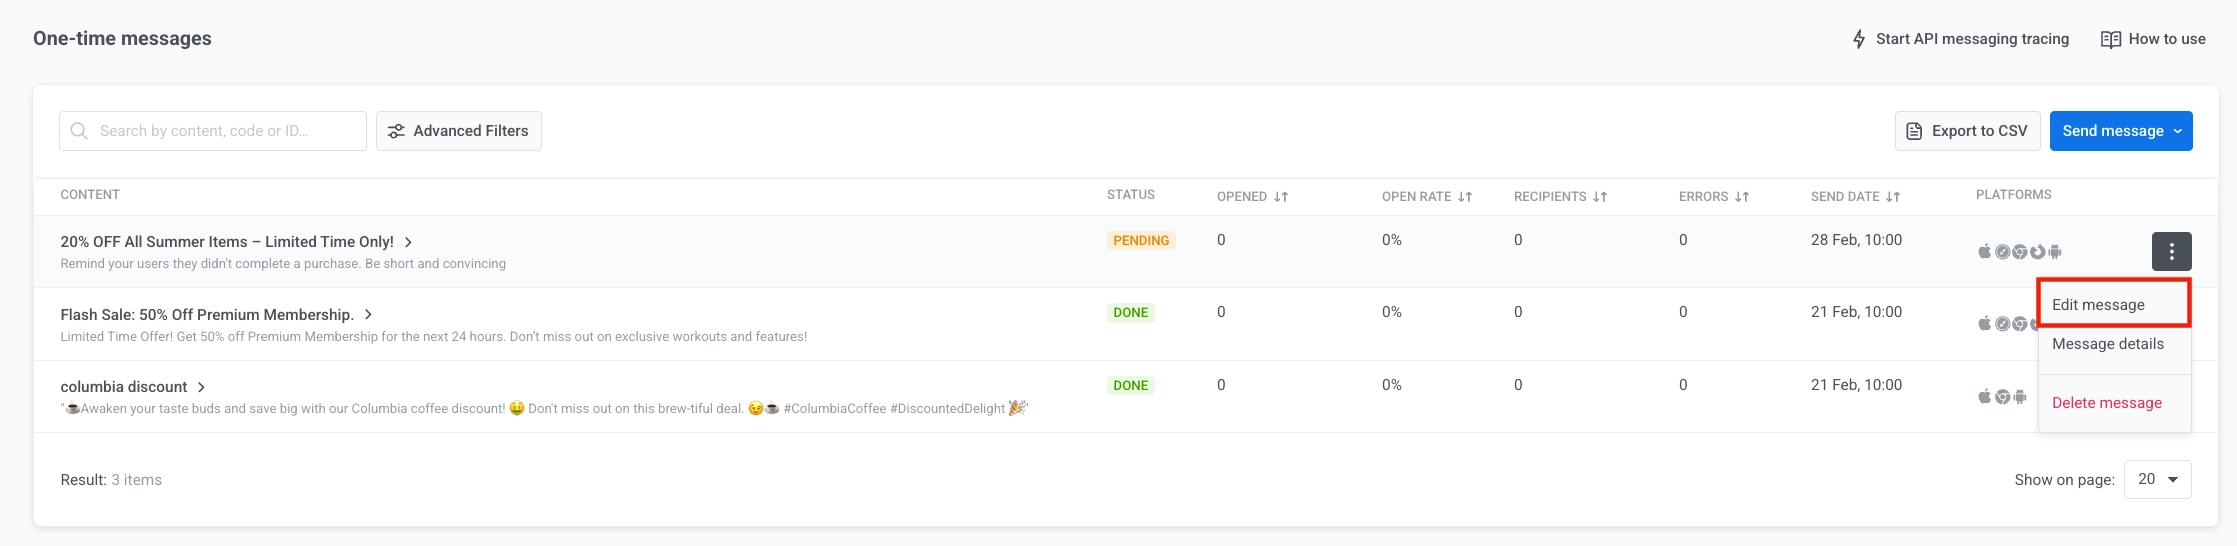
Anchor link to예약되었지만 아직 전송되지 않은 메시지(상태 PENDING)는 변경하거나 취소할 수 있습니다. 일회성 메시지 목록에서 해당 메시지의 작업 메뉴(⋮)를 엽니다:
- Delete message: 예약된 배달을 취소하고 상태를 Canceled로 변경합니다.

- Edit message: 메시지 데이터가 포함된 일회성 푸시 양식을 엽니다. 콘텐츠나 대상을 변경할 수 있습니다(예약된 전송 시간은 변경할 수 없음).
Customer Journey Builder로 푸시 예약하기
Anchor link to이 과정은 모바일 및 웹 푸시 알림 캠페인 모두 동일합니다. 이 가이드에서는 특정 날짜와 시간에 푸시 알림 배달을 예약하는 방법을 설명합니다.
예약 설정은 푸시 알림이 새로운 커뮤니케이션 플로우를 시작하는지 또는 기존 플로우를 계속하는지에 따라 다를 수 있습니다.
푸시 알림이 커뮤니케이션 플로우를 시작하는 경우
Anchor link to기본 푸시 플로우를 설정한 후, Entry 요소에서 예약을 추가할 수 있습니다.
Audience-based entry 요소에서 Entry schedule을 One-time entry로 설정한 다음, Schedule for a specific day를 선택하세요. 날짜, 시간, 시간대를 설정합니다.

시간대를 선택하세요. 두 가지 옵션이 있습니다:
- Subscriber’s device timezone (default): 사용자는 자신의 기기 시간대를 기준으로 진입합니다. 시간대가 없는 경우 대체 시간대가 사용됩니다. Change fallback을 클릭하여 변경할 수 있습니다.
- Specific timezone: 드롭다운에서 시간대를 선택하여 고정된 진입 시간을 설정합니다.
예약이 설정되면 Apply를 클릭하세요.
푸시 알림이 커뮤니케이션 플로우를 계속하는 경우
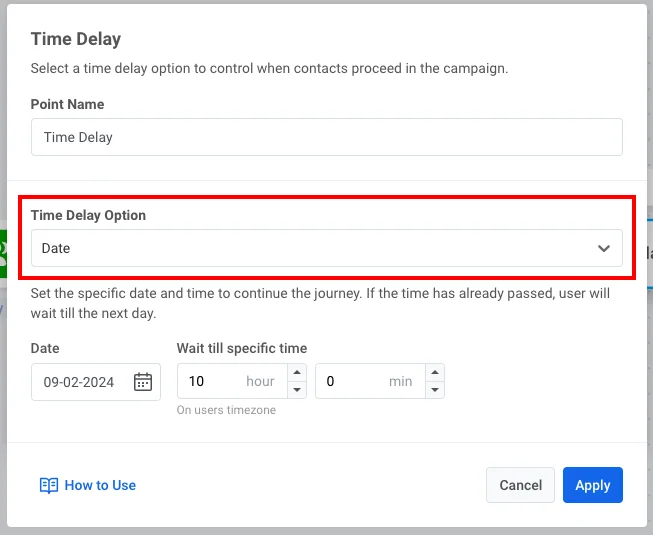
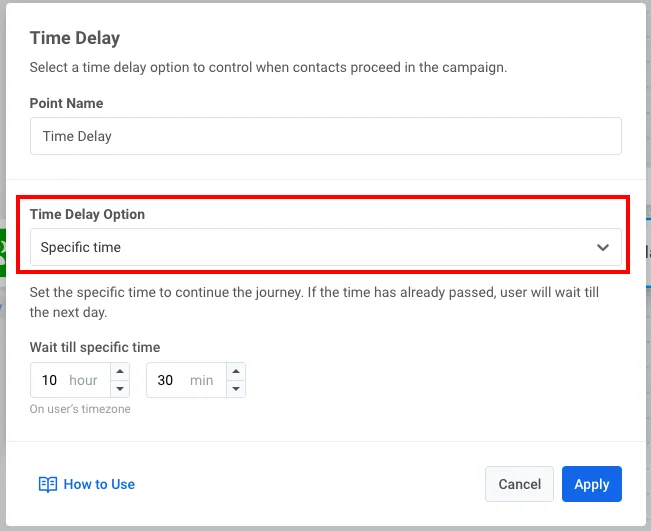
Anchor link to이전 커뮤니케이션 요소와 예약하려는 푸시 알림 사이에 Time Delay 요소를 삽입하세요:
Time Delay 요소를 더블 클릭하세요. Time Delay Option 필드에서 Specific time을 선택합니다:
또는 Date: