How to run A/B/n tests in customer journeys
Why A/B/n testing is useful
Anchor link toIt’s not always obvious which message, offer, timing, or channel will get the best response from your users. A/B/n testing lets you compare several variations at once so you can:
-
Find which combination drives the most conversions
-
Test ideas quickly in one journey instead of running separate campaigns
-
Keep a control group to benchmark against your current communication
For example, an online store can test whether more users complete checkout when they receive: a push with a 10% discount right away, an email with free shipping after 24 hours, or an SMS reminder with no incentive.
What you can test with A/B/n split in Pushwoosh
Anchor link toThe A/B/n split element in Customer Journeys allows you to test many aspects of your campaigns. Common test cases include:
-
Timing: Compare immediate vs. delayed messages (e.g., cart reminder right away vs. after 24 hours).
-
Personalization: Test generic vs. personalized content (e.g., “Shop new arrivals” vs. “Anna, your saved items are back”).
-
Channel performance: See which channel works best.
-
Message content: Experiment with different formats, including copy, visuals, call-to-action buttons, subject lines, layouts, etc.
Below, we’ll cover some common cases where A/B/n testing can help optimize your customer journeys.
Testing discount types for abandoned carts
Anchor link toGoal
Anchor link toFind out which discount type drives the highest conversion among users who abandoned their cart:
- 10% off
- $10 off
- Free shipping
Step 1. Set up the entry element
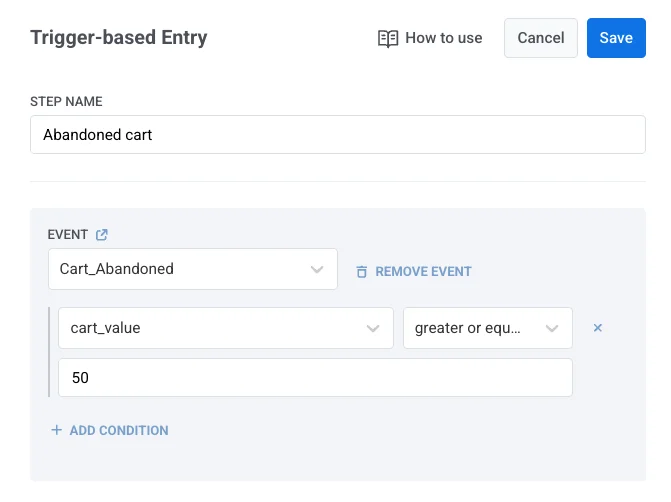
Anchor link toStart the journey with a Trigger-based entry element and select the event trigger Cart_Abandoned.
This ensures the journey targets users who added items to their cart but didn’t complete checkout. Optionally, you can filter the audience to include users who abandoned a cart with a minimum value (e.g., $50+).
For more information on how to configure events, see Events documentation.
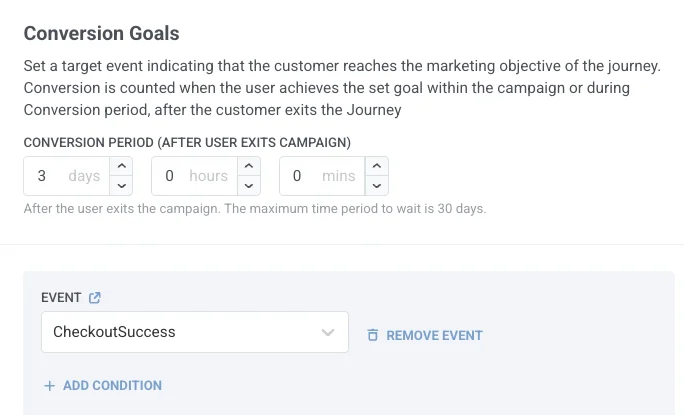
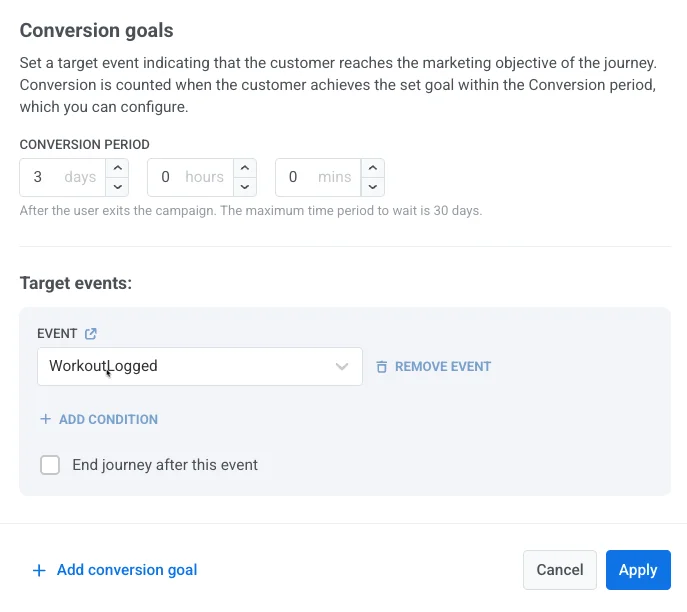
Step 2. Define the Conversion goal
Anchor link toSet a Conversion goal to measure the test results. For this, click Conversion goals at the top of the canvas and set the target event to CheckoutSuccess. This way, you can see which discount offer results in more completed checkouts.
Step 3. Configure the A/B/n split element
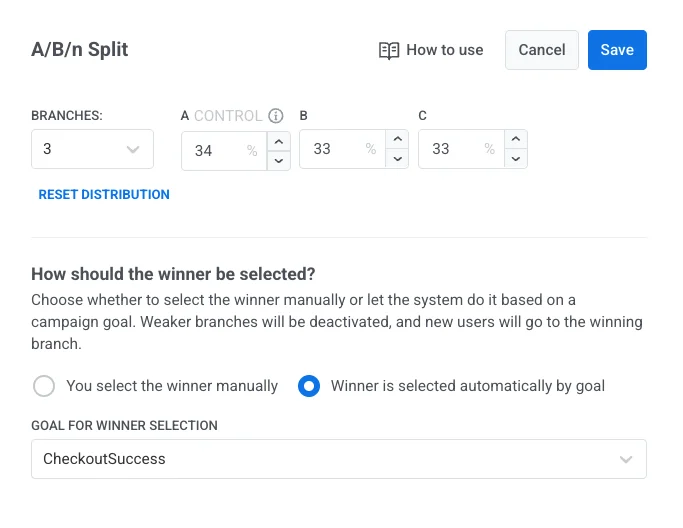
Anchor link toAfter the entry element, place an A/B/n split element to divide users into three groups. Distribute users evenly across branches.
Choose Winner is selected automatically by goal and select CheckoutSuccess as the goal for winner selection. This means once Pushwoosh detects a statistically significant winner, weaker branches will be deactivated, and all new users will be routed to the winning branch.
Step 4. Configure the rest of the journey
Anchor link toSet up the message in each branch. For each branch, add and configure a push element.
For example:
-
Branch A (control): Send a push offering 10% off.
Example content: “Complete your order today and enjoy 10% off – limited time only!” -
Branch B: Send a push offering $10 off.
Example content: “Here’s $10 off your order – finish checkout now.” -
Branch C: Send a push offering free shipping.
Example content: “We’ve saved your cart! Order today and get free shipping.”
Finally, add an Exit element to complete the journey.

Step 5. Launch the journey
Anchor link toOnce all branches are configured, launch the journey. Users who abandoned a cart will be randomly split into three groups, each receiving its assigned discount offer. When statistical significance is reached, Pushwoosh will automatically direct all new users with an abandoned cart to the winning branch.
To analyze the results, double-click the A/B/n split to open detailed statistics. Learn more
Testing channel effectiveness for a fitness app re-engagement campaign
Anchor link toGoal
Anchor link toDetermine which communication channel (push, email, SMS) best motivates inactive users to return to the app.
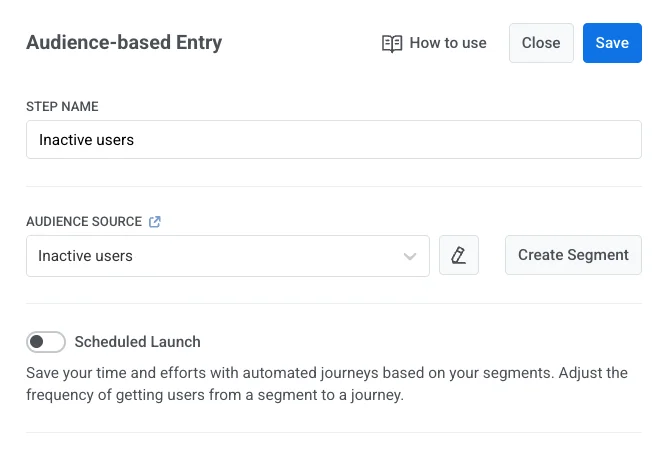
Step 1. Add an entry element and choose the audience
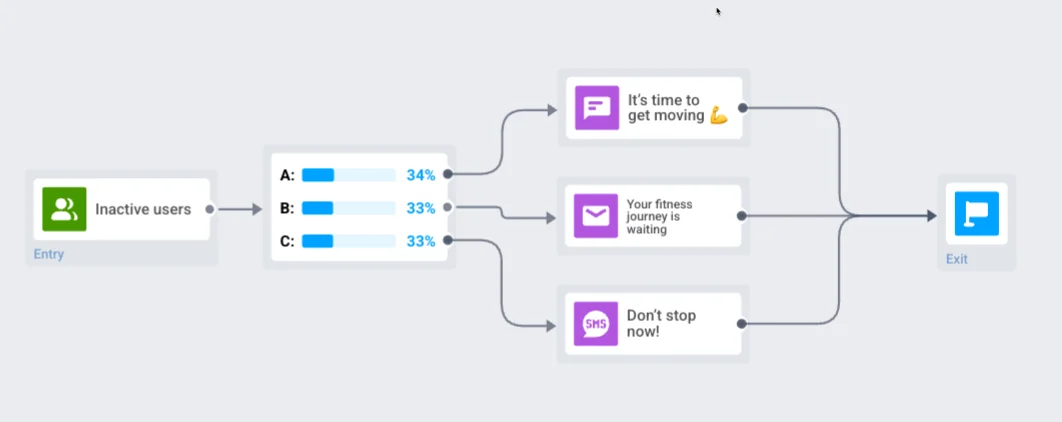
Anchor link toStart the journey with Audience-based entry and select or create the segment Inactive users (no workout logged in 14+ days).
Learn more about creating segments.
Step 2. Define the Conversion Goal
Anchor link toSet the WorkoutLogged event as the Conversion Goal to measure which channel drives re-engagement.
For more information on how to configure events, see Events documentation.
Step 3. Set up the A/B/n split element
Anchor link toAdd an A/B/n split element after the entry element. Select 3 branches with even distribution and use Winner is selected automatically by goal with the chosen Conversion Goal.

Step 4. Configure the rest of the journey
Anchor link toConfigure the journey for the following branches. In each branch, add and configure the appropriate message element (Push, Email, or SMS):
-
Branch A (control): Push element
Example content: “It’s time to get moving 💪 Tap to start your workout now!” -
Branch B: Email element
Example content: “Your fitness journey is waiting. Log your next session today!” -
Branch C: SMS element
Example content: “Don’t stop now! Track today’s workout and keep your streak alive!”
Finally, add an Exit element to complete the journey.
Step 5. Launch the journey
Anchor link toLaunch the journey. Users will be split across branches and contacted through one of the channels. Pushwoosh will automatically detect the winner and direct users to the winning branch.
To analyze the results, double-click the A/B/n split to open detailed statistics. Learn more