Journey elements
This article describes the elements you can use to create customer journeys
Journey elements are points of communication and controls needed to create a journey:
To add an element to a journey, drag-and-drop it from the left pane to the canvas, or pull it out of the circle on the previous element.
To delete an element, click it once and press the Bin icon on the top.
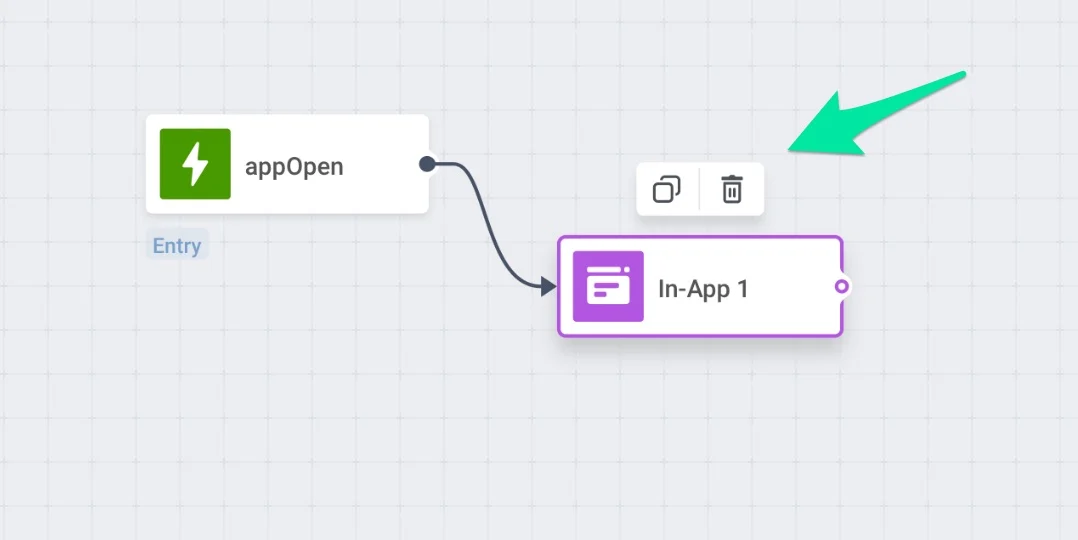
To edit an element, click it twice and fill in the fields of the pop-up window appeared.
Canvas hotkeys
To ease your journey configuration, use the hotkeys allowing instant managing journey's parts with no clicks:
Select a journey element and copy-paste it by Ctrl+C/Ctrl+V (Cmd+C/Cmd+V);
Select several journey elements by holding Shift/Cmd and copy-paste the whole selected combination by Ctrl+C/Ctrl+V;
Copy and paste elements between journeys (however, the limitation exists: do not switch the tab while copying);
Delete journey elements from the canvas by pressing your system Delete hotkey.
Entry
Trigger-based Entry
When a Trigger-based Entry is set for the journey, users who trigger a specific Event (i.e. performs a specific action) enter that journey once that Event takes place.
To set a Trigger-based Entry, locate the element on the canvas. Then, choose an Event to be used as a trigger for users to enter the journey.
Please refer to the documentation on Events to learn more on how to implement them in your projects.
If the Event you select has some attributes, you can narrow the Trigger-based Entry conditions with specific attributes. To do so, press the Add condition button when editing the element. Select an attribute from the drop-down and set its operator and values in the corresponding fields.
Then, press Apply to save changes.
Important!
Make sure to include HWID (hardware ID) into your /postEvent API request for the Start Event of the journey. Otherwise, users won't enter the journey.
UserID is not applicable for identifying users in customer journey.
You can add multiple Trigger-based Entry points — in that case, any of them will start the journey.
Audience-based Entry
Audience-based Entry launches a journey for a pre-built segment of a particular app's users. A segment includes app subscribers who comply with the specific conditions.
Learn more about the Audience Segments from the guide.
To set up the Audience-based Entry, choose an Audience Source (i.e., the pre-built Segment of that app subscribers).
Additionally, you can upload a CSV file to create a user segment and then create a journey for this segment. Learn more
Once the journey is activated, all users from the segment selected will enter the journey.
No timezone-sensitivity
Please be aware that users' timezones won't be taken into account when sending messages. All users will enter the journey once you activate it.
To schedule start of sending journey messages according to users' timezones, set the Time Delay element right after the Audience-based Entry.
Scheduled launch
If you use the Audience-based Entry, by default, users from the segment enter the journey only once – at its activation. However, you can also schedule a journey launch. Scheduled Launch enables you to automate campaigns by setting specific launch times, dates, and intervals. For example, a fitness app can send a daily 8 AM exercise reminder to encourage consistent routines.
You can choose from three scheduled launch options:
Launch once
Schedule the journey to launch on a specific date and time.
Launch on several dates
Schedule the journey to launch on multiple specific dates.
Periodic launch
Schedule the journey to launch periodically.
The segment will be refreshed prior to every scheduled entry, so the users who got into the segment after the journey's last launch will also enter at the next launch. Users traveling the journey at the moment of the repeated start don't enter it again.
However, note that RFM segments do not update automatically; they need to be calculated first in the RFM Segmentation tab to maintain accuracy.
Before launching a journey with an RFM segment:
-Navigate to Audience > RFM Segmentation and calculate the segment.
-For recurring journeys, ensure to recalculate the segment before each launch to include new users.
For instance, suppose you want to initiate a journey based on the RFM segment Champions, which reactivates every Monday. Start by calculating the segment and launching the journey with it. Before every Monday relaunch, remember to recalculate the segment in the RFM segments tab. This step ensures that new users meeting the segment criteria will be added to your journey.
Setting up a Scheduled Launch Journey
Launch once
Choose this option to initiate the journey on a specific date and time. Begin by setting the desired Launch date and specify the Launching time for the journey.
Then, select the timezone. There are 2 main options available:
1. Subscriber's device timezone (default). With this option, the journey will launch based on the timezone of each subscriber's device. If a subscriber's timezone data is missing, a fallback timezone will be used. You can modify the fallback timezone by clicking on Change fallback.
2. Specific timezone. Choose a timezone from the dropdown list if you need a specific timezone for the journey launch.
Please note that if the launch time has passed for a subscriber, they will not be included in the campaign.
Launch on several dates
This option allows you to schedule the journey for launch on multiple specific dates.
First, use the calendar to choose the desired launch dates. You can add or remove dates as needed.
Then, set the Launching time and Timezone. Follow the same steps as for the Launch once option.
Note: Subscribers whose time for a specific date has already passed will be included in the campaign on the next scheduled date.
Periodic launch
Choose Periodic launch to set up a journey that launches at regular intervals.
First, define how often the journey should launch by selecting a unit of time (e.g., Day, Week, Month) and specifying the interval (e.g. every 2 days).
Then, set the Launching time and Timezone. Follow the same steps as for the Launch once option.
Note: Subscribers whose launch time has already passed will be included in the campaign on the next scheduled interval.
API-based Entry
Using an API-based Entry, you can launch a customer journey automatically once some business event occurs outside the app. For example, you can inform customers when some of your products are back in stock.
To start a journey, you must send a special API request with specified segmentation conditions. You can also add content placeholders to the request to change message content depending on the context.
Combining entry elements
You can add multiple entry elements — in that case, any of them will start the journey. Each entry element can start their own journey.
If you use both Trigger-based and Audience-based simultaneously, conditions of both will apply but not intersect. That means the journey will include users who comply with the Segment conditions and those who trigger the Event. These sets of users may or may not intersect; not intersection enters the journey, but the whole sets in a union.
Channels
Push
Push element indicates a point to communicate to a customer with a push notification.
To specify when to send a push message to a journey traveler, add the Push element to the canvas following the journey element you consider to be the appropriate basis for communication. You can either choose a preset saved in your Pushwoosh account or create message content from scratch.
Please be aware that if any segmentation rules are saved in a Push Preset you choose, they won’t be applied to the journey.
Personalizing messages with Dynamic Content and Liquid Templates
For greater relevance of your messages to journey travelers, you can add personalized content based on users' behavior. For example, sending an Abandoned Cart push, add the product name for better conversion – remind users of what exactly they wanted to purchase, that'll make your message more convincing.
Save to inbox
The Save to inbox option lets you store push notifications in the app’s inbox, so users can access and review messages whenever it's convenient for them. This helps ensure that important notifications aren't missed and can be checked later, making it easier for users to stay engaged.
To save a message to the inbox, simply toggle the Save to inbox option and set it up.
Choose how long the message stays in the inbox.
Customize the message icon, if needed. You can choose a different icon for the message to help it stand out in the inbox.
Define what happens when the user clicks the message.
Learn more about setting up the inbox
Optimal time to send
If you want each user to receive a push notification when they are most likely to interact with pushes, enable the Optimal time to send option. The time for sending the message to each user will be calculated based on their behavior and previously sent messages' performance.
To use this option, first, enable the PW_ApplicationOpen and PW_NotificationOpen default Events in your project. We recommend doing this a few days before sending the push to collect enough data.
The accuracy of calculating the optimal time for each user depends on how many pushes you sent to this user earlier.
If there is not enough data on the user, they will receive a push at the Default time you specify according to their timezone.
The Optimal time is calculated for the next 24 hours after the user enters the journey point where this option is enabled.
If you specify the exact time of the next journey action using Time Delay, and the calculated Optimal time is later than this time, the user will not proceed to the next action and will drop off.
Split to opened/ignored
You can split the remaining journey flow based on whether this push notification is opened or ignored. For example, it might be helpful to send emails to those who don’t open pushes or send one more push to those who have read the first one.
Check the checkbox and set the period to wait after the push is sent – after that period, all users who open the push will go to the Opened journey branch, and others will pass through the Not opened branch.
Waiting period can be set to up to 7 days.
Send by user ID
When enabled, the message will be sent to all the devices associated with an ID of a user who reaches this journey element. Thus, if a user has several devices, all associated with a single userID, that user will receive several messages, one per device.
When everything’s set, press Apply.
Email
Email element indicates a point to communicate to a customer with an email message.
To send an email at some moment of the customer journey, add the Email element to the canvas following the element you consider to be the appropriate basis for communication. Choose the email content you'd like to use.
Please be aware that if any segmentation rules are saved in the email content you choose for a journey, they won't be applied to the Journey.
Send to unsubscribed users
Consider if you want to exclusively email users who are currently subscribed. Pushwoosh automatically manages unsubscribes and updates segments accordingly. However, you have the option to include unsubscribed users by enabling the Send to unsubscribed toggle.
BCC (Blind Carbon Copy)
You can turn on the BCC (Blind Carbon Copy) option when sending emails in a customer journey. BCC allows you to send a copy of the email to an additional recipient without revealing their address to the main recipient(s).
This feature allows you to:
Keep a record of customer interactions in your CRM system for better customer service.
Ensure internal teams (e.g. compliance and sales managers) receive copies for reference.
Important note: Activating the BCC option will double the count of sent emails, potentially leading to a higher monthly subscription cost.
How to enable BCC
To use the BCC feature, please contact our customer support team.
In the Email element, toggle the Send BCC switch.
Enter the email addresses you want to receive the BCC copy. You can add multiple addresses.
Click Apply.
Split to opened/ignored
You can split the remaining journey flow based on whether the email is opened or ignored. For example, it might be helpful to try reaching out to users via pushes or In-Apps or send one more email delivering more value.
Check the checkbox and set the period to wait after the push is sent – after that period, all users who open the push will go to the Opened journey branch, and others will pass through the Not opened branch.
Waiting period can be set to up to 7 days.
In-App
Requirements
For Android apps, the OS versions 6.0 and later are supported.
To show the In-App to users within the journey, add the In-App to the canvas next to any element and choose a Rich Media page to be shown.
If your app is opened at the moment the In-App element is triggered, the In-App will be displayed immediately.
If the app is closed, the In-App will be displayed the next time the user opens the app.
SMS
To start working with the SMS channel, please get in touch with our Sales team or your dedicated Customer Success Manager. Otherwise, sending SMS will not be available.
SMS element indicates a point to communicate with a customer via SMS.
To send SMS using Customer Journey Builder, first associate customer phone numbers with UserId using the /registerDevice method. The phone number must be specified in the "hwid" parameter.
To send SMS to users within the journey, add the SMS element to the canvas next to any element. Choose a preset or enter the text of the SMS manually.
If you want to use an SMS preset, create it in the Content → SMS presets section. You can also use Dynamic Content in the message text. Learn more
You can split the flow depending on whether the SMS is delivered and set the delivery waiting time.
If the journey involves users who may also receive push notifications and emails, enable the Send SMS notification across users devices with UserID option. This option ensures that the message is always sent to the correct channel.
WhatsApp
The WhatsApp element in Pushwoosh Customer Journey allows you to send personalized WhatsApp messages to users.
The WhatsApp element can be configured to use pre-approved templates from your Meta account or custom content created directly within Pushwoosh. Note: You can initiate conversations only by using an approved Message Template. Learn more
Preset
Select this option to use a pre-existing template from your Meta account. If your template includes placeholders to insert personalized data, make sure to configure them. Learn more
If your WhatsApp template includes interactive message types, such as quick replies or call-to-action buttons, configure the journey to split the flow based on user interactions with these buttons. Learn more
Custom content
If a user initiates a conversation, you are allowed to respond freely with custom content within a 24-hour period. Note that custom content only supports plain text (including placeholders, if any) and does not allow additional settings, such as platform-specific adjustments, media attachments, languages, etc.
After configuring the WhatsApp element, click Save to apply your settings.
Learn more about sending WhatsApp messages
Data to app
The Data to app Journey element allows you to send custom data or silent push notifications to deliver data that your app can interpret and act upon, enhancing user engagement and app functionality.
To send custom data with the Data to app element:
1. Add the Data to app element to the Journey canvas.
2. Paste your JSON code into the provided field.
3. After entering your JSON data, click Save to apply the configuration.
Flow controls
Segment Split
Segment Split uses Segments created in your Pushwoosh account. To learn more about Segments, please refer to the guide.
Segment Split divides the journey into two separate branches based on segmentation. Choose a Segment from your Pushwoosh account to constitute the first segment. Customers who do not fall under Segment's conditions will go through the second branch of the journey. Each branch can include any elements following the Segment Split and end with its own Exit.
You can add as many Segment Splits as you need, even flowing out of each other.
Wait for Trigger
Events should be created in advance. Click here to learn how to create Events in your own app.
Wait for Trigger step lets you set different communication scenarios based on whether a user triggers a particular Event or several Events within a specified time. The waiting period is limited to 90 days.
You can split the flow into branches depending on the triggered Event or group of Events, adding up to three such branches. Also, a Not triggered branch is always added for users who have not fulfilled the conditions of any branch.
Each branch can contain up to four Events with attributes. If there are several Events in a branch, you can choose a logical operator: AND (all conditions must be met to follow the Triggered branch) or OR (at least one condition must be met to follow the Triggered branch).
Fixed waiting period
If you want a user to wait for the entire specified time period, even if the chosen Event(s) occur earlier, enable the Fixed waiting period option:
For example, a journey has the following sequence of elements: Push → Wait for Trigger → Email. The Wait for Trigger element has the waiting period set to 1 day, and the Fixed waiting period is enabled. If a user triggers the event 5 minutes after receiving the push, they will still wait for one day before receiving the email.
A/B/n Split
Test which sequence of messages works best with the A/B/n Split and adjust your communications to your audience's needs and preferences.
More about running A/B/n tests
Reachability check
Before sending messages to your users, you might need to check whether they are reachable via a specific channel, be it push notifications or emails. Try reaching out to users who are not subscribed to pushes or emails via other channels, and make sure every single user is engaged!
Drag and drop the Reachability check element from the left panel to the canvas after any element you want to follow up by the communication. Then, choose the channel you'd like to check – push notifications or email.
For push notifications, the Push Alerts Enabled tag values will be reviewed, and the journey travelers will be split into two branches accordingly, one for those who have this tag set to "true" and those with "false" tag value. As for emails, users who have the Unsubscribed Email tag set to "true" will go to the not-reachable branch.
Then, follow up the Reachability check element with the communications accordingly – reach out to users not subscribed to pushes with emails and vice-versa, or send an In-App to cover all of them. You might want to check both channels simultaneously, and it's a piece of cake – just follow up the not-reachable branch of pushes, for example, with the reachability check for emails. Thus, you can detect the users who are not subscribed to any of your updates at all and reach out to them with In-Apps or other mediums (such as, e.g., SMS – refer to the Webhooks samples).
Time Delay
The Time Delay element makes users wait for a specified amount of time before moving forward to the next journey step. The delay can be set as a fixed period, specific time, date, and day of the week or can be automatically taken from a tag value or event attributes.
Fixed duration
When set to a fixed period, the Time Delay element lets users continue their journey only when the specified amount of time passes.
For example, if a delay is set to 8 hours, a user who reaches this journey element will wait for 8 hours before moving to the next step.
Please take into consideration that the delay period cannot be longer than 30 days.
Specific time
You can set the exact time for users to move forward through their journey. That means the users who have reached the delay element go to the next journey step once the specified time within that same day occurs.
Please keep in mind the specific time option is set according to the user's timezone.
For example, if a user gets to a delay element early in the morning and you have set the delay to wait until 5:30 PM, those users will proceed to the next journey point at 5:30 PM according to their device's timezone.
If the time you specify has already passed for some users in their timezones, those users will wait till that same exact time the next day.
Date
If you want to set up a one-time campaign on a specific date (for example, send a Black Friday notification), select a particular date and time to continue the journey.
Please remember that the date and time are set according to the user's timezone. If the date and time you specify have already passed for some users in their timezones, they will immediately proceed to the next journey element.
Day of week
If you want the user to move to the next journey point only on a specific day of the week, select the Day of week option and set the desired day and time.
Please remember that the day and time are set according to the user's timezone. If the day and time you specify have already passed for some users in their timezones, they will wait till that same day and time next week.
Delay based on user or event data
For some cases, you might need to set a delay dynamically, based on what you already know about journey travelers or what actions they perform within their journey.
To set a delay based on user Tags or Events they trigger:
choose the Based on user/event data option;
select a Tag or Event to get data from.
The next journey step can be scheduled to happen right on the date and time specified in a Tag value or Event attributes or several days after/several days before that date.
Prerequisites
To set time delays based on Tags or Events, please make sure to prepare those Tags and Events with the correct date and time format:
for Tags: create a Tag of the Date type and set its values in 2006-01-02T15:04:05 format (in UTC)
for Events: create an Event and add an attribute of the Date type; when sending /postEvent requests, use the following date-time format: 2006-01-02 15:04:05.
If the date or time has passed already when a user reaches this journey element, the user will exit the journey.
For example, you set the "before 2 days" delay to remind users of their appointment by getting the date and time of the visit from the Appointment event attributes. If a user makes an appointment for tomorrow, they won't fall under the "before 2 days" delay condition and will exit the journey right after they reach the Time Delay element in their journey.
However, to manage these cases, you can split the further journey into two branches following the Time Delay element and let users continue their journey even if they fall out on the delay step.
Check the Split to branches if the date's in the past or date is empty checkbox, and the further flow will be split up into two branches – "In the future" and "In the past", where "in the past" will gather users whose Tag values or Event attributes don't fall under the delay conditions and can be built of any other elements (for example, another Time Delay, Segment Splitter, Wait for Event, or immediate communication).
If a date and time specified in the user's Tags or Event attributes change while the user is traveling through the journey already, the Time Delay settings will remain unchanged.
Please consider creating several journeys in case users change the dates of their appointments, deliveries, etc.
For example, you can start a journey with the AppointmentCreated event with the DateTime attribute; let's name it a "Reminder" journey. Within the journey, set the push reminder to be sent 2 days before the planned visit using the Time Delay based on the Event attributes. To cover cases when users change their appointment's date or time:
Create an additional Event AppointmentChanged.
For the "Reminder" journey, set this AppointmentChanged Event as a Conversion goal and specify users who reach the goal will exit the journey.
Then, create a new journey starting with the AppointmentChanged Event to remind users who updated their visit's date and time.
Update User Profile
Manual update
To assign Tag values to users within the journey manually:
Add the Update User Profile element wherever you'd like on the canvas.
Press + Manual value and select a Tag from the drop-down list containing all the Tags created in your Pushwoosh account.
Specify values for the Tag selected depending on its type.
You can set up to 10 Tags at once.
For user-specific Tags, values are assigned to all user's devices with the same user ID. For Tags that are not user-specific, values are assigned to a particular device a user's traveling the journey with.
As for use cases, there are plenty of. For example, tagging users who reach a particular journey stage comes in handy when building further communications.
Dynamic Tag Value
Dynamic User Profile Update means the Tag values are taken automatically from attributes of the Events the user trigger prior to reaching the Update User Profile journey element. Setting Tag values according to Events users trigger or their attributes, you can communicate to that users more personally and send them tailored offers.
To learn more about Events and their attributes, please refer to the Events guide.
To set dynamic Tag values, do the following:
1. Put the Update User Profile element anywhere on the canvas providing that at least one triggered-based element (Trigger-based Entry or Wait for Trigger) precedes the Update User Profile element.
2. Double-click the element and press +Dynamic Value in the Dynamic Tag Value section.
3. Select the Tag to set.
If you choose a Tag to be set manually, it won’t appear in the Tags list of the Dynamic Tag Value section.
4. Choose an Event from the dropdown list and the Tag, which value will be set dynamically depending on the attributes of the Event the user triggers.
Please make sure the Tags’ and Event attributes’ types are the same. For example, to set the STRING Tag, the STRING Event attribute should be used. To learn more about Tag types, please refer to Tags and Filters guide.
Webhook
Using webhooks, you can share journey data with just about any other service out there: analytics, CRM systems, marketing automation services, and much more. For example, automatically notify external services when a customer has taken a particular action within the journey, send customer data into your analytic tools, and trigger third-party emails, SMS or WhatsApp messages on specific in-journey events – there are numerous use cases, choose yours.
Check out some examples of how to implement webhooks for different use cases and services: Webhook Integration Samples
Drag-and-drop the Webhook element to the canvas. Place Webhook anywhere you'd like, keeping in mind what journey info you're going to send to a third-party service.
Give it a name. It might be handy to name webhooks according to the services they send data to or the use case.
3. Specify the request URL that you want to send the data to.
4. Set the content type. By default, the content type is application/json. If the service you're sending the webhook to requires another content type, enter the appropriate one in the Content-Type header value. Examples of content types are:
x-www-form-urlencoded
text/plain
text/xml
5. Add headers if needed.
For example, some APIs may require HTTP Basic authentication. To authenticate such requests, do the following:
Open plain text editor and type without any spaces username and password separated by a colon, e.g.:
myuser:mypass
Encode it into Base64.
Copy the resulting string (e.g. bXl1c2VyOm15cGFzcw== )
Add the Authorization header in webhook settings, where the value would be "Basic <YOUR BASE64 STRING>". Mind the space after the word "Basic".
6. Compose the request.
Make sure to use the proper request syntax.
For example, if the content type you use is application/json, you can test the request validity in any JSON checker.
7. To add the Dynamic Data (customer's tag values, attributes of the events the customer triggered, device data, etc.) to your webhook, choose the Dynamic Data parameter, copy the placeholder, and paste it to the request body.
Exit from journey
Exit is a point where the journey ends. Once you specified all communications in a single journey, add the Exit element to complete it.
Last updated