CocoaPods দিয়ে InboxKit সেট আপ করুন
iOS SDK 7.0.40 থেকে উপলব্ধ।
InboxKit একটি ঐচ্ছিক সাবস্পেক (subspec) হিসেবে আমব্রেলা PushwooshXCFramework পডের সাথে আসে। আপনার প্রধান SDK আগে থেকেই ইন্টিগ্রেটেড থাকতে হবে; যদি আপনি নতুন করে শুরু করেন, তবে প্রথমে বেসিক ইন্টিগ্রেশন গাইড অনুসরণ করুন।
InboxKit pod যোগ করুন
Anchor link to1. আপনার Podfile খুলুন এবং আপনার অ্যাপ টার্গেটে InboxKit সাবস্পেক যোগ করুন:
target 'MyApp' do  use_frameworks!
  pod 'PushwooshXCFramework'  pod 'PushwooshXCFramework/PushwooshInboxKit'end
2. আপনার প্রজেক্ট ডিরেক্টরি থেকে pod install চালান:
pod install3. জেনারেট করা .xcworkspace ফাইলটি খুলুন। InboxKit এখন প্রধান SDK-এর সাথে লিঙ্ক করা আছে।
ইনবক্স দেখান
Anchor link toযেকোনো নেভিগেশন ফ্লোতে ইনবক্স কন্ট্রোলার যোগ করুন। ডিফল্ট কনফিগারেশন তিনটি স্ট্যান্ডার্ড সেল টাইপ সহ একটি কার্যকরী ইনবক্স পাওয়ার জন্য যথেষ্ট:
import PushwooshInboxKit
let inboxVC = PushwooshInboxKitViewController()navigationController?.pushViewController(inboxVC, animated: true)
@import PushwooshInboxKit;
PushwooshInboxKitViewController *inboxVC = [PushwooshInboxKitViewController new];[self.navigationController pushViewController:inboxVC animated:YES];ইনবক্স কাস্টমাইজ করুন
Anchor link toSwift-এ, PushwooshInboxKitAttributes ভ্যালু টাইপের মাধ্যমে কন্ট্রোলার কনফিগার করুন। Objective-C-তে, কন্ট্রোলারে @objc-ফ্রেন্ডলি সেটার ব্যবহার করুন — PushwooshInboxKitAttributes একটি Swift struct এবং এটি ব্রিজ করা হয় না।
var attributes = PushwooshInboxKitAttributes()attributes.pullToRefreshEnabled = trueattributes.swipeToDeleteEnabled = trueattributes.pinningEnabled = trueattributes.style.unreadBadgeColor = .systemBlueattributes.style.titleFont = .systemFont(ofSize: 17, weight: .semibold)
let inboxVC = PushwooshInboxKitViewController(attributes: attributes)
PushwooshInboxKitViewController *inboxVC = [PushwooshInboxKitViewController new];[inboxVC setBackgroundColor:[UIColor systemBackgroundColor]];[inboxVC setEmptyMessage:@"You have no messages yet"];Style struct ডিফল্ট সেল দ্বারা ব্যবহৃত সমস্ত রঙ, ফন্ট, কর্নার রেডিয়াস এবং তারিখ ফরম্যাটার প্রকাশ করে। প্রতিটি মান ডিফল্টরূপে একটি Apple সেমান্টিক রঙ, তাই ইনবক্স স্বয়ংক্রিয়ভাবে সিস্টেম ডার্ক মোডে প্রতিক্রিয়া জানায়।
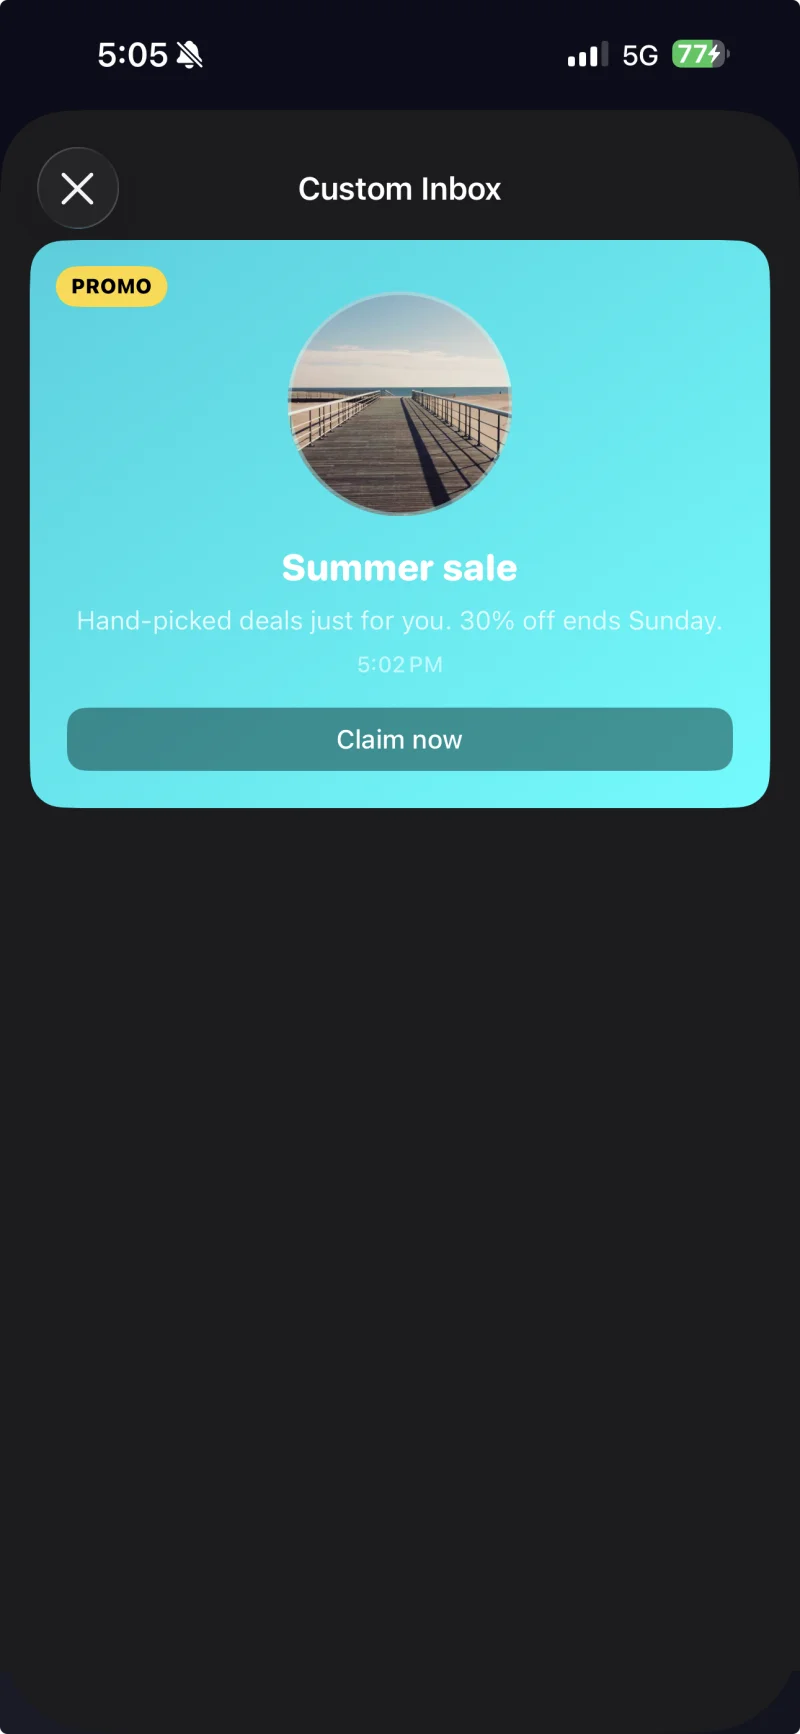
PushwooshInboxKitAttributes.Style-এর মাধ্যমে একটি কাস্টম থিম প্রয়োগ করা ক্যাপশনযুক্ত সেল।
ট্যাপ এবং রিফ্রেশ হ্যান্ডেল করুন
Anchor link toPushwooshInboxKitDelegate-এর সাথে সামঞ্জস্যপূর্ণ হন ব্যবহারকারীর ক্রিয়া এবং রিফ্রেশ ইভেন্টগুলিতে প্রতিক্রিয়া জানাতে। প্রতিটি পদ্ধতির একটি ডিফল্ট বাস্তবায়ন আছে, তাই আপনি শুধুমাত্র আপনার প্রয়োজনের অংশটি ওভাররাইড করবেন:
final class InboxCoordinator: NSObject, PushwooshInboxKitDelegate {    func inboxKit(_ vc: PushwooshInboxKitViewController,                  didSelect message: PWInboxMessageProtocol) -> Bool {        // Return true to let the SDK open the message URL or richmedia.        // Return false if you handled the tap entirely (e.g. routed to a custom screen).        return true    }
    func inboxKit(_ vc: PushwooshInboxKitViewController,                  didRefreshWith messages: [PWInboxMessageProtocol],                  error: Error?) {        // Show your own empty / error state here if needed.    }}
inboxVC.delegate = inboxCoordinator
SDK কন্ট্রোলারে @objc পদ্ধতি হিসাবে বাল্ক অপারেশন সরবরাহ করে, তাই আপনি সেগুলিকে সরাসরি একটি UIBarButtonItem-এর সাথে যুক্ত করতে পারেন:
let markAll = UIBarButtonItem( image: UIImage(systemName: "checkmark.circle"), style: .plain, target: inboxVC, action: #selector(PushwooshInboxKitViewController.markAllAsRead))let clearRead = UIBarButtonItem( image: UIImage(systemName: "trash"), style: .plain, target: inboxVC, action: #selector(PushwooshInboxKitViewController.clearReadMessages))inboxVC.navigationItem.rightBarButtonItems = [clearRead, markAll]