macOS
SDK herunterladen
Beispielprojekt
SDK-API-Dokumentation
Bevor Sie das SDK integrieren, konfigurieren Sie die macOS-Plattform in Ihrem Pushwoosh-Projekt. Folgen Sie der Anleitung zur macOS-Konfiguration.
Verknüpfen des Pushwoosh.framework
Anchor link toFügen Sie das Pushwoosh.framework über einen Abhängigkeitsmanager zu Ihrem Projekt hinzu, indem Sie die folgenden Zeilen in Ihre podfile oder cartfile einfügen:
platform :osx, '10.7'
target 'MyApp' do  pod 'Pushwoosh_mac'end
github "Pushwoosh/pushwoosh-mac-sdk"Alternativ können Sie das Framework einfach per Drag & Drop in Link Binaries With Libraries in den Build Phases Ihres Projekts ziehen.
Hinzufügen von Bibliotheken
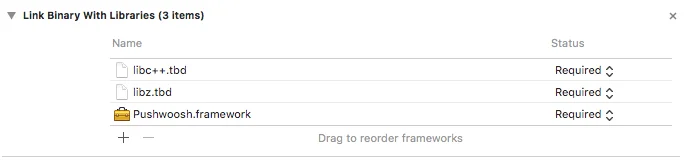
Anchor link toÖffnen Sie im Tab Build Phases Ihres Projekts Link Binaries With Libraries und klicken Sie auf „Elemente hinzufügen“ („+“-Button). Suchen Sie nach den Bibliotheken libz.tbd und libc++.tbd und fügen Sie sie Ihrem Projekt hinzu:
Verknüpfen der App mit dem Pushwoosh Control Panel
Anchor link toFügen Sie in Ihrer Info.plist einen Schlüssel vom Typ String Pushwoosh_APPID mit Ihrem Pushwoosh Application Code als Wert hinzu.
Ändern des AppDelegate
Anchor link toFügen Sie den folgenden Code zu Ihrem AppDelegate hinzu:
import PushKitimport Pushwoosh
func application(_ application: UIApplication, didFinishLaunchingWithOptions launchOptions: [UIApplicationLaunchOptionsKey : Any]? = nil) -> Bool {
//lots of your initialization code
//-----------PUSHWOOSH PART-----------
NSUserNotificationCenter.default.delegate = Pushwoosh.sharedInstance()?.notificationCenterDelegateProxy
// set custom delegate for push handling, in our case - view controllerPushwoosh.sharedInstance().delegate = self
// handling push on app startPushwoosh.sharedInstance().handlePushReceived(aNotification.userInfo)
// register for push notifications!Pushwoosh.sharedInstance().registerForPushNotifications()
#import <Pushwoosh/Pushwoosh.h>
- (void)applicationDidFinishLaunching:(NSNotification *)aNotification{ //lots of your initialization code
//-----------PUSHWOOSH PART-----------
[NSUserNotificationCenter defaultUserNotificationCenter].delegate = [Pushwoosh sharedInstance].notificationCenterDelegateProxy;
// set custom delegate for push handling, in our case - view controller [Pushwoosh sharedInstance].delegate = self;
// handling push on app start [[Pushwoosh sharedInstance] handlePushReceived:[aNotification userInfo]];
// register for push notifications! [[Pushwoosh sharedInstance] registerForPushNotifications]; }Fügen Sie den folgenden Code zu Ihrem UIApplicationDelegate hinzu (dieselbe Datei wie oben).
// system push notification registration success callback, delegate to PWMessagingDelegatefunc application(_ application: NSApplication, didRegisterForRemoteNotificationsWithDeviceToken deviceToken: Data) {   Pushwoosh.sharedInstance()?.handlePushRegistration(deviceToken)}
// system push notification registration error callback, delegate to PWMessagingDelegatefunc application(_ application: NSApplication, didFailToRegisterForRemoteNotificationsWithError error: Error) {   Pushwoosh.sharedInstance()?.handlePushRegistrationFailure(error)}
// system push notification registration success callback, delegate to pushManager- (void)application:(NSApplication *)application didRegisterForRemoteNotificationsWithDeviceToken:(NSData *)deviceToken { [[Pushwoosh sharedInstance] handlePushRegistration:deviceToken];}
// system push notification registration error callback, delegate to pushManager- (void)application:(NSApplication *)application didFailToRegisterForRemoteNotificationsWithError:(NSError *)error { [[Pushwoosh sharedInstance] handlePushRegistrationFailure:error];}Um Push-Benachrichtigungen zu verarbeiten, fügen Sie die folgende Funktion zu Ihrem UIApplicationDelegate hinzu (dieselbe Datei wie drei Schritte zuvor):
//this event is fired when the push gets receivedfunc pushwoosh(_ pushwoosh: Pushwoosh!, onMessageReceived message: PWMessage!) {   print("onMessageReceived: \(String(describing: message.payload))")}
//this event is fired when user taps the notificationfunc pushwoosh(_ pushwoosh: Pushwoosh!, onMessageOpened message: PWMessage!) {   print("onMessageOpened: \(String(describing: message.payload))")}
//this event is fired when the push gets received- (void)pushwoosh:(Pushwoosh *)pushwoosh onMessageReceived:(PWMessage *)message { NSLog(@"onMessageReceived: %@", message.payload);}
//this event is fired when user taps the notification- (void)pushwoosh:(Pushwoosh *)pushwoosh onMessageOpened:(PWMessage *)message { NSLog(@"onMessageOpened: %@", message.payload);}Aktivieren von Push-Benachrichtigungen
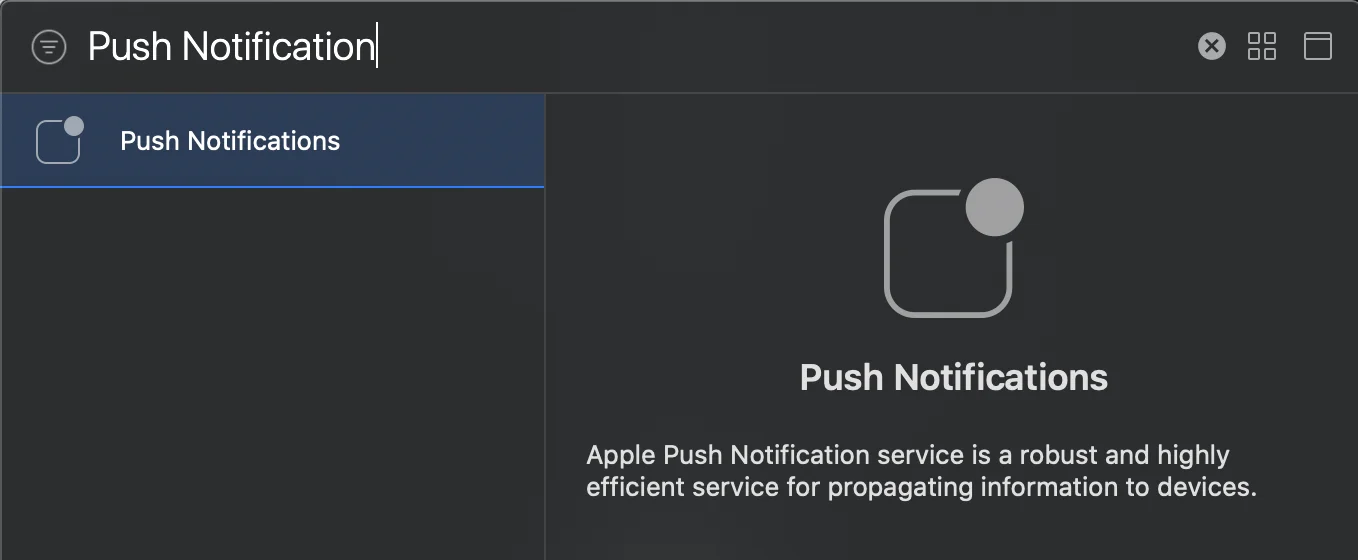
Anchor link toGehen Sie zu Signing and Capabilities in Ihrem Target. Drücken Sie + Capability und fügen Sie Push Notifications hinzu.