iOS SDK 7.0+ 基础集成指南
本节包含有关如何将 Pushwoosh SDK 集成到您的 iOS 应用程序中的信息。
先决条件
Anchor link to要将 Pushwoosh iOS SDK 集成到您的应用程序中,您需要具备以下条件:
集成步骤
Anchor link to1. 安装
Anchor link to您可以使用 Swift Package Manager 或 CocoaPods 将 Pushwoosh SDK 集成到您的应用程序中。
Swift Package Manager
Anchor link to在 Package Dependencies 部分,添加以下包:
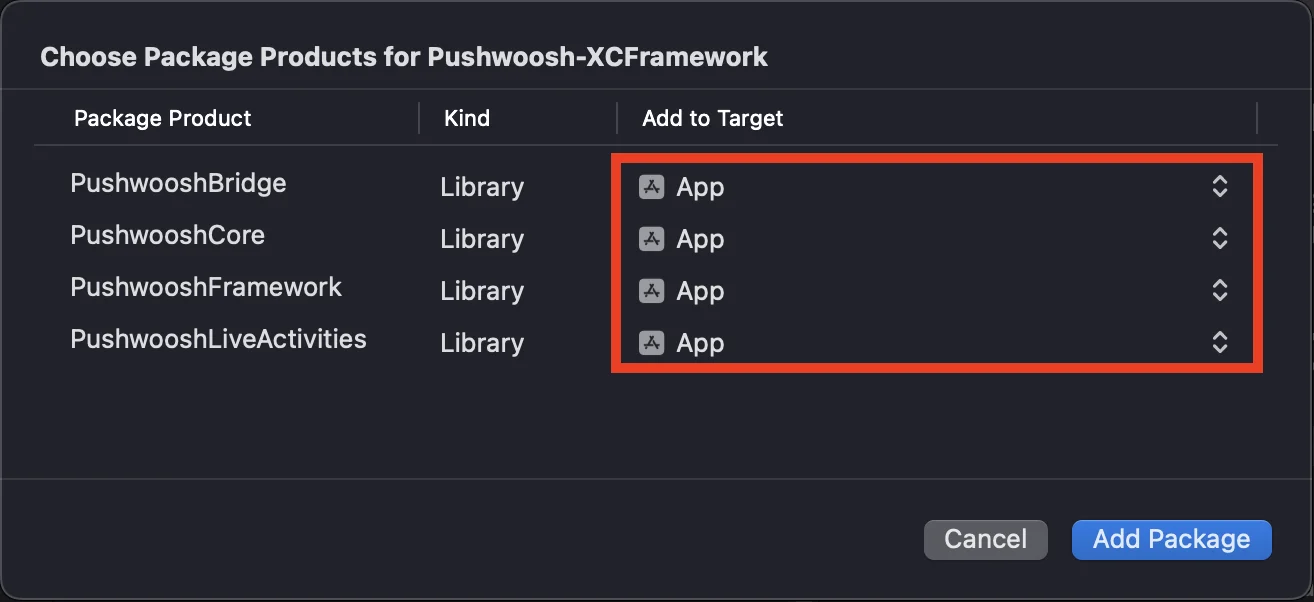
https://github.com/Pushwoosh/Pushwoosh-XCFramework要使用 Pushwoosh iOS SDK,请确保在通过 Swift Package Manager 集成时将以下三个框架添加到您的应用程序目标中:
PushwooshFrameworkPushwooshCorePushwooshBridge
CocoaPods
Anchor link to打开您的 Podfile 并添加依赖项:
# Uncomment the next line to define a global platform for your project# platform :ios, '9.0'
target 'MyApp' do  # Comment the next line if you don't want to use dynamic frameworks  use_frameworks!
  pod 'PushwooshXCFramework'
end
然后,在终端中运行以下命令来安装依赖项:
pod install2. 功能 (Capabilities)
Anchor link to要在您的项目中启用推送通知,您需要添加某些功能。
在 Signing & Capabilities 部分,添加以下功能:
Push NotificationsBackground Modes。添加此功能后,选中Remote notifications复选框。
如果您打算使用 Time Sensitive Notifications (iOS 15+),也请添加 Time Sensitive Notifications 功能。
3. 初始化代码
Anchor link toAppDelegate
Anchor link to将以下代码添加到您的 AppDelegate 类中:
import SwiftUIimport PushwooshFramework
@mainstruct MyApp: App {    // 将 AppDelegate 注册为 UIApplicationDelegate    @UIApplicationDelegateAdaptor(AppDelegate.self) var appDelegate
    var body: some Scene {        WindowGroup {            ContentView()        }    }}
class AppDelegate: NSObject, UIApplicationDelegate, PWMessagingDelegate {
    func application(_ application: UIApplication, didFinishLaunchingWithOptions launchOptions: [UIApplication.LaunchOptionsKey: Any]?) -> Bool {        // 初始化代码        // 为推送处理设置自定义委托        Pushwoosh.configure.delegate = self
        // 注册推送通知        Pushwoosh.configure.registerForPushNotifications()
        return true    }
    // 处理从 APNS 收到的令牌    func application(_ application: UIApplication, didRegisterForRemoteNotificationsWithDeviceToken deviceToken: Data) {        Pushwoosh.configure.handlePushRegistration(deviceToken)    }
    // 处理令牌接收错误    func application(_ application: UIApplication, didFailToRegisterForRemoteNotificationsWithError error: Error) {        Pushwoosh.configure.handlePushRegistrationFailure(error)    }
    // 用于静默推送通知    func application(_ application: UIApplication, didReceiveRemoteNotification userInfo: [AnyHashable: Any], fetchCompletionHandler completionHandler: @escaping (UIBackgroundFetchResult) -> Void) {        Pushwoosh.configure.handlePushReceived(userInfo)        completionHandler(.noData)    }
    // 收到推送时触发    func pushwoosh(_ pushwoosh: Pushwoosh, onMessageReceived message: PWMessage) {        print("onMessageReceived: ", message.payload!.description)    }
    // 用户点击通知时触发    func pushwoosh(_ pushwoosh: Pushwoosh, onMessageOpened message: PWMessage) {        print("onMessageOpened: ", message.payload!.description)    }}
struct ContentView: View {    var body: some View {        Text("Pushwoosh with SwiftUI")            .padding()    }}
import PushwooshFramework
@UIApplicationMainclass AppDelegate: UIResponder, UIApplicationDelegate, PWMessagingDelegate {
var window: UIWindow?
func application(_ application: UIApplication, didFinishLaunchingWithOptions launchOptions: [UIApplication.LaunchOptionsKey: Any]?) -> Bool { // 初始化代码 // 为推送处理设置自定义委托,在我们的例子中是 AppDelegate Pushwoosh.configure.delegate = self;
// 注册推送通知 Pushwoosh.configure.registerForPushNotifications()
return true }
// 处理从 APNS 收到的令牌 func application(_ application: UIApplication, didRegisterForRemoteNotificationsWithDeviceToken deviceToken: Data) { Pushwoosh.configure.handlePushRegistration(deviceToken) }
// 处理令牌接收错误 func application(_ application: UIApplication, didFailToRegisterForRemoteNotificationsWithError error: Error) { Pushwoosh.configure.handlePushRegistrationFailure(error); }
// 用于静默推送通知 func application(_ application: UIApplication, didReceiveRemoteNotification userInfo: [AnyHashable : Any], fetchCompletionHandler completionHandler: @escaping (UIBackgroundFetchResult) -> Void) { Pushwoosh.configure.handlePushReceived(userInfo) completionHandler(.noData) }
// 收到推送时会触发此事件 func pushwoosh(_ pushwoosh: Pushwoosh, onMessageReceived message: PWMessage) { print("onMessageReceived: ", message.payload!.description) }
// 用户点击通知时触发 func pushwoosh(_ pushwoosh: Pushwoosh, onMessageOpened message: PWMessage) { print("onMessageOpened: ", message.payload!.description) }}#import <PushwooshFramework/PushwooshFramework.h>
@interface AppDelegate () <PWMessagingDelegate>
@end
@implementation AppDelegate
- (BOOL)application:(UIApplication *)application didFinishLaunchingWithOptions:(NSDictionary *)launchOptions { //-----------PUSHWOOSH 部分-----------
// 为推送处理设置自定义委托,在我们的例子中是 AppDelegate [[Pushwoosh configure] setDelegate:self];
// 注册推送通知! [[Pushwoosh configure] registerForPushNotifications];
return YES;}
// 处理从 APNS 收到的令牌- (void)application:(UIApplication *)application didRegisterForRemoteNotificationsWithDeviceToken:(NSData *)deviceToken { [[Pushwoosh configure] handlePushRegistration:deviceToken];}
// 处理令牌接收错误- (void)application:(UIApplication *)application didFailToRegisterForRemoteNotificationsWithError:(NSError *)error { [[Pushwoosh configure] handlePushRegistrationFailure:error];}
// 用于静默推送通知- (void)application:(UIApplication *)application didReceiveRemoteNotification:(NSDictionary *)userInfo fetchCompletionHandler:(void (^)(UIBackgroundFetchResult))completionHandler { [[Pushwoosh configure] handlePushReceived:userInfo]; completionHandler(UIBackgroundFetchResultNoData);}
// 收到推送时会触发此事件- (void)pushwoosh:(Pushwoosh *)pushwoosh onMessageReceived:(PWMessage *)message { NSLog(@"onMessageReceived: %@", message.payload);}
// 用户点击通知时会触发此事件- (void)pushwoosh:(Pushwoosh *)pushwoosh onMessageOpened:(PWMessage *)message { NSLog(@"onMessageOpened: %@", message.payload);}
@endInfo.plist
Anchor link to在您的 Info.plist 中:
- 将
Pushwoosh_APPID键设置为 Pushwoosh Application Code。 - 将
Pushwoosh_API_TOKEN键设置为 Pushwoosh 设备 API 令牌
4. 消息送达跟踪
Anchor link toPushwoosh 支持通过 Notification Service Extension 跟踪推送通知的送达事件
添加 Notification Service Extension
Anchor link to- 在 Xcode 中,选择 File > New > Target…
- 选择 Notification Service Extension 并按 Next。
- 输入目标名称并按 Finish。
- 当提示激活时,按 Cancel。
Notification Service Extension 的依赖项 (仅限 CocoaPods)
Anchor link to注意:如果您使用 Swift Package Manager 管理依赖项,可以跳过此步骤,因为依赖项会自动添加。
打开您的 Podfile 并为目标添加依赖项:
# Uncomment the next line to define a global platform for your project# platform :ios, '9.0'
target 'MyApp' do  # Comment the next line if you don't want to use dynamic frameworks  use_frameworks!
  pod 'PushwooshXCFramework'
end
target 'MyAppNotificationExtension' do  use_frameworks!
  pod 'PushwooshXCFramework'
end
在终端中运行以下命令以更新依赖项:
pod update将 Pushwoosh SDK 添加到 Notification Service Extension
Anchor link to将生成的 NotificationService 类替换为 PushwooshNotificationServiceExtension 的子类。Pushwoosh 随后会处理推送所需的一切——发送送达事件、角标计数、下载媒体附件以及强制性的 serviceExtensionTimeWillExpire 超时回退。无需其他代码。
import PushwooshFramework
class NotificationService: PushwooshNotificationServiceExtension {}
#import <PushwooshFramework/PushwooshFramework.h>
@interface NotificationService : PushwooshNotificationServiceExtension@end
@implementation NotificationService@end注意:您可以完全跳过源文件——在其 Info.plist 中将扩展的 NSExtensionPrincipalClass 设置为 PushwooshNotificationServiceExtension,完全不用编写代码。
要在通知显示前对其进行修改,请覆盖 didReceive(_:withContentHandler:),用您自己的内容处理程序调用 super,在其中修改内容,然后将其转发给原始处理程序。Pushwoosh 仍会运行送达事件、角标、附件和超时回退。
import UserNotificationsimport PushwooshFramework
class NotificationService: PushwooshNotificationServiceExtension {
    override func didReceive(_ request: UNNotificationRequest,                             withContentHandler contentHandler: @escaping (UNNotificationContent) -> Void) {        super.didReceive(request) { content in            let mutable = (content.mutableCopy() as? UNMutableNotificationContent) ?? content            // 在此处修改通知内容...            contentHandler(mutable)        }    }
}
#import <PushwooshFramework/PushwooshFramework.h>
@interface NotificationService : PushwooshNotificationServiceExtension@end
@implementation NotificationService
- (void)didReceiveNotificationRequest:(UNNotificationRequest *)request withContentHandler:(void (^)(UNNotificationContent * _Nonnull))contentHandler { [super didReceiveNotificationRequest:request withContentHandler:^(UNNotificationContent *content) { UNMutableNotificationContent *mutable = [content mutableCopy]; // 在此处修改通知内容... contentHandler(mutable); }];}
@endInfo.plist
Anchor link to扩展会从主应用程序继承 Pushwoosh_APPID(以及其他 Pushwoosh_* 键),因此您无需在扩展的 Info.plist 中重复它们。仅当您想覆盖主应用程序的值时,才在其中添加键。
要将角标计数和反向代理设置与应用程序同步,请在应用程序和扩展之间共享一个 App Group。将 App Groups 功能添加到两个目标,然后在主应用程序的 Info.plist 中设置 App Group ID:
PW_APP_GROUPS_NAME- 您的 App Group 标识符(例如,group.com.example.app)。
扩展会从主应用程序继承此值,因此您无需在扩展的 Info.plist 中重复它——仅在需要覆盖主应用程序的值时才添加。或者,通过覆盖 pushwooshAppGroupsName 在代码中提供它。
5. 运行项目
Anchor link to- 构建并运行项目。
- 前往 Pushwoosh Control Panel 并发送推送通知。
- 您应该会在应用程序中看到该通知。
Pushwoosh iOS 扩展集成
Anchor link to至此,您已经集成了 SDK,可以发送和接收推送通知。现在,让我们来探索核心功能
推送通知
Anchor link to在 Pushwoosh SDK 中,有两个用于处理推送通知的回调:
onMessageReceived:当收到推送通知时调用此方法。onMessageOpened:当用户与通知交互(打开)时调用此方法
这些回调使开发人员能够在其应用程序中管理推送通知的接收和用户交互
import PushwooshFramework
class AppDelegate: NSObject, UIApplicationDelegate, PWMessagingDelegate {
    func application(_ application: UIApplication, didFinishLaunchingWithOptions launchOptions: [UIApplication.LaunchOptionsKey : Any]? = nil) -> Bool {        Pushwoosh.configure.delegate = self;    }
    func pushwoosh(_ pushwoosh: Pushwoosh, onMessageOpened message: PWMessage) {        if let payload = message.payload {            print("onMessageOpened: \(payload)")        }    }
    func pushwoosh(_ pushwoosh: Pushwoosh, onMessageReceived message: PWMessage) {        if let payload = message.payload {            print("onMessageReceived: \(payload)")        }    }}
#import <PushwooshFramework/PushwooshFramework.h>
@interface AppDelegate () <PWMessagingDelegate>
@end
@implementation AppDelegate
- (BOOL)application:(UIApplication *)application didFinishLaunchingWithOptions:(NSDictionary *)launchOptions { [[Pushwoosh configure] setDelegate:self]; return YES;}
- (void)pushwoosh:(Pushwoosh *)pushwoosh onMessageOpened:(PWMessage *)message { if (message.payload) { NSLog(@"onMessageOpened: %@", message.payload); }}
- (void)pushwoosh:(Pushwoosh *)pushwoosh onMessageReceived:(PWMessage *)message { if (message.payload) { NSLog(@"onMessageReceived: %@", message.payload); }}@end用户配置
Anchor link to通过关注个人用户的行为和偏好,您可以提供个性化内容,从而提高用户满意度和忠诚度
import PushwooshFramework
class Registration {
    func afterUserLogin(user: User) {        let pushwoosh = Pushwoosh.configure        // 设置用户 ID        if let userId = user.userId {            pushwoosh.setUserId(userId)        }
        // 设置用户邮箱        if let userEmail = user.email {            pushwoosh.setEmail(userEmail)        }
        // 设置用户短信号码        if let userSmsNumber = user.SmsNumber {            pushwoosh.registerSmsNumber(userSmsNumber)        }
        // 设置用户 WhatsApp 号码        if let userWhatsAppNumber = user.WhatsAppNumber {            pushwoosh.registerSmsNumber(userWhatsAppNumber)        }
        // 将其他用户信息设置为 Pushwoosh 的标签        if let age = user.userDetails.age,            let name = user.userDetails.userName,            let lastLogin = user.userDetails.lastLoginDate {            pushwoosh.setTags([                "age": age,                "name": name,                "last_login": lastLogin            ])        }    }}
#import <PushwooshFramework/PushwooshFramework.h>
@implementation Registration
- (void)afterUserLogin:(User *)user { Pushwoosh *pushwoosh = [Pushwoosh configure];
// 设置用户 ID if (user.userId) { [pushwoosh setUserId:user.userId]; }
// 设置用户邮箱 if (user.email) { [pushwoosh setEmail:user.email]; }
// 将其他用户信息设置为 Pushwoosh 的标签 if (user.userDetails.age && user.userDetails.userName && user.userDetails.lastLoginDate) { NSDictionary *tags = @{ @"age": user.userDetails.age, @"name": user.userDetails.userName, @"last_login": user.userDetails.lastLoginDate }; [pushwoosh setTags:tags]; }}
@end标签 (Tags)
Anchor link to标签是分配给用户或设备的键值对,允许根据偏好或行为等属性进行分段,从而实现定向消息传递。
import PushwooshFramework
class UpdateUser {    func afterUserUpdateProfile(user: User) {        let pushwoosh = Pushwoosh.configure
        // 设置喜爱的类别列表        pushwoosh.setTags(["favorite_categories" : user.getFavoriteCategories()])
        // 设置支付信息        pushwoosh.setTags([            "is_subscribed": user.isSubscribed(),            "payment_status": user.getPaymentStatus(),            "billing_address": user.getBillingAddress()        ])    }}
#import <PushwooshFramework/PushwooshFramework.h>
@implementation UpdateUser
- (void)afterUserUpdateProfile:(User *)user { Pushwoosh *pushwoosh = [Pushwoosh configure];
// 设置喜爱的类别列表 [pushwoosh setTags:@{@"favorite_categories" : user.getFavoriteCategories}];
// 设置支付信息 NSDictionary *tags = @{ @"is_subscribed": @(user.isSubscribed), @"payment_status": user.getPaymentStatus, @"billing_address": user.getBillingAddress }; [pushwoosh setTags:tags];}
@end事件 (Events)
Anchor link to事件是应用内特定的用户操作或发生的事情,可以被跟踪以分析行为并触发相应的消息或操作
import PushwooshFramework
class Registration {
    func afterUserLogin(user: User) {        if let userName = user.getUserName(), let lastLogin = user.getLastLoginDate() {            PWInAppManager.shared().postEvent("login", withAttributes: [                "name": userName,                "last_login": lastLogin            ])        }    }
    func afterUserPurchase(user: User, product: Product) {        let pushwoosh = Pushwoosh.configure
        // 跟踪购买事件        PWInAppManager.shared().postEvent("purchase", withAttributes: [            "product_id": product.getId(),            "product_name": product.getName(),            "price": product.getPrice(),            "quantity": product.getQuantity()        ])
        // 设置用户标签        let lastPurchaseDate = Date().timeIntervalSince1970        let lifetimeSpend = getCurrentLifetimeSpend() + product.getPrice()
        pushwoosh.setTags([            "last_purchase_date": lastPurchaseDate,            "lifetime_spend": lifetimeSpend        ])    }}
#import <PushwooshFramework/PushwooshFramework.h>#import <PushwooshFramework/PWInAppManager.h>
@implementation Registration
- (void)afterUserLogin:(User *)user { NSString *userName = [user getUserName]; NSDate *lastLogin = [user getLastLoginDate];
if (userName && lastLogin) { [[PWInAppManager sharedManager] postEvent:@"login" withAttributes:@{ @"name": userName, @"last_login": lastLogin }]; }}
- (void)afterUserPurchase:(User *)user product:(Product *)product { Pushwoosh *pushwoosh = [Pushwoosh configure];
// 跟踪购买事件 [[PWInAppManager sharedManager] postEvent:@"purchase" withAttributes:@{ @"product_id": [product getId], @"product_name": [product getName], @"price": @([product getPrice]), @"quantity": @([product getQuantity]) }];
// 设置用户标签 NSTimeInterval lastPurchaseDate = [[NSDate date] timeIntervalSince1970]; double lifetimeSpend = /* 获取当前生命周期总支出 */ + [product getPrice];
NSDictionary *tags = @{ @"last_purchase_date": @(lastPurchaseDate), @"lifetime_spend": @(lifetimeSpend) };
[pushwoosh setTags:tags];}
@end富媒体 (Rich Media)
Anchor link to富媒体是指在通知和应用内消息中使用的交互式多媒体内容,如图像、视频或 HTML,以增强用户参与度
import PushwooshFramework
class ViewController: UIViewController, PWRichMediaPresentingDelegate {
    override func viewDidLoad() {        super.viewDidLoad()        let richMediaConfiguration = PWModalWindowConfiguration.shared()
        PWRichMediaManager.shared().delegate = self        richMediaConfiguration.configureModalWindow(with: .PWModalWindowPositionBottom,                                                             present: .PWAnimationPresentFromBottom,                                                             dismiss: .PWAnimationDismissDown)    }
    func richMediaManager(_ richMediaManager: PWRichMediaManager!, shouldPresent richMedia: PWRichMedia!) -> Bool {        print("Rich media will be presented with: \(richMedia.pushPayload!)")        return true    }
    func richMediaManager(_ richMediaManager: PWRichMediaManager!, didPresent richMedia: PWRichMedia!) {        print("Rich media has been presented with: \(richMedia.pushPayload!)")    }
    func richMediaManager(_ richMediaManager: PWRichMediaManager!, didClose richMedia: PWRichMedia!) {        print("Rich media has been closed with: \(richMedia.pushPayload!)")    }
    func richMediaManager(_ richMediaManager: PWRichMediaManager!, presentingDidFailFor richMedia: PWRichMedia!, withError error: (any Error)!) {        print("Failed to present rich media with: \(richMedia.pushPayload!). Error: \(error.localizedDescription)")    }}
#import "ViewController.h"#import <PushwooshFramework/PushwooshFramework.h>#import <PushwooshFramework/PWRichMediaManager.h>#import <PushwooshFramework/PWModalWindowConfiguration.h>
@interface ViewController () <PWRichMediaPresentingDelegate>
@end
@implementation ViewController
- (void)viewDidLoad { [super viewDidLoad];
[[PWRichMediaManager sharedManager] setDelegate:self]; [[PWModalWindowConfiguration shared] configureModalWindowWith:PWModalWindowPositionBottom presentAnimation:PWAnimationPresentFromBottom dismissAnimation:PWAnimationDismissDown];}
- (BOOL)richMediaManager:(PWRichMediaManager *)richMediaManager shouldPresentRichMedia:(PWRichMedia *)richMedia { NSLog(@"Rich media will be presented with: %@", richMedia.pushPayload); return YES;}
- (void)richMediaManager:(PWRichMediaManager *)richMediaManager didPresentRichMedia:(PWRichMedia *)richMedia { NSLog(@"Rich media has been presented with: %@", richMedia.pushPayload);}
- (void)richMediaManager:(PWRichMediaManager *)richMediaManager didCloseRichMedia:(PWRichMedia *)richMedia { NSLog(@"Rich media has been closed with:: %@", richMedia.pushPayload);}
- (void)richMediaManager:(PWRichMediaManager *)richMediaManager presentingDidFailForRichMedia:(PWRichMedia *)richMedia withError:(NSError *)error { NSLog(@"Failed to present rich media with: %@. Error: %@", richMedia.pushPayload, error.localizedDescription);}
@end故障排除
Anchor link to未能构建模块 ‘PushwooshFramework’
Anchor link to在构建项目时,您可能会遇到类似以下的错误:
Failed to build module 'PushwooshFramework'; this SDK is not supported by the compiler(the SDK is built with 'Apple Swift version 5.10 (swiftlang-5.10.0.13 clang-1500.3.9.4)',while this compiler is 'Apple Swift version 6.1.2 effective-5.10 (swiftlang-6.1.2.1.2 clang-1700.0.13.5)')原因: 此错误与 Swift 编译器版本不兼容无关。从 Pushwoosh iOS SDK 6.8.0 版本开始,SDK 被模块化为几个相互交互的组件。当并非所有必需的框架都添加到您的项目中时,就会发生此错误。
解决方案: 确保在通过 Swift Package Manager 集成时,将所有四个必需的框架都添加到您的应用程序目标中:
PushwooshFrameworkPushwooshCorePushwooshBridgePushwooshLiveActivities
要在 Xcode 中验证这一点:
- 在 Project Navigator 中选择您的项目
- 选择您的应用程序目标
- 前往 General > Frameworks, Libraries, and Embedded Content
- 确认所有四个框架都已列出
推送已发送但未送达
Anchor link to如果推送未送达 iOS 设备,请参阅 iOS、Mac OS X、Safari 错误,了解错误代码及每个错误的修复方法。
如果在集成过程中遇到任何问题,请参阅支持和社区部分。