自定义 Android SDK
深层链接
Anchor link to在将处理深层链接的 activity 中,添加带有 scheme、host 和 pathPrefix 参数的 <data> 标签。
<activity          android:name=".PromoActivity"          android:label="PromoActivity">    <intent-filter>        <action android:name="android.intent.action.VIEW" />        <category android:name="android.intent.category.DEFAULT" />        <category android:name="android.intent.category.BROWSABLE" />
<data android:scheme="com.pushwoosh" android:host="promotion" android:pathPrefix="" /> </intent-filter></activity>在上面的示例中,深层链接将打开 PromoActivity。为简单起见,下面的基本实现会显示带有 promo id 值的警报。在您的应用程序中,它肯定可以做一些有用的事情!
public class PromoActivity extends Activity{    @Override    protected void onCreate(Bundle savedInstanceState)    {        super.onCreate(savedInstanceState);
        setContentView(R.layout.deep_link);        setTitle("Deep link activity");
        Intent intent = getIntent();        String action = intent.getAction();        Uri data = intent.getData();
        if (TextUtils.equals(action, Intent.ACTION_VIEW))        {            openUrl(data);        }    }
    private void openUrl(Uri uri)    {        String promoId = uri.getQueryParameter("id");        Toast.makeText(getApplicationContext(), promoId, Toast.LENGTH_LONG).show();    }}
应用内购买跟踪
Anchor link to如果您想在 Customer Journeys 中跟踪应用内购买,请通过调用此方法配置向 Pushwoosh 发送购买信息:
Pushwoosh.getInstance().sendInappPurchase(@NonNull String sku, @NonNull BigDecimal price, @NonNull String currency);Geozones 推送通知
Anchor link to要使用地理区域推送,请添加 com.pushwoosh:pushwoosh-location 库并调用:
PushwooshLocation.startLocationTracking();在您的 AndroidManifest.xml 中,包含必要的权限:
<manifest ... >  <!-- Required for geolocation-based push notifications -->  <uses-permission android:name="android.permission.ACCESS_COARSE_LOCATION" />
  <!-- Required for precise location tracking -->  <uses-permission android:name="android.permission.ACCESS_FINE_LOCATION" />
  <!-- Required for background location access on Android 10 (API level 29) and higher -->  <uses-permission android:name="android.permission.ACCESS_BACKGROUND_LOCATION" /></manifest>
将本地通知与 Pushwoosh 结合使用
Anchor link to如果您使用 Pushwoosh 本地通知 API,请将 RECEIVE_BOOT_COMPLETED 权限添加到您的 AndroidManifest.xml 中:
<uses-permission android:name="android.permission.RECEIVE_BOOT_COMPLETED"/>x在 Android 上使用角标数字
Anchor link toPushwoosh 支持在以下 Android 启动器的应用图标快捷方式上设置角标数字:
索尼、三星、LG、HTC、华硕、ADW、APEX、NOVA、华为、ZUK、OPPO。
要使用此功能,只需将 com.pushwoosh:pushwoosh-badge 库添加到您的应用程序中即可。
打开自定义 activity
Anchor link to如果您想在响应推送通知时启动特定的 activity,请将以下 intent-filter 添加到该 activity 中:
<activity android:name="YourActivity"> <intent-filter> <action android:name="${applicationId}.MESSAGE"/> <category android:name="android.intent.category.DEFAULT"/> </intent-filter></activity>控制日志级别
Anchor link to为了帮助调试和集成,SDK 默认会将所有请求打印到控制台。当您准备好进行生产构建时,请将值为 “ERROR” 的 com.pushwoosh.log_level meta-data 添加到 AndroidManifest.xml 中。这样,只有关于错误的信息会输出到控制台。其他选项可以是以下之一:
NONE - SDK 不记录任何日志
ERROR - 仅在控制台显示错误
WARN - 同时显示警告
INFO - 显示信息性消息
DEBUG - 现在甚至显示调试信息
NOISE - SDK 可以打印的所有内容以及更多
<meta-data android:name="com.pushwoosh.log_level" android:value="ERROR" />使用 Proguard
Anchor link to使用 Proguard 时,请添加以下选项:
-keep class com.pushwoosh.** { *; }-dontwarn com.pushwoosh.**有关 Proguard 的 Google Play Services 库要求,请参阅:
https://developers.google.com/android/guides/setup
自定义通知打开行为
Anchor link to如果您需要以编程方式选择因推送通知而显示的 activity,您可以创建自定义的 NotificationServiceExtension,并在 com.pushwoosh.notification_service_extension 值的元数据中包含您的 NotificationServiceExtension 的完全限定类名。
<meta-data android:name="com.pushwoosh.notification_service_extension" android:value="com.your.package.YourNotificationServiceExtension" />public class YourNotificationServiceExtension extends NotificationServiceExtension { @Override protected void startActivityForPushMessage(PushMessage message) { // super.startActivityForPushMessage() starts default launcher activity // or activity marked with ${applicationId}.MESSAGE action. // Simply do not call it to override this behaviour. // super.startActivityForPushMessage(message);
// start your activity instead: Intent launchIntent = new Intent(getApplicationContext(), YourActivity.class); launchIntent.setFlags(Intent.FLAG_ACTIVITY_NEW_TASK | Intent.FLAG_ACTIVITY_RESET_TASK_IF_NEEDED);
// (Optional) pass notification data to Activity launchIntent.putExtra(Pushwoosh.PUSH_RECEIVE_EVENT, message.toJson().toString());
context.startActivity(launchIntent); }}自定义推送通知
Anchor link to要自定义推送通知的视图,您需要创建一个自定义 Factory,您可以创建自定义的 NotificationFactory,并在 com.pushwoosh.notification_factory 值的元数据中包含您的 NotificationFactory 的完全限定类名。
<meta-data android:name="com.pushwoosh.notification_factory" android:value="com.your.package.YourNotificationFactory" />public class YourNotificationFactory extends PushwooshNotificationFactory { @Override public Notification onGenerateNotification(@NonNull PushMessage pushMessage) { if (customNotification) { // TODO: generate and return custom notification }
// return default Pushwoosh notification return super.onGenerateNotification(pushMessage); }}自定义分组摘要
Anchor link to要自定义分组摘要的外观,请创建一个自定义 Factory。您可以创建自定义的 SummaryNotificationFactory,并在 com.pushwoosh.summary_notification_factory 值的元数据中包含您的 SummaryNotificationFactory 的完全限定类名。
<meta-data android:name="com.pushwoosh.summary_notification_factory" android:value="com.your.package.YourSummaryNotificationFactory" />public class YourSummaryNotificationFactory extends PushwooshSummaryNotificationFactory { @Override public String summaryNotificationMessage(int notificationsAmount) { // return the message you want return super.summaryNotificationMessage(notificationsAmount); } @Override public int summaryNotificationIconResId() { // return the icon resource id you want return super.summaryNotificationIconResId(); }}私有端点 URL
Anchor link toPushwoosh 为拥有自定义计划订阅的客户提供私有端点。要为 Android SDK 设置私有端点,您需要将以下内容添加到您的 AndroidManifest.xml 文件中:
<meta-data android:name="com.pushwoosh.base_url" android:value="PUSHWOOSH_PRIVATE_ENDPOINT_URL_PROVIDED" />创建富媒体队列
Anchor link to如果需要同时显示多个富媒体页面(例如,两个或多个应用内消息的触发事件同时发生,或者在另一个触发事件发生时已经显示了一个富媒体页面),您可以设置一个富媒体页面显示队列。要创建队列,请将以下代码添加到您的项目中:
package com.pushwoosh.testingapp;
import com.pushwoosh.RichMediaManager;import com.pushwoosh.exception.PushwooshException;import com.pushwoosh.richmedia.RichMediaPresentingDelegate;import com.pushwoosh.richmedia.RichMedia;import com.pushwoosh.internal.utils.PWLog;
import java.util.ArrayDeque;import java.util.concurrent.locks.ReentrantLock;
public class DefaultRichMediaPresentingDelegate implements RichMediaPresentingDelegate {    private final String TAG = DefaultRichMediaPresentingDelegate.class.getSimpleName();    private ArrayDeque<RichMedia> richMediaQueue = new ArrayDeque<>();    private RichMedia currentRichMedia = null;    private ReentrantLock reentrantLock;
    public DefaultRichMediaPresentingDelegate() {        PWLog.noise(TAG, "new DefaultRichMediaPresentingDelegate:" + this);        reentrantLock = new ReentrantLock();    }
    @Override    public boolean shouldPresent(RichMedia richMedia) {        PWLog.noise(TAG, "shouldPresent:" + richMedia);        if (currentRichMedia == null) {            PWLog.noise(TAG, "currentRichMedia is null");        }        if (richMedia.isLockScreen()) {            PWLog.noise(TAG, "isLockScreen is true");            return true;        }        try {            reentrantLock.lock();            if (currentRichMedia == null) {                PWLog.noise(TAG, "show:" + richMedia);                currentRichMedia = richMedia;                return true;            } else {                PWLog.noise(TAG, "add to queue:" + richMedia);                richMediaQueue.add(richMedia);                return false;            }        } finally {            reentrantLock.unlock();        }    }
    @Override    public void onPresent(RichMedia richMedia) {        PWLog.noise(TAG, "onPresent" + richMedia);    }
    @Override    public void onError(RichMedia richMedia, PushwooshException pushwooshException) {        PWLog.error(TAG, pushwooshException + " richMedia:"+richMedia.toString());        tryShowNextRichMediaThreadSafety();    }
    @Override    public void onClose(RichMedia richMedia) {        PWLog.noise(TAG, "onClose:" + richMedia);        tryShowNextRichMediaThreadSafety();    }
    private void tryShowNextRichMediaThreadSafety() {        try {            reentrantLock.lock();            tryShowNextRichMedia();        } finally {            reentrantLock.unlock();        }    }
private void tryShowNextRichMedia() { if (!richMediaQueue.isEmpty()) { currentRichMedia = richMediaQueue.poll(); PWLog.noise(TAG, "try manual show:" + currentRichMedia); RichMediaManager.present(currentRichMedia); } else { PWLog.noise(TAG, "richMediaQueue is empty"); currentRichMedia = null; } }}自定义声音推送
Anchor link to- 将您的音频文件放在正确的文件夹中。对于原生 Android 框架,您的文件应放在
/app/src/main/res/raw文件夹中。
-
创建一个通知渠道。
-
在配置推送消息时选择一个声音。
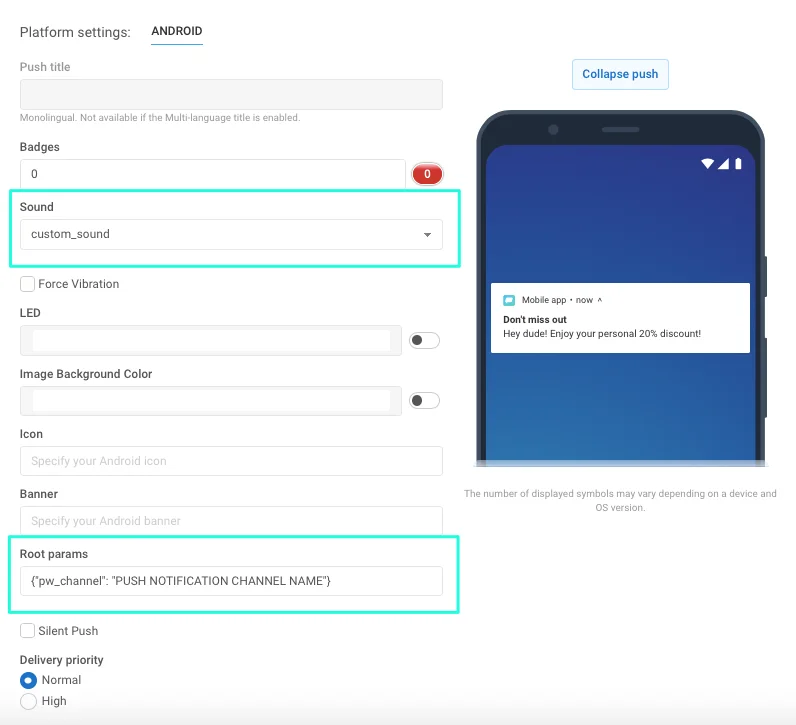
- 设置消息所属的通知渠道。为此,请在“Android root params”字段中指定以下内容:
{"pw_channel": "PUSH NOTIFICATION CHANNEL NAME"} //_此处需要指定带有自定义声音的渠道名称_
如果使用远程 API,请在您的 /createMessage API 请求中按如下方式设置参数:
"android_root_params": {"pw_channel": "push"} // here you need to specify the name for your channel with custom sound, for example, "push" for the notifications with push.wav sound."android_sound": "push" // here you should specify the file name without extension一旦您发送了带有这些指定参数的推送,就会为所有 Android 8+ 设备创建带有选定声音的通知渠道。
现在,要发送带有自定义声音的推送,您只需指定与该声音关联的渠道即可。
自定义通知声音的 Proguard 规则
Anchor link to如果您的应用使用 proguard 进行代码和资源压缩,保持您的声音文件完整并可供外部库使用非常重要。如果您在 build.gradle 中使用 minifyEnabled = true 属性,请将以下规则添加到您的 proguard-rules.pro 中:
-keep public class your.package.name.R$raw { *;}如果您在代码压缩的基础上通过使用 shrinkResources=true 属性来压缩应用的资源,您应额外指定要保留的资源。为此,请创建一个任意名称的新 XML 文件,将其保存在您项目的某个位置(例如,在 res/xml 中),并在 resources 标签下的 tools:keep 参数中指定资源名称:
<?xml version="1.0" encoding="utf-8"?><resources xmlns:tools="http://schemas.android.com/tools" tools:keep="@raw/*"/>Android SDK meta-data 标志完整列表
Anchor link to要设置一个标志,您需要将 meta-data 块添加到 AndroidManifest.xml 文件中的 application 标签内。例如,如果您想设置 Pushwoosh 应用程序 ID,请将以下代码添加到您的 AndroidManifest.xml 文件中:
<meta-data android:name="com.pushwoosh.appid" android:value="XXXXX-XXXXX" />| 标志 | 描述 | 可能的值 |
|---|---|---|
| com.pushwoosh.appid | 设置 Pushwoosh 应用程序 ID。 | XXXXX-XXXXX |
| com.pushwoosh.log_level | 设置日志记录级别。有关详细信息,请参阅 控制日志级别。 | NONE / ERROR / WARN / INFO / DEBUG (默认) / NOISE |
| com.pushwoosh.base_url | 覆盖 Pushwoosh 服务器基础 URL。 | https://cp.pushwoosh.com/json/1.3/ (默认) |
| com.pushwoosh.notification_service_extension | 自定义 NotificationServiceExtension。有关详细信息,请参阅 自定义通知打开行为。 | com.myapp.MyNotificationServiceExtension |
| com.pushwoosh.notification_factory | 自定义 NotificationFactory。 有关详细信息,请参阅 自定义推送通知。 | com.myapp.MyNotificationFactory |
| com.pushwoosh.summary_notification_factory | 自定义 SummaryNotificationFactory。 | com.myapp.MySummaryNotificationFactory |
| com.pushwoosh.multi_notification_mode | 如果为 true,通知将被分组。如果为 false,则只显示最后收到的通知。 | true / false (默认) |
| com.pushwoosh.allow_server_communication | 如果为 true,则允许 SDK 向 Pushwoosh 服务器发送网络请求。 | true (默认) / false |
| com.pushwoosh.handle_notifications_using_workmanager | 如果为 true,则设置 WorkManager 来处理通知。 | true / false (默认) |
| com.pushwoosh.notification_icon | 自定义通知(小)图标资源名称。如果为 null,将使用默认应用程序图标。 | res/drawable-xxhdpi-v11/notification_small_icon.png / null |
| com.pushwoosh.notification_icon_color | 通知(小)图标背景颜色。 | #FFFFFF |
| com.pushwoosh.allow_collecting_device_data | 如果为 true,则允许 SDK 收集设备数据并发送到 Pushwoosh。 | true (默认) / false |
| com.pushwoosh.allow_collecting_device_os_version | 如果为 true,则允许 SDK 收集设备操作系统版本并发送到 Pushwoosh。 | true (默认) / false |
| com.pushwoosh.allow_collecting_device_locale | 如果为 true,则允许 SDK 收集设备区域设置并发送到 Pushwoosh。 | true (默认) / false |
| com.pushwoosh.allow_collecting_device_model | 如果为 true,则允许 SDK 收集设备型号并发送到 Pushwoosh。 | true (默认) / false |
| com.pushwoosh.in_app_business_solutions_capping | 限制 push-unregister 应用内消息一天内可以显示的次数。 | 1 (默认), 2, …, n |
| com.pushwoosh.start_foreground_service | 如果为 true,则前台服务会与 PushwooshLocation.startLocationTracking() 调用一起启动 | true / false (默认) |
| com.pushwoosh.foreground_service_notification_text | 设置当为“com.pushwoosh.start_foreground_service”键启动前台服务时创建的通知文本。 | Work in progress (默认) |
| com.pushwoosh.foreground_service_notification_channel_name | 设置当为“com.pushwoosh.start_foreground_service”键启动前台服务时创建的通知的渠道名称。 | Foreground service (默认) |
| com.pushwoosh.trusted_package_names | 允许与指定的包共享 Pushwoosh HWID | ”com.mycompany.myapp1, com.mycompany.myapp2” |
通过 TTL (Time-To-Live) 删除推送通知
Anchor link to要使用 TTL (Time-to-Live) 在指定时间段后自动删除推送通知,请按照以下步骤操作:
-
创建一个自定义 NotificationFactory。了解更多
-
在
onGenerateNotification()方法中,使用Notification.Builder或NotificationCompat.Builder类创建一个通知,并调用setTimeoutAfter方法:
public class YourNotificationFactory extends PushwooshNotificationFactory {
    @Override    public Notification onGenerateNotification(@NonNull PushMessage pushMessage) {        Notification.Builder builder = new Notification.Builder(getApplicationContext(), addChannel(pushData));
        Notification notification = builder.setContentText(pushData.getMessage())                                           .setContentTitle(title)                                           .setContentText(text)                                           // rest of your notification creation code                                           .setTimeoutAfter(timeout) // time in milliseconds before the notification is canceled                                           .build();    }}
与我们分享您的反馈
Anchor link to您的反馈有助于我们创造更好的体验,因此如果您在 SDK 集成过程中遇到任何问题,我们很乐意听取您的意见。如果您遇到任何困难,请随时通过此表格与我们分享您的想法。