macOS
在集成 SDK 之前,请在您的 Pushwoosh 项目中配置 macOS 平台。请遵循 macOS 配置指南。
链接 Pushwoosh.framework
Anchor link to通过依赖管理器将 Pushwoosh.framework 添加到您的项目中,方法是将以下几行代码放入您的 podfile 或 cartfile 中:
platform :osx, '10.7'
target 'MyApp' do  pod 'Pushwoosh_mac'end
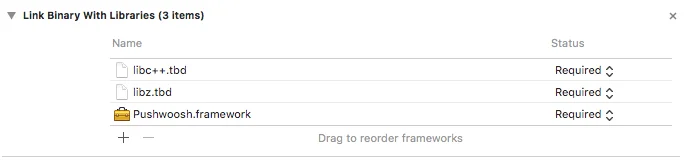
github "Pushwoosh/pushwoosh-mac-sdk"或者,您也可以简单地将该框架拖放到项目 Build Phases 中的 Link Binaries With Libraries 中。
在您项目的 Build Phases 选项卡中,打开 Link Binaries With Libraries,然后点击添加项(“+”按钮)。搜索并添加 libz.tbd 和 libc++.tbd 库到您的项目中:
将应用与 Pushwoosh Control Panel 链接
Anchor link to在您的 Info.plist 中,添加一个字符串类型的键 Pushwoosh_APPID,其值为您的 Pushwoosh Application Code。
修改 AppDelegate
Anchor link to将以下代码添加到您的 AppDelegate 中:
import PushKitimport Pushwoosh
func application(_ application: UIApplication, didFinishLaunchingWithOptions launchOptions: [UIApplicationLaunchOptionsKey : Any]? = nil) -> Bool {
// 您的许多初始化代码
//-----------PUSHWOOSH 部分-----------
NSUserNotificationCenter.default.delegate = Pushwoosh.sharedInstance()?.notificationCenterDelegateProxy
// 为推送处理设置自定义委托,在我们的例子中是视图控制器Pushwoosh.sharedInstance().delegate = self
// 在应用启动时处理推送Pushwoosh.sharedInstance().handlePushReceived(aNotification.userInfo)
// 注册推送通知!Pushwoosh.sharedInstance().registerForPushNotifications()
#import <Pushwoosh/Pushwoosh.h>
- (void)applicationDidFinishLaunching:(NSNotification *)aNotification{ // 您的许多初始化代码
//-----------PUSHWOOSH 部分-----------
[NSUserNotificationCenter defaultUserNotificationCenter].delegate = [Pushwoosh sharedInstance].notificationCenterDelegateProxy;
// 为推送处理设置自定义委托,在我们的例子中是视图控制器 [Pushwoosh sharedInstance].delegate = self;
// 在应用启动时处理推送 [[Pushwoosh sharedInstance] handlePushReceived:[aNotification userInfo]];
// 注册推送通知! [[Pushwoosh sharedInstance] registerForPushNotifications]; }将以下代码添加到您的 UIApplicationDelegate 中(与上述文件相同)。
// 系统推送通知注册成功回调,委托给 PWMessagingDelegatefunc application(_ application: NSApplication, didRegisterForRemoteNotificationsWithDeviceToken deviceToken: Data) {   Pushwoosh.sharedInstance()?.handlePushRegistration(deviceToken)}
// 系统推送通知注册失败回调,委托给 PWMessagingDelegatefunc application(_ application: NSApplication, didFailToRegisterForRemoteNotificationsWithError error: Error) {   Pushwoosh.sharedInstance()?.handlePushRegistrationFailure(error)}
// 系统推送通知注册成功回调,委托给 pushManager- (void)application:(NSApplication *)application didRegisterForRemoteNotificationsWithDeviceToken:(NSData *)deviceToken { [[Pushwoosh sharedInstance] handlePushRegistration:deviceToken];}
// 系统推送通知注册失败回调,委托给 pushManager- (void)application:(NSApplication *)application didFailToRegisterForRemoteNotificationsWithError:(NSError *)error { [[Pushwoosh sharedInstance] handlePushRegistrationFailure:error];}要处理推送通知,请将以下函数添加到您的 UIApplicationDelegate 中(与上面三个步骤中的文件相同):
// 当收到推送时会触发此事件func pushwoosh(_ pushwoosh: Pushwoosh!, onMessageReceived message: PWMessage!) {   print("onMessageReceived: \(String(describing: message.payload))")}
// 当用户点击通知时会触发此事件func pushwoosh(_ pushwoosh: Pushwoosh!, onMessageOpened message: PWMessage!) {   print("onMessageOpened: \(String(describing: message.payload))")}
// 当收到推送时会触发此事件- (void)pushwoosh:(Pushwoosh *)pushwoosh onMessageReceived:(PWMessage *)message { NSLog(@"onMessageReceived: %@", message.payload);}
// 当用户点击通知时会触发此事件- (void)pushwoosh:(Pushwoosh *)pushwoosh onMessageOpened:(PWMessage *)message { NSLog(@"onMessageOpened: %@", message.payload);}启用推送通知
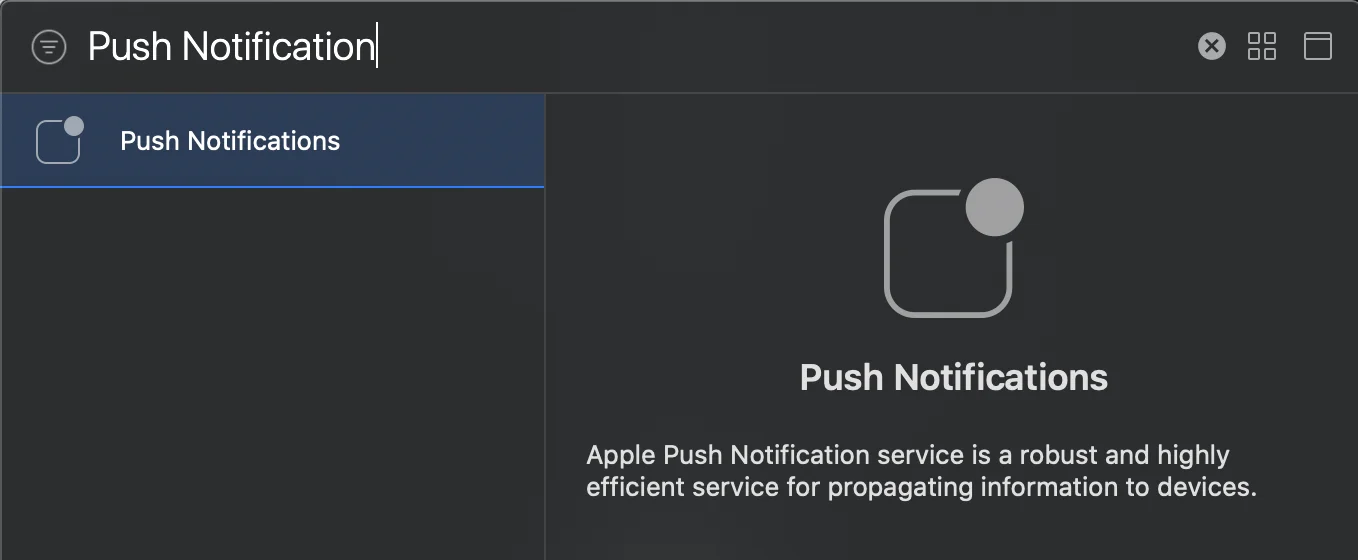
Anchor link to转到您目标中的 Signing and Capabilities。按 + Capability 并添加 Push Notifications。