iOS SDK 7.0+ बेसिक इंटीग्रेशन गाइड
इस सेक्शन में यह जानकारी दी गई है कि Pushwoosh SDK को अपने iOS एप्लिकेशन में कैसे इंटीग्रेट करें।
आवश्यक शर्तें
Anchor link toPushwoosh iOS SDK को अपने ऐप में इंटीग्रेट करने के लिए, आपको निम्नलिखित की आवश्यकता होगी:
इंटीग्रेशन के चरण
Anchor link to1. इंस्टॉलेशन
Anchor link toआप स्विफ्ट पैकेज मैनेजर या कोकोआपॉड्स का उपयोग करके Pushwoosh SDK को अपने एप्लिकेशन में इंटीग्रेट कर सकते हैं।
स्विफ्ट पैकेज मैनेजर
Anchor link toपैकेज डिपेंडेंसी सेक्शन में, निम्नलिखित पैकेज जोड़ें:
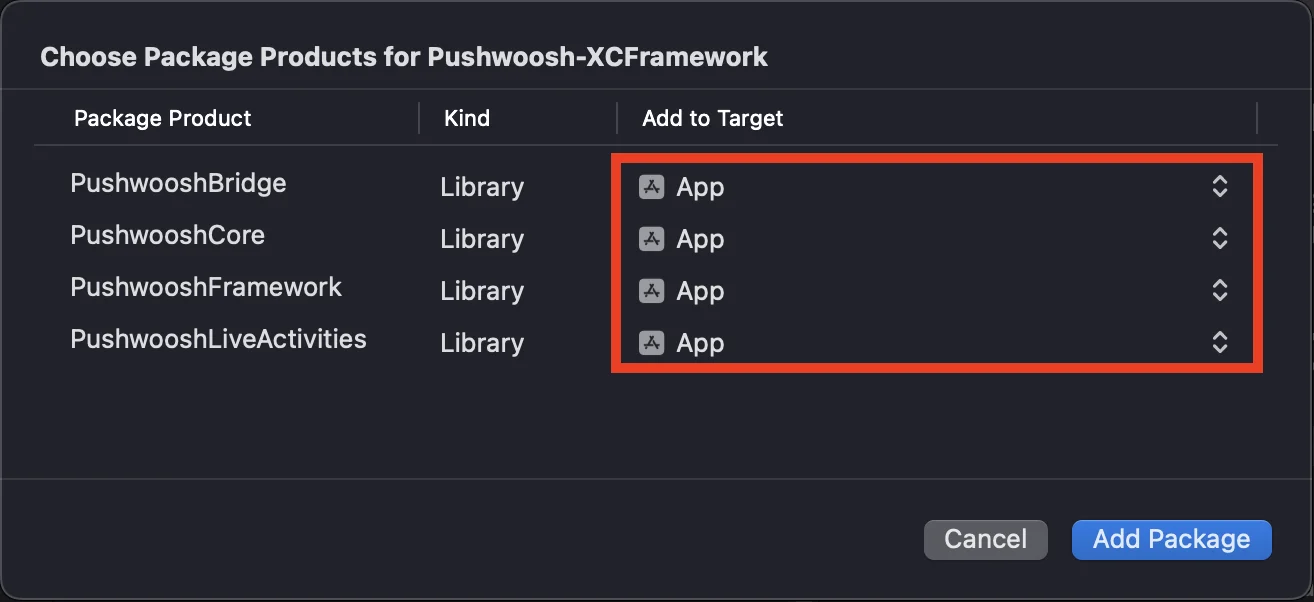
https://github.com/Pushwoosh/Pushwoosh-XCFrameworkPushwoosh iOS SDK का उपयोग करने के लिए, स्विफ्ट पैकेज मैनेजर के माध्यम से इंटीग्रेट करते समय अपने ऐप टारगेट में निम्नलिखित तीन फ्रेमवर्क जोड़ना सुनिश्चित करें:
PushwooshFrameworkPushwooshCorePushwooshBridge
कोकोआपॉड्स
Anchor link toअपना Podfile खोलें और डिपेंडेंसी जोड़ें:
# अपने प्रोजेक्ट के लिए एक ग्लोबल प्लेटफॉर्म को परिभाषित करने के लिए अगली लाइन को अनकम्मेंट करें# platform :ios, '9.0'
target 'MyApp' do  # अगर आप डायनामिक फ्रेमवर्क का उपयोग नहीं करना चाहते हैं तो अगली लाइन को कमेंट करें  use_frameworks!
  pod 'PushwooshXCFramework'
end
फिर, टर्मिनल में, डिपेंडेंसी इंस्टॉल करने के लिए निम्नलिखित कमांड चलाएँ:
pod install2. कैपेबिलिटीज़
Anchor link toअपने प्रोजेक्ट में पुश नोटिफिकेशन को सक्षम करने के लिए, आपको कुछ कैपेबिलिटीज़ जोड़ने की आवश्यकता है।
साइनिंग और कैपेबिलिटीज़ सेक्शन में, निम्नलिखित कैपेबिलिटीज़ जोड़ें:
Push NotificationsBackground Modes। इस कैपेबिलिटी को जोड़ने के बाद,Remote notificationsके लिए बॉक्स को चेक करें।
यदि आप टाइम सेंसिटिव नोटिफिकेशन (iOS 15+) का उपयोग करना चाहते हैं, तो Time Sensitive Notifications कैपेबिलिटी भी जोड़ें।
3. इनिशियलाइज़ेशन कोड
Anchor link toAppDelegate
Anchor link toअपने AppDelegate क्लास में निम्नलिखित कोड जोड़ें:
import SwiftUIimport PushwooshFramework
@mainstruct MyApp: App {    // Register AppDelegate as UIApplicationDelegate    @UIApplicationDelegateAdaptor(AppDelegate.self) var appDelegate
    var body: some Scene {        WindowGroup {            ContentView()        }    }}
class AppDelegate: NSObject, UIApplicationDelegate, PWMessagingDelegate {
    func application(_ application: UIApplication, didFinishLaunchingWithOptions launchOptions: [UIApplication.LaunchOptionsKey: Any]?) -> Bool {        // Initialization code        // Set custom delegate for push handling        Pushwoosh.configure.delegate = self
        // Register for push notifications        Pushwoosh.configure.registerForPushNotifications()
        return true    }
    // Handle token received from APNS    func application(_ application: UIApplication, didRegisterForRemoteNotificationsWithDeviceToken deviceToken: Data) {        Pushwoosh.configure.handlePushRegistration(deviceToken)    }
    // Handle token receiving error    func application(_ application: UIApplication, didFailToRegisterForRemoteNotificationsWithError error: Error) {        Pushwoosh.configure.handlePushRegistrationFailure(error)    }
    //for silent push notifications    func application(_ application: UIApplication, didReceiveRemoteNotification userInfo: [AnyHashable: Any], fetchCompletionHandler completionHandler: @escaping (UIBackgroundFetchResult) -> Void) {        Pushwoosh.configure.handlePushReceived(userInfo)        completionHandler(.noData)    }
    // Fired when a push is received    func pushwoosh(_ pushwoosh: Pushwoosh, onMessageReceived message: PWMessage) {        print("onMessageReceived: ", message.payload!.description)    }
    // Fired when a user taps the notification    func pushwoosh(_ pushwoosh: Pushwoosh, onMessageOpened message: PWMessage) {        print("onMessageOpened: ", message.payload!.description)    }}
struct ContentView: View {    var body: some View {        Text("Pushwoosh with SwiftUI")            .padding()    }}
import PushwooshFramework
@UIApplicationMainclass AppDelegate: UIResponder, UIApplicationDelegate, PWMessagingDelegate {
var window: UIWindow?
func application(_ application: UIApplication, didFinishLaunchingWithOptions launchOptions: [UIApplication.LaunchOptionsKey: Any]?) -> Bool { //initialization code //set custom delegate for push handling, in our case AppDelegate Pushwoosh.configure.delegate = self;
//register for push notifications Pushwoosh.configure.registerForPushNotifications()
return true }
//handle token received from APNS func application(_ application: UIApplication, didRegisterForRemoteNotificationsWithDeviceToken deviceToken: Data) { Pushwoosh.configure.handlePushRegistration(deviceToken) }
//handle token receiving error func application(_ application: UIApplication, didFailToRegisterForRemoteNotificationsWithError error: Error) { Pushwoosh.configure.handlePushRegistrationFailure(error); }
//for silent push notifications func application(_ application: UIApplication, didReceiveRemoteNotification userInfo: [AnyHashable : Any], fetchCompletionHandler completionHandler: @escaping (UIBackgroundFetchResult) -> Void) { Pushwoosh.configure.handlePushReceived(userInfo) completionHandler(.noData) }
//this event is fired when the push gets received func pushwoosh(_ pushwoosh: Pushwoosh, onMessageReceived message: PWMessage) { print("onMessageReceived: ", message.payload!.description) }
// Fired when a user taps the notification func pushwoosh(_ pushwoosh: Pushwoosh, onMessageOpened message: PWMessage) { print("onMessageOpened: ", message.payload!.description) }}#import <PushwooshFramework/PushwooshFramework.h>
@interface AppDelegate () <PWMessagingDelegate>
@end
@implementation AppDelegate
- (BOOL)application:(UIApplication *)application didFinishLaunchingWithOptions:(NSDictionary *)launchOptions { //-----------PUSHWOOSH PART-----------
// set custom delegate for push handling, in our case AppDelegate [[Pushwoosh configure] setDelegate:self];
//register for push notifications! [[Pushwoosh configure] registerForPushNotifications];
return YES;}
//handle token received from APNS- (void)application:(UIApplication *)application didRegisterForRemoteNotificationsWithDeviceToken:(NSData *)deviceToken { [[Pushwoosh configure] handlePushRegistration:deviceToken];}
//handle token receiving error- (void)application:(UIApplication *)application didFailToRegisterForRemoteNotificationsWithError:(NSError *)error { [[Pushwoosh configure] handlePushRegistrationFailure:error];}
//for silent push notifications- (void)application:(UIApplication *)application didReceiveRemoteNotification:(NSDictionary *)userInfo fetchCompletionHandler:(void (^)(UIBackgroundFetchResult))completionHandler { [[Pushwoosh configure] handlePushReceived:userInfo]; completionHandler(UIBackgroundFetchResultNoData);}
//this event is fired when the push gets received- (void)pushwoosh:(Pushwoosh *)pushwoosh onMessageReceived:(PWMessage *)message { NSLog(@"onMessageReceived: %@", message.payload);}
//this event is fired when user taps the notification- (void)pushwoosh:(Pushwoosh *)pushwoosh onMessageOpened:(PWMessage *)message { NSLog(@"onMessageOpened: %@", message.payload);}
@endInfo.plist
Anchor link toअपने Info.plist में:
Pushwoosh_APPIDकुंजी को Pushwoosh एप्लिकेशन कोड पर सेट करें।Pushwoosh_API_TOKENकुंजी को Pushwoosh डिवाइस API टोकन पर सेट करें।
4. मैसेज डिलीवरी ट्रैकिंग
Anchor link toPushwoosh नोटिफिकेशन सर्विस एक्सटेंशन के माध्यम से पुश नोटिफिकेशन के लिए डिलीवरी इवेंट्स को ट्रैक करने का समर्थन करता है।
नोटिफिकेशन सर्विस एक्सटेंशन जोड़ें
Anchor link to- Xcode में, File > New > Target… चुनें।
- Notification Service Extension चुनें और Next दबाएँ।
- टारगेट का नाम दर्ज करें और Finish दबाएँ।
- जब एक्टिवेशन के लिए कहा जाए, तो Cancel दबाएँ।
नोटिफिकेशन सर्विस एक्सटेंशन के लिए डिपेंडेंसी (केवल CocoaPods)
Anchor link toध्यान दें: यदि आप डिपेंडेंसी को मैनेज करने के लिए स्विफ्ट पैकेज मैनेजर का उपयोग कर रहे हैं, तो आप इस चरण को छोड़ सकते हैं, क्योंकि डिपेंडेंसी स्वचालित रूप से जुड़ जाती हैं।
अपना Podfile खोलें और टारगेट के लिए डिपेंडेंसी जोड़ें:
# अपने प्रोजेक्ट के लिए एक ग्लोबल प्लेटफॉर्म को परिभाषित करने के लिए अगली लाइन को अनकम्मेंट करें# platform :ios, '9.0'
target 'MyApp' do  # अगर आप डायनामिक फ्रेमवर्क का उपयोग नहीं करना चाहते हैं तो अगली लाइन को कमेंट करें  use_frameworks!
  pod 'PushwooshXCFramework'
end
target 'MyAppNotificationExtension' do  use_frameworks!
  pod 'PushwooshXCFramework'
end
डिपेंडेंसी को अपडेट करने के लिए टर्मिनल में निम्नलिखित कमांड चलाएँ:
pod updateनोटिफिकेशन सर्विस एक्सटेंशन में Pushwoosh SDK जोड़ें
Anchor link toउत्पन्न NotificationService क्लास को PushwooshNotificationServiceExtension के सबक्लास से बदलें। Pushwoosh फिर एक पुश के लिए आवश्यक सब कुछ संभालता है - डिलीवरी इवेंट भेजना, बैज गिनना, मीडिया अटैचमेंट डाउनलोड करना, और अनिवार्य serviceExtensionTimeWillExpire टाइमआउट फॉलबैक। किसी अन्य कोड की आवश्यकता नहीं है।
import PushwooshFramework
class NotificationService: PushwooshNotificationServiceExtension {}
#import <PushwooshFramework/PushwooshFramework.h>
@interface NotificationService : PushwooshNotificationServiceExtension@end
@implementation NotificationService@endध्यान दें: आप स्रोत फ़ाइल को पूरी तरह से छोड़ सकते हैं - एक्सटेंशन के NSExtensionPrincipalClass को उसके Info.plist में PushwooshNotificationServiceExtension पर सेट करें और कोई कोड न लिखें।
नोटिफिकेशन को दिखाए जाने से पहले संशोधित करने के लिए, didReceive(_:withContentHandler:) को ओवरराइड करें, अपने स्वयं के कंटेंट हैंडलर के साथ super को कॉल करें, उसके अंदर कंटेंट को म्यूटेट करें, फिर उसे मूल हैंडलर को फॉरवर्ड करें। Pushwoosh अभी भी डिलीवरी इवेंट, बैज, अटैचमेंट और टाइमआउट फॉलबैक चलाता है।
import UserNotificationsimport PushwooshFramework
class NotificationService: PushwooshNotificationServiceExtension {
    override func didReceive(_ request: UNNotificationRequest,                             withContentHandler contentHandler: @escaping (UNNotificationContent) -> Void) {        super.didReceive(request) { content in            let mutable = (content.mutableCopy() as? UNMutableNotificationContent) ?? content            // Modify the notification content here...            contentHandler(mutable)        }    }
}
#import <PushwooshFramework/PushwooshFramework.h>
@interface NotificationService : PushwooshNotificationServiceExtension@end
@implementation NotificationService
- (void)didReceiveNotificationRequest:(UNNotificationRequest *)request withContentHandler:(void (^)(UNNotificationContent * _Nonnull))contentHandler { [super didReceiveNotificationRequest:request withContentHandler:^(UNNotificationContent *content) { UNMutableNotificationContent *mutable = [content mutableCopy]; // Modify the notification content here... contentHandler(mutable); }];}
@endInfo.plist
Anchor link toएक्सटेंशन होस्ट ऐप से Pushwoosh_APPID (और अन्य Pushwoosh_* कुंजियाँ) इनहेरिट करता है, इसलिए आपको उन्हें एक्सटेंशन के Info.plist में डुप्लिकेट करने की आवश्यकता नहीं है। वहां एक कुंजी केवल तभी जोड़ें जब आप होस्ट मान को ओवरराइड करना चाहते हैं।
बैज काउंट और रिवर्स-प्रॉक्सी सेटिंग्स को ऐप के साथ सिंक करने के लिए, ऐप और एक्सटेंशन के बीच एक ऐप ग्रुप साझा करें। दोनों टारगेट्स में ऐप ग्रुप्स कैपेबिलिटी जोड़ें, फिर मुख्य ऐप के Info.plist में ऐप ग्रुप आईडी सेट करें:
PW_APP_GROUPS_NAME- आपका ऐप ग्रुप पहचानकर्ता (उदाहरण के लिए,group.com.example.app)।
एक्सटेंशन इस मान को होस्ट ऐप से इनहेरिट करता है, इसलिए आपको इसे एक्सटेंशन के Info.plist में दोहराने की आवश्यकता नहीं है - इसे केवल होस्ट को ओवरराइड करने के लिए वहां जोड़ें। वैकल्पिक रूप से, इसे pushwooshAppGroupsName को ओवरराइड करके कोड में प्रदान करें।
5. प्रोजेक्ट चलाएँ
Anchor link to- प्रोजेक्ट को बनाएँ और चलाएँ।
- Pushwoosh कंट्रोल पैनल पर जाएँ और एक पुश नोटिफिकेशन भेजें।
- आपको ऐप में नोटिफिकेशन दिखना चाहिए।
विस्तारित Pushwoosh iOS इंटीग्रेशन
Anchor link toइस स्तर पर, आपने पहले ही SDK को इंटीग्रेट कर लिया है और पुश नोटिफिकेशन भेज और प्राप्त कर सकते हैं। अब, आइए मुख्य कार्यक्षमता का पता लगाएँ।
पुश नोटिफिकेशन्स
Anchor link toPushwoosh SDK में, पुश नोटिफिकेशन को संभालने के लिए दो कॉलबैक डिज़ाइन किए गए हैं:
onMessageReceived: यह विधि तब लागू होती है जब एक पुश नोटिफिकेशन प्राप्त होता है।onMessageOpened: यह विधि तब कॉल की जाती है जब उपयोगकर्ता नोटिफिकेशन के साथ इंटरैक्ट करता है (खोलता है)।
ये कॉलबैक डेवलपर्स को अपने एप्लिकेशन के भीतर पुश नोटिफिकेशन के रिसेप्शन और उपयोगकर्ता इंटरैक्शन को मैनेज करने में सक्षम बनाते हैं।
import PushwooshFramework
class AppDelegate: NSObject, UIApplicationDelegate, PWMessagingDelegate {
    func application(_ application: UIApplication, didFinishLaunchingWithOptions launchOptions: [UIApplication.LaunchOptionsKey : Any]? = nil) -> Bool {        Pushwoosh.configure.delegate = self;    }
    func pushwoosh(_ pushwoosh: Pushwoosh, onMessageOpened message: PWMessage) {        if let payload = message.payload {            print("onMessageOpened: \(payload)")        }    }
    func pushwoosh(_ pushwoosh: Pushwoosh, onMessageReceived message: PWMessage) {        if let payload = message.payload {            print("onMessageReceived: \(payload)")        }    }}
#import <PushwooshFramework/PushwooshFramework.h>
@interface AppDelegate () <PWMessagingDelegate>
@end
@implementation AppDelegate
- (BOOL)application:(UIApplication *)application didFinishLaunchingWithOptions:(NSDictionary *)launchOptions { [[Pushwoosh configure] setDelegate:self]; return YES;}
- (void)pushwoosh:(Pushwoosh *)pushwoosh onMessageOpened:(PWMessage *)message { if (message.payload) { NSLog(@"onMessageOpened: %@", message.payload); }}
- (void)pushwoosh:(Pushwoosh *)pushwoosh onMessageReceived:(PWMessage *)message { if (message.payload) { NSLog(@"onMessageReceived: %@", message.payload); }}@endयूज़र कॉन्फ़िगरेशन
Anchor link toव्यक्तिगत उपयोगकर्ता व्यवहार और वरीयताओं पर ध्यान केंद्रित करके, आप व्यक्तिगत सामग्री प्रदान कर सकते हैं, जिससे उपयोगकर्ता संतुष्टि और वफादारी में वृद्धि होती है।
import PushwooshFramework
class Registration {
    func afterUserLogin(user: User) {        let pushwoosh = Pushwoosh.configure        // set user ID        if let userId = user.userId {            pushwoosh.setUserId(userId)        }
        // set user email        if let userEmail = user.email {            pushwoosh.setEmail(userEmail)        }
        // set user SMS number        if let userSmsNumber = user.SmsNumber {            pushwoosh.registerSmsNumber(userSmsNumber)        }
        // set user WhatsApp number        if let userWhatsAppNumber = user.WhatsAppNumber {            pushwoosh.registerSmsNumber(userWhatsAppNumber)        }
        // setting additional user information as tags for Pushwoosh        if let age = user.userDetails.age,            let name = user.userDetails.userName,            let lastLogin = user.userDetails.lastLoginDate {            pushwoosh.setTags([                "age": age,                "name": name,                "last_login": lastLogin            ])        }    }}
#import <PushwooshFramework/PushwooshFramework.h>
@implementation Registration
- (void)afterUserLogin:(User *)user { Pushwoosh *pushwoosh = [Pushwoosh configure];
// set user ID if (user.userId) { [pushwoosh setUserId:user.userId]; }
// set user email if (user.email) { [pushwoosh setEmail:user.email]; }
// setting additional user information as tags for Pushwoosh if (user.userDetails.age && user.userDetails.userName && user.userDetails.lastLoginDate) { NSDictionary *tags = @{ @"age": user.userDetails.age, @"name": user.userDetails.userName, @"last_login": user.userDetails.lastLoginDate }; [pushwoosh setTags:tags]; }}
@endटैग्स
Anchor link toटैग्स उपयोगकर्ताओं या उपकरणों को सौंपे गए की-वैल्यू पेयर होते हैं, जो वरीयताओं या व्यवहार जैसे गुणों के आधार पर सेगमेंटेशन की अनुमति देते हैं, जिससे लक्षित संदेश भेजना संभव होता है।
import PushwooshFramework
class UpdateUser {    func afterUserUpdateProfile(user: User) {        let pushwoosh = Pushwoosh.configure
        // set list of favorite categories        pushwoosh.setTags(["favorite_categories" : user.getFavoriteCategories()])
        // set payment information        pushwoosh.setTags([            "is_subscribed": user.isSubscribed(),            "payment_status": user.getPaymentStatus(),            "billing_address": user.getBillingAddress()        ])    }}
#import <PushwooshFramework/PushwooshFramework.h>
@implementation UpdateUser
- (void)afterUserUpdateProfile:(User *)user { Pushwoosh *pushwoosh = [Pushwoosh configure];
// set list of favorite categories [pushwoosh setTags:@{@"favorite_categories" : user.getFavoriteCategories}];
// set payment information NSDictionary *tags = @{ @"is_subscribed": @(user.isSubscribed), @"payment_status": user.getPaymentStatus, @"billing_address": user.getBillingAddress }; [pushwoosh setTags:tags];}
@endइवेंट्स
Anchor link toइवेंट्स ऐप के भीतर विशिष्ट उपयोगकर्ता क्रियाएँ या घटनाएँ होती हैं जिन्हें व्यवहार का विश्लेषण करने और संबंधित संदेशों या क्रियाओं को ट्रिगर करने के लिए ट्रैक किया जा सकता है।
import PushwooshFramework
class Registration {
    func afterUserLogin(user: User) {        if let userName = user.getUserName(), let lastLogin = user.getLastLoginDate() {            PWInAppManager.shared().postEvent("login", withAttributes: [                "name": userName,                "last_login": lastLogin            ])        }    }
    func afterUserPurchase(user: User, product: Product) {        let pushwoosh = Pushwoosh.configure
        // Track purchase event        PWInAppManager.shared().postEvent("purchase", withAttributes: [            "product_id": product.getId(),            "product_name": product.getName(),            "price": product.getPrice(),            "quantity": product.getQuantity()        ])
        // Set user tags        let lastPurchaseDate = Date().timeIntervalSince1970        let lifetimeSpend = getCurrentLifetimeSpend() + product.getPrice()
        pushwoosh.setTags([            "last_purchase_date": lastPurchaseDate,            "lifetime_spend": lifetimeSpend        ])    }}
#import <PushwooshFramework/PushwooshFramework.h>#import <PushwooshFramework/PWInAppManager.h>
@implementation Registration
- (void)afterUserLogin:(User *)user { NSString *userName = [user getUserName]; NSDate *lastLogin = [user getLastLoginDate];
if (userName && lastLogin) { [[PWInAppManager sharedManager] postEvent:@"login" withAttributes:@{ @"name": userName, @"last_login": lastLogin }]; }}
- (void)afterUserPurchase:(User *)user product:(Product *)product { Pushwoosh *pushwoosh = [Pushwoosh configure];
// Track purchase event [[PWInAppManager sharedManager] postEvent:@"purchase" withAttributes:@{ @"product_id": [product getId], @"product_name": [product getName], @"price": @([product getPrice]), @"quantity": @([product getQuantity]) }];
// Set user tags NSTimeInterval lastPurchaseDate = [[NSDate date] timeIntervalSince1970]; double lifetimeSpend = /* fetch current lifetime spend */ + [product getPrice];
NSDictionary *tags = @{ @"last_purchase_date": @(lastPurchaseDate), @"lifetime_spend": @(lifetimeSpend) };
[pushwoosh setTags:tags];}
@endरिच मीडिया
Anchor link toरिच मीडिया इंटरैक्टिव और मल्टीमीडिया सामग्री को संदर्भित करता है, जैसे कि चित्र, वीडियो, या HTML, जिसका उपयोग नोटिफिकेशन और इन-ऐप संदेशों में उपयोगकर्ता जुड़ाव को बढ़ाने के लिए किया जाता है।
import PushwooshFramework
class ViewController: UIViewController, PWRichMediaPresentingDelegate {
    override func viewDidLoad() {        super.viewDidLoad()        let richMediaConfiguration = PWModalWindowConfiguration.shared()
        PWRichMediaManager.shared().delegate = self        richMediaConfiguration.configureModalWindow(with: .PWModalWindowPositionBottom,                                                             present: .PWAnimationPresentFromBottom,                                                             dismiss: .PWAnimationDismissDown)    }
    func richMediaManager(_ richMediaManager: PWRichMediaManager!, shouldPresent richMedia: PWRichMedia!) -> Bool {        print("Rich media will be presented with: \(richMedia.pushPayload!)")        return true    }
    func richMediaManager(_ richMediaManager: PWRichMediaManager!, didPresent richMedia: PWRichMedia!) {        print("Rich media has been presented with: \(richMedia.pushPayload!)")    }
    func richMediaManager(_ richMediaManager: PWRichMediaManager!, didClose richMedia: PWRichMedia!) {        print("Rich media has been closed with: \(richMedia.pushPayload!)")    }
    func richMediaManager(_ richMediaManager: PWRichMediaManager!, presentingDidFailFor richMedia: PWRichMedia!, withError error: (any Error)!) {        print("Failed to present rich media with: \(richMedia.pushPayload!). Error: \(error.localizedDescription)")    }}
#import "ViewController.h"#import <PushwooshFramework/PushwooshFramework.h>#import <PushwooshFramework/PWRichMediaManager.h>#import <PushwooshFramework/PWModalWindowConfiguration.h>
@interface ViewController () <PWRichMediaPresentingDelegate>
@end
@implementation ViewController
- (void)viewDidLoad { [super viewDidLoad];
[[PWRichMediaManager sharedManager] setDelegate:self]; [[PWModalWindowConfiguration shared] configureModalWindowWith:PWModalWindowPositionBottom presentAnimation:PWAnimationPresentFromBottom dismissAnimation:PWAnimationDismissDown];}
- (BOOL)richMediaManager:(PWRichMediaManager *)richMediaManager shouldPresentRichMedia:(PWRichMedia *)richMedia { NSLog(@"Rich media will be presented with: %@", richMedia.pushPayload); return YES;}
- (void)richMediaManager:(PWRichMediaManager *)richMediaManager didPresentRichMedia:(PWRichMedia *)richMedia { NSLog(@"Rich media has been presented with: %@", richMedia.pushPayload);}
- (void)richMediaManager:(PWRichMediaManager *)richMediaManager didCloseRichMedia:(PWRichMedia *)richMedia { NSLog(@"Rich media has been closed with:: %@", richMedia.pushPayload);}
- (void)richMediaManager:(PWRichMediaManager *)richMediaManager presentingDidFailForRichMedia:(PWRichMedia *)richMedia withError:(NSError *)error { NSLog(@"Failed to present rich media with: %@. Error: %@", richMedia.pushPayload, error.localizedDescription);}
@endसमस्या निवारण
Anchor link to’PushwooshFramework’ मॉड्यूल बनाने में विफल
Anchor link toअपने प्रोजेक्ट को बनाते समय, आपको एक त्रुटि का सामना करना पड़ सकता है जो इस तरह दिखती है:
Failed to build module 'PushwooshFramework'; this SDK is not supported by the compiler(the SDK is built with 'Apple Swift version 5.10 (swiftlang-5.10.0.13 clang-1500.3.9.4)',while this compiler is 'Apple Swift version 6.1.2 effective-5.10 (swiftlang-6.1.2.1.2 clang-1700.0.13.5)')कारण: यह त्रुटि स्विफ्ट कंपाइलर संस्करण की असंगति से संबंधित नहीं है। Pushwoosh iOS SDK संस्करण 6.8.0 से शुरू होकर, SDK को कई घटकों में मॉड्युलराइज़ किया गया है जो एक दूसरे के साथ इंटरैक्ट करते हैं। त्रुटि तब होती है जब आपके प्रोजेक्ट में सभी आवश्यक फ्रेमवर्क नहीं जोड़े जाते हैं।
समाधान: सुनिश्चित करें कि स्विफ्ट पैकेज मैनेजर के माध्यम से इंटीग्रेट करते समय आपके ऐप टारगेट में सभी चार आवश्यक फ्रेमवर्क जोड़े गए हैं:
PushwooshFrameworkPushwooshCorePushwooshBridgePushwooshLiveActivities
Xcode में इसे सत्यापित करने के लिए:
- प्रोजेक्ट नेविगेटर में अपना प्रोजेक्ट चुनें।
- अपना ऐप टारगेट चुनें।
- General > Frameworks, Libraries, and Embedded Content पर जाएँ।
- पुष्टि करें कि सभी चार फ्रेमवर्क सूचीबद्ध हैं।
पुश भेजा गया लेकिन डिलीवर नहीं हुआ
Anchor link toयदि कोई पुश iOS डिवाइस पर डिलीवर नहीं होता है, तो त्रुटि कोड और प्रत्येक को ठीक करने का तरीका जानने के लिए iOS, Mac OS X, Safari त्रुटियाँ देखें।
यदि आपको इंटीग्रेशन प्रक्रिया के दौरान किसी भी समस्या का सामना करना पड़ता है, तो कृपया सपोर्ट और कम्युनिटी सेक्शन देखें।