Web push SDK 3.0
การผสานรวม
Anchor link toรับ Pushwoosh Web Push SDK และแตกไฟล์ คุณควรมีไฟล์ต่อไปนี้:
Anchor link to- pushwoosh-service-worker.js
วางไฟล์ทั้งหมดนี้ไว้ที่ไดเรกทอรีราก (root) ระดับบนสุดของเว็บไซต์ของคุณ
Anchor link toเริ่มต้น SDK:
Anchor link to- รวม SDK จาก CDN ของเราแบบ อะซิงโครนัส
<script type="text/javascript" src="//cdn.pushwoosh.com/webpush/v3/pushwoosh-web-notifications.js" async></script>- เริ่มต้น Web Push SDK และตรวจสอบให้แน่ใจว่าได้จัดคิวการเริ่มต้นจนกว่า SDK จะโหลดเต็มที่
<script type="text/javascript">var Pushwoosh = Pushwoosh || [];Pushwoosh.push(['init', { logLevel: 'info', // possible values: error, info, debug applicationCode: 'XXXXX-XXXXX', // you application code from Pushwoosh Control Panel apiToken: 'XXXXXXX', // Device API Token safariWebsitePushID: 'web.com.example.domain', // unique reverse-domain string, obtained in you Apple Developer Portal. Only needed if you send push notifications to Safari browser defaultNotificationTitle: 'Pushwoosh', // sets a default title for push notifications defaultNotificationImage: 'https://yoursite.com/img/logo-medium.png', // URL to custom custom notification image autoSubscribe: false, // or true. If true, prompts a user to subscribe for pushes upon SDK initialization subscribeWidget: { enable: true }, userId: 'user_id', // optional, set custom user ID tags: { 'Name': 'John Smith' // optional, set custom Tags }}]);</script>Web popups
Anchor link toเพิ่ม webPopups ไปยังอ็อบเจกต์ init ของคุณเพื่อเปิดใช้งาน แคมเปญ Web popup บนเว็บไซต์ของคุณ
webPopups: { enable: true,},แคมเปญ Web popup จะแสดงโอเวอร์เลย์ที่คุณกำหนดค่าใน Control Panel เช่น โปรโมชั่น, ประกาศ, หรือแบบฟอร์มเก็บข้อมูลลูกค้า ซึ่งแตกต่างจาก ป๊อปอัปการสมัครสมาชิกแบบกำหนดเอง (subscribePopup) ซึ่งจัดการเฉพาะการเลือกรับการแจ้งเตือนแบบพุชบนเว็บเท่านั้น แคมเปญ Web popup สามารถแสดงเนื้อหาใดๆ ที่คุณกำหนดค่าได้
สำหรับการตั้งค่าใน Control Panel โปรดดู ทำความเข้าใจ Web popups
ปุ่มสมัครรับการแจ้งเตือนแบบพุช
Anchor link toเพื่อกระตุ้นให้ผู้ใช้ของคุณสมัครรับการแจ้งเตือนแบบพุช เราขอแนะนำให้ใช้ ปุ่มสมัครรับการแจ้งเตือนแบบพุช บนเว็บไซต์ของคุณ เพื่อเพิ่มประสบการณ์ผู้ใช้และรับผู้ติดตามมากขึ้น!
การกำหนดค่า
Anchor link toเพื่อให้การใช้งานการแจ้งเตือนแบบพุชบนเว็บไซต์ของคุณเสร็จสมบูรณ์ คุณต้องกำหนดค่าแพลตฟอร์มเว็บใน Pushwoosh Control Panel ของคุณตามคำแนะนำทีละขั้นตอนของเรา:
การลงทะเบียน service worker ในขอบเขตที่แตกต่างกัน
Anchor link toบางครั้งคุณไม่สามารถวางไฟล์ service worker ในไดเรกทอรีรากของเว็บไซต์ได้ แต่อยู่ในไดเรกทอรีย่อย
ในกรณีนี้ ให้แก้ไขการกำหนดค่า (ขั้นตอนที่ 4.3) โดยการเพิ่มพารามิเตอร์
serviceWorkerUrl: “/push-notifications/pushwoosh-service-worker.js”
โดยที่ /push-notifications/pushwoosh-service-worker.js คือพาธไปยังไฟล์ pushwoosh-service-worker.js
ตัวจัดการเหตุการณ์ (Event handlers)
Anchor link toใน Pushwoosh Web SDK 3.0 คุณสามารถสมัครรับเหตุการณ์บางอย่างเพื่อติดตามหรือยกเลิกการสมัครจากเหตุการณ์หากคุณไม่ต้องการติดตามอีกต่อไป
ในการติดตามการโหลดของ Web SDK 3.0 ให้เรียกเหตุการณ์ onLoad ดังนี้:
// Load EventPushwoosh.push(['onLoad', (api) => { console.log('Pushwoosh load!');}]);ในการติดตามการเริ่มต้น Web SDK ที่ถูกต้อง ให้เรียกเหตุการณ์ onReady:
// Ready EventPushwoosh.push((api) => { console.log('Pushwoosh ready!');});ในการสมัครหรือยกเลิกการสมัครจากเหตุการณ์ SDK ใดๆ ให้ใช้ตัวจัดการหลังจาก SDK โหลด:
Pushwoosh.push(['onLoad', (api) => {  function onEventNameHandler() {    console.log('Triggered event: event-name!');  }
  // To subscribe to an event:  Pushwoosh.addEventHandler('event-name', onEventNameHandler)
  // To unsubscribe from an event:  Pushwoosh.removeEventHandler('event-name', onEventNameHandler)}]);
เหตุการณ์ SDK
Anchor link toเหตุการณ์ Subscribe
Anchor link toทำงานหลังจากผู้ใช้ตกลงที่จะรับการแจ้งเตือนแบบพุช
Pushwoosh.push(['onLoad', (api) => { Pushwoosh.addEventHandler('subscribe', (payload) => { console.log('Triggered event: subscribe'); });}]);เหตุการณ์ Unsubscribe
Anchor link toทำงานหลังจากอุปกรณ์ถูกยกเลิกการลงทะเบียนจากการแจ้งเตือน
Pushwoosh.push(['onLoad', (api) => { Pushwoosh.addEventHandler('unsubscribe', (payload) => { console.log('Triggered event: unsubscribe'); });}]);เหตุการณ์วิดเจ็ตการสมัครสมาชิก
Anchor link toติดตามการแสดงผลของวิดเจ็ต Subscription Prompt
Pushwoosh.push(['onLoad', (api) => {  // Executed on displaying of the Subscription Prompt widget  Pushwoosh.addEventHandler('show-subscription-widget', (payload) => {    console.log('Triggered event: show-subscription-widget');  });
  // Executed on hiding of the Subscription Prompt widget  Pushwoosh.addEventHandler('hide-subscription-widget', (payload) => {    console.log('Triggered event: hide-subscription-widget');  });}]);
เหตุการณ์ไดอะล็อกการอนุญาตการแจ้งเตือน
Anchor link toติดตามการแสดงผลของไดอะล็อกการสมัครสมาชิกแบบเนทีฟ
Pushwoosh.push(['onLoad', function (api) {  // Executed on permission dialog displaying  Pushwoosh.addEventHandler('show-notification-permission-dialog', (payload) => {    console.log('Triggered event: show-notification-permission-dialog');  });
  // Executed on hiding the permission dialog with one of three possible statuses:  // 1. default - the dialog is closed  // 2. granted - permission is granted  // 3. denied - permission is denied  Pushwoosh.addEventHandler('hide-notification-permission-dialog', (payload) => {    console.log('Triggered event: hide-notification-permission-dialog', payload.permission);  });}]);
เหตุการณ์การอนุญาต
Anchor link toตรวจสอบสถานะการอนุญาตการแจ้งเตือนแบบพุชเมื่อเริ่มต้น SDK; ติดตามการอัปเดตสถานะนี้เมื่อใดก็ตามที่เกิดขึ้น
Pushwoosh.push(['onLoad', (api) => {  // Executed during the SDK initialization if 'autoSubscribe: false' or/and if a user ignores a push notification prompt.  Pushwoosh.addEventHandler('permission-default', (payload) => {    console.log('Triggered event: permission-default');  });
  // Executed during the SDK initialization if notifications are blocked or once a user blocks push notifications.  Pushwoosh.addEventHandler('permission-denied', (payload) => {    console.log('Triggered event: permission-denied');  });
  // Executed during the SDK initialization if notifications are allowed or once a user allows push notifications.  Pushwoosh.addEventHandler('permission-granted', (payload) => {    console.log('Triggered event: permission-granted');  });}]);
เหตุการณ์รับพุช
Anchor link toติดตามการส่งพุชไปยังอุปกรณ์
Pushwoosh.push(['onLoad', (api) => { // Executed when a push notification is displayed. Pushwoosh.addEventHandler('receive-push', (payload) => { console.log('Triggered event: receive-push', payload.notification); });}]);เหตุการณ์การแจ้งเตือน
Anchor link toติดตามว่าการแจ้งเตือนแบบพุชถูกเปิดหรือปิดโดยผู้ใช้
Pushwoosh.push(['onLoad', (api) => {  // Executed when a user clicks on notification.  Pushwoosh.addEventHandler('open-notification', (payload) => {    console.log('Triggered event: open-notification', payload.notification);  });
  // Executed when a user closes a push notification.  Pushwoosh.addEventHandler('hide-notification', (payload) => {    console.log('Triggered event: hide-notification', payload.notification);  });}]);
เหตุการณ์ Inbox
Anchor link toติดตามการแจ้งเตือนที่ส่งไปยัง Inbox
Pushwoosh.push(['onLoad', (api) => {  // Executed by ServiceWorker after the Inbox Message is received and saved to indexedDB.  Pushwoosh.addEventHandler('receive-inbox-message', (payload) => {    console.log('Triggered event: receive-inbox-message', payload.message);  });
  // Executed after the Inbox is updated automatically while the page is loading.  Pushwoosh.addEventHandler('update-inbox-messages', (payload) => {    console.log('Triggered event: receive-inbox-message', payload.messages);  });}]);
เหตุการณ์ป๊อปอัปการสมัครสมาชิกแบบกำหนดเอง
Anchor link toสำหรับรายละเอียดเกี่ยวกับการจัดการเหตุการณ์ป๊อปอัปการสมัครสมาชิกแบบกำหนดเอง โปรดดูที่ คู่มือเหตุการณ์ป๊อปอัปการสมัครสมาชิกแบบกำหนดเอง
หลังจากที่ Web Push SDK เริ่มต้นแล้ว คุณสามารถเรียกใช้ Pushwoosh API ต่อไปนี้ได้ เมธอดทั้งหมดจะคืนค่าอ็อบเจกต์ Promise
Pushwoosh.push((api) => {  // Set tags for a user  api.setTags({    'Tag Name 1': 'value1',    'Tag Name 2': 'value2'  });
  // Get tags for a user from server  api.getTags();
  // Register user ID  api.registerUser('user123');
    // Register user email  api.registerEmail('user@example.com');
  // Register SMS number  api.registerSmsNumber('+15551234567');
  // Register WhatsApp number  api.registerWhatsappNumber('+1234567890');
  // Post an Event  api.postEvent('myEventName', {attributeName: 'attributeValue'});
  //Unregister from notifications  api.unregisterDevice();
  // Set the device language (overrides the value in the "Language" Tag)  api.setLanguage('es');
  // Alternatively Multi-register user with devices and channels  api.multiRegisterDevice({    user_id: 'user123',    email: 'user@example.com',    sms_phone_number: '+1234567890',    tags: {      'UserType': { operation: TTagOperationSet, value: 'Premium' },      'Interests': { operation: TTagOperationAppend, values: ['sports', 'technology'] }    }  });});
multiRegisterDevice
Anchor link toเมธอดการลงทะเบียนที่ปรับปรุงแล้วซึ่งอนุญาตให้ลงทะเบียนโปรไฟล์ผู้ใช้กับอุปกรณ์และช่องทางการส่งข้อความหลายช่องทางในการเรียก API เพียงครั้งเดียว เมธอดนี้มีประโยชน์อย่างยิ่งสำหรับแอปพลิเคชันข้ามแพลตฟอร์มหรือเมื่อใช้กลยุทธ์การส่งข้อความแบบ omnichannel
Pushwoosh.push((api) => { api.multiRegisterDevice({ user_id: 'user123', // Optional: User identifier email: 'user@example.com', // Optional: Email for email messaging sms_phone_number: '+1234567890', // Optional: SMS phone number (E.164 format) whatsapp_phone_number: '+1234567890', // Optional: WhatsApp number (E.164 format) kakao_phone_number: '+1234567890', // Optional: KakaoTalk number (E.164 format) language: 'en', // Optional: Language code (ISO 639-1) timezone: 'America/New_York', // Optional: Timezone identifier city: 'New York', // Optional: City for targeting country: 'US', // Optional: Country for targeting state: 'NY', // Optional: State for targeting tags: { // Optional: Tag values with operations 'UserType': { operation: TTagOperationSet, // Set tag value (0) value: 'Premium' }, 'Interests': { operation: TTagOperationAppend, // Append to tag value (1) values: ['sports', 'technology'] }, 'LoginCount': { operation: TTagOperationIncrement, // Increment tag value (3) value: '1' } }, push_devices: [ // Optional: Array of push devices { hwid: 'web-device-456', platform: TPlatformChrome, // Chrome platform (11) push_token: 'fcm-token-here', app_version: '2.1.0', platformData: { public_key: 'web-push-public-key', auth_token: 'web-push-auth-token', browser: 'chrome' } } ] }) .then((response) => { console.log('Multi-registration successful:', response); }) .catch((error) => { console.error('Multi-registration failed:', error); });});ประเภทแพลตฟอร์ม:
TPlatformSafari(10): แพลตฟอร์ม SafariTPlatformChrome(11): แพลตฟอร์ม ChromeTPlatformFirefox(12): แพลตฟอร์ม Firefox
ประเภทการดำเนินการของแท็ก:
TTagOperationSet(0): ตั้งค่าแท็ก (แทนที่ค่าที่มีอยู่)TTagOperationAppend(1): เพิ่มค่าในแท็ก (เพิ่มในรายการ)TTagOperationRemove(2): ลบค่าแท็ก (ลบออกจากรายการ)TTagOperationIncrement(3): เพิ่มค่าแท็ก (เพิ่มค่าตัวเลข)
ประโยชน์:
- การเรียก API ครั้งเดียว: ลงทะเบียนอุปกรณ์และช่องทางหลายรายการพร้อมกัน
- การดำเนินการแบบอะตอม: การลงทะเบียนทั้งหมดจะสำเร็จหรือล้มเหลวพร้อมกัน
- เน้นผู้ใช้เป็นศูนย์กลาง: เชื่อมโยงอุปกรณ์ทั้งหมดกับโปรไฟล์ผู้ใช้เดียว
- การแท็กขั้นสูง: รองรับการดำเนินการแท็กที่ซับซ้อน
- ข้ามแพลตฟอร์ม: จัดการหลายแพลตฟอร์มพร้อมกัน
ตัวอย่างการส่ง Tags ไปยัง Pushwoosh:
Pushwoosh.push((api) => { var myCustomTags = { 'Tag 1': 123, 'Tag 2': 'some string' }; api.setTags(myCustomTags) .then((res) => { var skipped = res && res.skipped || []; if (!skipped.length) { console.log('success'); } else { console.warn('skipped tags:', skipped); } }) .catch((err) => { console.error('setTags error:', err); });});เพิ่มค่าแท็ก
Anchor link toในการเพิ่มค่าของ Number Tag ให้ใช้พารามิเตอร์ operation ที่มีค่า ‘increment’ ดังนี้:
Pushwoosh.push((api) => { api.setTags({ 'Tag 1': { operation: 'increment', value: 1 } })});เพิ่มค่าแท็ก
Anchor link toในการเพิ่มค่าใหม่ลงใน List Tag ที่มีอยู่ ให้ใช้พารามิเตอร์ operation ที่มีค่า ‘append’ ดังนี้:
Pushwoosh.push((api) => { api.setTags({ 'Tag 3': { operation: 'append', value: ['Value3'] } })});ลบค่าแท็ก
Anchor link toในการลบค่าออกจาก List Tag ให้ใช้พารามิเตอร์ operation ที่มีค่า ‘remove’ ดังนี้:
Pushwoosh.push((api) =>{ api.setTags({ 'Tag 3': { operation: 'remove', value: ['Value2'] } })});เมธอดสาธารณะ
Anchor link toPushwoosh.subscribe()
เมธอดนี้ใช้เพื่อขออนุญาตจากผู้ใช้สำหรับการแจ้งเตือนแบบพุช หากผู้ใช้สมัครสมาชิกแล้ว เมธอดจะหยุดทำงาน
หากผู้ใช้ยังไม่ได้สมัครรับพุช:
- ขออนุญาตสำหรับการแจ้งเตือนแบบพุช
- หากผู้ใช้อนุญาตการแจ้งเตือน เหตุการณ์
onSubscribeจะถูกเรียก
Pushwoosh.subscribe() จะทำงานโดยอัตโนมัติหากตั้งค่า autoSubscribe: true ระหว่างการเริ่มต้น SDK
เรียกเมธอดนี้หากคุณเลือกที่จะแจ้งให้ผู้ใช้สมัครรับพุชด้วยตนเองโดยใช้พารามิเตอร์ autoSubscribe: false ระหว่างการเริ่มต้น:
<button onclick="Pushwoosh.subscribe()">Subscribe</button><script> Pushwoosh.push(['onSubscribe', (api) => { console.log('User successfully subscribed'); }]);</script>Pushwoosh.unsubscribe()
- เมธอด
/unregisterDeviceจะทำงาน - เหตุการณ์
onUnsubscribeจะถูกเรียก
<button onclick="Pushwoosh.unsubscribe()">Unsubscribe</button><script type="text/javascript"> Pushwoosh.push(['onUnsubscribe', (api) => { console.log('User successfully unsubscribed'); }]);</script>Pushwoosh.isSubscribed()
ตรวจสอบว่าผู้ใช้สมัครสมาชิกหรือไม่และคืนค่าแฟล็ก true/false
Pushwoosh.isSubscribed().then((isSubscribed) => { console.log('isSubscribed', isSubscribed);});Pushwoosh.getHWID()
คืนค่า Pushwoosh HWID
Pushwoosh.getHWID().then((hwid) => { console.log('hwid:', hwid);});Pushwoosh.getPushToken()
คืนค่า push token หากมี
Pushwoosh.getPushToken().then((pushToken) => { console.log('pushToken:', pushToken);});Pushwoosh.getUserId()
คืนค่า User ID หากมี
Pushwoosh.getUserId().then((userId) => { console.log('userId:', userId);});Pushwoosh.getParams()
คืนค่ารายการพารามิเตอร์ต่อไปนี้:
Pushwoosh.getParams().then((params) => { params = params || {}; var hwid = params.hwid; var pushToken = params.pushToken; var userId = params.userId;});Pushwoosh.isAvailableNotifications()
ตรวจสอบว่าเบราว์เซอร์รองรับ Pushwoosh WebSDK 3.0 หรือไม่ คืนค่า ‘true’ หรือ ‘false’
Pushwoosh.isAvailableNotifications() // true/falseเมธอด InboxMessages
Anchor link tomessagesWithNoActionPerformedCount(): Promise<number>
คืนค่าจำนวนข้อความที่เปิดแล้ว
Pushwoosh.pwinbox.messagesWithNoActionPerformedCount() .then((count) => { console.log(`${count} messages opened`); });unreadMessagesCount()
คืนค่าจำนวนข้อความที่ยังไม่ได้อ่าน
Pushwoosh.pwinbox.unreadMessagesCount() .then((count) => { console.log(`${count} messages unread`); });messagesCount(): Promise<number>
คืนค่าจำนวนข้อความทั้งหมด
Pushwoosh.pwinbox.messagesCount() .then((count) => { console.log(`${count} messages`); });loadMessages(): Promise<Array>
โหลดรายการข้อความที่ยังไม่ถูกลบ
Pushwoosh.pwinbox.loadMessages() .then(() => { console.log('Messages have been loaded'); });readMessagesWithCodes(codes: Array<string>): Promise<void>
ทำเครื่องหมายข้อความว่าอ่านแล้วโดยใช้ Inbox_Ids
Pushwoosh.pwinbox.readMessagesWithCodes(codes) .then(() => { console.log('Messages have been read'); });performActionForMessageWithCode(code: string): Promise<void>
ดำเนินการที่กำหนดให้กับข้อความและทำเครื่องหมายข้อความว่าอ่านแล้ว
Pushwoosh.pwinbox.performActionForMessageWithCode(code) .then(() => { console.log('Action has been performed'); });deleteMessagesWithCodes(codes: Array<string>): Promise<void>
ทำเครื่องหมายข้อความว่าถูกลบแล้ว
Pushwoosh.pwinbox.deleteMessagesWithCodes([code]) .then(() => { console.log('Messages have been deleted'); });syncMessages(): Promise<void>
ซิงโครไนซ์ข้อความกับเซิร์ฟเวอร์
Pushwoosh.pwinbox.syncMessages() .then(() => { console.log('Messages have been synchronized'); });การรองรับ Progressive Web App
Anchor link toในการผสานรวม Pushwoosh เข้ากับ Progressive Web Application (PWA) ของคุณ ให้ทำตามขั้นตอนที่อธิบายไว้ด้านล่าง
1. คัดลอกพาธไปยังไฟล์ Service Worker ของคุณ:
if ('serviceWorker' in navigator) { window.addEventListener('load', () => { navigator.serviceWorker.register('/service-worker.js') // <- your service worker url });}จากนั้น ใช้พารามิเตอร์ serviceWorkerUrl ขณะเริ่มต้น WebSDK ดังนี้:
var Pushwoosh = Pushwoosh || [];Pushwoosh.push(['init', { logLevel: 'error', applicationCode: 'XXXXX-XXXXX', safariWebsitePushID: 'web.com.example.domain', defaultNotificationTitle: 'Pushwoosh', defaultNotificationImage: 'https://yoursite.com/img/logo-medium.png', serviceWorkerUrl: '/service-worker.js', // <- your service worker url}]);WebSDK ไม่ได้ลงทะเบียน Service Worker ใหม่ทันที; Service Worker จะถูกลงทะเบียนเมื่อจำเป็น:
- เมื่ออุปกรณ์ได้รับ push token (ในการลงทะเบียนอุปกรณ์หรือการสมัครสมาชิกใหม่),
- เมื่อ push token ถูกลบ (เมื่อลบอุปกรณ์ออกจากฐานผู้ใช้)
ซึ่งจะช่วยให้หน้าเว็บของคุณโหลดเร็วขึ้นโดยลดจำนวนคำขอไปยังเซิร์ฟเวอร์
เบราว์เซอร์ไม่อนุญาตให้ลงทะเบียน Service Worker สองตัวที่แตกต่างกันในเวลาเดียวกัน (อ่านเพิ่มเติม: https://github.com/w3c/ServiceWorker/issues/921) ดังนั้นเพื่อให้ PWA ของคุณทำงานได้อย่างถูกต้อง ควรลงทะเบียน Service Worker ร่วมกันสำหรับ codebase ของคุณและ codebase ของ Pushwoosh
2. เพิ่มสตริงต่อไปนี้ไปยัง Service Worker ของคุณ (ที่จุดเริ่มต้นหรือท้ายสุด ไม่สำคัญ):
importScripts('https://cdn.pushwoosh.com/webpush/v3/pushwoosh-service-worker.js' + self.location.search);ดังนั้นคุณจึงเปิดใช้งานการรับและประมวลผลการแจ้งเตือนแบบพุชที่ส่งผ่านบริการของ Pushwoosh สำหรับ Service Worker ของคุณ
การติดตั้งจาก Google Tag Manager
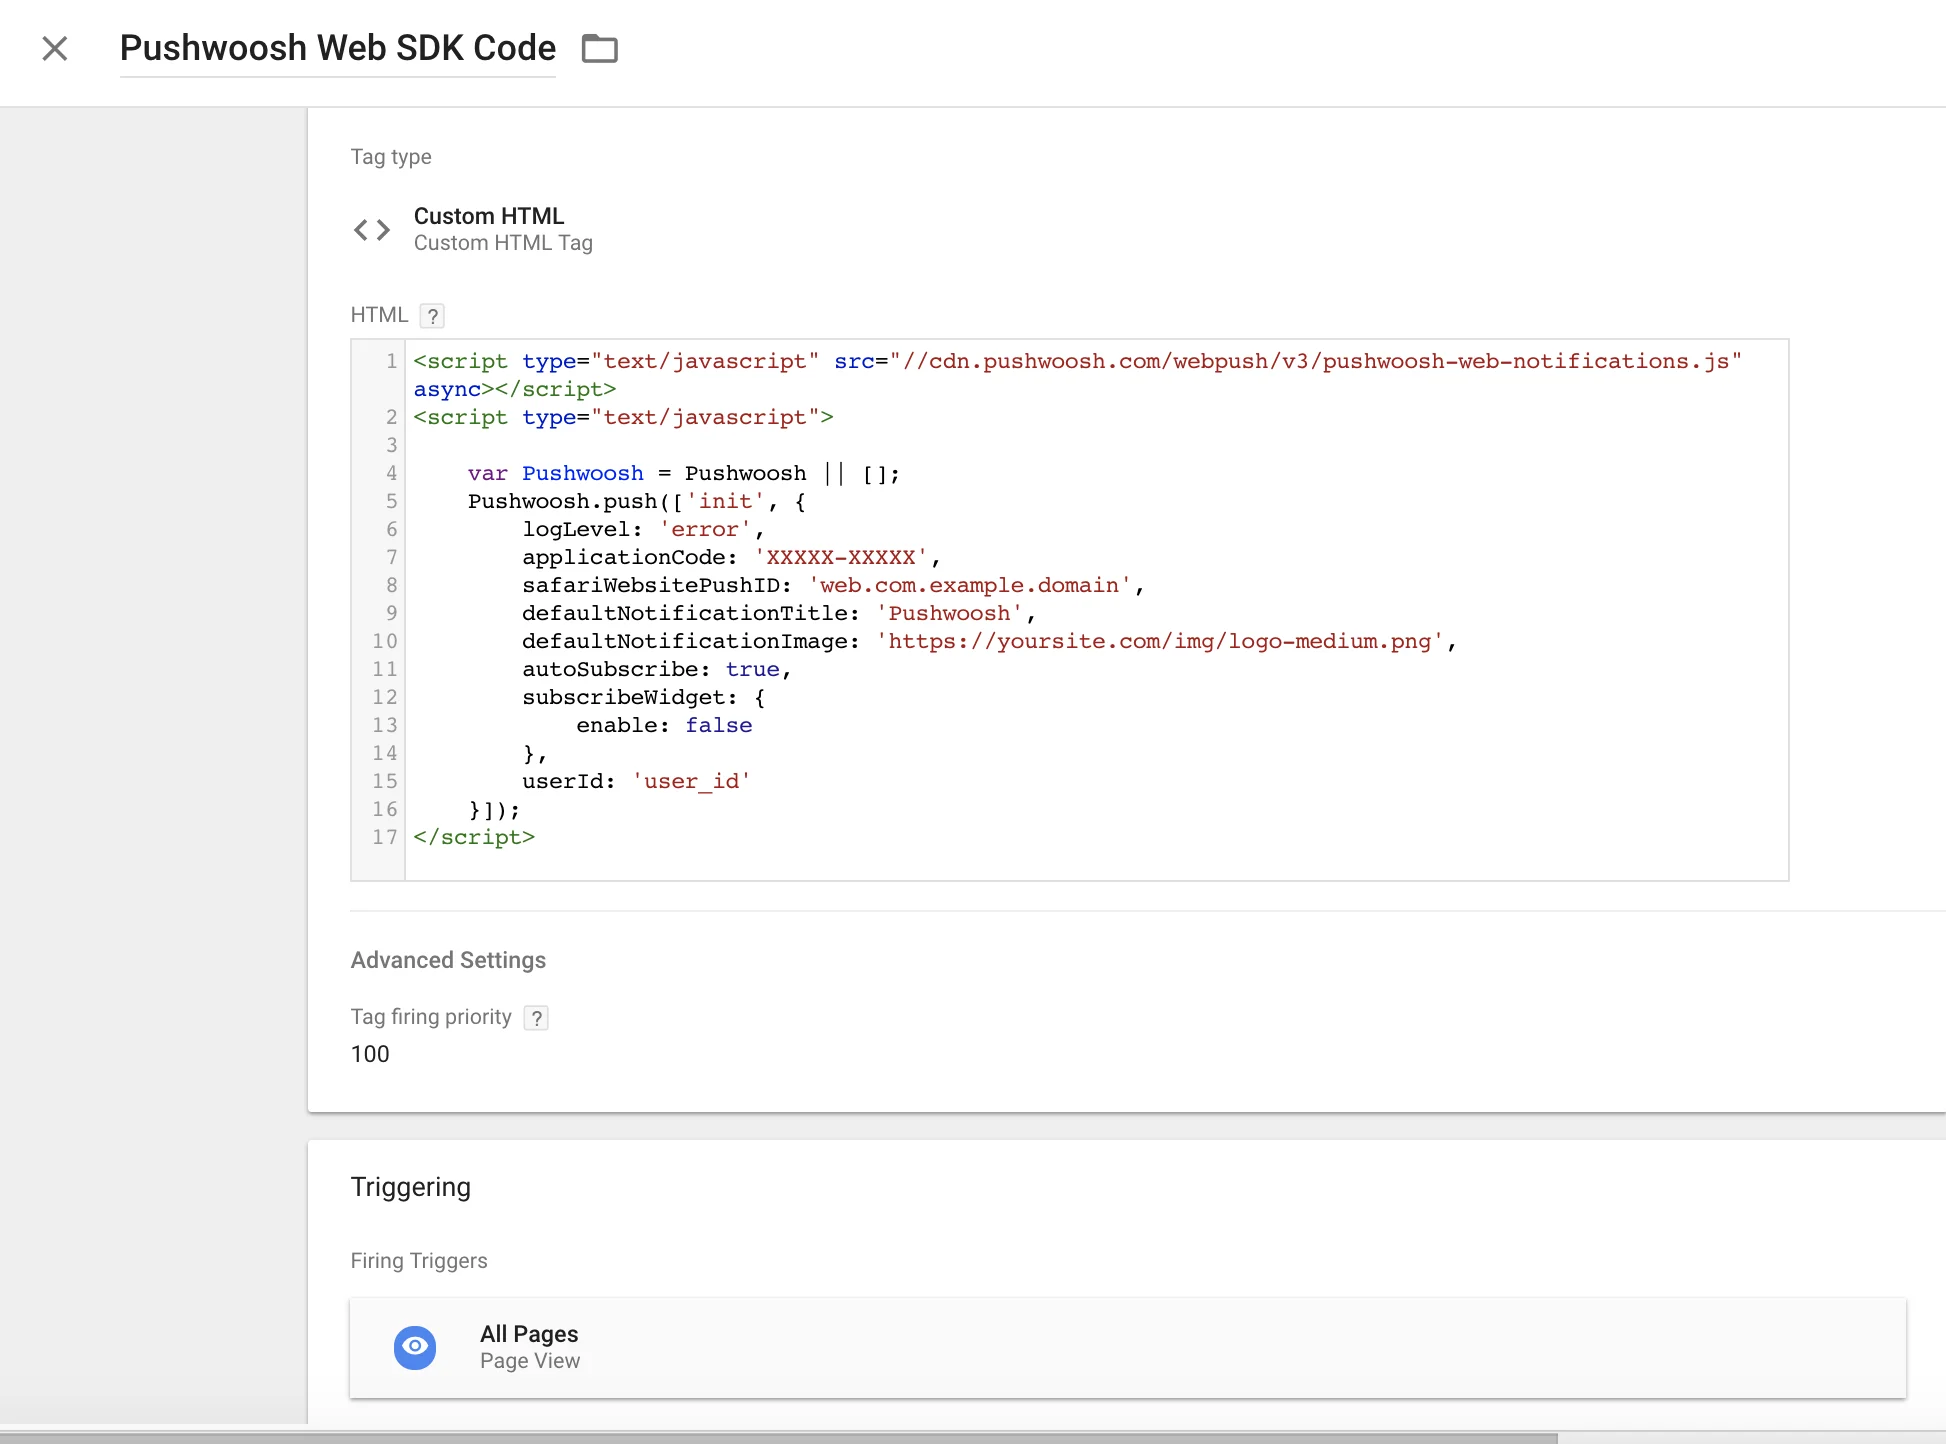
Anchor link toใช้โค้ดต่อไปนี้ใน Google Tag Manager ของคุณเพื่อเริ่มต้น Pushwoosh SDK สร้าง Custom HTML Tag และวางโค้ดด้านล่าง ตรวจสอบให้แน่ใจว่าได้เปลี่ยน Pushwoosh Application Code, Safari Website ID และ URL รูปภาพการแจ้งเตือนเริ่มต้นของคุณ
นอกจากนี้ให้ตั้งค่าลำดับความสำคัญของ Tag Firing ให้สูง (เช่น 100) และทริกเกอร์บน All Pages ดูภาพหน้าจอด้านล่างคัดลอก
<script type="text/javascript" src="//cdn.pushwoosh.com/webpush/v3/pushwoosh-web-notifications.js" async></script><script type="text/javascript"> var Pushwoosh = Pushwoosh || []; Pushwoosh.push(['init', { logLevel: 'error', applicationCode: 'XXXXX-XXXXX', safariWebsitePushID: 'web.com.example.domain', defaultNotificationTitle: 'Pushwoosh', defaultNotificationImage: 'https://yoursite.com/img/logo-medium.png', autoSubscribe: true, subscribeWidget: { enable: false }, userId: 'user_id' }]);</script>