กิจกรรมสดบน iOS
กิจกรรมสด (Live Activities) จะแสดงข้อมูลล่าสุดของแอปของคุณบนหน้าจอล็อกของ iPhone หรือ iPad และใน Dynamic Island คุณสมบัตินี้ช่วยให้ผู้ใช้เห็นข้อมูลสดได้อย่างรวดเร็วและดำเนินการด่วนที่เกี่ยวข้องกับข้อมูลที่แสดง
นี่คือตัวอย่างบางส่วนของการใช้กิจกรรมสด:
- แสดงสถานะการสั่งซื้อในแอปจัดส่ง
- แสดงการนับถอยหลังแบบเรียลไทม์ในแอปฝึกซ้อม
- แสดงข้อมูลการติดตามในแอปแท็กซี่
- แสดงสถิติเกมและคะแนนปัจจุบันในแอปกีฬา
- แสดงพยากรณ์อากาศรายชั่วโมงในแอปสภาพอากาศ
คุณสามารถเปิดใช้งานกิจกรรมสดโดยใช้ Pushwoosh iOS SDK ตามที่อธิบายไว้ด้านล่าง หากต้องการจัดการกิจกรรมสดและอัปเดตเนื้อหา ให้ใช้เมธอด /updateLiveActivity
การตั้งค่า
Anchor link toเพิ่ม Widget Extension
Anchor link to- สร้าง target ใหม่
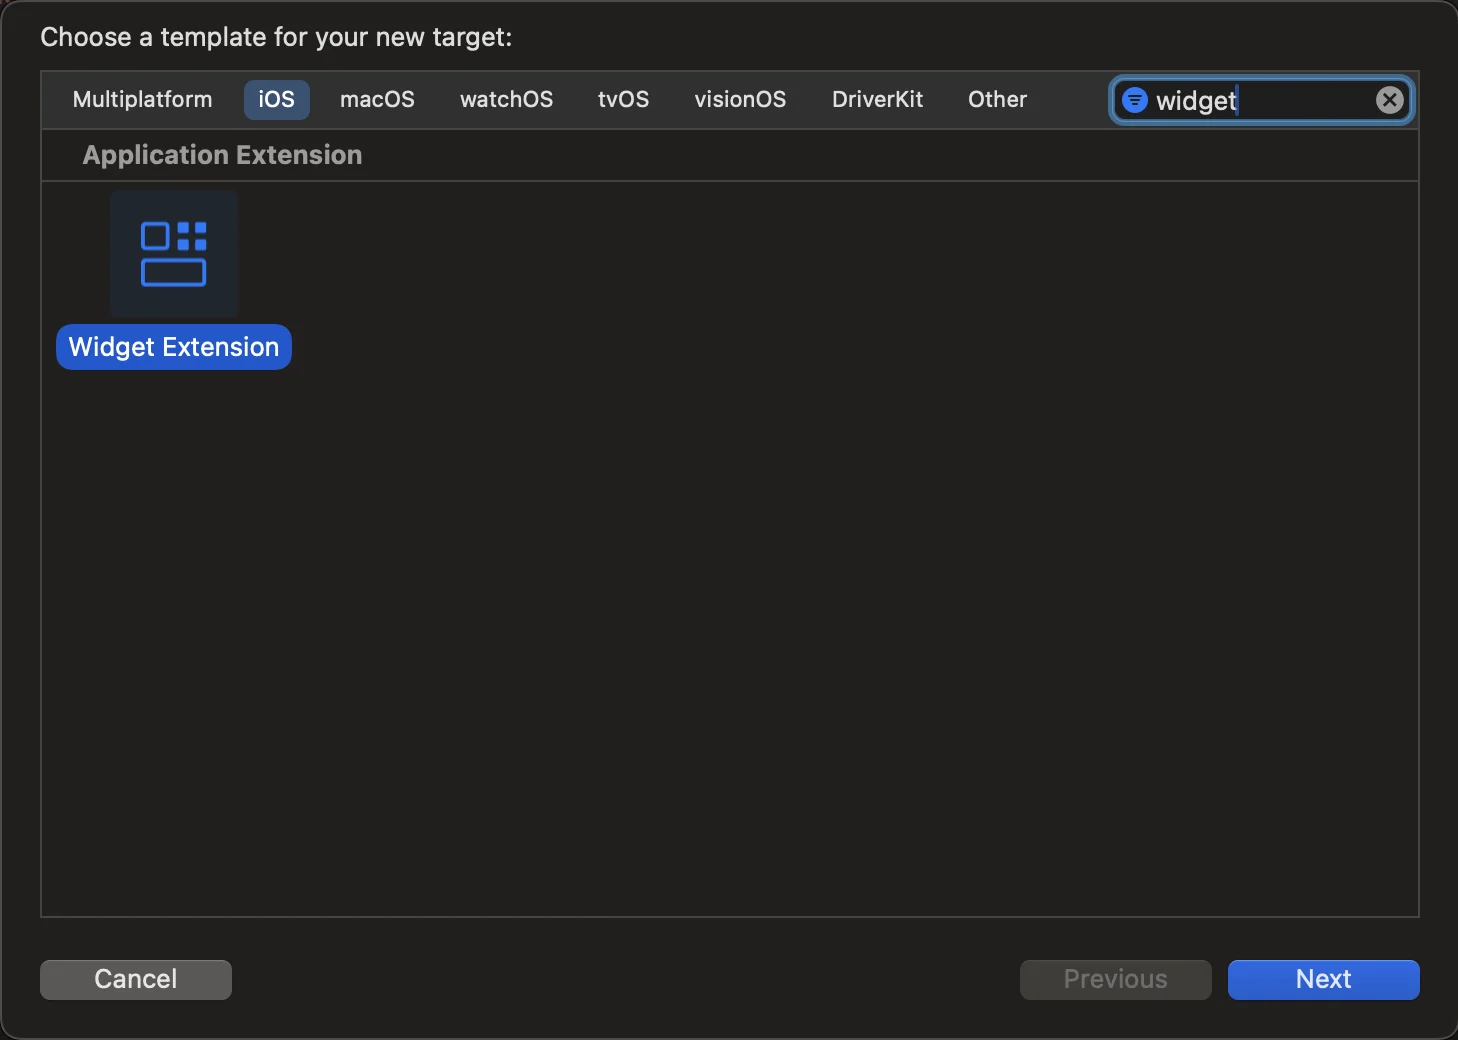
ไปที่ File > New > Target และเลือก Widget Extension
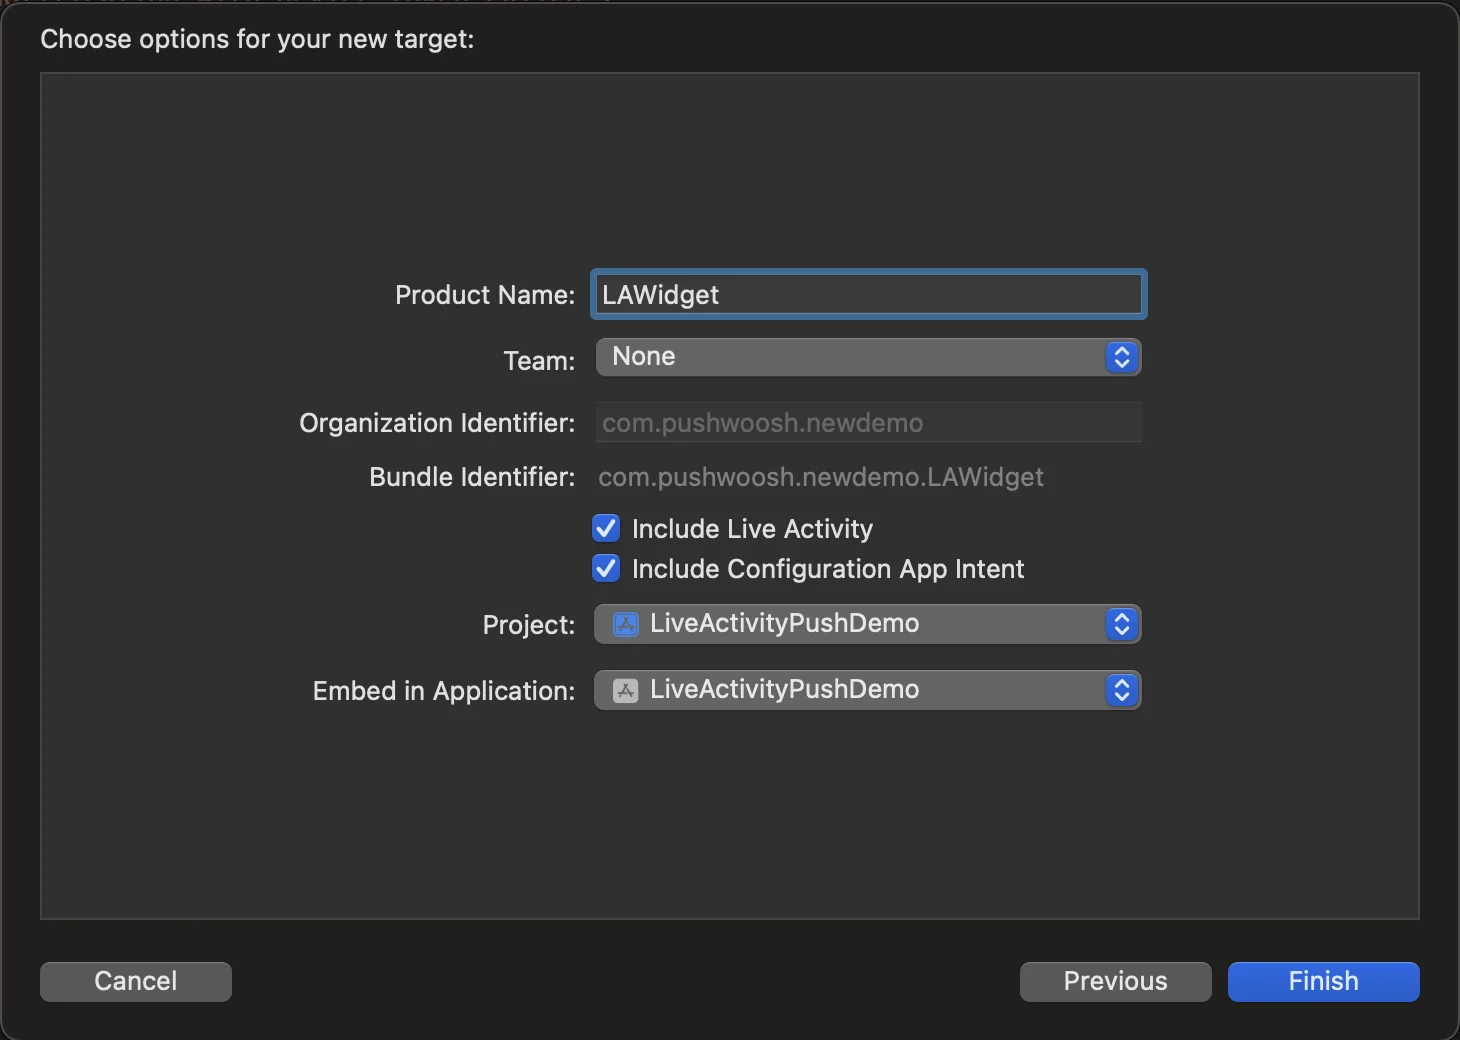
- การกำหนดค่า Widget Extension โปรดป้อนชื่อและตรวจสอบให้แน่ใจว่าได้เลือก Include Live Activity และคลิก Finish
การกำหนดค่า Info.plist
Anchor link toค้นหาไฟล์ Info.plist ใน target หลัก แทรกคีย์ “Supports Live Activities” และตั้งค่าเป็น YES
<key>NSSupportsLiveActivities</key> <true/>การเปิดใช้งานกิจกรรมสดจากแอป
Anchor link toหากต้องการเปิดใช้งานกิจกรรมสด ให้เพิ่มโค้ดลงใน widget extension ที่มีอยู่ของคุณ หรือสร้างใหม่หากแอปของคุณยังไม่มี กิจกรรมสดใช้ฟังก์ชันการทำงานของ SwiftUI และ WidgetKit สำหรับส่วนติดต่อผู้ใช้ ActivityKit จะจัดการวงจรชีวิตของแต่ละกิจกรรมสด: API ของมันใช้เพื่อร้องขอ อัปเดต และสิ้นสุดกิจกรรมสด และเพื่อรับการแจ้งเตือนพุชของ ActivityKit คุณสามารถเรียนรู้เพิ่มเติมเกี่ยวกับกิจกรรมสดได้ใน เอกสารของ Apple
- ไปที่ไฟล์ ContentView ของโปรเจกต์ของคุณใน Xcode และสร้าง Button
import SwiftUI
struct ContentView: View {    var body: some View {        VStack(spacing: 20) {
            Button(action: {                LiveActivityManager.shared.startActivity()            }, label: {                Text("Start Live Activity")                    .foregroundColor(.white)                    .padding()                    .background(Color.blue)                    .cornerRadius(10)            })        }        .padding()    }}
#Preview {    ContentView()}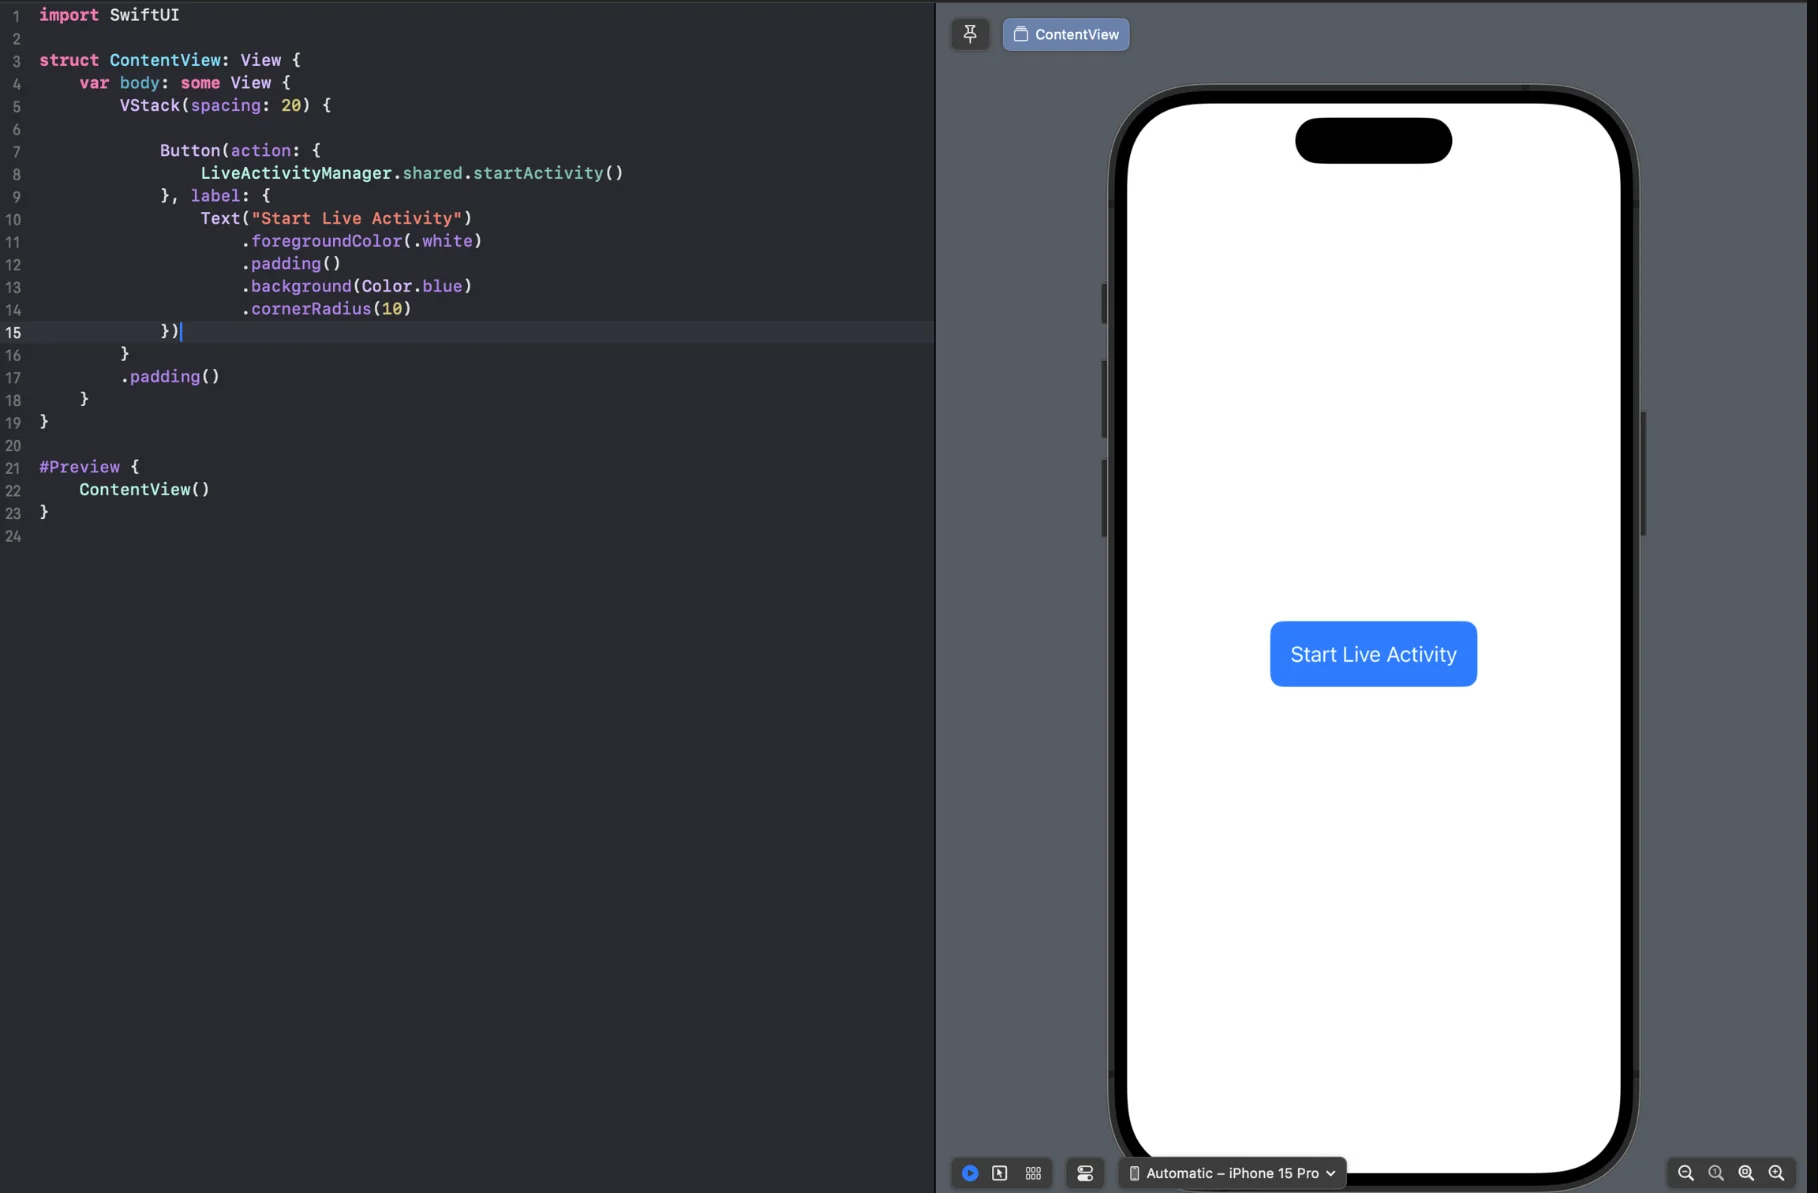
- สร้างไฟล์ LiveActivityManager.swift เพื่อจัดการกิจกรรมสด
import Foundationimport ActivityKitimport UIKitimport PushwooshFrameworkimport PushwooshLiveActivities
class LiveActivityManager: NSObject, ObservableObject { public static let shared: LiveActivityManager = LiveActivityManager()
private var currentActivity: Activity<FoodDeliveryAttributes>? = nil
override init() { super.init() }
func startActivity() { guard ActivityAuthorizationInfo().areActivitiesEnabled else { print("You can't start live activity.") return } do { let pushwooshData = PushwooshLiveActivityAttributeData(activityId: "activity_id") let atttribute = FoodDeliveryAttributes(orderNumber: "1234567", pushwoosh: pushwooshData) let initialState = FoodDeliveryAttributes.ContentState( status: "Preparing your meal", estimatedTime: "25 min", emoji: "👨🍳", pushwoosh: nil ) let activity = try Activity<FoodDeliveryAttributes>.request( attributes: atttribute, content: .init(state:initialState , staleDate: nil), pushType: .token ) self.currentActivity = activity
Task { for await pushToken in activity.pushTokenUpdates { let pushTokenString = pushToken.reduce("") { $0 + String(format: "%02x", $1) } print("Activity:\(activity.id) push token: \(pushTokenString)")
// MARK: - ส่ง Push Token ไปยัง Pushwoosh Pushwoosh.LiveActivities.startLiveActivity( token: pushTokenString, activityId: "activity_id" ) } } } catch { print("Start Activity Error: \(error.localizedDescription)") } }}- เท่านี้ก็เรียบร้อย ตอนนี้เรารันโปรเจกต์และกดปุ่ม ‘Start Live Activity’ จากนั้นไปที่หน้าจอล็อกและดูกิจกรรมสดที่สร้างขึ้น
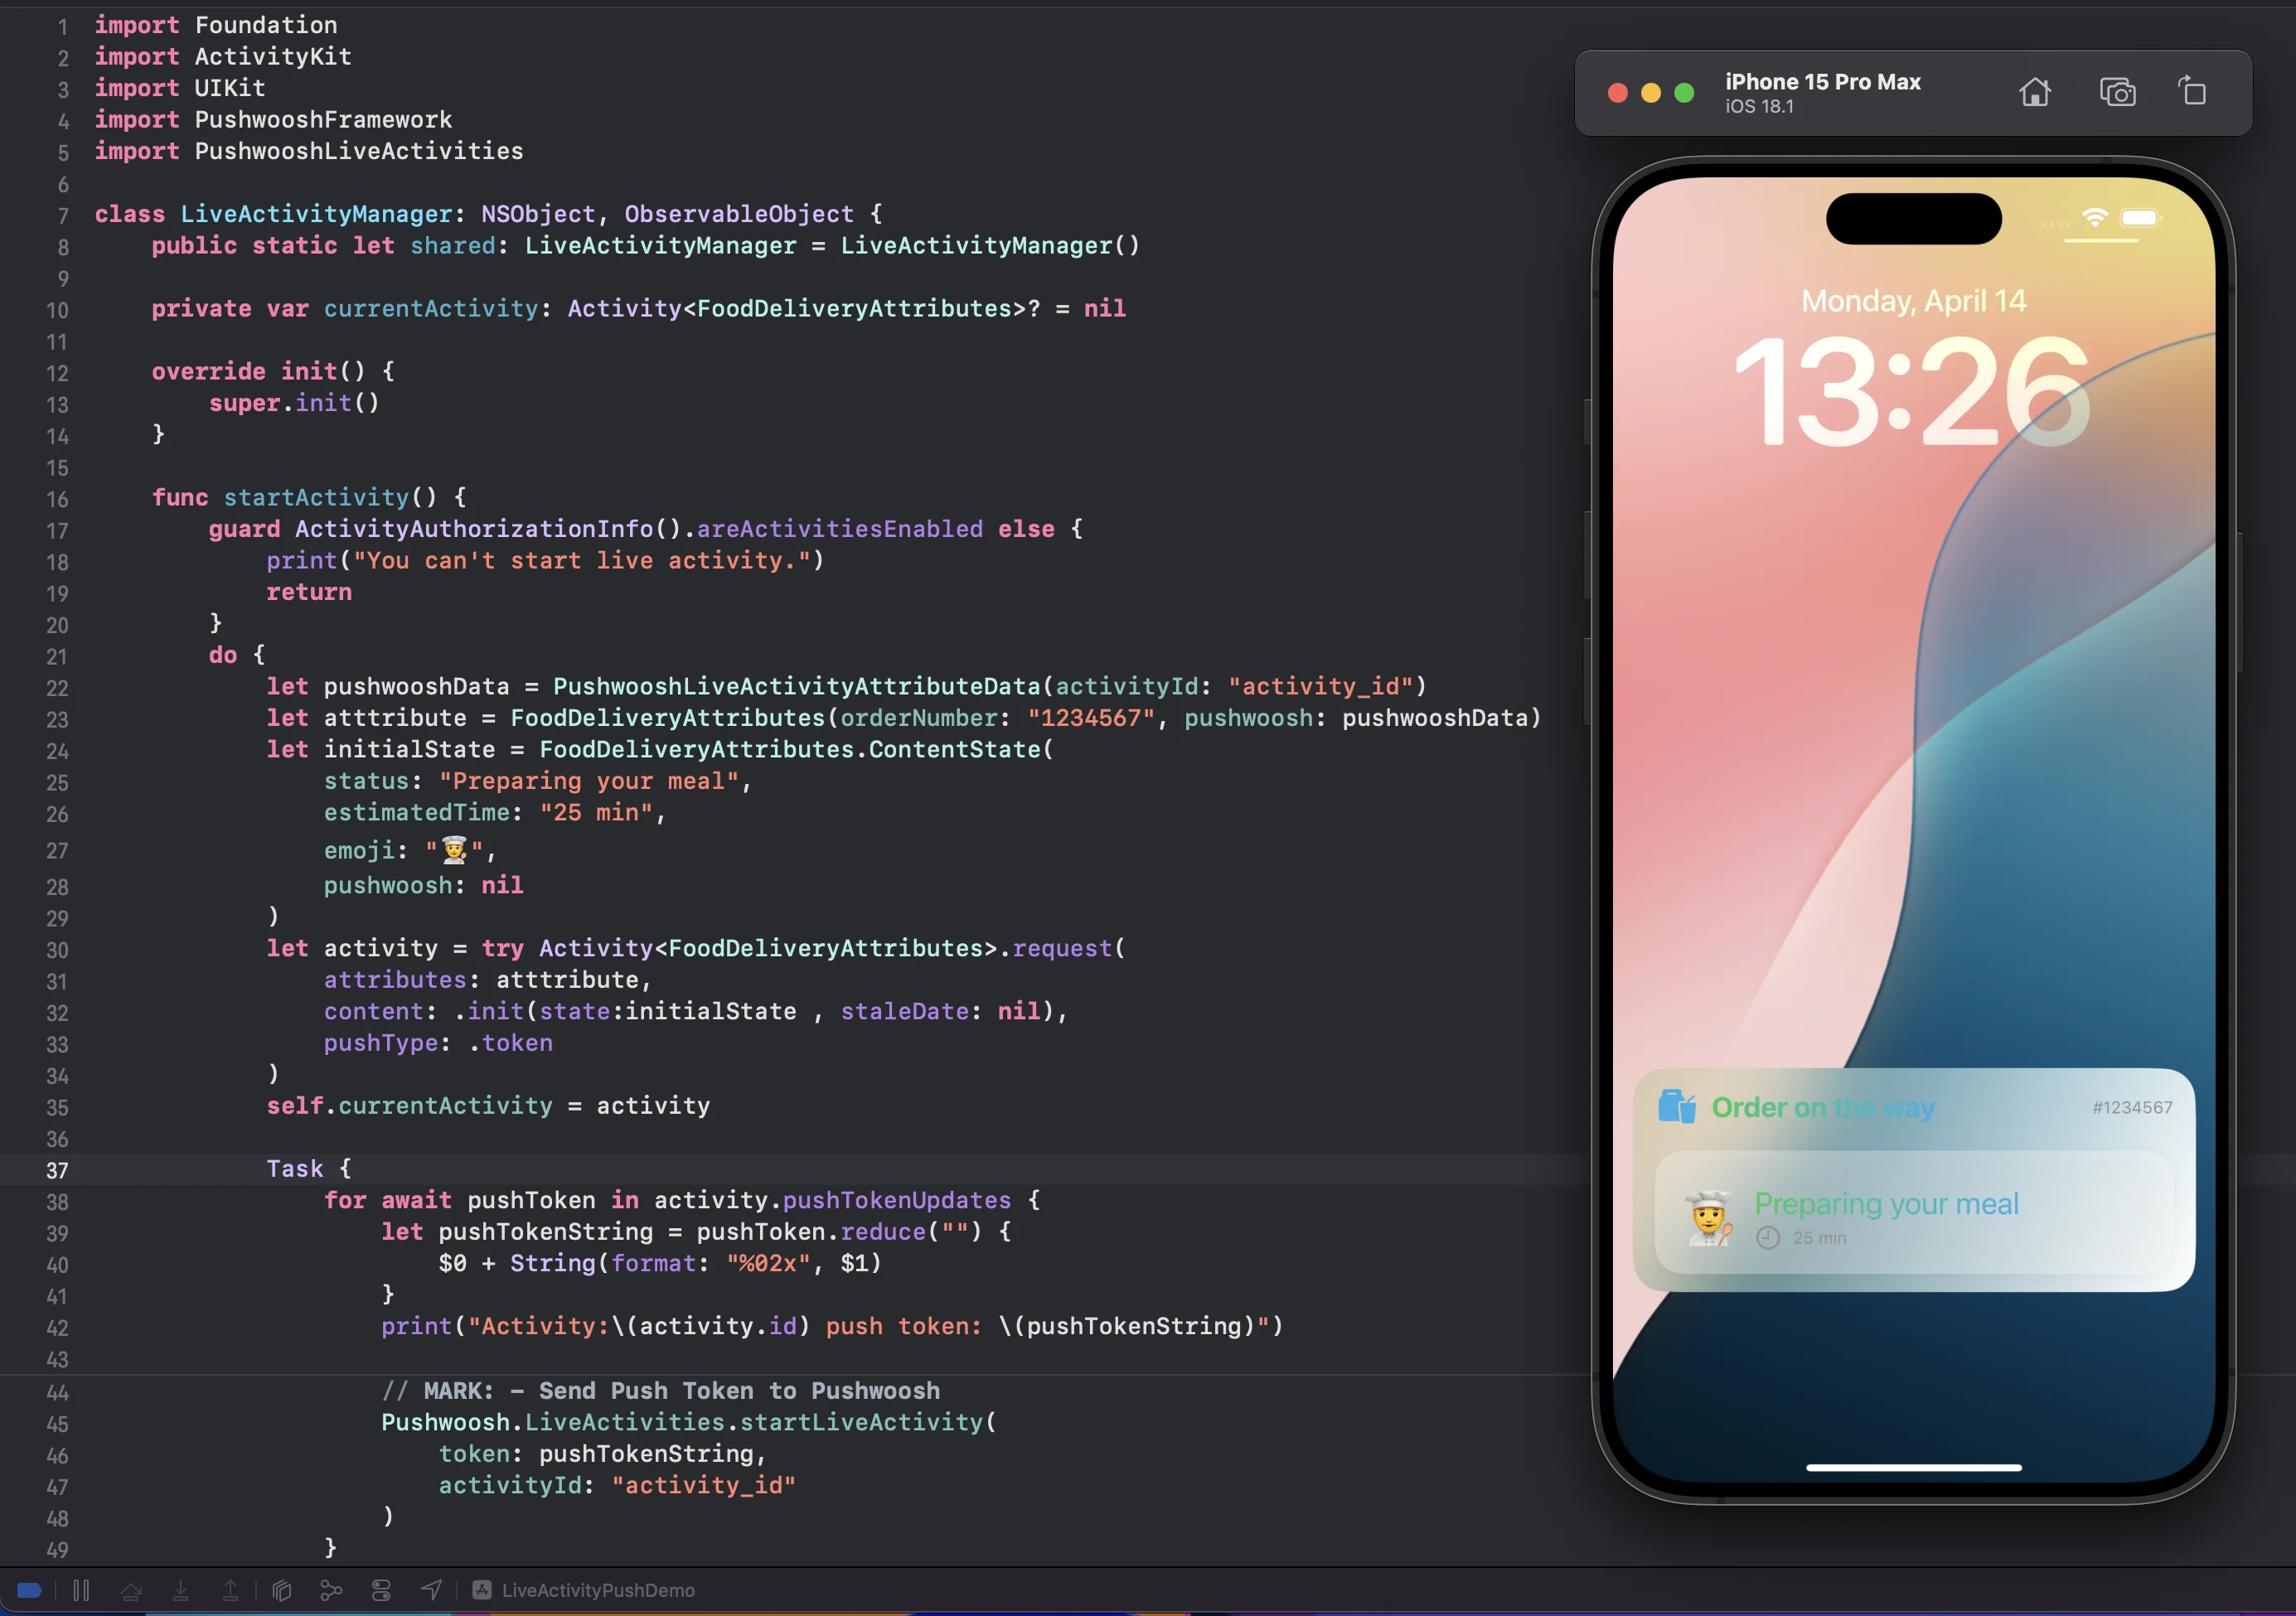
เริ่มกิจกรรมสดด้วยการแจ้งเตือนพุชระยะไกล
Anchor link to- ในการเริ่มกิจกรรมสดผ่านการแจ้งเตือนพุชระยะไกล คุณต้องส่งโทเค็น pushToStartTokenUpdates ไปยัง Pushwoosh
func getPushToStartToken() {    if #available(iOS 17.2, *) {        Task {            for await data in Activity<LiveActivityAttributes>.pushToStartTokenUpdates {                let token = data.map {String(format: "%02x", $0)}.joined()                print("Activity PushToStart Token: \(token)")
// ส่งโทเค็น `pushToStartTokenUpdates` ไปยัง Pushwoosh try await Pushwoosh.LiveActivities.sendPushToStartLiveActivity(token: token) } } }}- เริ่มกิจกรรมสดด้วยการแจ้งเตือนพุชระยะไกล
การจัดการกิจกรรมสด
Anchor link toPushwoosh iOS SDK มีเมธอดต่อไปนี้สำหรับทำงานกับกิจกรรมสด:
// ส่ง Live Activity Push To Start Token ไปยัง Pushwooshstatic func sendPushToStartLiveActivity(token: String)static func sendPushToStartLiveActivity(token: String, completion: @escaping (Error?) -> Void)
// เมธอดเริ่มกิจกรรมสดด้วย Activity IDstatic func startLiveActivity(token: String, activityId: String)static func startLiveActivity(token: String, activityId: String, completion: @escaping (Error?) -> Void)
// เมธอดหยุดกิจกรรมสดstatic func stopLiveActivity()static func stopLiveActivity(completion: @escaping (Error?) -> Void)
static func stopLiveActivity(activityId: String)static func stopLiveActivity(activityId: String, completion: @escaping (Error?) -> Void)
// กำหนดเวลากิจกรรมสดให้เริ่มในอนาคต (iOS 26.0+)static func schedule<Attributes: PushwooshLiveActivityAttributes>(attributes: Attributes, contentState: Attributes.ContentState, at startDate: Date, alertTitle: String, alertBody: String) throws -> Activity<Attributes>
// ยกเลิกกิจกรรมสดที่กำหนดเวลาไว้หรือกำลังทำงานอยู่ด้วย Activity ID (iOS 16.2+)static func cancel<Attributes: PushwooshLiveActivityAttributes>(_ activityType: Attributes.Type, activityId: String)
คุณยังสามารถอัปเดตกิจกรรมสดตามเซกเมนต์โดยใช้พารามิเตอร์ Activity ID เมื่อสร้างกิจกรรม คุณต้องส่งพารามิเตอร์ Activity ID ที่ไม่ซ้ำกันในเมธอด ซึ่งจะเกี่ยวข้องกับเซกเมนต์ผู้ใช้ที่เฉพาะเจาะจง
ตัวอย่างเช่น ผู้ใช้ N คนได้สมัครรับข้อมูลเหตุการณ์เดียวกันในกิจกรรมสด จำเป็นที่พารามิเตอร์ Activity ID จะต้องไม่ซ้ำกันสำหรับผู้ใช้ N คนเหล่านี้ทั้งหมด
เมื่อคุณทำงานกับกิจกรรมสดเสร็จแล้ว ให้ใช้เมธอดเหล่านี้:
static func stopLiveActivity()static func stopLiveActivity(completion: @escaping (Error?) -> Void)การกำหนดเวลากิจกรรมสดให้เริ่มในอนาคต
Anchor link toแทนที่จะเริ่มกิจกรรมสดทันที คุณสามารถกำหนดเวลาให้เริ่มในอนาคตได้ alertTitle และ alertBody จะแสดงให้ผู้ใช้เห็นในการแจ้งเตือนแบบ local notification ที่จะปรากฏขึ้นเมื่อกิจกรรมที่กำหนดเวลาไว้เริ่มทำงานจริง:
if #available(iOS 26.0, *) {    let startDate = Date().addingTimeInterval(3600) // เริ่มใน 1 ชั่วโมง
    do {        let activity = try Pushwoosh.LiveActivities.schedule(            attributes: atttribute,            contentState: initialState,            at: startDate,            alertTitle: "Game starting!",            alertBody: "The match is about to begin"        )        self.currentActivity = activity    } catch {        print("Schedule Activity Error: \(error.localizedDescription)")    }}
startDate ต้องเป็นเวลาในอนาคต มิฉะนั้นการเรียกจะเกิดข้อผิดพลาด เรียก schedule บน main thread ในขณะที่แอปอยู่ในเบื้องหน้า ไม่มีการส่งคำขอไปยัง Pushwoosh ณ เวลาที่กำหนดเวลา: เซิร์ฟเวอร์จะรับรู้เกี่ยวกับกิจกรรมเมื่อมันเริ่มทำงานจริงและได้รับ push token ผ่าน token observer เดียวกันที่ติดตั้งโดยเมธอด setup() (ดูด้านล่าง)
การยกเลิกกิจกรรมสดด้วย Activity ID
Anchor link toใช้ cancel(_:activityId:) เพื่อยกเลิกกิจกรรมสดด้วย Activity ID โดยไม่ต้องอ้างอิงถึงอินสแตนซ์ Activity:
if #available(iOS 16.2, *) { Pushwoosh.LiveActivities.cancel(FoodDeliveryAttributes.self, activityId: "activity_id")}cancel จะสิ้นสุดกิจกรรมบนอุปกรณ์ทันทีและแจ้งเตือนเซิร์ฟเวอร์ Pushwoosh ซึ่งแตกต่างจาก stopLiveActivity(activityId:) ซึ่งจะแจ้งเตือนเซิร์ฟเวอร์เท่านั้นและไม่ได้สิ้นสุดกิจกรรมบนอุปกรณ์โดยตรง cancel ยังทำงานสำหรับกิจกรรมสดที่กำหนดเวลาไว้ด้วย schedule แต่ยังไม่ได้เริ่ม — มันจะถูกยกเลิกก่อนที่จะเริ่ม
เมธอด Setup()
Anchor link toPushwoosh ทำให้การถ่ายโอน activity ID ง่ายขึ้นโดยการแนะนำฟังก์ชัน PushwooshLiveActivities.setup ซึ่งจัดการวงจรชีวิตทั้งหมดของกิจกรรมสดภายในแอปพลิเคชัน ฟังก์ชันนี้จะคอยฟังการอัปเดตโทเค็นทั้ง pushToStart และ pushToUpdate โดยอัตโนมัติ การใช้วิธีนี้ทำให้แอปพลิเคชันไม่จำเป็นต้องติดตามการเริ่มต้นของกิจกรรมสดหรือจัดการการอัปเดตโทเค็นสำหรับการอัปเดตกิจกรรมด้วยตนเองอีกต่อไป
เราขอแนะนำให้ใช้วิธีนี้เนื่องจากจะจัดการการจัดการโทเค็นทั้งหมดในฝั่งของเรา ซึ่งช่วยลดปริมาณโค้ดที่คุณต้องดูแลในฝั่งของคุณ สิ่งนี้ทำให้การผสานรวมง่ายขึ้นและรับประกันประสบการณ์ที่ราบรื่นและมีประสิทธิภาพมากขึ้นสำหรับแอปของคุณ
ใน AppDelegate ตรวจสอบให้แน่ใจว่าคุณได้ import PushwooshFramework และ PushwooshLiveActivities และเรียกเมธอด setup จากโมดูล Pushwoosh.LiveActivities
AppDelegate.swift
if #available(iOS 16.1, *) { Pushwoosh.LiveActivities.setup(FoodDeliveryAttributes.self)}FoodDeliveryAttributes
import WidgetKitimport SwiftUIimport ActivityKitimport PushwooshFrameworkimport PushwooshLiveActivities
struct FoodDeliveryAttributes: PushwooshLiveActivityAttributes {    public struct ContentState: PushwooshLiveActivityContentState {        var status: String        var estimatedTime: String        var emoji: String        var pushwoosh: PushwooshLiveActivityContentStateData?    }
var orderNumber: String var pushwoosh: PushwooshLiveActivityAttributeData}FoodDeliveryAttributes: โครงสร้างนี้สอดคล้องกับโปรโตคอล PushwooshLiveActivityAttributes ใช้เพื่อกำหนดแอตทริบิวต์ของกิจกรรมสดภายในแอป
คู่มือการย้ายข้อมูล
Anchor link toตั้งแต่เวอร์ชัน 6.8.0 ของ Pushwoosh iOS SDK เราได้อัปเดตโครงสร้าง SDK ตอนนี้เมธอดของกิจกรรมสดจะเข้าถึงได้ผ่านโมดูล PushwooshLiveActivities
หากคุณใช้ Pushwoosh iOS SDK เวอร์ชันก่อน 6.8.0 และเรียกใช้เมธอดที่ระบุไว้ด้านล่าง และได้อัปเดตเป็นเวอร์ชัน 6.8.0 หรือใหม่กว่า โปรดทราบการเปลี่ยนแปลงต่อไปนี้:
static func setup<Attributes: PushwooshLiveActivityAttributes>(_ activityType: Attributes.Type)static func defaultSetup()static func defaultStart(_ activityId: String, attributes: [String: Any], content: [String: Any])ตอนนี้ หากต้องการเข้าถึงเมธอดเหล่านี้ คุณควรใช้โมดูล LiveActivity
import PushwooshFrameworkimport PushwooshLiveActivitiesPushwoosh.LiveActivities.setup(FoodDeliveryAttributes.self)Pushwoosh.LiveActivities.defaultSetup()Pushwoosh.LiveActivities.defaultStart("activity_id", attributes: ["key_attribute": "value_attribute"], content: ["key_content": "value_content"])เรายังคงรองรับเมธอดผ่าน Pushwoosh.sharedInstance() ตามที่ระบุไว้ด้านล่าง แต่โปรดทราบว่าเมธอดเหล่านี้จะถูกเลิกใช้งานในรุ่นต่อๆ ไป
// ส่ง Live Activity Push To Start Token ไปยัง Pushwooshstatic func sendPushToStartLiveActivity(token: String)static func sendPushToStartLiveActivity(token: String, completion: @escaping (Error?) -> Void)
// เมธอดเริ่มกิจกรรมสดด้วย Activity IDstatic func startLiveActivity(token: String, activityId: String)static func startLiveActivity(token: String, activityId: String, completion: @escaping (Error?) -> Void)
// เมธอดหยุดกิจกรรมสดstatic func stopLiveActivity()static func stopLiveActivity(completion: @escaping (Error?) -> Void)
static func stopLiveActivity(activityId: String)static func stopLiveActivity(activityId: String, completion: @escaping (Error?) -> Void)