iOS SDK 기본 통합 가이드
이 섹션에서는 Pushwoosh SDK를 iOS 애플리케이션에 통합하는 방법에 대한 정보를 제공합니다.
사전 요구 사항
Anchor link toPushwoosh iOS SDK를 앱에 통합하려면 다음이 필요합니다:
통합 단계
Anchor link to1. 설치
Anchor link toSwift Package Manager 또는 CocoaPods를 사용하여 Pushwoosh SDK를 애플리케이션에 통합할 수 있습니다.
Swift Package Manager
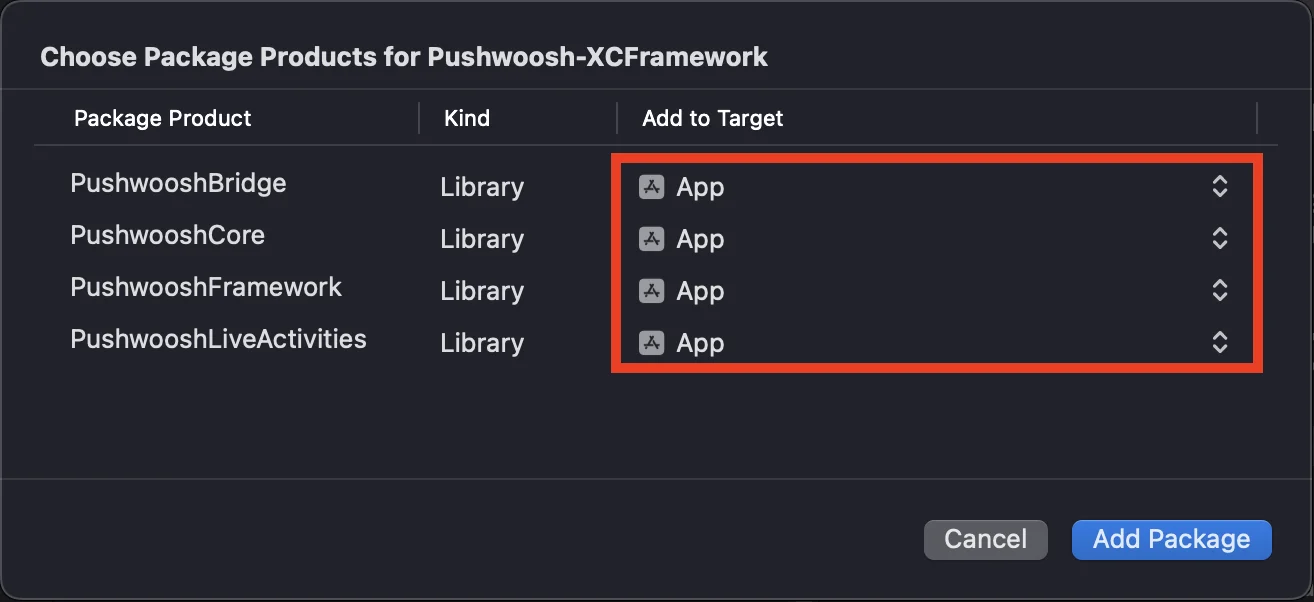
Anchor link toPackage Dependencies 섹션에서 다음 패키지를 추가합니다:
https://github.com/Pushwoosh/Pushwoosh-XCFrameworkPushwoosh iOS SDK를 사용하려면 Swift Package Manager를 통해 통합할 때 다음 네 가지 프레임워크를 앱 타겟에 추가해야 합니다:
PushwooshFrameworkPushwooshCorePushwooshBridgePushwooshLiveActivities
CocoaPods
Anchor link toPodfile을 열고 종속성을 추가합니다:
# Uncomment the next line to define a global platform for your project# platform :ios, '9.0'
target 'MyApp' do  # Comment the next line if you don't want to use dynamic frameworks  use_frameworks!
  pod 'PushwooshXCFramework'
end
그런 다음 터미널에서 다음 명령을 실행하여 종속성을 설치합니다:
pod install2. 기능
Anchor link to프로젝트에서 푸시 알림을 활성화하려면 특정 기능을 추가해야 합니다.
Signing & Capabilities 섹션에서 다음 기능을 추가합니다:
Push NotificationsBackground Modes. 이 기능을 추가한 후Remote notifications확인란을 선택합니다.
Time Sensitive Notifications(iOS 15 이상)를 사용하려는 경우 Time Sensitive Notifications 기능도 추가합니다.
3. 초기화 코드
Anchor link toAppDelegate
Anchor link toAppDelegate 클래스에 다음 코드를 추가합니다:
import SwiftUIimport PushwooshFramework
@mainstruct MyApp: App {    // AppDelegate를 UIApplicationDelegate로 등록    @UIApplicationDelegateAdaptor(AppDelegate.self) var appDelegate
    var body: some Scene {        WindowGroup {            ContentView()        }    }}
class AppDelegate: NSObject, UIApplicationDelegate, PWMessagingDelegate {
    func application(_ application: UIApplication, didFinishLaunchingWithOptions launchOptions: [UIApplication.LaunchOptionsKey: Any]?) -> Bool {        // 초기화 코드        // 푸시 처리를 위한 사용자 정의 델리게이트 설정        Pushwoosh.sharedInstance().delegate = self
        // 푸시 알림 등록        Pushwoosh.sharedInstance().registerForPushNotifications()
        return true    }
    // APNS에서 받은 토큰 처리    func application(_ application: UIApplication, didRegisterForRemoteNotificationsWithDeviceToken deviceToken: Data) {        Pushwoosh.sharedInstance().handlePushRegistration(deviceToken)    }
    // 토큰 수신 오류 처리    func application(_ application: UIApplication, didFailToRegisterForRemoteNotificationsWithError error: Error) {        Pushwoosh.sharedInstance().handlePushRegistrationFailure(error)    }
    // 자동 푸시 알림용    func application(_ application: UIApplication, didReceiveRemoteNotification userInfo: [AnyHashable: Any], fetchCompletionHandler completionHandler: @escaping (UIBackgroundFetchResult) -> Void) {        Pushwoosh.sharedInstance().handlePushReceived(userInfo)        completionHandler(.noData)    }
    // 푸시가 수신되면 실행됨    func pushwoosh(_ pushwoosh: Pushwoosh, onMessageReceived message: PWMessage) {        print("onMessageReceived: ", message.payload!.description)    }
    // 사용자가 알림을 탭하면 실행됨    func pushwoosh(_ pushwoosh: Pushwoosh, onMessageOpened message: PWMessage) {        print("onMessageOpened: ", message.payload!.description)    }}
struct ContentView: View {    var body: some View {        Text("Pushwoosh with SwiftUI")            .padding()    }}
import PushwooshFramework
@UIApplicationMainclass AppDelegate: UIResponder, UIApplicationDelegate, PWMessagingDelegate {
var window: UIWindow?
func application(_ application: UIApplication, didFinishLaunchingWithOptions launchOptions: [UIApplication.LaunchOptionsKey: Any]?) -> Bool { //초기화 코드 //푸시 처리를 위한 사용자 정의 델리게이트 설정, 이 경우 AppDelegate Pushwoosh.sharedInstance().delegate = self;
//푸시 알림 등록 Pushwoosh.sharedInstance().registerForPushNotifications()
return true }
//APNS에서 받은 토큰 처리 func application(_ application: UIApplication, didRegisterForRemoteNotificationsWithDeviceToken deviceToken: Data) { Pushwoosh.sharedInstance().handlePushRegistration(deviceToken) }
//토큰 수신 오류 처리 func application(_ application: UIApplication, didFailToRegisterForRemoteNotificationsWithError error: Error) { Pushwoosh.sharedInstance().handlePushRegistrationFailure(error); }
//자동 푸시 알림용 func application(_ application: UIApplication, didReceiveRemoteNotification userInfo: [AnyHashable : Any], fetchCompletionHandler completionHandler: @escaping (UIBackgroundFetchResult) -> Void) { Pushwoosh.sharedInstance().handlePushReceived(userInfo) completionHandler(.noData) }
//푸시가 수신되면 이 이벤트가 실행됨 func pushwoosh(_ pushwoosh: Pushwoosh, onMessageReceived message: PWMessage) { print("onMessageReceived: ", message.payload!.description) }
// 사용자가 알림을 탭하면 실행됨 func pushwoosh(_ pushwoosh: Pushwoosh, onMessageOpened message: PWMessage) { print("onMessageOpened: ", message.payload!.description) }}#import <PushwooshFramework/PushwooshFramework.h>
@implementation AppDelegate
- (BOOL)application:(UIApplication *)application didFinishLaunchingWithOptions:(NSDictionary *)launchOptions { //-----------PUSHWOOSH 부분-----------
// 푸시 처리를 위한 사용자 정의 델리게이트 설정, 이 경우 AppDelegate [Pushwoosh sharedInstance].delegate = self;
//푸시 알림 등록! [[Pushwoosh sharedInstance] registerForPushNotifications];
return YES;}
//APNS에서 받은 토큰 처리- (void)application:(UIApplication *)application didRegisterForRemoteNotificationsWithDeviceToken:(NSData *)deviceToken { [[Pushwoosh sharedInstance] handlePushRegistration:deviceToken];}
//토큰 수신 오류 처리- (void)application:(UIApplication *)application didFailToRegisterForRemoteNotificationsWithError:(NSError *)error { [[Pushwoosh sharedInstance] handlePushRegistrationFailure:error];}
//자동 푸시 알림용- (void)application:(UIApplication *)application didReceiveRemoteNotification:(NSDictionary *)userInfo fetchCompletionHandler:(void (^)(UIBackgroundFetchResult))completionHandler { [[Pushwoosh sharedInstance] handlePushReceived:userInfo]; completionHandler(UIBackgroundFetchResultNoData);}
//푸시가 수신되면 이 이벤트가 실행됨- (void)pushwoosh:(Pushwoosh *)pushwoosh onMessageReceived:(PWMessage *)message { NSLog(@"onMessageReceived: %@", message.payload);}
//사용자가 알림을 탭하면 이 이벤트가 실행됨- (void)pushwoosh:(Pushwoosh *)pushwoosh onMessageOpened:(PWMessage *)message { NSLog(@"onMessageOpened: %@", message.payload);}
@endInfo.plist
Anchor link toInfo.plist에서:
Pushwoosh_APPID키를 Pushwoosh 애플리케이션 코드로 설정합니다.Pushwoosh_API_TOKEN키를 Pushwoosh Device API Token으로 설정합니다.
4. 메시지 전송 추적
Anchor link toPushwoosh는 Notification Service Extension을 통해 푸시 알림의 전송 이벤트를 추적하는 것을 지원합니다.
Notification Service Extension 추가
Anchor link to- Xcode에서 File > New > **Target…**을 선택합니다.
- Notification Service Extension을 선택하고 Next를 누릅니다.
- 타겟 이름을 입력하고 Finish를 누릅니다.
- 활성화하라는 메시지가 나타나면 Cancel을 누릅니다.
Notification Service Extension 종속성 (CocoaPods만 해당)
Anchor link to참고: Swift Package Manager를 사용하여 종속성을 관리하는 경우, 종속성이 자동으로 추가되므로 이 단계를 건너뛸 수 있습니다.
Podfile을 열고 타겟에 대한 종속성을 추가합니다:
# Uncomment the next line to define a global platform for your project# platform :ios, '9.0'
target 'MyApp' do  # Comment the next line if you don't want to use dynamic frameworks  use_frameworks!
  pod 'PushwooshXCFramework'
end
target 'MyAppNotificationExtension' do  use_frameworks!
  pod 'PushwooshXCFramework'
end
터미널에서 다음 명령을 실행하여 종속성을 업데이트합니다:
pod updateNotification Service Extension에 Pushwoosh SDK 추가
Anchor link to이 코드를 사용하면 알림 확장 프로그램 내에서 알림을 가로채고 처리할 수 있습니다.
import UserNotificationsimport PushwooshFramework
class NotificationService: UNNotificationServiceExtension {
    var contentHandler: ((UNNotificationContent) -> Void)?    var bestAttemptContent: UNMutableNotificationContent?
    override func didReceive(_ request: UNNotificationRequest, withContentHandler contentHandler: @escaping (UNNotificationContent) -> Void) {        // Pushwoosh **********        PWNotificationExtensionManager.shared().handle(request, contentHandler: contentHandler)        // ********************
        self.contentHandler = contentHandler        bestAttemptContent = (request.content.mutableCopy() as? UNMutableNotificationContent)
        if let bestAttemptContent = bestAttemptContent {            // 여기에서 알림 내용을 수정합니다...            contentHandler(bestAttemptContent)        }    }
    override func serviceExtensionTimeWillExpire() {        // 시스템에 의해 확장 프로그램이 종료되기 직전에 호출됩니다.        // 수정된 콘텐츠를 최선을 다해 전달할 기회로 사용하세요. 그렇지 않으면 원래 푸시 페이로드가 사용됩니다.        if let contentHandler = contentHandler, let bestAttemptContent =  bestAttemptContent {            contentHandler(bestAttemptContent)        }    }
}
#import "PWNotificationExtensionManager.h"
@interface NotificationService : UNNotificationServiceExtension
@end
@implementation NotificationService
- (void)didReceiveNotificationRequest:(UNNotificationRequest *)request withContentHandler:(void (^)(UNNotificationContent * _Nonnull))contentHandler { // Pushwoosh ********** [[PWNotificationExtensionManager sharedManager] handleNotificationRequest:request contentHandler:contentHandler]; //*********************}
@endInfo.plist
Anchor link toNotification Service Extension의 Info.plist에 다음을 추가합니다:
Pushwoosh_APPID- 애플리케이션 코드.
5. 프로젝트 실행
Anchor link to- 프로젝트를 빌드하고 실행합니다.
- Pushwoosh Control Panel로 이동하여 푸시 알림을 보냅니다.
- 앱에서 알림을 볼 수 있습니다.
확장된 Pushwoosh iOS 통합
Anchor link to이 단계에서는 이미 SDK를 통합했으며 푸시 알림을 보내고 받을 수 있습니다. 이제 핵심 기능을 살펴보겠습니다.
푸시 알림
Anchor link toPushwoosh SDK에는 푸시 알림 처리를 위해 설계된 두 가지 콜백이 있습니다:
onMessageReceived: 이 메서드는 푸시 알림이 수신될 때 호출됩니다.onMessageOpened: 이 메서드는 사용자가 알림과 상호 작용(열기)할 때 호출됩니다.
이러한 콜백을 통해 개발자는 애플리케이션 내에서 푸시 알림 수신 및 사용자 상호 작용을 관리할 수 있습니다.
import PushwooshFramework
class AppDelegate: NSObject, UIApplicationDelegate, PWMessagingDelegate {
    func application(_ application: UIApplication, didFinishLaunchingWithOptions launchOptions: [UIApplication.LaunchOptionsKey : Any]? = nil) -> Bool {        Pushwoosh.sharedInstance().delegate = self;    }
    func pushwoosh(_ pushwoosh: Pushwoosh, onMessageOpened message: PWMessage) {        if let payload = message.payload {            print("onMessageOpened: \(payload)")        }    }
    func pushwoosh(_ pushwoosh: Pushwoosh, onMessageReceived message: PWMessage) {        if let payload = message.payload {            print("onMessageReceived: \(payload)")        }    }}
#import <PushwooshFramework/PushwooshFramework.h>
@interface AppDelegate () <PWMessagingDelegate>
@end
@implementation AppDelegate
- (BOOL)application:(UIApplication *)application didFinishLaunchingWithOptions:(NSDictionary *)launchOptions { [[Pushwoosh sharedInstance] setDelegate:self]; return YES;}
- (void)pushwoosh:(Pushwoosh *)pushwoosh onMessageOpened:(PWMessage *)message { if (message.payload) { NSLog(@"onMessageOpened: %@", message.payload); }}
- (void)pushwoosh:(Pushwoosh *)pushwoosh onMessageReceived:(PWMessage *)message { if (message.payload) { NSLog(@"onMessageReceived: %@", message.payload); }}@end사용자 구성
Anchor link to개별 사용자 행동 및 선호도에 초점을 맞춤으로써 개인화된 콘텐츠를 제공하여 사용자 만족도와 충성도를 높일 수 있습니다.
import PushwooshFramework
class Registration {
    func afterUserLogin(user: User) {        let pushwoosh = Pushwoosh.sharedInstance()        // 사용자 ID 설정        if let userId = user.userId {            pushwoosh.setUserId(userId)        }
        // 사용자 이메일 설정        if let userEmail = user.email {            pushwoosh.setEmail(userEmail)        }
        // 사용자 SMS 번호 설정        if let userSmsNumber = user.SmsNumber {            pushwoosh.registerSmsNumber(userSmsNumber)        }
        // 사용자 WhatsApp 번호 설정        if let userWhatsAppNumber = user.WhatsAppNumber {            pushwoosh.registerSmsNumber(userWhatsAppNumber)        }
        // Pushwoosh에 대한 태그로 추가 사용자 정보 설정        if let age = user.userDetails.age,            let name = user.userDetails.userName,            let lastLogin = user.userDetails.lastLoginDate {            pushwoosh.setTags([                "age": age,                "name": name,                "last_login": lastLogin            ])        }    }}
#import <PushwooshFramework/PushwooshFramework.h>
@implementation Registration
- (void)afterUserLogin:(User *)user { Pushwoosh *pushwoosh = [Pushwoosh sharedInstance];
// 사용자 ID 설정 if (user.userId) { [pushwoosh setUserId:user.userId]; }
// 사용자 이메일 설정 if (user.email) { [pushwoosh setEmail:user.email]; }
// Pushwoosh에 대한 태그로 추가 사용자 정보 설정 if (user.userDetails.age && user.userDetails.userName && user.userDetails.lastLoginDate) { NSDictionary *tags = @{ @"age": user.userDetails.age, @"name": user.userDetails.userName, @"last_login": user.userDetails.lastLoginDate }; [pushwoosh setTags:tags]; }}
@end태그는 사용자 또는 장치에 할당된 키-값 쌍으로, 선호도나 행동과 같은 속성을 기반으로 세분화하여 타겟 메시징을 가능하게 합니다.
import PushwooshFramework
class UpdateUser {    func afterUserUpdateProfile(user: User) {        let pushwoosh = Pushwoosh.sharedInstance()
        // 즐겨찾는 카테고리 목록 설정        pushwoosh.setTags(["favorite_categories" : user.getFavoriteCategories()])
        // 결제 정보 설정        pushwoosh.setTags([            "is_subscribed": user.isSubscribed(),            "payment_status": user.getPaymentStatus(),            "billing_address": user.getBillingAddress()        ])    }}
#import <PushwooshFramework/PushwooshFramework.h>
@implementation UpdateUser
- (void)afterUserUpdateProfile:(User *)user { Pushwoosh *pushwoosh = [Pushwoosh sharedInstance];
// 즐겨찾는 카테고리 목록 설정 [pushwoosh setTags:@{@"favorite_categories" : user.getFavoriteCategories}];
// 결제 정보 설정 NSDictionary *tags = @{ @"is_subscribed": @(user.isSubscribed), @"payment_status": user.getPaymentStatus, @"billing_address": user.getBillingAddress }; [pushwoosh setTags:tags];}
@end이벤트는 행동을 분석하고 해당 메시지나 작업을 트리거하기 위해 추적할 수 있는 앱 내의 특정 사용자 작업 또는 발생입니다.
import PushwooshFramework
class Registration {
    func afterUserLogin(user: User) {        if let userName = user.getUserName(), let lastLogin = user.getLastLoginDate() {            PWInAppManager.shared().postEvent("login", withAttributes: [                "name": userName,                "last_login": lastLogin            ])        }    }
    func afterUserPurchase(user: User, product: Product) {        let pushwoosh = Pushwoosh.sharedInstance()
        // 구매 이벤트 추적        PWInAppManager.shared().postEvent("purchase", withAttributes: [            "product_id": product.getId(),            "product_name": product.getName(),            "price": product.getPrice(),            "quantity": product.getQuantity()        ])
        // 사용자 태그 설정        let lastPurchaseDate = Date().timeIntervalSince1970        let lifetimeSpend = getCurrentLifetimeSpend() + product.getPrice()
        pushwoosh.setTags([            "last_purchase_date": lastPurchaseDate,            "lifetime_spend": lifetimeSpend        ])    }}
#import <PushwooshFramework/PushwooshFramework.h>#import <PushwooshFramework/PWInAppManager.h>
@implementation Registration
- (void)afterUserLogin:(User *)user { NSString *userName = [user getUserName]; NSDate *lastLogin = [user getLastLoginDate];
if (userName && lastLogin) { [[PWInAppManager sharedManager] postEvent:@"login" withAttributes:@{ @"name": userName, @"last_login": lastLogin }]; }}
- (void)afterUserPurchase:(User *)user product:(Product *)product { Pushwoosh *pushwoosh = [Pushwoosh sharedInstance];
// 구매 이벤트 추적 [[PWInAppManager sharedManager] postEvent:@"purchase" withAttributes:@{ @"product_id": [product getId], @"product_name": [product getName], @"price": @([product getPrice]), @"quantity": @([product getQuantity]) }];
// 사용자 태그 설정 NSTimeInterval lastPurchaseDate = [[NSDate date] timeIntervalSince1970]; double lifetimeSpend = /* 현재까지의 총 지출액 가져오기 */ + [product getPrice];
NSDictionary *tags = @{ @"last_purchase_date": @(lastPurchaseDate), @"lifetime_spend": @(lifetimeSpend) };
[pushwoosh setTags:tags];}
@end리치 미디어
Anchor link to리치 미디어는 사용자 참여를 높이기 위해 알림 및 인앱 메시지에 사용되는 이미지, 비디오 또는 HTML과 같은 대화형 멀티미디어 콘텐츠를 의미합니다.
import PushwooshFramework
class ViewController: UIViewController, PWRichMediaPresentingDelegate {
    override func viewDidLoad() {        super.viewDidLoad()        let richMediaConfiguration = PWModalWindowConfiguration.shared()
        PWRichMediaManager.shared().delegate = self        richMediaConfiguration.configureModalWindow(with: .PWModalWindowPositionBottom,                                                                 present: .PWAnimationPresentFromBottom,                                                                 dismiss: .PWAnimationDismissDown)    }
    func richMediaManager(_ richMediaManager: PWRichMediaManager!, shouldPresent richMedia: PWRichMedia!) -> Bool {        print("Rich media will be presented with: \(richMedia.pushPayload!)")        return true    }
    func richMediaManager(_ richMediaManager: PWRichMediaManager!, didPresent richMedia: PWRichMedia!) {        print("Rich media has been presented with: \(richMedia.pushPayload!)")    }
    func richMediaManager(_ richMediaManager: PWRichMediaManager!, didClose richMedia: PWRichMedia!) {        print("Rich media has been closed with: \(richMedia.pushPayload!)")    }
    func richMediaManager(_ richMediaManager: PWRichMediaManager!, presentingDidFailFor richMedia: PWRichMedia!, withError error: (any Error)!) {        print("Failed to present rich media with: \(richMedia.pushPayload!). Error: \(error.localizedDescription)")    }}
#import "ViewController.h"#import <PushwooshFramework/PushwooshFramework.h>#import <PushwooshFramework/PWRichMediaManager.h>#import <PushwooshFramework/PWModalWindowConfiguration.h>
@interface ViewController () <PWRichMediaPresentingDelegate>
@end
@implementation ViewController
- (void)viewDidLoad { [super viewDidLoad];
[[PWRichMediaManager sharedManager] setDelegate:self]; [[PWModalWindowConfiguration shared] configureModalWindowWith:PWModalWindowPositionBottom presentAnimation:PWAnimationPresentFromBottom dismissAnimation:PWAnimationDismissDown];}
- (BOOL)richMediaManager:(PWRichMediaManager *)richMediaManager shouldPresentRichMedia:(PWRichMedia *)richMedia { NSLog(@"Rich media will be presented with: %@", richMedia.pushPayload); return YES;}
- (void)richMediaManager:(PWRichMediaManager *)richMediaManager didPresentRichMedia:(PWRichMedia *)richMedia { NSLog(@"Rich media has been presented with: %@", richMedia.pushPayload);}
- (void)richMediaManager:(PWRichMediaManager *)richMediaManager didCloseRichMedia:(PWRichMedia *)richMedia { NSLog(@"Rich media has been closed with:: %@", richMedia.pushPayload);}
- (void)richMediaManager:(PWRichMediaManager *)richMediaManager presentingDidFailForRichMedia:(PWRichMedia *)richMedia withError:(NSError *)error { NSLog(@"Failed to present rich media with: %@. Error: %@", richMedia.pushPayload, error.localizedDescription);}
@end문제 해결
Anchor link to’PushwooshFramework’ 모듈 빌드 실패
Anchor link to프로젝트를 빌드할 때 다음과 유사한 오류가 발생할 수 있습니다:
Failed to build module 'PushwooshFramework'; this SDK is not supported by the compiler(the SDK is built with 'Apple Swift version 5.10 (swiftlang-5.10.0.13 clang-1500.3.9.4)',while this compiler is 'Apple Swift version 6.1.2 effective-5.10 (swiftlang-6.1.2.1.2 clang-1700.0.13.5)')원인: 이 오류는 Swift 컴파일러 버전 비호환성과 관련이 없습니다. Pushwoosh iOS SDK 버전 6.8.0부터 SDK는 서로 상호 작용하는 여러 구성 요소로 모듈화되었습니다. 이 오류는 필요한 모든 프레임워크가 프로젝트에 추가되지 않았을 때 발생합니다.
해결책: Swift Package Manager를 통해 통합할 때 네 가지 필수 프레임워크가 모두 앱 타겟에 추가되었는지 확인하십시오:
PushwooshFrameworkPushwooshCorePushwooshBridgePushwooshLiveActivities
Xcode에서 이를 확인하려면:
- Project Navigator에서 프로젝트를 선택합니다.
- 앱 타겟을 선택합니다.
- General > Frameworks, Libraries, and Embedded Content로 이동합니다.
- 네 가지 프레임워크가 모두 나열되어 있는지 확인합니다.
통합 과정에서 문제가 발생하면 지원 및 커뮤니티 섹션을 참조하십시오.