Unity SDK 기본 통합 가이드
이 섹션에서는 Pushwoosh Unity SDK를 애플리케이션에 통합하는 방법에 대한 정보를 제공합니다.
사전 요구 사항
Anchor link toPushwoosh Unity SDK를 앱에 통합하려면 다음이 필요합니다:
통합 단계
Anchor link to1. Pushwoosh Unity SDK 종속성 추가
Anchor link toUnity 푸시 알림 플러그인을 Unity의 Assets 폴더로 가져옵니다.
2. Unity SDK 초기화
Anchor link toPushNotificator.cs 스크립트를 생성하고 씬의 Camera Object에 연결합니다.
스크립트에서:
- 애플리케이션 코드와 Firebase 프로젝트 번호로 Pushwoosh SDK를 초기화합니다.
- 초기화 로직에서
RegisterForPushNotifications()를 호출하여 푸시 알림에 등록합니다. - 푸시 등록 이벤트를 관리하기 위해 등록 이벤트 핸들러를 추가합니다:
using UnityEngine;using UnityEngine.UI;
public class PushNotificator : MonoBehaviour {    void Start () {        Pushwoosh.ApplicationCode = "__YOUR_APP_ID__";        Pushwoosh.FcmProjectNumber = "__YOUR_FCM_SENDER_ID__";        Pushwoosh.Instance.OnRegisteredForPushNotifications += OnRegisteredForPushNotifications;        Pushwoosh.Instance.OnFailedToRegisteredForPushNotifications += OnFailedToRegisteredForPushNotifications;        Pushwoosh.Instance.RegisterForPushNotifications();    }
    void OnRegisteredForPushNotifications(string token) {        Debug.LogFormat(LogType.Log, LogOption.NoStacktrace, null, "Received token: \n{0}", token);    }
    void OnFailedToRegisteredForPushNotifications(string error) {        Debug.LogFormat(LogType.Log, LogOption.NoStacktrace, null, "Error ocurred while registering to push notifications: \n{0}", error);    }}
여기서:
__YOUR_APP_ID__는 Pushwoosh Control Panel의 애플리케이션 코드입니다.__YOUR_FCM_SENDER_ID__는 Firebase Console의 Firebase 프로젝트 번호입니다.
3. iOS 네이티브 설정
Anchor link to3.1 기능(Capabilities)
Anchor link to프로젝트에서 푸시 알림을 활성화하려면 특정 기능을 추가해야 합니다.
Signing & Capabilities 섹션에서 다음 기능을 추가합니다:
Push NotificationsBackground Modes. 이 기능을 추가한 후Remote notifications확인란을 선택합니다.
Time Sensitive Notifications(iOS 15+)를 사용하려는 경우 Time Sensitive Notifications 기능도 추가합니다.
3.2 Info.plist
Anchor link toRunner/Info.plist에서 __PUSHWOOSH_DEVICE_API_TOKEN__ 키를 Pushwoosh Device API Token으로 설정합니다:
<key>Pushwoosh_API_TOKEN</key><string>__PUSHWOOSH_DEVICE_API_TOKEN__</string>3.3 메시지 전송 추적
Anchor link to프로젝트에 Notification Service Extension 타겟을 추가해야 합니다. 이는 정확한 전송 추적 및 iOS의 Rich Media와 같은 기능에 필수적입니다.
네이티브 가이드의 단계에 따라 확장 타겟과 그 안에 필요한 Pushwoosh 코드를 추가하세요.
4. Android 네이티브 설정
Anchor link to4.1 Firebase 구성 파일 추가
Anchor link togoogle-services.json 파일을 프로젝트 디렉토리의 Assets 폴더에 넣습니다.
4.2 빌드 설정 조정
Anchor link toAndroid 빌드 프로필의 Publishing Settings 섹션에서 Custom Main Manifest 옵션을 활성화합니다.
4.3 Pushwoosh 메타데이터 추가
Anchor link toAssets/Plugins/Android/AndroidManifest.xml에서 <application> 태그 안에 Pushwoosh Device API Token을 추가합니다:
<meta-data android:name="com.pushwoosh.apitoken" android:value="__YOUR_DEVICE_API_TOKEN__" />중요: Pushwoosh Control Panel에서 토큰이 올바른 앱에 액세스할 수 있도록 하세요. 자세히 알아보기
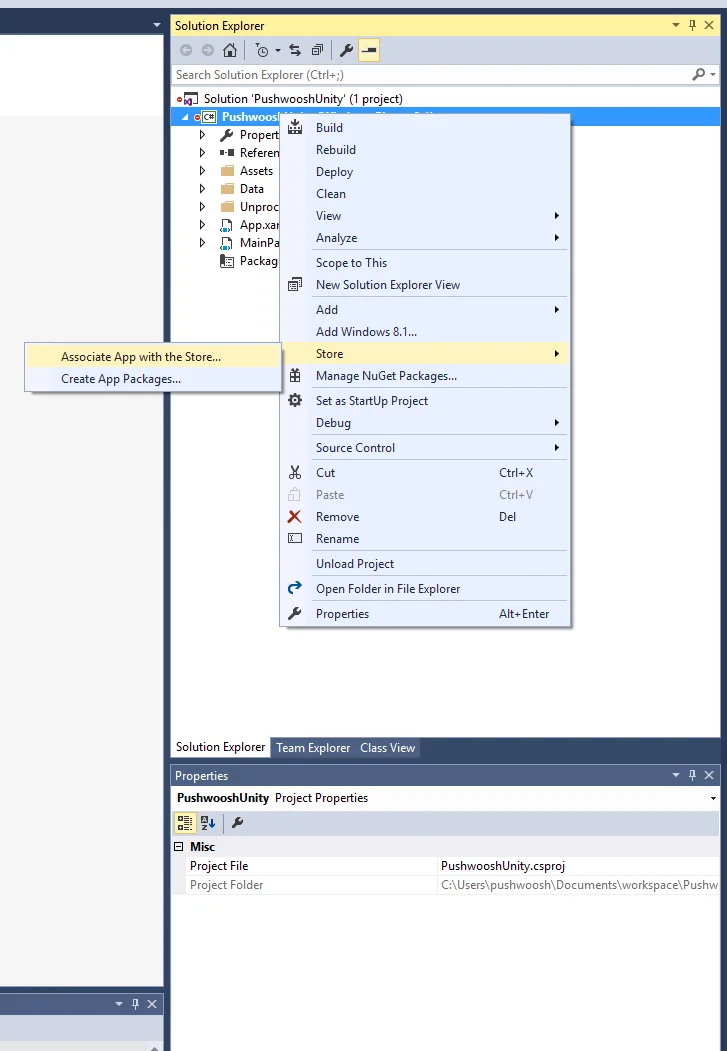
5. Windows Store 통합
Anchor link toAssets/디렉토리에 다음 내용으로link.xml을 추가합니다:
<linker> <assembly fullname="PushSDK" preserve="all"/></linker>- 내보낸 Visual Studio 프로젝트에서 스토어와 앱 연결을 해야 합니다. 앱이 게시자 ID와 일치하는 인증서로 서명되었는지 확인하세요.
내보낸 Visual Studio 프로젝트의 .appxmanifest의 Capabilities 탭에서 Internet (Client) 기능을 선택합니다.
6. 프로젝트 실행
Anchor link to- 프로젝트를 빌드하고 실행합니다.
- Pushwoosh Control Panel로 이동하여 푸시 알림을 보냅니다.
- 앱에서 알림을 볼 수 있습니다.
확장 통합
Anchor link to이 단계에서는 이미 SDK를 통합했으며 푸시 알림을 보내고 받을 수 있습니다. 이제 핵심 기능을 살펴보겠습니다.
푸시 알림 이벤트 리스너
Anchor link toPushwoosh SDK에는 푸시 알림 처리를 위해 설계된 두 개의 이벤트 리스너가 있습니다:
OnPushNotificationsReceived이벤트는 푸시 알림을 수신할 때 트리거됩니다.OnPushNotificationsOpened이벤트는 사용자가 알림을 열 때 트리거됩니다.
PushNotificator.cs에서 SDK 초기화 직후에 이러한 이벤트 리스너를 설정해야 합니다:
using UnityEngine;using UnityEngine.UI;
public class PushNotificator : MonoBehaviour {    void Start () {        Pushwoosh.ApplicationCode = "__YOUR_APP_ID__";        Pushwoosh.FcmProjectNumber = "__YOUR_FCM_SENDER_ID__";        Pushwoosh.Instance.OnPushNotificationsReceived += OnPushNotificationsReceived;        Pushwoosh.Instance.OnPushNotificationsOpened += OnPushNotificationsOpened;        Pushwoosh.Instance.RegisterForPushNotifications();    }
    void OnPushNotificationsReceived(string payload) {        Debug.LogFormat(LogType.Log, LogOption.NoStacktrace, null, "Received push notificaiton: \n{0}", payload);    }
    void OnPushNotificationsOpened(string payload) {        Debug.LogFormat(LogType.Log, LogOption.NoStacktrace, null, "Opened push notificaiton: \n{0}", payload);    }
사용자 구성
Anchor link to개별 사용자 행동 및 선호도에 초점을 맞춤으로써 개인화된 콘텐츠를 제공하여 사용자 만족도와 충성도를 높일 수 있습니다.
public class Registration {  public void afterUserLogin(User user) {
    // 사용자 ID 설정    Pushwoosh.Instance.SetUserId(user.getId());
    // 사용자 이메일 설정    Pushwoosh.Instance.SetEmail(user.getEmail());
// Pushwoosh에 대한 태그로 추가 사용자 정보 설정 Pushwoosh.Instance.SetIntTag("Age", user.getAge()); Pushwoosh.Instance.SetStringTag("Name", user.getName()); Pushwoosh.Instance.SetStringTag("LastLoginDate", user.getLastLoginDate()); }}태그는 사용자나 장치에 할당된 키-값 쌍으로, 선호도나 행동과 같은 속성을 기반으로 세분화하여 타겟 메시징을 가능하게 합니다.
public class UpdateUser {  public void afterUserUpdateProfile(User user) {
    // 즐겨찾는 카테고리 목록 설정    Pushwoosh.Instance.SetListTag(      "favorite_categories": user.getFavoriteCategoriesList()    );
// 결제 정보 설정 Pushwoosh.Instance.SetStringTag("is_subscribed", user.isSubscribed()); Pushwoosh.Instance.SetStringTag("payment_status", user.getPaymentStatus()); Pushwoosh.Instance.SetStringTag("billing_address", user.getBillingAddress()); }}이벤트는 앱 내에서 발생하는 특정 사용자 행동 또는 발생으로, 행동을 분석하고 해당 메시지나 작업을 트리거하기 위해 추적할 수 있습니다.
public class Registration {
  // 로그인 이벤트 추적  public void afterUserLogin(User user) {    Pushwoosh.Instance.PostEvent("login", new Dictionary<string, object>() {      { "name", user.getName() },      { "last_login", user.getLastLoginDate() }    });  }
  public void afterUserPurchase(Product product) {    // 구매 이벤트 추적    Pushwoosh.Instance.PostEvent("purchase", new Dictionary<string, object>() {      { "product_id", product.getId() },      { "product_name", product.getName() },      { "price", product.getPrice() },      { "quantity", product.getQuantity() }    });  }}
문제 해결
Anchor link to통합 과정에서 문제가 발생하면 지원 및 커뮤니티 섹션을 참조하세요.