iOS SDK 7.0+ বেসিক ইন্টিগ্রেশন গাইড
এই বিভাগে আপনার iOS অ্যাপ্লিকেশনে Pushwoosh SDK কীভাবে ইন্টিগ্রেট করবেন সে সম্পর্কে তথ্য রয়েছে।
পূর্বশর্ত
Anchor link toআপনার অ্যাপে Pushwoosh iOS SDK ইন্টিগ্রেট করার জন্য, আপনার নিম্নলিখিত জিনিসগুলির প্রয়োজন হবে:
ইন্টিগ্রেশন ধাপ
Anchor link to১. ইনস্টলেশন
Anchor link toআপনি সুইফট প্যাকেজ ম্যানেজার বা কোকোপডস ব্যবহার করে আপনার অ্যাপ্লিকেশনে Pushwoosh SDK ইন্টিগ্রেট করতে পারেন।
সুইফট প্যাকেজ ম্যানেজার
Anchor link toপ্যাকেজ ডিপেন্ডেন্সি বিভাগে, নিম্নলিখিত প্যাকেজটি যোগ করুন:
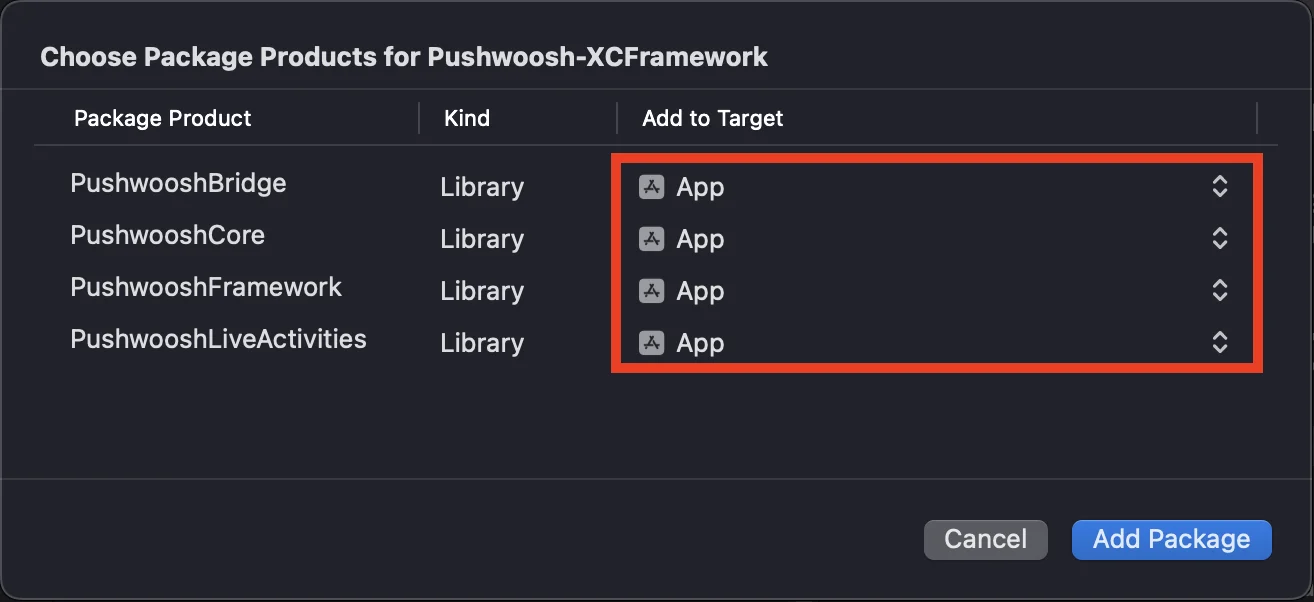
https://github.com/Pushwoosh/Pushwoosh-XCFrameworkPushwoosh iOS SDK ব্যবহার করার জন্য, সুইফট প্যাকেজ ম্যানেজারের মাধ্যমে ইন্টিগ্রেট করার সময় আপনার অ্যাপ টার্গেটে নিম্নলিখিত তিনটি ফ্রেমওয়ার্ক যোগ করতে ভুলবেন না:
PushwooshFrameworkPushwooshCorePushwooshBridge
কোকোপডস
Anchor link toআপনার Podfile খুলুন এবং ডিপেন্ডেন্সি যোগ করুন:
# Uncomment the next line to define a global platform for your project# platform :ios, '9.0'
target 'MyApp' do  # Comment the next line if you don't want to use dynamic frameworks  use_frameworks!
  pod 'PushwooshXCFramework'
end
তারপর, টার্মিনালে, ডিপেন্ডেন্সি ইনস্টল করার জন্য নিম্নলিখিত কমান্ডটি চালান:
pod install২. ক্যাপাবিলিটিস
Anchor link toআপনার প্রজেক্টে পুশ নোটিফিকেশন সক্রিয় করতে, আপনাকে কিছু ক্যাপাবিলিটিস যোগ করতে হবে।
সাইনিং এবং ক্যাপাবিলিটিস বিভাগে, নিম্নলিখিত ক্যাপাবিলিটিস যোগ করুন:
Push NotificationsBackground Modes। এই ক্যাপাবিলিটি যোগ করার পরে,Remote notifications-এর জন্য বক্সটি চেক করুন।
আপনি যদি টাইম সেনসিটিভ নোটিফিকেশন (iOS 15+) ব্যবহার করতে চান, তাহলে Time Sensitive Notifications ক্যাপাবিলিটিটিও যোগ করুন।
৩. ইনিশিয়ালাইজেশন কোড
Anchor link toAppDelegate
Anchor link toআপনার AppDelegate ক্লাসে নিম্নলিখিত কোডটি যোগ করুন:
import SwiftUIimport PushwooshFramework
@mainstruct MyApp: App {    // AppDelegate-কে UIApplicationDelegate হিসেবে রেজিস্টার করুন    @UIApplicationDelegateAdaptor(AppDelegate.self) var appDelegate
    var body: some Scene {        WindowGroup {            ContentView()        }    }}
class AppDelegate: NSObject, UIApplicationDelegate, PWMessagingDelegate {
    func application(_ application: UIApplication, didFinishLaunchingWithOptions launchOptions: [UIApplication.LaunchOptionsKey: Any]?) -> Bool {        // ইনিশিয়ালাইজেশন কোড        // পুশ হ্যান্ডলিংয়ের জন্য কাস্টম ডেলিগেট সেট করুন        Pushwoosh.configure.delegate = self
        // পুশ নোটিফিকেশনের জন্য রেজিস্টার করুন        Pushwoosh.configure.registerForPushNotifications()
        return true    }
    // APNS থেকে প্রাপ্ত টোকেন হ্যান্ডেল করুন    func application(_ application: UIApplication, didRegisterForRemoteNotificationsWithDeviceToken deviceToken: Data) {        Pushwoosh.configure.handlePushRegistration(deviceToken)    }
    // টোকেন প্রাপ্তির ত্রুটি হ্যান্ডেল করুন    func application(_ application: UIApplication, didFailToRegisterForRemoteNotificationsWithError error: Error) {        Pushwoosh.configure.handlePushRegistrationFailure(error)    }
    // সাইলেন্ট পুশ নোটিফিকেশনের জন্য    func application(_ application: UIApplication, didReceiveRemoteNotification userInfo: [AnyHashable: Any], fetchCompletionHandler completionHandler: @escaping (UIBackgroundFetchResult) -> Void) {        Pushwoosh.configure.handlePushReceived(userInfo)        completionHandler(.noData)    }
    // যখন একটি পুশ পাওয়া যায় তখন ফায়ার হয়    func pushwoosh(_ pushwoosh: Pushwoosh, onMessageReceived message: PWMessage) {        print("onMessageReceived: ", message.payload!.description)    }
    // যখন একজন ব্যবহারকারী নোটিফিকেশনে ট্যাপ করে তখন ফায়ার হয়    func pushwoosh(_ pushwoosh: Pushwoosh, onMessageOpened message: PWMessage) {        print("onMessageOpened: ", message.payload!.description)    }}
struct ContentView: View {    var body: some View {        Text("Pushwoosh with SwiftUI")            .padding()    }}
import PushwooshFramework
@UIApplicationMainclass AppDelegate: UIResponder, UIApplicationDelegate, PWMessagingDelegate {
var window: UIWindow?
func application(_ application: UIApplication, didFinishLaunchingWithOptions launchOptions: [UIApplication.LaunchOptionsKey: Any]?) -> Bool { //ইনিশিয়ালাইজেশন কোড //পুশ হ্যান্ডলিংয়ের জন্য কাস্টম ডেলিগেট সেট করুন, আমাদের ক্ষেত্রে AppDelegate Pushwoosh.configure.delegate = self;
//পুশ নোটিফিকেশনের জন্য রেজিস্টার করুন Pushwoosh.configure.registerForPushNotifications()
return true }
//APNS থেকে প্রাপ্ত টোকেন হ্যান্ডেল করুন func application(_ application: UIApplication, didRegisterForRemoteNotificationsWithDeviceToken deviceToken: Data) { Pushwoosh.configure.handlePushRegistration(deviceToken) }
//টোকেন প্রাপ্তির ত্রুটি হ্যান্ডেল করুন func application(_ application: UIApplication, didFailToRegisterForRemoteNotificationsWithError error: Error) { Pushwoosh.configure.handlePushRegistrationFailure(error); }
//সাইলেন্ট পুশ নোটিফিকেশনের জন্য func application(_ application: UIApplication, didReceiveRemoteNotification userInfo: [AnyHashable : Any], fetchCompletionHandler completionHandler: @escaping (UIBackgroundFetchResult) -> Void) { Pushwoosh.configure.handlePushReceived(userInfo) completionHandler(.noData) }
//এই ইভেন্টটি ফায়ার হয় যখন পুশ পাওয়া যায় func pushwoosh(_ pushwoosh: Pushwoosh, onMessageReceived message: PWMessage) { print("onMessageReceived: ", message.payload!.description) }
// যখন একজন ব্যবহারকারী নোটিফিকেশনে ট্যাপ করে তখন ফায়ার হয় func pushwoosh(_ pushwoosh: Pushwoosh, onMessageOpened message: PWMessage) { print("onMessageOpened: ", message.payload!.description) }}#import <PushwooshFramework/PushwooshFramework.h>
@implementation AppDelegate
- (BOOL)application:(UIApplication *)application didFinishLaunchingWithOptions:(NSDictionary *)launchOptions { //-----------PUSHWOOSH PART-----------
// পুশ হ্যান্ডলিংয়ের জন্য কাস্টম ডেলিগেট সেট করুন, আমাদের ক্ষেত্রে AppDelegate [Pushwoosh configure].delegate = self;
//পুশ নোটিফিকেশনের জন্য রেজিস্টার করুন! [[Pushwoosh configure] registerForPushNotifications];
return YES;}
//APNS থেকে প্রাপ্ত টোকেন হ্যান্ডেল করুন- (void)application:(UIApplication *)application didRegisterForRemoteNotificationsWithDeviceToken:(NSData *)deviceToken { [[Pushwoosh configure] handlePushRegistration:deviceToken];}
//টোকেন প্রাপ্তির ত্রুটি হ্যান্ডেল করুন- (void)application:(UIApplication *)application didFailToRegisterForRemoteNotificationsWithError:(NSError *)error { [[Pushwoosh configure] handlePushRegistrationFailure:error];}
//সাইলেন্ট পুশ নোটিফিকেশনের জন্য- (void)application:(UIApplication *)application didReceiveRemoteNotification:(NSDictionary *)userInfo fetchCompletionHandler:(void (^)(UIBackgroundFetchResult))completionHandler { [[Pushwoosh configure] handlePushReceived:userInfo]; completionHandler(UIBackgroundFetchResultNoData);}
//এই ইভেন্টটি ফায়ার হয় যখন পুশ পাওয়া যায়- (void)pushwoosh:(Pushwoosh *)pushwoosh onMessageReceived:(PWMessage *)message { NSLog(@"onMessageReceived: %@", message.payload);}
//এই ইভেন্টটি ফায়ার হয় যখন ব্যবহারকারী নোটিফিকেশনে ট্যাপ করে- (void)pushwoosh:(Pushwoosh *)pushwoosh onMessageOpened:(PWMessage *)message { NSLog(@"onMessageOpened: %@", message.payload);}
@endInfo.plist
Anchor link toআপনার Info.plist-এ:
Pushwoosh_APPIDকী-কে Pushwoosh অ্যাপ্লিকেশন কোডে সেট করুন।Pushwoosh_API_TOKENকী-কে Pushwoosh ডিভাইস API টোকেন-এ সেট করুন।
৪. মেসেজ ডেলিভারি ট্র্যাকিং
Anchor link toPushwoosh নোটিফিকেশন সার্ভিস এক্সটেনশনের মাধ্যমে পুশ নোটিফিকেশনের জন্য ডেলিভারি ইভেন্ট ট্র্যাকিং সমর্থন করে।
নোটিফিকেশন সার্ভিস এক্সটেনশন যোগ করুন
Anchor link to১. Xcode-এ, ফাইল > নতুন > টার্গেট… নির্বাচন করুন। ২. নোটিফিকেশন সার্ভিস এক্সটেনশন বেছে নিন এবং পরবর্তী চাপুন। ৩. টার্গেটের নাম লিখুন এবং শেষ চাপুন। ৪. অ্যাক্টিভেশনের জন্য জিজ্ঞাসা করা হলে, বাতিল চাপুন।
নোটিফিকেশন সার্ভিস এক্সটেনশনের জন্য ডিপেন্ডেন্সি (শুধুমাত্র CocoaPods)
Anchor link toদ্রষ্টব্য: আপনি যদি ডিপেন্ডেন্সি পরিচালনা করার জন্য সুইফট প্যাকেজ ম্যানেজার ব্যবহার করেন, তাহলে আপনি এই ধাপটি এড়িয়ে যেতে পারেন, কারণ ডিপেন্ডেন্সিগুলি স্বয়ংক্রিয়ভাবে যোগ হয়ে যায়।
আপনার Podfile খুলুন এবং টার্গেটের জন্য ডিপেন্ডেন্সি যোগ করুন:
# Uncomment the next line to define a global platform for your project# platform :ios, '9.0'
target 'MyApp' do  # Comment the next line if you don't want to use dynamic frameworks  use_frameworks!
  pod 'PushwooshXCFramework'
end
target 'MyAppNotificationExtension' do  use_frameworks!
  pod 'PushwooshXCFramework'
end
ডিপেন্ডেন্সি আপডেট করার জন্য টার্মিনালে নিম্নলিখিত কমান্ডটি চালান:
pod updateনোটিফিকেশন সার্ভিস এক্সটেনশনে Pushwoosh SDK যোগ করুন
Anchor link toএই কোডটি আপনাকে আপনার নোটিফিকেশন এক্সটেনশনের মধ্যে নোটিফিকেশন আটকাতে এবং প্রক্রিয়া করতে দেয়।
import UserNotificationsimport PushwooshFramework
class NotificationService: UNNotificationServiceExtension {
    var contentHandler: ((UNNotificationContent) -> Void)?    var bestAttemptContent: UNMutableNotificationContent?
    override func didReceive(_ request: UNNotificationRequest, withContentHandler contentHandler: @escaping (UNNotificationContent) -> Void) {        // Pushwoosh **********        PWNotificationExtensionManager.shared().handle(request, contentHandler: contentHandler)        // ********************
        self.contentHandler = contentHandler        bestAttemptContent = (request.content.mutableCopy() as? UNMutableNotificationContent)
        if let bestAttemptContent = bestAttemptContent {            // এখানে নোটিফিকেশন কন্টেন্ট পরিবর্তন করুন...            contentHandler(bestAttemptContent)        }    }
    override func serviceExtensionTimeWillExpire() {        // সিস্টেম দ্বারা এক্সটেনশনটি বন্ধ করার ঠিক আগে কল করা হয়।        // পরিবর্তিত কন্টেন্টের "সেরা প্রচেষ্টা" প্রদান করার সুযোগ হিসেবে এটি ব্যবহার করুন, অন্যথায় মূল পুশ পেলোড ব্যবহার করা হবে।        if let contentHandler = contentHandler, let bestAttemptContent =  bestAttemptContent {            contentHandler(bestAttemptContent)        }    }
}
#import "PWNotificationExtensionManager.h"
@interface NotificationService : UNNotificationServiceExtension
@end
@implementation NotificationService
- (void)didReceiveNotificationRequest:(UNNotificationRequest *)request withContentHandler:(void (^)(UNNotificationContent * _Nonnull))contentHandler { // Pushwoosh ********** [[PWNotificationExtensionManager sharedManager] handleNotificationRequest:request contentHandler:contentHandler]; //*********************}
@endInfo.plist
Anchor link toআপনার নোটিফিকেশন সার্ভিস এক্সটেনশনের Info.plist-এ যোগ করুন:
Pushwoosh_APPID- আপনার অ্যাপ্লিকেশন কোড।
৫. প্রজেক্ট চালান
Anchor link to১. প্রজেক্টটি বিল্ড করুন এবং চালান। ২. Pushwoosh কন্ট্রোল প্যানেলে যান এবং একটি পুশ নোটিফিকেশন পাঠান। ৩. আপনার অ্যাপে নোটিফিকেশনটি দেখতে পাওয়া উচিত।
বর্ধিত Pushwoosh iOS ইন্টিগ্রেশন
Anchor link toএই পর্যায়ে, আপনি ইতিমধ্যে SDK ইন্টিগ্রেট করেছেন এবং পুশ নোটিফিকেশন পাঠাতে ও গ্রহণ করতে পারেন। এখন, আসুন মূল কার্যকারিতা অন্বেষণ করি।
পুশ নোটিফিকেশন
Anchor link toPushwoosh SDK-তে, পুশ নোটিফিকেশন হ্যান্ডেল করার জন্য দুটি কলব্যাক ডিজাইন করা হয়েছে:
onMessageReceived: এই মেথডটি কল করা হয় যখন একটি পুশ নোটিফিকেশন পাওয়া যায়।onMessageOpened: এই মেথডটি কল করা হয় যখন ব্যবহারকারী নোটিফিকেশনের সাথে ইন্টারঅ্যাক্ট করে (খোলে)।
এই কলব্যাকগুলি ডেভেলপারদের তাদের অ্যাপ্লিকেশনের মধ্যে পুশ নোটিফিকেশন গ্রহণ এবং ব্যবহারকারীর ইন্টারঅ্যাকশন পরিচালনা করতে সক্ষম করে।
import PushwooshFramework
class AppDelegate: NSObject, UIApplicationDelegate, PWMessagingDelegate {
    func application(_ application: UIApplication, didFinishLaunchingWithOptions launchOptions: [UIApplication.LaunchOptionsKey : Any]? = nil) -> Bool {        Pushwoosh.configure.delegate = self;    }
    func pushwoosh(_ pushwoosh: Pushwoosh, onMessageOpened message: PWMessage) {        if let payload = message.payload {            print("onMessageOpened: \(payload)")        }    }
    func pushwoosh(_ pushwoosh: Pushwoosh, onMessageReceived message: PWMessage) {        if let payload = message.payload {            print("onMessageReceived: \(payload)")        }    }}
#import <PushwooshFramework/PushwooshFramework.h>
@interface AppDelegate () <PWMessagingDelegate>
@end
@implementation AppDelegate
- (BOOL)application:(UIApplication *)application didFinishLaunchingWithOptions:(NSDictionary *)launchOptions { [[Pushwoosh configure] setDelegate:self]; return YES;}
- (void)pushwoosh:(Pushwoosh *)pushwoosh onMessageOpened:(PWMessage *)message { if (message.payload) { NSLog(@"onMessageOpened: %@", message.payload); }}
- (void)pushwoosh:(Pushwoosh *)pushwoosh onMessageReceived:(PWMessage *)message { if (message.payload) { NSLog(@"onMessageReceived: %@", message.payload); }}@endব্যবহারকারী কনফিগারেশন
Anchor link toব্যক্তিগত ব্যবহারকারীর আচরণ এবং পছন্দের উপর ফোকাস করে, আপনি ব্যক্তিগতকৃত সামগ্রী সরবরাহ করতে পারেন, যা ব্যবহারকারীর সন্তুষ্টি এবং আনুগত্য বৃদ্ধি করে।
import PushwooshFramework
class Registration {
    func afterUserLogin(user: User) {        let pushwoosh = Pushwoosh.configure        // ব্যবহারকারী আইডি সেট করুন        if let userId = user.userId {            pushwoosh.setUserId(userId)        }
        // ব্যবহারকারী ইমেল সেট করুন        if let userEmail = user.email {            pushwoosh.setEmail(userEmail)        }
        // ব্যবহারকারী এসএমএস নম্বর সেট করুন        if let userSmsNumber = user.SmsNumber {            pushwoosh.registerSmsNumber(userSmsNumber)        }
        // ব্যবহারকারী হোয়াটসঅ্যাপ নম্বর সেট করুন        if let userWhatsAppNumber = user.WhatsAppNumber {            pushwoosh.registerSmsNumber(userWhatsAppNumber)        }
        // Pushwoosh-এর জন্য ট্যাগ হিসেবে অতিরিক্ত ব্যবহারকারী তথ্য সেট করা হচ্ছে        if let age = user.userDetails.age,            let name = user.userDetails.userName,            let lastLogin = user.userDetails.lastLoginDate {            pushwoosh.setTags([                "age": age,                "name": name,                "last_login": lastLogin            ])        }    }}
#import <PushwooshFramework/PushwooshFramework.h>
@implementation Registration
- (void)afterUserLogin:(User *)user { Pushwoosh *pushwoosh = [Pushwoosh configure];
// ব্যবহারকারী আইডি সেট করুন if (user.userId) { [pushwoosh setUserId:user.userId]; }
// ব্যবহারকারী ইমেল সেট করুন if (user.email) { [pushwoosh setEmail:user.email]; }
// Pushwoosh-এর জন্য ট্যাগ হিসেবে অতিরিক্ত ব্যবহারকারী তথ্য সেট করা হচ্ছে if (user.userDetails.age && user.userDetails.userName && user.userDetails.lastLoginDate) { NSDictionary *tags = @{ @"age": user.userDetails.age, @"name": user.userDetails.userName, @"last_login": user.userDetails.lastLoginDate }; [pushwoosh setTags:tags]; }}
@endট্যাগ
Anchor link toট্যাগ হলো ব্যবহারকারী বা ডিভাইসের জন্য নির্ধারিত কী-ভ্যালু পেয়ার, যা পছন্দ বা আচরণের মতো অ্যাট্রিবিউটের উপর ভিত্তি করে সেগমেন্টেশন করতে দেয়, যার ফলে টার্গেটেড মেসেজিং সম্ভব হয়।
import PushwooshFramework
class UpdateUser {    func afterUserUpdateProfile(user: User) {        let pushwoosh = Pushwoosh.configure
        // প্রিয় ক্যাটাগরির তালিকা সেট করুন        pushwoosh.setTags(["favorite_categories" : user.getFavoriteCategories()])
        // পেমেন্টের তথ্য সেট করুন        pushwoosh.setTags([            "is_subscribed": user.isSubscribed(),            "payment_status": user.getPaymentStatus(),            "billing_address": user.getBillingAddress()        ])    }}
#import <PushwooshFramework/PushwooshFramework.h>
@implementation UpdateUser
- (void)afterUserUpdateProfile:(User *)user { Pushwoosh *pushwoosh = [Pushwoosh configure];
// প্রিয় ক্যাটাগরির তালিকা সেট করুন [pushwoosh setTags:@{@"favorite_categories" : user.getFavoriteCategories}];
// পেমেন্টের তথ্য সেট করুন NSDictionary *tags = @{ @"is_subscribed": @(user.isSubscribed), @"payment_status": user.getPaymentStatus, @"billing_address": user.getBillingAddress }; [pushwoosh setTags:tags];}
@endইভেন্টস
Anchor link toইভেন্ট হলো অ্যাপের মধ্যে নির্দিষ্ট ব্যবহারকারীর ক্রিয়া বা ঘটনা যা আচরণ বিশ্লেষণ করতে এবং সংশ্লিষ্ট বার্তা বা ক্রিয়া ট্রিগার করতে ট্র্যাক করা যায়।
import PushwooshFramework
class Registration {
    func afterUserLogin(user: User) {        if let userName = user.getUserName(), let lastLogin = user.getLastLoginDate() {            PWInAppManager.shared().postEvent("login", withAttributes: [                "name": userName,                "last_login": lastLogin            ])        }    }
    func afterUserPurchase(user: User, product: Product) {        let pushwoosh = Pushwoosh.configure
        // ক্রয় ইভেন্ট ট্র্যাক করুন        PWInAppManager.shared().postEvent("purchase", withAttributes: [            "product_id": product.getId(),            "product_name": product.getName(),            "price": product.getPrice(),            "quantity": product.getQuantity()        ])
        // ব্যবহারকারী ট্যাগ সেট করুন        let lastPurchaseDate = Date().timeIntervalSince1970        let lifetimeSpend = getCurrentLifetimeSpend() + product.getPrice()
        pushwoosh.setTags([            "last_purchase_date": lastPurchaseDate,            "lifetime_spend": lifetimeSpend        ])    }}
#import <PushwooshFramework/PushwooshFramework.h>#import <PushwooshFramework/PWInAppManager.h>
@implementation Registration
- (void)afterUserLogin:(User *)user { NSString *userName = [user getUserName]; NSDate *lastLogin = [user getLastLoginDate];
if (userName && lastLogin) { [[PWInAppManager sharedManager] postEvent:@"login" withAttributes:@{ @"name": userName, @"last_login": lastLogin }]; }}
- (void)afterUserPurchase:(User *)user product:(Product *)product { Pushwoosh *pushwoosh = [Pushwoosh configure];
// ক্রয় ইভেন্ট ট্র্যাক করুন [[PWInAppManager sharedManager] postEvent:@"purchase" withAttributes:@{ @"product_id": [product getId], @"product_name": [product getName], @"price": @([product getPrice]), @"quantity": @([product getQuantity]) }];
// ব্যবহারকারী ট্যাগ সেট করুন NSTimeInterval lastPurchaseDate = [[NSDate date] timeIntervalSince1970]; double lifetimeSpend = /* fetch current lifetime spend */ + [product getPrice];
NSDictionary *tags = @{ @"last_purchase_date": @(lastPurchaseDate), @"lifetime_spend": @(lifetimeSpend) };
[pushwoosh setTags:tags];}
@endরিচ মিডিয়া
Anchor link toরিচ মিডিয়া বলতে ইন্টারেক্টিভ এবং মাল্টিমিডিয়া সামগ্রী বোঝায়, যেমন ছবি, ভিডিও বা HTML, যা ব্যবহারকারীর সম্পৃক্ততা বাড়ানোর জন্য নোটিফিকেশন এবং ইন-অ্যাপ মেসেজে ব্যবহৃত হয়।
import PushwooshFramework
class ViewController: UIViewController, PWRichMediaPresentingDelegate {
    override func viewDidLoad() {        super.viewDidLoad()        let richMediaConfiguration = PWModalWindowConfiguration.shared()
        PWRichMediaManager.shared().delegate = self        richMediaConfiguration.configureModalWindow(with: .PWModalWindowPositionBottom,                                                             present: .PWAnimationPresentFromBottom,                                                             dismiss: .PWAnimationDismissDown)    }
    func richMediaManager(_ richMediaManager: PWRichMediaManager!, shouldPresent richMedia: PWRichMedia!) -> Bool {        print("Rich media will be presented with: \(richMedia.pushPayload!)")        return true    }
    func richMediaManager(_ richMediaManager: PWRichMediaManager!, didPresent richMedia: PWRichMedia!) {        print("Rich media has been presented with: \(richMedia.pushPayload!)")    }
    func richMediaManager(_ richMediaManager: PWRichMediaManager!, didClose richMedia: PWRichMedia!) {        print("Rich media has been closed with: \(richMedia.pushPayload!)")    }
    func richMediaManager(_ richMediaManager: PWRichMediaManager!, presentingDidFailFor richMedia: PWRichMedia!, withError error: (any Error)!) {        print("Failed to present rich media with: \(richMedia.pushPayload!). Error: \(error.localizedDescription)")    }}
#import "ViewController.h"#import <PushwooshFramework/PushwooshFramework.h>#import <PushwooshFramework/PWRichMediaManager.h>#import <PushwooshFramework/PWModalWindowConfiguration.h>
@interface ViewController () <PWRichMediaPresentingDelegate>
@end
@implementation ViewController
- (void)viewDidLoad { [super viewDidLoad];
[[PWRichMediaManager sharedManager] setDelegate:self]; [[PWModalWindowConfiguration shared] configureModalWindowWith:PWModalWindowPositionBottom presentAnimation:PWAnimationPresentFromBottom dismissAnimation:PWAnimationDismissDown];}
- (BOOL)richMediaManager:(PWRichMediaManager *)richMediaManager shouldPresentRichMedia:(PWRichMedia *)richMedia { NSLog(@"Rich media will be presented with: %@", richMedia.pushPayload); return YES;}
- (void)richMediaManager:(PWRichMediaManager *)richMediaManager didPresentRichMedia:(PWRichMedia *)richMedia { NSLog(@"Rich media has been presented with: %@", richMedia.pushPayload);}
- (void)richMediaManager:(PWRichMediaManager *)richMediaManager didCloseRichMedia:(PWRichMedia *)richMedia { NSLog(@"Rich media has been closed with:: %@", richMedia.pushPayload);}
- (void)richMediaManager:(PWRichMediaManager *)richMediaManager presentingDidFailForRichMedia:(PWRichMedia *)richMedia withError:(NSError *)error { NSLog(@"Failed to present rich media with: %@. Error: %@", richMedia.pushPayload, error.localizedDescription);}
@endট্রাবলশুটিং
Anchor link to’PushwooshFramework’ মডিউল বিল্ড করতে ব্যর্থ
Anchor link toআপনার প্রজেক্ট বিল্ড করার সময়, আপনি নিম্নলিখিত ধরনের একটি ত্রুটির সম্মুখীন হতে পারেন:
Failed to build module 'PushwooshFramework'; this SDK is not supported by the compiler(the SDK is built with 'Apple Swift version 5.10 (swiftlang-5.10.0.13 clang-1500.3.9.4)',while this compiler is 'Apple Swift version 6.1.2 effective-5.10 (swiftlang-6.1.2.1.2 clang-1700.0.13.5)')কারণ: এই ত্রুটিটি সুইফট কম্পাইলার ভার্সন অসঙ্গতির সাথে সম্পর্কিত নয়। Pushwoosh iOS SDK সংস্করণ 6.8.0 থেকে, SDK-কে কয়েকটি মডিউলে ভাগ করা হয়েছে যা একে অপরের সাথে ইন্টারঅ্যাক্ট করে। যখন আপনার প্রজেক্টে সমস্ত প্রয়োজনীয় ফ্রেমওয়ার্ক যোগ করা হয় না তখন এই ত্রুটিটি ঘটে।
সমাধান: সুইফট প্যাকেজ ম্যানেজারের মাধ্যমে ইন্টিগ্রেট করার সময় আপনার অ্যাপ টার্গেটে চারটি প্রয়োজনীয় ফ্রেমওয়ার্ক যোগ করা হয়েছে কিনা তা নিশ্চিত করুন:
PushwooshFrameworkPushwooshCorePushwooshBridgePushwooshLiveActivities
Xcode-এ এটি যাচাই করতে: ১. প্রজেক্ট নেভিগেটরে আপনার প্রজেক্ট নির্বাচন করুন ২. আপনার অ্যাপ টার্গেট নির্বাচন করুন ৩. সাধারণ > ফ্রেমওয়ার্ক, লাইব্রেরি, এবং এমবেডেড কন্টেন্ট-এ যান ৪. নিশ্চিত করুন যে চারটি ফ্রেমওয়ার্কই তালিকাভুক্ত আছে
ইন্টিগ্রেশন প্রক্রিয়ার সময় আপনি যদি কোনো সমস্যার সম্মুখীন হন, তাহলে অনুগ্রহ করে সাপোর্ট এবং কমিউনিটি বিভাগটি দেখুন।