Unity SDK 基本集成指南
本节包含有关如何将 Pushwoosh Unity SDK 集成到您的应用程序中的信息。
先决条件
Anchor link to要将 Pushwoosh Unity SDK 集成到您的应用中,您需要以下内容:
集成步骤
Anchor link to1. 添加 Pushwoosh Unity SDK 依赖
Anchor link to将 Unity 推送通知插件 导入到您 Unity 的 Assets 文件夹中。
2. Unity SDK 初始化
Anchor link to创建 PushNotificator.cs 脚本并将其附加到场景中的 Camera Object。
在脚本中:
- 使用应用程序代码和 Firebase 项目编号初始化 Pushwoosh SDK。
- 在您的初始化逻辑中调用
RegisterForPushNotifications()以注册推送通知。 - 添加注册事件处理程序以管理推送注册事件:
using UnityEngine;using UnityEngine.UI;
public class PushNotificator : MonoBehaviour {    void Start () {        Pushwoosh.ApplicationCode = "__YOUR_APP_ID__";        Pushwoosh.FcmProjectNumber = "__YOUR_FCM_SENDER_ID__";        Pushwoosh.Instance.OnRegisteredForPushNotifications += OnRegisteredForPushNotifications;        Pushwoosh.Instance.OnFailedToRegisteredForPushNotifications += OnFailedToRegisteredForPushNotifications;        Pushwoosh.Instance.RegisterForPushNotifications();    }
    void OnRegisteredForPushNotifications(string token) {        Debug.LogFormat(LogType.Log, LogOption.NoStacktrace, null, "Received token: \n{0}", token);    }
    void OnFailedToRegisteredForPushNotifications(string error) {        Debug.LogFormat(LogType.Log, LogOption.NoStacktrace, null, "Error ocurred while registering to push notifications: \n{0}", error);    }}
其中:
__YOUR_APP_ID__是来自 Pushwoosh Control Panel 的应用程序代码。__YOUR_FCM_SENDER_ID__是来自 Firebase Console 的 Firebase 项目编号。
3. iOS 原生设置
Anchor link to3.1 功能
Anchor link to要在您的项目中启用推送通知,您需要添加某些功能。
在 Signing & Capabilities 部分,添加以下功能:
Push NotificationsBackground Modes。添加此功能后,选中Remote notifications复选框。
如果您打算使用 Time Sensitive Notifications (iOS 15+),还需添加 Time Sensitive Notifications 功能。
3.2 Info.plist
Anchor link to在您的 Runner/Info.plist 中,将 __PUSHWOOSH_DEVICE_API_TOKEN__ 键设置为 Pushwoosh Device API Token:
<key>Pushwoosh_API_TOKEN</key><string>__PUSHWOOSH_DEVICE_API_TOKEN__</string>3.3 消息送达跟踪
Anchor link to您必须向您的项目中添加一个 Notification Service Extension 目标。这对于在 iOS 上实现准确的送达跟踪和 Rich Media 等功能至关重要。
请遵循 原生指南的步骤 来添加扩展目标并在其中添加必要的 Pushwoosh 代码。
4. Android 原生设置
Anchor link to4.1 添加 Firebase 配置文件
Anchor link to将 google-services.json 文件放入您项目目录的 Assets 文件夹中。
4.2 调整构建设置
Anchor link to在您的 Android 构建配置文件的 Publishing Settings 部分,启用 Custom Main Manifest 选项。
4.3 添加 Pushwoosh 元数据
Anchor link to在您的 Assets/Plugins/Android/AndroidManifest.xml 中,在 <application> 标签内添加 Pushwoosh Device API Token:
<meta-data android:name="com.pushwoosh.apitoken" android:value="__YOUR_DEVICE_API_TOKEN__" />重要提示: 请确保在您的 Pushwoosh Control Panel 中为该令牌授予对正确应用的访问权限。了解更多
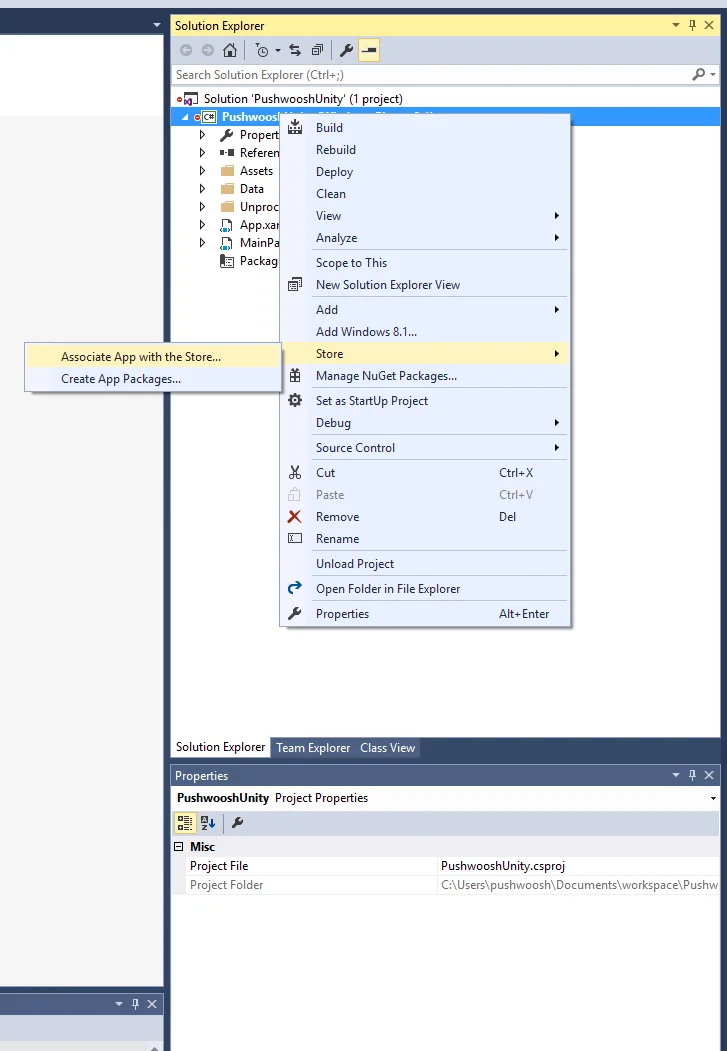
5. Windows Store 集成
Anchor link to- 将
link.xml添加到您的Assets/目录,内容如下:
<linker> <assembly fullname="PushSDK" preserve="all"/></linker>- 您还需要在导出的 Visual Studio 项目中 将应用与商店关联。确保您的应用使用与您的 Publisher Identity 匹配的证书进行签名。
在导出的 Visual Studio 项目的 .appxmanifest 的 Capabilities 选项卡中,选择 Internet (Client) 功能。
6. 运行项目
Anchor link to- 构建并运行项目。
- 前往 Pushwoosh Control Panel 并 发送一条推送通知。
- 您应该会在应用中看到该通知。
扩展集成
Anchor link to至此,您已经集成了 SDK,可以发送和接收推送通知。现在,让我们来探索核心功能。
推送通知事件监听器
Anchor link to在 Pushwoosh SDK 中,有两个事件监听器,专为处理推送通知而设计:
OnPushNotificationsReceived事件在收到推送通知时触发OnPushNotificationsOpened事件在用户打开通知时触发
您应该在 PushNotificator.cs 中初始化 SDK 后立即设置这些事件监听器:
using UnityEngine;using UnityEngine.UI;
public class PushNotificator : MonoBehaviour {    void Start () {        Pushwoosh.ApplicationCode = "__YOUR_APP_ID__";        Pushwoosh.FcmProjectNumber = "__YOUR_FCM_SENDER_ID__";        Pushwoosh.Instance.OnPushNotificationsReceived += OnPushNotificationsReceived;        Pushwoosh.Instance.OnPushNotificationsOpened += OnPushNotificationsOpened;        Pushwoosh.Instance.RegisterForPushNotifications();    }
    void OnPushNotificationsReceived(string payload) {        Debug.LogFormat(LogType.Log, LogOption.NoStacktrace, null, "Received push notificaiton: \n{0}", payload);    }
    void OnPushNotificationsOpened(string payload) {        Debug.LogFormat(LogType.Log, LogOption.NoStacktrace, null, "Opened push notificaiton: \n{0}", payload);    }
用户配置
Anchor link to通过关注个人用户的行为和偏好,您可以提供个性化内容,从而提高用户满意度和忠诚度。
public class Registration {  public void afterUserLogin(User user) {
    // Set user ID    Pushwoosh.Instance.SetUserId(user.getId());
    // Set user email    Pushwoosh.Instance.SetEmail(user.getEmail());
// Setting additional user information as tags for Pushwoosh Pushwoosh.Instance.SetIntTag("Age", user.getAge()); Pushwoosh.Instance.SetStringTag("Name", user.getName()); Pushwoosh.Instance.SetStringTag("LastLoginDate", user.getLastLoginDate()); }}标签是分配给用户或设备的键值对,允许根据偏好或行为等属性进行分段,从而实现有针对性的消息传递。
public class UpdateUser {  public void afterUserUpdateProfile(User user) {
    // Set list of favorite categories    Pushwoosh.Instance.SetListTag(      "favorite_categories": user.getFavoriteCategoriesList()    );
// Set payment information Pushwoosh.Instance.SetStringTag("is_subscribed", user.isSubscribed()); Pushwoosh.Instance.SetStringTag("payment_status", user.getPaymentStatus()); Pushwoosh.Instance.SetStringTag("billing_address", user.getBillingAddress()); }}事件是应用内特定的用户操作或发生的事情,可以被跟踪以分析行为并触发相应的消息或操作。
public class Registration {
  // Track login event  public void afterUserLogin(User user) {    Pushwoosh.Instance.PostEvent("login", new Dictionary<string, object>() {      { "name", user.getName() },      { "last_login", user.getLastLoginDate() }    });  }
  public void afterUserPurchase(Product product) {    // Track purchase event    Pushwoosh.Instance.PostEvent("purchase", new Dictionary<string, object>() {      { "product_id", product.getId() },      { "product_name", product.getName() },      { "price", product.getPrice() },      { "quantity", product.getQuantity() }    });  }}
故障排除
Anchor link to如果在集成过程中遇到任何问题,请参阅 支持和社区 部分。