Guía de integración básica del SDK de iOS
Esta sección contiene información sobre cómo integrar el SDK de Pushwoosh en su aplicación de iOS.
Prerrequisitos
Anchor link toPara integrar el SDK de Pushwoosh para iOS en su aplicación, necesitará lo siguiente:
Pasos de integración
Anchor link to1. Instalación
Anchor link toPuede integrar el SDK de Pushwoosh en su aplicación utilizando Swift Package Manager o CocoaPods.
Swift Package Manager
Anchor link toEn la sección Package Dependencies, agregue el siguiente paquete:
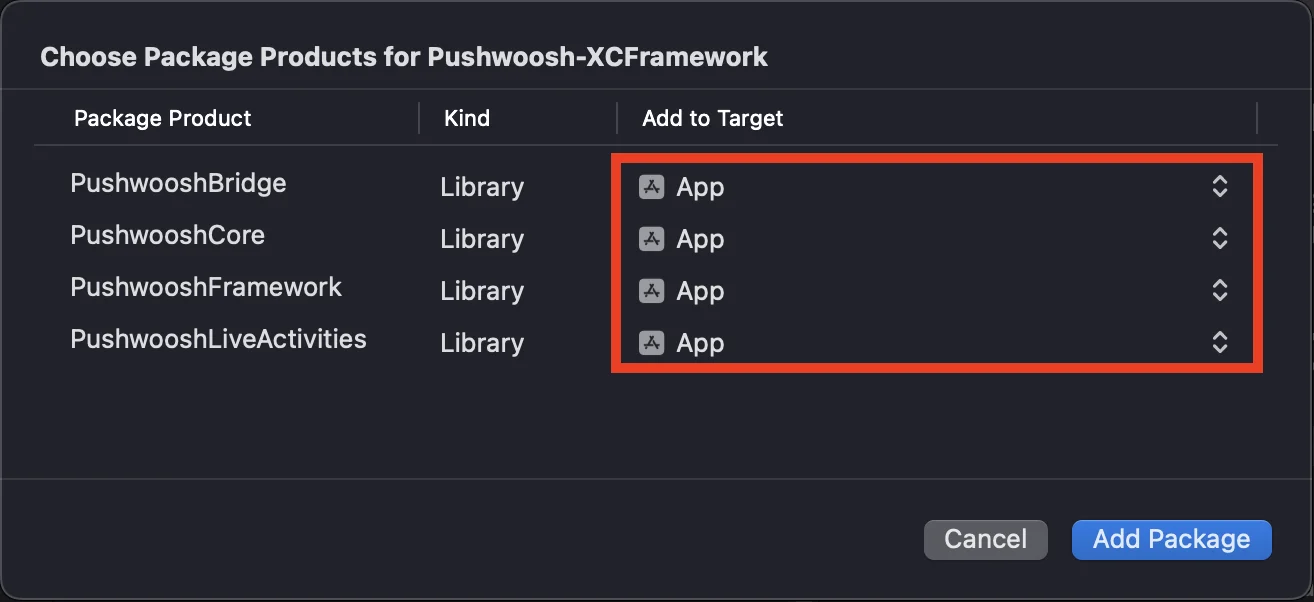
https://github.com/Pushwoosh/Pushwoosh-XCFrameworkPara usar el SDK de Pushwoosh para iOS, asegúrese de agregar los siguientes cuatro frameworks a su app target al integrar a través de Swift Package Manager:
PushwooshFrameworkPushwooshCorePushwooshBridgePushwooshLiveActivities
CocoaPods
Anchor link toAbra su Podfile y agregue la dependencia:
# Uncomment the next line to define a global platform for your project# platform :ios, '9.0'
target 'MyApp' do  # Comment the next line if you don't want to use dynamic frameworks  use_frameworks!
  pod 'PushwooshXCFramework'
end
Luego, en la terminal, ejecute el siguiente comando para instalar las dependencias:
pod install2. Capacidades
Anchor link toPara habilitar las Notificaciones Push en su proyecto, necesita agregar ciertas capacidades.
En la sección Signing & Capabilities, agregue las siguientes capacidades:
Push NotificationsBackground Modes. Después de agregar esta capacidad, marque la casilla paraRemote notifications.
Si tiene la intención de usar Time Sensitive Notifications (iOS 15+), agregue también la capacidad de Time Sensitive Notifications.
3. Código de inicialización
Anchor link toAppDelegate
Anchor link toAgregue el siguiente código a su clase AppDelegate:
import SwiftUIimport PushwooshFramework
@mainstruct MyApp: App {    // Register AppDelegate as UIApplicationDelegate    @UIApplicationDelegateAdaptor(AppDelegate.self) var appDelegate
    var body: some Scene {        WindowGroup {            ContentView()        }    }}
class AppDelegate: NSObject, UIApplicationDelegate, PWMessagingDelegate {
    func application(_ application: UIApplication, didFinishLaunchingWithOptions launchOptions: [UIApplication.LaunchOptionsKey: Any]?) -> Bool {        // Initialization code        // Set custom delegate for push handling        Pushwoosh.sharedInstance().delegate = self
        // Register for push notifications        Pushwoosh.sharedInstance().registerForPushNotifications()
        return true    }
    // Handle token received from APNS    func application(_ application: UIApplication, didRegisterForRemoteNotificationsWithDeviceToken deviceToken: Data) {        Pushwoosh.sharedInstance().handlePushRegistration(deviceToken)    }
    // Handle token receiving error    func application(_ application: UIApplication, didFailToRegisterForRemoteNotificationsWithError error: Error) {        Pushwoosh.sharedInstance().handlePushRegistrationFailure(error)    }
    //for silent push notifications    func application(_ application: UIApplication, didReceiveRemoteNotification userInfo: [AnyHashable: Any], fetchCompletionHandler completionHandler: @escaping (UIBackgroundFetchResult) -> Void) {        Pushwoosh.sharedInstance().handlePushReceived(userInfo)        completionHandler(.noData)    }
    // Fired when a push is received    func pushwoosh(_ pushwoosh: Pushwoosh, onMessageReceived message: PWMessage) {        print("onMessageReceived: ", message.payload!.description)    }
    // Fired when a user taps the notification    func pushwoosh(_ pushwoosh: Pushwoosh, onMessageOpened message: PWMessage) {        print("onMessageOpened: ", message.payload!.description)    }}
struct ContentView: View {    var body: some View {        Text("Pushwoosh with SwiftUI")            .padding()    }}
import PushwooshFramework
@UIApplicationMainclass AppDelegate: UIResponder, UIApplicationDelegate, PWMessagingDelegate {
var window: UIWindow?
func application(_ application: UIApplication, didFinishLaunchingWithOptions launchOptions: [UIApplication.LaunchOptionsKey: Any]?) -> Bool { //initialization code //set custom delegate for push handling, in our case AppDelegate Pushwoosh.sharedInstance().delegate = self;
//register for push notifications Pushwoosh.sharedInstance().registerForPushNotifications()
return true }
//handle token received from APNS func application(_ application: UIApplication, didRegisterForRemoteNotificationsWithDeviceToken deviceToken: Data) { Pushwoosh.sharedInstance().handlePushRegistration(deviceToken) }
//handle token receiving error func application(_ application: UIApplication, didFailToRegisterForRemoteNotificationsWithError error: Error) { Pushwoosh.sharedInstance().handlePushRegistrationFailure(error); }
//for silent push notifications func application(_ application: UIApplication, didReceiveRemoteNotification userInfo: [AnyHashable : Any], fetchCompletionHandler completionHandler: @escaping (UIBackgroundFetchResult) -> Void) { Pushwoosh.sharedInstance().handlePushReceived(userInfo) completionHandler(.noData) }
//this event is fired when the push gets received func pushwoosh(_ pushwoosh: Pushwoosh, onMessageReceived message: PWMessage) { print("onMessageReceived: ", message.payload!.description) }
// Fired when a user taps the notification func pushwoosh(_ pushwoosh: Pushwoosh, onMessageOpened message: PWMessage) { print("onMessageOpened: ", message.payload!.description) }}#import <PushwooshFramework/PushwooshFramework.h>
@implementation AppDelegate
- (BOOL)application:(UIApplication *)application didFinishLaunchingWithOptions:(NSDictionary *)launchOptions { //-----------PUSHWOOSH PART-----------
// set custom delegate for push handling, in our case AppDelegate [Pushwoosh sharedInstance].delegate = self;
//register for push notifications! [[Pushwoosh sharedInstance] registerForPushNotifications];
return YES;}
//handle token received from APNS- (void)application:(UIApplication *)application didRegisterForRemoteNotificationsWithDeviceToken:(NSData *)deviceToken { [[Pushwoosh sharedInstance] handlePushRegistration:deviceToken];}
//handle token receiving error- (void)application:(UIApplication *)application didFailToRegisterForRemoteNotificationsWithError:(NSError *)error { [[Pushwoosh sharedInstance] handlePushRegistrationFailure:error];}
//for silent push notifications- (void)application:(UIApplication *)application didReceiveRemoteNotification:(NSDictionary *)userInfo fetchCompletionHandler:(void (^)(UIBackgroundFetchResult))completionHandler { [[Pushwoosh sharedInstance] handlePushReceived:userInfo]; completionHandler(UIBackgroundFetchResultNoData);}
//this event is fired when the push gets received- (void)pushwoosh:(Pushwoosh *)pushwoosh onMessageReceived:(PWMessage *)message { NSLog(@"onMessageReceived: %@", message.payload);}
//this event is fired when user taps the notification- (void)pushwoosh:(Pushwoosh *)pushwoosh onMessageOpened:(PWMessage *)message { NSLog(@"onMessageOpened: %@", message.payload);}
@endInfo.plist
Anchor link toEn su Info.plist:
- establezca la clave
Pushwoosh_APPIDen el Código de Aplicación de Pushwoosh. - establezca la clave
Pushwoosh_API_TOKENen el Token de API de Dispositivo de Pushwoosh
4. Seguimiento de la entrega de mensajes
Anchor link toPushwoosh admite el seguimiento de eventos de entrega para notificaciones push a través de la Notification Service Extension
Agregar Notification Service Extension
Anchor link to- En Xcode, seleccione File > New > Target…
- Elija Notification Service Extension y presione Next.
- Ingrese el nombre del target y presione Finish.
- Cuando se le solicite la activación, presione Cancel.
Dependencias para la Notification Service Extension (solo CocoaPods)
Anchor link toNota: Si está utilizando Swift Package Manager para gestionar las dependencias, puede omitir este paso, ya que las dependencias se agregan automáticamente.
Abra su Podfile y agregue la dependencia para el target:
# Uncomment the next line to define a global platform for your project# platform :ios, '9.0'
target 'MyApp' do  # Comment the next line if you don't want to use dynamic frameworks  use_frameworks!
  pod 'PushwooshXCFramework'
end
target 'MyAppNotificationExtension' do  use_frameworks!
  pod 'PushwooshXCFramework'
end
Ejecute el siguiente comando en la terminal para actualizar las dependencias:
pod updateAgregar el SDK de Pushwoosh a la Notification Service Extension
Anchor link toEste código le permite interceptar y procesar notificaciones dentro de su extensión de notificación.
import UserNotificationsimport PushwooshFramework
class NotificationService: UNNotificationServiceExtension {
    var contentHandler: ((UNNotificationContent) -> Void)?    var bestAttemptContent: UNMutableNotificationContent?
    override func didReceive(_ request: UNNotificationRequest, withContentHandler contentHandler: @escaping (UNNotificationContent) -> Void) {        // Pushwoosh **********        PWNotificationExtensionManager.shared().handle(request, contentHandler: contentHandler)        // ********************
        self.contentHandler = contentHandler        bestAttemptContent = (request.content.mutableCopy() as? UNMutableNotificationContent)
        if let bestAttemptContent = bestAttemptContent {            // Modify the notification content here...            contentHandler(bestAttemptContent)        }    }
    override func serviceExtensionTimeWillExpire() {        // Called just before the extension will be terminated by the system.        // Use this as an opportunity to deliver your "best attempt" at modified content, otherwise the original push payload will be used.        if let contentHandler = contentHandler, let bestAttemptContent =  bestAttemptContent {            contentHandler(bestAttemptContent)        }    }
}
#import "PWNotificationExtensionManager.h"
@interface NotificationService : UNNotificationServiceExtension
@end
@implementation NotificationService
- (void)didReceiveNotificationRequest:(UNNotificationRequest *)request withContentHandler:(void (^)(UNNotificationContent * _Nonnull))contentHandler { // Pushwoosh ********** [[PWNotificationExtensionManager sharedManager] handleNotificationRequest:request contentHandler:contentHandler]; //*********************}
@endInfo.plist
Anchor link toEn el Info.plist de su Notification Service Extension, agregue:
Pushwoosh_APPID- Su Código de Aplicación.
5. Ejecutar el proyecto
Anchor link to- Compile y ejecute el proyecto.
- Vaya al Panel de Control de Pushwoosh y envíe una notificación push.
- Debería ver la notificación en la aplicación.
Integración extendida de Pushwoosh para iOS
Anchor link toEn esta etapa, ya ha integrado el SDK y puede enviar y recibir notificaciones push. Ahora, exploremos la funcionalidad principal
Notificaciones push
Anchor link toEn el SDK de Pushwoosh, hay dos callbacks diseñados para manejar notificaciones push:
onMessageReceived: Este método se invoca cuando se recibe una notificación push.onMessageOpened: Este método se llama cuando el usuario interactúa con (abre) la notificación
Estos callbacks permiten a los desarrolladores gestionar la recepción y la interacción del usuario con las notificaciones push dentro de sus aplicaciones
import PushwooshFramework
class AppDelegate: NSObject, UIApplicationDelegate, PWMessagingDelegate {
    func application(_ application: UIApplication, didFinishLaunchingWithOptions launchOptions: [UIApplication.LaunchOptionsKey : Any]? = nil) -> Bool {        Pushwoosh.sharedInstance().delegate = self;    }
    func pushwoosh(_ pushwoosh: Pushwoosh, onMessageOpened message: PWMessage) {        if let payload = message.payload {            print("onMessageOpened: \(payload)")        }    }
    func pushwoosh(_ pushwoosh: Pushwoosh, onMessageReceived message: PWMessage) {        if let payload = message.payload {            print("onMessageReceived: \(payload)")        }    }}
#import <PushwooshFramework/PushwooshFramework.h>
@interface AppDelegate () <PWMessagingDelegate>
@end
@implementation AppDelegate
- (BOOL)application:(UIApplication *)application didFinishLaunchingWithOptions:(NSDictionary *)launchOptions { [[Pushwoosh sharedInstance] setDelegate:self]; return YES;}
- (void)pushwoosh:(Pushwoosh *)pushwoosh onMessageOpened:(PWMessage *)message { if (message.payload) { NSLog(@"onMessageOpened: %@", message.payload); }}
- (void)pushwoosh:(Pushwoosh *)pushwoosh onMessageReceived:(PWMessage *)message { if (message.payload) { NSLog(@"onMessageReceived: %@", message.payload); }}@endConfiguración de usuario
Anchor link toAl centrarse en el comportamiento y las preferencias individuales de los usuarios, puede ofrecer contenido personalizado, lo que conduce a una mayor satisfacción y lealtad del usuario
import PushwooshFramework
class Registration {
    func afterUserLogin(user: User) {        let pushwoosh = Pushwoosh.sharedInstance()        // set user ID        if let userId = user.userId {            pushwoosh.setUserId(userId)        }
        // set user email        if let userEmail = user.email {            pushwoosh.setEmail(userEmail)        }
        // set user SMS number        if let userSmsNumber = user.SmsNumber {            pushwoosh.registerSmsNumber(userSmsNumber)        }
        // set user WhatsApp number        if let userWhatsAppNumber = user.WhatsAppNumber {            pushwoosh.registerSmsNumber(userWhatsAppNumber)        }
        // setting additional user information as tags for Pushwoosh        if let age = user.userDetails.age,            let name = user.userDetails.userName,            let lastLogin = user.userDetails.lastLoginDate {            pushwoosh.setTags([                "age": age,                "name": name,                "last_login": lastLogin            ])        }    }}
#import <PushwooshFramework/PushwooshFramework.h>
@implementation Registration
- (void)afterUserLogin:(User *)user { Pushwoosh *pushwoosh = [Pushwoosh sharedInstance];
// set user ID if (user.userId) { [pushwoosh setUserId:user.userId]; }
// set user email if (user.email) { [pushwoosh setEmail:user.email]; }
// setting additional user information as tags for Pushwoosh if (user.userDetails.age && user.userDetails.userName && user.userDetails.lastLoginDate) { NSDictionary *tags = @{ @"age": user.userDetails.age, @"name": user.userDetails.userName, @"last_login": user.userDetails.lastLoginDate }; [pushwoosh setTags:tags]; }}
@endEtiquetas
Anchor link toLas etiquetas son pares clave-valor asignados a usuarios o dispositivos, que permiten la segmentación basada en atributos como preferencias o comportamiento, lo que posibilita la mensajería dirigida.
import PushwooshFramework
class UpdateUser {    func afterUserUpdateProfile(user: User) {        let pushwoosh = Pushwoosh.sharedInstance()
        // set list of favorite categories        pushwoosh.setTags(["favorite_categories" : user.getFavoriteCategories()])
        // set payment information        pushwoosh.setTags([            "is_subscribed": user.isSubscribed(),            "payment_status": user.getPaymentStatus(),            "billing_address": user.getBillingAddress()        ])    }}
#import <PushwooshFramework/PushwooshFramework.h>
@implementation UpdateUser
- (void)afterUserUpdateProfile:(User *)user { Pushwoosh *pushwoosh = [Pushwoosh sharedInstance];
// set list of favorite categories [pushwoosh setTags:@{@"favorite_categories" : user.getFavoriteCategories}];
// set payment information NSDictionary *tags = @{ @"is_subscribed": @(user.isSubscribed), @"payment_status": user.getPaymentStatus, @"billing_address": user.getBillingAddress }; [pushwoosh setTags:tags];}
@endEventos
Anchor link toLos eventos son acciones específicas del usuario u ocurrencias dentro de la aplicación que se pueden rastrear para analizar el comportamiento y activar los mensajes o acciones correspondientes
import PushwooshFramework
class Registration {
    func afterUserLogin(user: User) {        if let userName = user.getUserName(), let lastLogin = user.getLastLoginDate() {            PWInAppManager.shared().postEvent("login", withAttributes: [                "name": userName,                "last_login": lastLogin            ])        }    }
    func afterUserPurchase(user: User, product: Product) {        let pushwoosh = Pushwoosh.sharedInstance()
        // Track purchase event        PWInAppManager.shared().postEvent("purchase", withAttributes: [            "product_id": product.getId(),            "product_name": product.getName(),            "price": product.getPrice(),            "quantity": product.getQuantity()        ])
        // Set user tags        let lastPurchaseDate = Date().timeIntervalSince1970        let lifetimeSpend = getCurrentLifetimeSpend() + product.getPrice()
        pushwoosh.setTags([            "last_purchase_date": lastPurchaseDate,            "lifetime_spend": lifetimeSpend        ])    }}
#import <PushwooshFramework/PushwooshFramework.h>#import <PushwooshFramework/PWInAppManager.h>
@implementation Registration
- (void)afterUserLogin:(User *)user { NSString *userName = [user getUserName]; NSDate *lastLogin = [user getLastLoginDate];
if (userName && lastLogin) { [[PWInAppManager sharedManager] postEvent:@"login" withAttributes:@{ @"name": userName, @"last_login": lastLogin }]; }}
- (void)afterUserPurchase:(User *)user product:(Product *)product { Pushwoosh *pushwoosh = [Pushwoosh sharedInstance];
// Track purchase event [[PWInAppManager sharedManager] postEvent:@"purchase" withAttributes:@{ @"product_id": [product getId], @"product_name": [product getName], @"price": @([product getPrice]), @"quantity": @([product getQuantity]) }];
// Set user tags NSTimeInterval lastPurchaseDate = [[NSDate date] timeIntervalSince1970]; double lifetimeSpend = /* fetch current lifetime spend */ + [product getPrice];
NSDictionary *tags = @{ @"last_purchase_date": @(lastPurchaseDate), @"lifetime_spend": @(lifetimeSpend) };
[pushwoosh setTags:tags];}
@endRich Media
Anchor link toRich media se refiere a contenido interactivo y multimedia, como imágenes, videos o HTML, utilizado en notificaciones y mensajes in-app para mejorar la participación del usuario
import PushwooshFramework
class ViewController: UIViewController, PWRichMediaPresentingDelegate {
    override func viewDidLoad() {        super.viewDidLoad()        let richMediaConfiguration = PWModalWindowConfiguration.shared()
        PWRichMediaManager.shared().delegate = self        richMediaConfiguration.configureModalWindow(with: .PWModalWindowPositionBottom,                                                                 present: .PWAnimationPresentFromBottom,                                                                 dismiss: .PWAnimationDismissDown)    }
    func richMediaManager(_ richMediaManager: PWRichMediaManager!, shouldPresent richMedia: PWRichMedia!) -> Bool {        print("Rich media will be presented with: \(richMedia.pushPayload!)")        return true    }
    func richMediaManager(_ richMediaManager: PWRichMediaManager!, didPresent richMedia: PWRichMedia!) {        print("Rich media has been presented with: \(richMedia.pushPayload!)")    }
    func richMediaManager(_ richMediaManager: PWRichMediaManager!, didClose richMedia: PWRichMedia!) {        print("Rich media has been closed with: \(richMedia.pushPayload!)")    }
    func richMediaManager(_ richMediaManager: PWRichMediaManager!, presentingDidFailFor richMedia: PWRichMedia!, withError error: (any Error)!) {        print("Failed to present rich media with: \(richMedia.pushPayload!). Error: \(error.localizedDescription)")    }}
#import "ViewController.h"#import <PushwooshFramework/PushwooshFramework.h>#import <PushwooshFramework/PWRichMediaManager.h>#import <PushwooshFramework/PWModalWindowConfiguration.h>
@interface ViewController () <PWRichMediaPresentingDelegate>
@end
@implementation ViewController
- (void)viewDidLoad { [super viewDidLoad];
[[PWRichMediaManager sharedManager] setDelegate:self]; [[PWModalWindowConfiguration shared] configureModalWindowWith:PWModalWindowPositionBottom presentAnimation:PWAnimationPresentFromBottom dismissAnimation:PWAnimationDismissDown];}
- (BOOL)richMediaManager:(PWRichMediaManager *)richMediaManager shouldPresentRichMedia:(PWRichMedia *)richMedia { NSLog(@"Rich media will be presented with: %@", richMedia.pushPayload); return YES;}
- (void)richMediaManager:(PWRichMediaManager *)richMediaManager didPresentRichMedia:(PWRichMedia *)richMedia { NSLog(@"Rich media has been presented with: %@", richMedia.pushPayload);}
- (void)richMediaManager:(PWRichMediaManager *)richMediaManager didCloseRichMedia:(PWRichMedia *)richMedia { NSLog(@"Rich media has been closed with:: %@", richMedia.pushPayload);}
- (void)richMediaManager:(PWRichMediaManager *)richMediaManager presentingDidFailForRichMedia:(PWRichMedia *)richMedia withError:(NSError *)error { NSLog(@"Failed to present rich media with: %@. Error: %@", richMedia.pushPayload, error.localizedDescription);}
@endSolución de problemas
Anchor link toError al compilar el módulo ‘PushwooshFramework’
Anchor link toAl compilar su proyecto, puede encontrar un error similar a:
Failed to build module 'PushwooshFramework'; this SDK is not supported by the compiler(the SDK is built with 'Apple Swift version 5.10 (swiftlang-5.10.0.13 clang-1500.3.9.4)',while this compiler is 'Apple Swift version 6.1.2 effective-5.10 (swiftlang-6.1.2.1.2 clang-1700.0.13.5)')Causa: Este error no está relacionado con la incompatibilidad de la versión del compilador de Swift. A partir de la versión 6.8.0 del SDK de Pushwoosh para iOS, el SDK está modularizado en varios componentes que interactúan entre sí. El error ocurre cuando no se agregan todos los frameworks requeridos a su proyecto.
Solución: Asegúrese de que los cuatro frameworks requeridos se agreguen a su app target al integrar a través de Swift Package Manager:
PushwooshFrameworkPushwooshCorePushwooshBridgePushwooshLiveActivities
Para verificar esto en Xcode:
- Seleccione su proyecto en el Project Navigator
- Seleccione su app target
- Vaya a General > Frameworks, Libraries, and Embedded Content
- Confirme que los cuatro frameworks están en la lista
Si encuentra algún problema durante el proceso de integración, consulte la sección de soporte y comunidad.