دليل التكامل الأساسي لـ iOS SDK 7.0+
يحتوي هذا القسم على معلومات حول كيفية دمج Pushwoosh SDK في تطبيق iOS الخاص بك.
المتطلبات الأساسية
Anchor link toلدمج Pushwoosh iOS SDK في تطبيقك، ستحتاج إلى ما يلي:
خطوات التكامل
Anchor link to1. التثبيت
Anchor link toيمكنك دمج Pushwoosh SDK في تطبيقك باستخدام Swift Package Manager أو CocoaPods.
Swift Package Manager
Anchor link toفي قسم Package Dependencies، أضف الحزمة التالية:
https://github.com/Pushwoosh/Pushwoosh-XCFrameworkلاستخدام Pushwoosh iOS SDK، تأكد من إضافة الأطر الثلاثة التالية إلى هدف تطبيقك عند التكامل عبر Swift Package Manager:
PushwooshFrameworkPushwooshCorePushwooshBridge
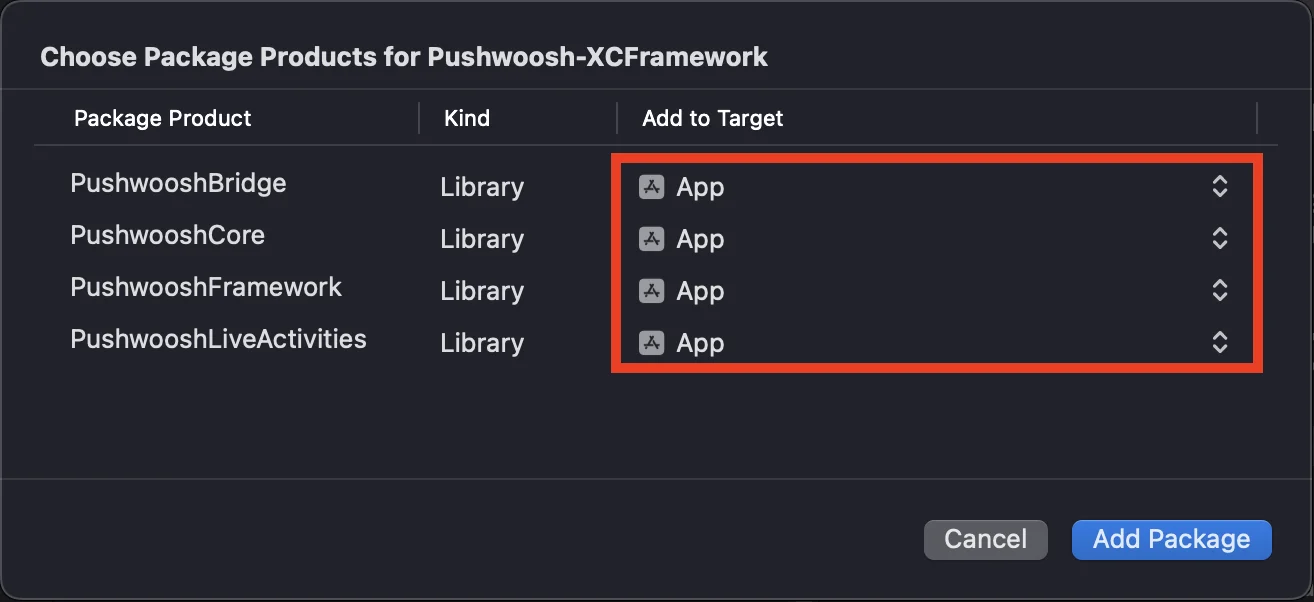
CocoaPods
Anchor link toافتح ملف Podfile الخاص بك وأضف الاعتمادية:
# Uncomment the next line to define a global platform for your project# platform :ios, '9.0'
target 'MyApp' do  # Comment the next line if you don't want to use dynamic frameworks  use_frameworks!
  pod 'PushwooshXCFramework'
end
ثم، في الطرفية (terminal)، قم بتشغيل الأمر التالي لتثبيت الاعتماديات:
pod install2. القدرات (Capabilities)
Anchor link toلتمكين الإشعارات الفورية في مشروعك، تحتاج إلى إضافة قدرات معينة.
في قسم Signing & Capabilities، أضف القدرات التالية:
Push NotificationsBackground Modes. بعد إضافة هذه القدرة، حدد مربعRemote notifications.
إذا كنت تنوي استخدام الإشعارات الحساسة للوقت (Time Sensitive Notifications) (iOS 15+)، أضف أيضًا قدرة Time Sensitive Notifications.
3. كود التهيئة
Anchor link toAppDelegate
Anchor link toأضف الكود التالي إلى فئة AppDelegate الخاصة بك:
import SwiftUIimport PushwooshFramework
@mainstruct MyApp: App {    // Register AppDelegate as UIApplicationDelegate    @UIApplicationDelegateAdaptor(AppDelegate.self) var appDelegate
    var body: some Scene {        WindowGroup {            ContentView()        }    }}
class AppDelegate: NSObject, UIApplicationDelegate, PWMessagingDelegate {
    func application(_ application: UIApplication, didFinishLaunchingWithOptions launchOptions: [UIApplication.LaunchOptionsKey: Any]?) -> Bool {        // كود التهيئة        // تعيين مفوض مخصص للتعامل مع الإشعارات        Pushwoosh.configure.delegate = self
        // التسجيل للإشعارات الفورية        Pushwoosh.configure.registerForPushNotifications()
        return true    }
    // التعامل مع التوكن المستلم من APNS    func application(_ application: UIApplication, didRegisterForRemoteNotificationsWithDeviceToken deviceToken: Data) {        Pushwoosh.configure.handlePushRegistration(deviceToken)    }
    // التعامل مع خطأ استلام التوكن    func application(_ application: UIApplication, didFailToRegisterForRemoteNotificationsWithError error: Error) {        Pushwoosh.configure.handlePushRegistrationFailure(error)    }
    // للإشعارات الفورية الصامتة    func application(_ application: UIApplication, didReceiveRemoteNotification userInfo: [AnyHashable: Any], fetchCompletionHandler completionHandler: @escaping (UIBackgroundFetchResult) -> Void) {        Pushwoosh.configure.handlePushReceived(userInfo)        completionHandler(.noData)    }
    // يتم إطلاقه عند استلام إشعار فوري    func pushwoosh(_ pushwoosh: Pushwoosh, onMessageReceived message: PWMessage) {        print("onMessageReceived: ", message.payload!.description)    }
    // يتم إطلاقه عندما ينقر المستخدم على الإشعار    func pushwoosh(_ pushwoosh: Pushwoosh, onMessageOpened message: PWMessage) {        print("onMessageOpened: ", message.payload!.description)    }}
struct ContentView: View {    var body: some View {        Text("Pushwoosh with SwiftUI")            .padding()    }}
import PushwooshFramework
@UIApplicationMainclass AppDelegate: UIResponder, UIApplicationDelegate, PWMessagingDelegate {
var window: UIWindow?
func application(_ application: UIApplication, didFinishLaunchingWithOptions launchOptions: [UIApplication.LaunchOptionsKey: Any]?) -> Bool { //كود التهيئة //تعيين مفوض مخصص للتعامل مع الإشعارات، في حالتنا AppDelegate Pushwoosh.configure.delegate = self;
//التسجيل للإشعارات الفورية Pushwoosh.configure.registerForPushNotifications()
return true }
//التعامل مع التوكن المستلم من APNS func application(_ application: UIApplication, didRegisterForRemoteNotificationsWithDeviceToken deviceToken: Data) { Pushwoosh.configure.handlePushRegistration(deviceToken) }
//التعامل مع خطأ استلام التوكن func application(_ application: UIApplication, didFailToRegisterForRemoteNotificationsWithError error: Error) { Pushwoosh.configure.handlePushRegistrationFailure(error); }
//للإشعارات الفورية الصامتة func application(_ application: UIApplication, didReceiveRemoteNotification userInfo: [AnyHashable : Any], fetchCompletionHandler completionHandler: @escaping (UIBackgroundFetchResult) -> Void) { Pushwoosh.configure.handlePushReceived(userInfo) completionHandler(.noData) }
//يتم إطلاق هذا الحدث عند استلام الإشعار الفوري func pushwoosh(_ pushwoosh: Pushwoosh, onMessageReceived message: PWMessage) { print("onMessageReceived: ", message.payload!.description) }
// يتم إطلاقه عندما ينقر المستخدم على الإشعار func pushwoosh(_ pushwoosh: Pushwoosh, onMessageOpened message: PWMessage) { print("onMessageOpened: ", message.payload!.description) }}#import <PushwooshFramework/PushwooshFramework.h>
@interface AppDelegate () <PWMessagingDelegate>
@end
@implementation AppDelegate
- (BOOL)application:(UIApplication *)application didFinishLaunchingWithOptions:(NSDictionary *)launchOptions { //-----------جزء PUSHWOOSH-----------
// تعيين مفوض مخصص للتعامل مع الإشعارات، في حالتنا AppDelegate [[Pushwoosh configure] setDelegate:self];
//التسجيل للإشعارات الفورية! [[Pushwoosh configure] registerForPushNotifications];
return YES;}
//التعامل مع التوكن المستلم من APNS- (void)application:(UIApplication *)application didRegisterForRemoteNotificationsWithDeviceToken:(NSData *)deviceToken { [[Pushwoosh configure] handlePushRegistration:deviceToken];}
//التعامل مع خطأ استلام التوكن- (void)application:(UIApplication *)application didFailToRegisterForRemoteNotificationsWithError:(NSError *)error { [[Pushwoosh configure] handlePushRegistrationFailure:error];}
//للإشعارات الفورية الصامتة- (void)application:(UIApplication *)application didReceiveRemoteNotification:(NSDictionary *)userInfo fetchCompletionHandler:(void (^)(UIBackgroundFetchResult))completionHandler { [[Pushwoosh configure] handlePushReceived:userInfo]; completionHandler(UIBackgroundFetchResultNoData);}
//يتم إطلاق هذا الحدث عند استلام الإشعار الفوري- (void)pushwoosh:(Pushwoosh *)pushwoosh onMessageReceived:(PWMessage *)message { NSLog(@"onMessageReceived: %@", message.payload);}
//يتم إطلاق هذا الحدث عندما ينقر المستخدم على الإشعار- (void)pushwoosh:(Pushwoosh *)pushwoosh onMessageOpened:(PWMessage *)message { NSLog(@"onMessageOpened: %@", message.payload);}
@endInfo.plist
Anchor link toفي ملف Info.plist الخاص بك:
- قم بتعيين مفتاح
Pushwoosh_APPIDإلى كود تطبيق Pushwoosh. - قم بتعيين مفتاح
Pushwoosh_API_TOKENإلى Pushwoosh Device API Token
4. تتبع تسليم الرسائل
Anchor link toيدعم Pushwoosh تتبع أحداث التسليم للإشعارات الفورية عبر Notification Service Extension.
إضافة Notification Service Extension
Anchor link to- في Xcode، حدد File > New > Target…
- اختر Notification Service Extension واضغط Next.
- أدخل اسم الهدف واضغط Finish.
- عند المطالبة بالتفعيل، اضغط Cancel.
الاعتماديات لـ Notification Service Extension (CocoaPods فقط)
Anchor link toملاحظة: إذا كنت تستخدم Swift Package Manager لإدارة الاعتماديات، يمكنك تخطي هذه الخطوة، حيث تتم إضافة الاعتماديات تلقائيًا.
افتح ملف Podfile الخاص بك وأضف الاعتمادية للهدف:
# Uncomment the next line to define a global platform for your project# platform :ios, '9.0'
target 'MyApp' do  # Comment the next line if you don't want to use dynamic frameworks  use_frameworks!
  pod 'PushwooshXCFramework'
end
target 'MyAppNotificationExtension' do  use_frameworks!
  pod 'PushwooshXCFramework'
end
قم بتشغيل الأمر التالي في الطرفية لتحديث الاعتماديات:
pod updateإضافة Pushwoosh SDK إلى Notification Service Extension
Anchor link toاستبدل فئة NotificationService التي تم إنشاؤها بفئة فرعية من PushwooshNotificationServiceExtension. يتولى Pushwoosh بعد ذلك كل ما يحتاجه الإشعار الفوري — إرسال حدث التسليم، وعد الشارات (badge)، وتنزيل المرفقات الإعلامية، والمهلة الإلزامية serviceExtensionTimeWillExpire. لا يلزم أي كود آخر.
import PushwooshFramework
class NotificationService: PushwooshNotificationServiceExtension {}
#import <PushwooshFramework/PushwooshFramework.h>
@interface NotificationService : PushwooshNotificationServiceExtension@end
@implementation NotificationService@endملاحظة: يمكنك تخطي الملف المصدري بالكامل — قم بتعيين NSExtensionPrincipalClass للملحق إلى PushwooshNotificationServiceExtension في ملف Info.plist الخاص به ولا تكتب أي كود على الإطلاق.
لتعديل الإشعار قبل عرضه، قم بتجاوز didReceive(_:withContentHandler:)، واستدعِ super مع معالج المحتوى الخاص بك، وقم بتعديل المحتوى داخله، ثم قم بتمريره إلى المعالج الأصلي. لا يزال Pushwoosh يقوم بتشغيل حدث التسليم، والشارة، والمرفقات، والمهلة الاحتياطية.
import UserNotificationsimport PushwooshFramework
class NotificationService: PushwooshNotificationServiceExtension {
    override func didReceive(_ request: UNNotificationRequest,                             withContentHandler contentHandler: @escaping (UNNotificationContent) -> Void) {        super.didReceive(request) { content in            let mutable = (content.mutableCopy() as? UNMutableNotificationContent) ?? content            // Modify the notification content here...            contentHandler(mutable)        }    }
}
#import <PushwooshFramework/PushwooshFramework.h>
@interface NotificationService : PushwooshNotificationServiceExtension@end
@implementation NotificationService
- (void)didReceiveNotificationRequest:(UNNotificationRequest *)request withContentHandler:(void (^)(UNNotificationContent * _Nonnull))contentHandler { [super didReceiveNotificationRequest:request withContentHandler:^(UNNotificationContent *content) { UNMutableNotificationContent *mutable = [content mutableCopy]; // Modify the notification content here... contentHandler(mutable); }];}
@endInfo.plist
Anchor link toيرث الملحق Pushwoosh_APPID (والمفاتيح الأخرى التي تبدأ بـ Pushwoosh_*) من التطبيق المضيف، لذلك لا تحتاج إلى تكرارها في ملف Info.plist الخاص بالملحق. أضف مفتاحًا هناك فقط عندما تريد تجاوز قيمة المضيف.
لمزامنة عدد الشارات وإعدادات الوكيل العكسي مع التطبيق، شارك App Group بين التطبيق والملحق. أضف قدرة App Groups إلى كلا الهدفين، ثم قم بتعيين معرف App Group في ملف Info.plist الخاص بـ التطبيق الرئيسي:
PW_APP_GROUPS_NAME- معرف App Group الخاص بك (على سبيل المثال،group.com.example.app).
يرث الملحق هذه القيمة من التطبيق المضيف، لذلك لا تحتاج إلى تكرارها في ملف Info.plist الخاص بالملحق — أضفها هناك فقط لتجاوز المضيف. بدلاً من ذلك، قم بتوفيرها في الكود عن طريق تجاوز pushwooshAppGroupsName.
5. تشغيل المشروع
Anchor link to- قم ببناء وتشغيل المشروع.
- اذهب إلى لوحة تحكم Pushwoosh و أرسل إشعارًا فوريًا.
- يجب أن ترى الإشعار في التطبيق.
تكامل Pushwoosh iOS الممتد
Anchor link toفي هذه المرحلة، لقد قمت بالفعل بدمج SDK ويمكنك إرسال واستقبال الإشعارات الفورية. الآن، دعنا نستكشف الوظائف الأساسية.
الإشعارات الفورية
Anchor link toفي Pushwoosh SDK، هناك استدعاءان (callbacks) مصممان للتعامل مع الإشعارات الفورية:
onMessageReceived: يتم استدعاء هذه الطريقة عند استلام إشعار فوري.onMessageOpened: يتم استدعاء هذه الطريقة عندما يتفاعل المستخدم مع الإشعار (يفتحه).
تمكن هذه الاستدعاءات المطورين من إدارة استقبال الإشعارات الفورية وتفاعل المستخدم معها داخل تطبيقاتهم.
import PushwooshFramework
class AppDelegate: NSObject, UIApplicationDelegate, PWMessagingDelegate {
    func application(_ application: UIApplication, didFinishLaunchingWithOptions launchOptions: [UIApplication.LaunchOptionsKey : Any]? = nil) -> Bool {        Pushwoosh.configure.delegate = self;    }
    func pushwoosh(_ pushwoosh: Pushwoosh, onMessageOpened message: PWMessage) {        if let payload = message.payload {            print("onMessageOpened: \(payload)")        }    }
    func pushwoosh(_ pushwoosh: Pushwoosh, onMessageReceived message: PWMessage) {        if let payload = message.payload {            print("onMessageReceived: \(payload)")        }    }}
#import <PushwooshFramework/PushwooshFramework.h>
@interface AppDelegate () <PWMessagingDelegate>
@end
@implementation AppDelegate
- (BOOL)application:(UIApplication *)application didFinishLaunchingWithOptions:(NSDictionary *)launchOptions { [[Pushwoosh configure] setDelegate:self]; return YES;}
- (void)pushwoosh:(Pushwoosh *)pushwoosh onMessageOpened:(PWMessage *)message { if (message.payload) { NSLog(@"onMessageOpened: %@", message.payload); }}
- (void)pushwoosh:(Pushwoosh *)pushwoosh onMessageReceived:(PWMessage *)message { if (message.payload) { NSLog(@"onMessageReceived: %@", message.payload); }}@endتكوين المستخدم
Anchor link toمن خلال التركيز على سلوك وتفضيلات المستخدم الفردية، يمكنك تقديم محتوى مخصص، مما يؤدي إلى زيادة رضا المستخدم وولائه.
import PushwooshFramework
class Registration {
    func afterUserLogin(user: User) {        let pushwoosh = Pushwoosh.configure        // تعيين معرف المستخدم        if let userId = user.userId {            pushwoosh.setUserId(userId)        }
        // تعيين بريد المستخدم الإلكتروني        if let userEmail = user.email {            pushwoosh.setEmail(userEmail)        }
        // تعيين رقم SMS للمستخدم        if let userSmsNumber = user.SmsNumber {            pushwoosh.registerSmsNumber(userSmsNumber)        }
        // تعيين رقم WhatsApp للمستخدم        if let userWhatsAppNumber = user.WhatsAppNumber {            pushwoosh.registerSmsNumber(userWhatsAppNumber)        }
        // تعيين معلومات إضافية للمستخدم كعلامات لـ Pushwoosh        if let age = user.userDetails.age,            let name = user.userDetails.userName,            let lastLogin = user.userDetails.lastLoginDate {            pushwoosh.setTags([                "age": age,                "name": name,                "last_login": lastLogin            ])        }    }}
#import <PushwooshFramework/PushwooshFramework.h>
@implementation Registration
- (void)afterUserLogin:(User *)user { Pushwoosh *pushwoosh = [Pushwoosh configure];
// تعيين معرف المستخدم if (user.userId) { [pushwoosh setUserId:user.userId]; }
// تعيين بريد المستخدم الإلكتروني if (user.email) { [pushwoosh setEmail:user.email]; }
// تعيين معلومات إضافية للمستخدم كعلامات لـ Pushwoosh if (user.userDetails.age && user.userDetails.userName && user.userDetails.lastLoginDate) { NSDictionary *tags = @{ @"age": user.userDetails.age, @"name": user.userDetails.userName, @"last_login": user.userDetails.lastLoginDate }; [pushwoosh setTags:tags]; }}
@endالعلامات (Tags)
Anchor link toالعلامات هي أزواج من المفاتيح والقيم يتم تعيينها للمستخدمين أو الأجهزة، مما يسمح بالتقسيم بناءً على سمات مثل التفضيلات أو السلوك، مما يتيح إرسال رسائل مستهدفة.
import PushwooshFramework
class UpdateUser {    func afterUserUpdateProfile(user: User) {        let pushwoosh = Pushwoosh.configure
        // تعيين قائمة الفئات المفضلة        pushwoosh.setTags(["favorite_categories" : user.getFavoriteCategories()])
        // تعيين معلومات الدفع        pushwoosh.setTags([            "is_subscribed": user.isSubscribed(),            "payment_status": user.getPaymentStatus(),            "billing_address": user.getBillingAddress()        ])    }}
#import <PushwooshFramework/PushwooshFramework.h>
@implementation UpdateUser
- (void)afterUserUpdateProfile:(User *)user { Pushwoosh *pushwoosh = [Pushwoosh configure];
// تعيين قائمة الفئات المفضلة [pushwoosh setTags:@{@"favorite_categories" : user.getFavoriteCategories}];
// تعيين معلومات الدفع NSDictionary *tags = @{ @"is_subscribed": @(user.isSubscribed), @"payment_status": user.getPaymentStatus, @"billing_address": user.getBillingAddress }; [pushwoosh setTags:tags];}
@endالأحداث (Events)
Anchor link toالأحداث هي إجراءات أو وقائع محددة للمستخدم داخل التطبيق يمكن تتبعها لتحليل السلوك وتشغيل الرسائل أو الإجراءات المقابلة.
import PushwooshFramework
class Registration {
    func afterUserLogin(user: User) {        if let userName = user.getUserName(), let lastLogin = user.getLastLoginDate() {            PWInAppManager.shared().postEvent("login", withAttributes: [                "name": userName,                "last_login": lastLogin            ])        }    }
    func afterUserPurchase(user: User, product: Product) {        let pushwoosh = Pushwoosh.configure
        // تتبع حدث الشراء        PWInAppManager.shared().postEvent("purchase", withAttributes: [            "product_id": product.getId(),            "product_name": product.getName(),            "price": product.getPrice(),            "quantity": product.getQuantity()        ])
        // تعيين علامات المستخدم        let lastPurchaseDate = Date().timeIntervalSince1970        let lifetimeSpend = getCurrentLifetimeSpend() + product.getPrice()
        pushwoosh.setTags([            "last_purchase_date": lastPurchaseDate,            "lifetime_spend": lifetimeSpend        ])    }}
#import <PushwooshFramework/PushwooshFramework.h>#import <PushwooshFramework/PWInAppManager.h>
@implementation Registration
- (void)afterUserLogin:(User *)user { NSString *userName = [user getUserName]; NSDate *lastLogin = [user getLastLoginDate];
if (userName && lastLogin) { [[PWInAppManager sharedManager] postEvent:@"login" withAttributes:@{ @"name": userName, @"last_login": lastLogin }]; }}
- (void)afterUserPurchase:(User *)user product:(Product *)product { Pushwoosh *pushwoosh = [Pushwoosh configure];
// تتبع حدث الشراء [[PWInAppManager sharedManager] postEvent:@"purchase" withAttributes:@{ @"product_id": [product getId], @"product_name": [product getName], @"price": @([product getPrice]), @"quantity": @([product getQuantity]) }];
// تعيين علامات المستخدم NSTimeInterval lastPurchaseDate = [[NSDate date] timeIntervalSince1970]; double lifetimeSpend = /* fetch current lifetime spend */ + [product getPrice];
NSDictionary *tags = @{ @"last_purchase_date": @(lastPurchaseDate), @"lifetime_spend": @(lifetimeSpend) };
[pushwoosh setTags:tags];}
@endالوسائط الغنية (Rich Media)
Anchor link toتشير الوسائط الغنية إلى المحتوى التفاعلي والوسائط المتعددة، مثل الصور أو مقاطع الفيديو أو HTML، المستخدمة في الإشعارات والرسائل داخل التطبيق لتعزيز تفاعل المستخدم.
import PushwooshFramework
class ViewController: UIViewController, PWRichMediaPresentingDelegate {
    override func viewDidLoad() {        super.viewDidLoad()        let richMediaConfiguration = PWModalWindowConfiguration.shared()
        PWRichMediaManager.shared().delegate = self        richMediaConfiguration.configureModalWindow(with: .PWModalWindowPositionBottom,                                                             present: .PWAnimationPresentFromBottom,                                                             dismiss: .PWAnimationDismissDown)    }
    func richMediaManager(_ richMediaManager: PWRichMediaManager!, shouldPresent richMedia: PWRichMedia!) -> Bool {        print("Rich media will be presented with: \(richMedia.pushPayload!)")        return true    }
    func richMediaManager(_ richMediaManager: PWRichMediaManager!, didPresent richMedia: PWRichMedia!) {        print("Rich media has been presented with: \(richMedia.pushPayload!)")    }
    func richMediaManager(_ richMediaManager: PWRichMediaManager!, didClose richMedia: PWRichMedia!) {        print("Rich media has been closed with: \(richMedia.pushPayload!)")    }
    func richMediaManager(_ richMediaManager: PWRichMediaManager!, presentingDidFailFor richMedia: PWRichMedia!, withError error: (any Error)!) {        print("Failed to present rich media with: \(richMedia.pushPayload!). Error: \(error.localizedDescription)")    }}
#import "ViewController.h"#import <PushwooshFramework/PushwooshFramework.h>#import <PushwooshFramework/PWRichMediaManager.h>#import <PushwooshFramework/PWModalWindowConfiguration.h>
@interface ViewController () <PWRichMediaPresentingDelegate>
@end
@implementation ViewController
- (void)viewDidLoad { [super viewDidLoad];
[[PWRichMediaManager sharedManager] setDelegate:self]; [[PWModalWindowConfiguration shared] configureModalWindowWith:PWModalWindowPositionBottom presentAnimation:PWAnimationPresentFromBottom dismissAnimation:PWAnimationDismissDown];}
- (BOOL)richMediaManager:(PWRichMediaManager *)richMediaManager shouldPresentRichMedia:(PWRichMedia *)richMedia { NSLog(@"Rich media will be presented with: %@", richMedia.pushPayload); return YES;}
- (void)richMediaManager:(PWRichMediaManager *)richMediaManager didPresentRichMedia:(PWRichMedia *)richMedia { NSLog(@"Rich media has been presented with: %@", richMedia.pushPayload);}
- (void)richMediaManager:(PWRichMediaManager *)richMediaManager didCloseRichMedia:(PWRichMedia *)richMedia { NSLog(@"Rich media has been closed with:: %@", richMedia.pushPayload);}
- (void)richMediaManager:(PWRichMediaManager *)richMediaManager presentingDidFailForRichMedia:(PWRichMedia *)richMedia withError:(NSError *)error { NSLog(@"Failed to present rich media with: %@. Error: %@", richMedia.pushPayload, error.localizedDescription);}
@endاستكشاف الأخطاء وإصلاحها
Anchor link toفشل في بناء الوحدة ‘PushwooshFramework’
Anchor link toعند بناء مشروعك، قد تواجه خطأً مشابهًا لـ:
Failed to build module 'PushwooshFramework'; this SDK is not supported by the compiler(the SDK is built with 'Apple Swift version 5.10 (swiftlang-5.10.0.13 clang-1500.3.9.4)',while this compiler is 'Apple Swift version 6.1.2 effective-5.10 (swiftlang-6.1.2.1.2 clang-1700.0.13.5)')السبب: هذا الخطأ لا يتعلق بعدم توافق إصدار مترجم Swift. بدءًا من إصدار Pushwoosh iOS SDK 6.8.0، تم تقسيم SDK إلى عدة مكونات تتفاعل مع بعضها البعض. يحدث الخطأ عندما لا يتم إضافة جميع الأطر المطلوبة إلى مشروعك.
الحل: تأكد من إضافة جميع الأطر الأربعة المطلوبة إلى هدف تطبيقك عند التكامل عبر Swift Package Manager:
PushwooshFrameworkPushwooshCorePushwooshBridgePushwooshLiveActivities
للتحقق من ذلك في Xcode:
- حدد مشروعك في Project Navigator
- حدد هدف تطبيقك
- اذهب إلى General > Frameworks, Libraries, and Embedded Content
- تأكد من إدراج جميع الأطر الأربعة
تم إرسال الإشعار ولكن لم يتم تسليمه
Anchor link toإذا لم يتم تسليم إشعار Push إلى أجهزة iOS، فراجع أخطاء iOS و Mac OS X و Safari للاطلاع على رموز الأخطاء وكيفية إصلاح كل منها.
إذا واجهت أي مشاكل أثناء عملية التكامل، يرجى الرجوع إلى قسم الدعم والمجتمع.